
How to set up DMARC/DKIM/SPF for Atlassian Statuspage

To authenticate Atlassian Statuspage notifications, save a custom From address, verify its domain, add include:stspg-customer.com to its SPF record, publish the generated DKIM records, and publish DMARC for the From domain. I confirm the result with a freshly delivered notification before enforcing p=reject.
These steps apply to subscriber emails using your domain. The status page's website address is a separate setting. Authenticate the domain in the email's visible From address.
Add your domain
I start with the sender address, such as status@example.com. Have access to that domain's authoritative DNS before changing Statuspage.
- Open email settings. In Statuspage, go to Your page > Customize page and email > Customize email.
- Save the sender. Set Send from email to Status <status@example.com>, then click Save email customizations.
- Publish ownership proof. Open Your page > DNS configuration. Copy the domain verification TXT value and publish it at the hostname shown.
- Check ownership. After DNS updates, click Revalidate all records. Keep the verification TXT record published.
Domain verification templatetext
Name: example.com
Type: TXT
Value: status-page-domain-verification=<ORGANIZATION_CODE>
Replace <ORGANIZATION_CODE> with the value Statuspage provides. Add this as a separate TXT record; it is not part of SPF.
For status@example.com, the email domain is example.com, even if the page lives at status.example.com. Changing Reply to does not change the domain DMARC checks.
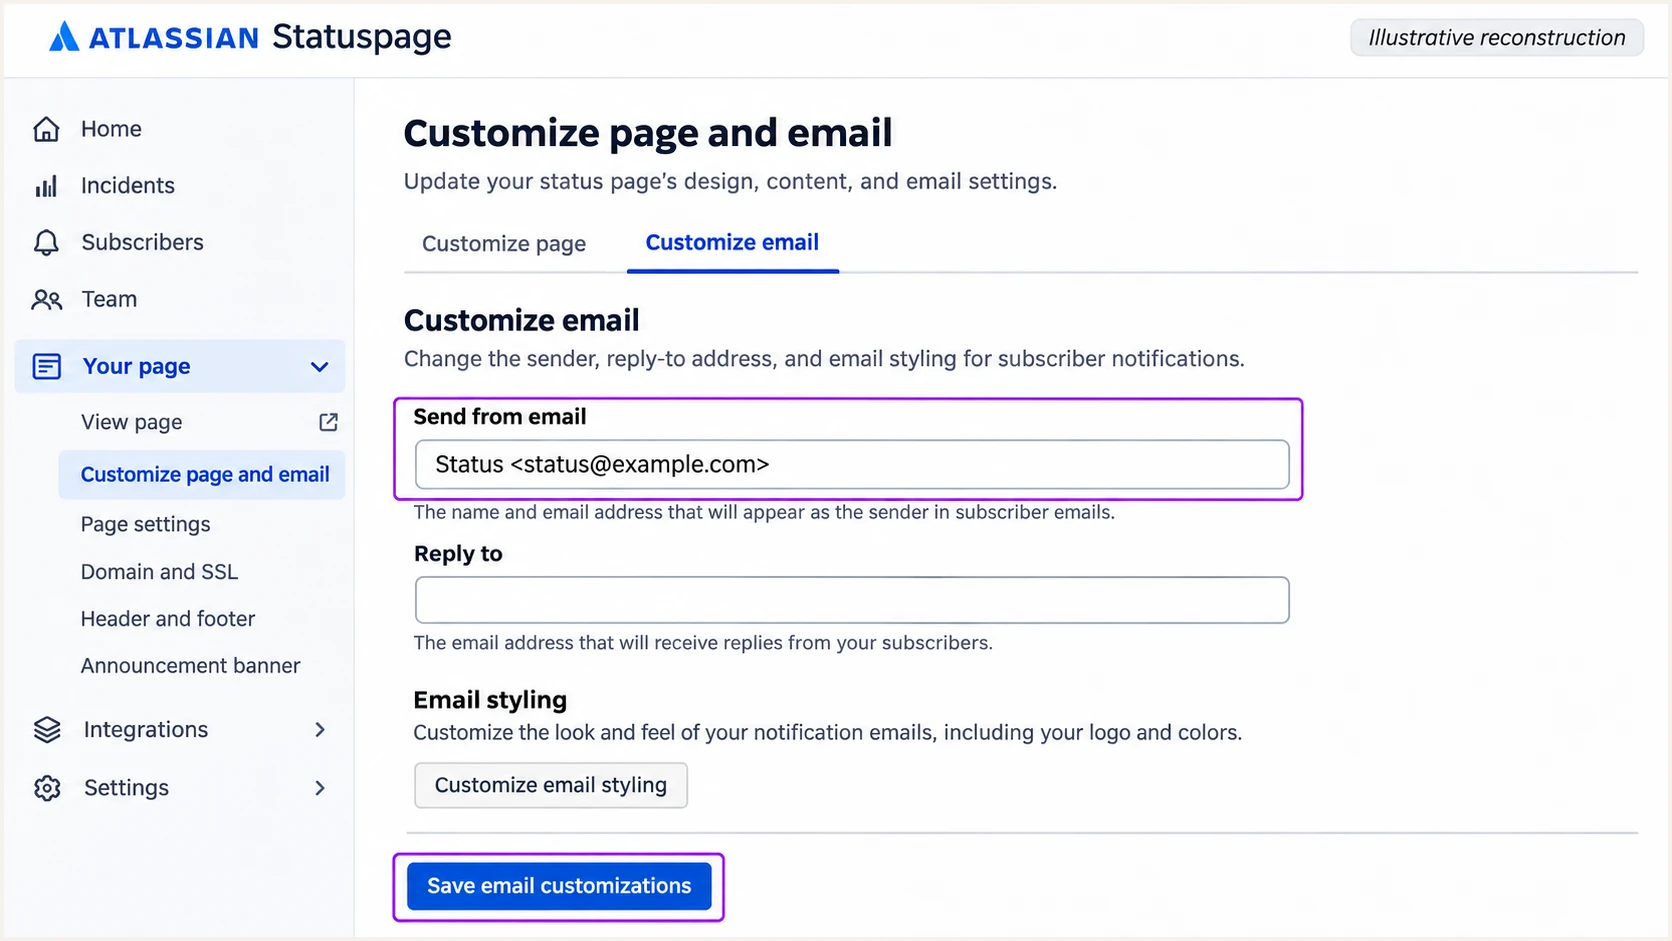
Illustrative Statuspage Customize email screen showing the custom sender field and save action.
Save the custom sender before collecting authentication records. Use the values generated for your own page throughout the remaining steps.
Set up SPF
I add Statuspage's authorization to the existing SPF TXT record. SPF records are specific to each hostname; a subdomain does not inherit its parent's SPF.
- Read existing SPF. Find the TXT record beginning v=spf1 at your configured email domain.
- Add Statuspage. Insert include:stspg-customer.com before the final all mechanism. Preserve existing authorized senders.
- Keep one SPF record. Merge authorization into one v=spf1 value. Other unrelated TXT records can remain.
- Check the envelope. Publish every delivery-domain CNAME supplied by Statuspage, then inspect the delivered message's Return-Path. SPF contributes to DMARC only when that authenticated domain matches the From domain under your policy's alignment mode.
SPF template for a domain used only by Statuspagetext
Name: example.com
Type: TXT
Value: v=spf1 include:stspg-customer.com -all
Use this complete template only when Statuspage is the domain's sole sender. Otherwise, edit your existing record and preserve its other mechanisms and final qualifier.
Check the completed record below. SPF permits at most 10 DNS-querying terms during evaluation, including nested includes. Remove obsolete authorizations if the evaluation exceeds that limit.
SPF checker
Find SPF syntax issues, lookup limits, and weak records.
?/16tests passed
Look up the exact domain you configured, then check the actual Return-Path domain on a received notification. A successful SPF lookup alone does not establish DMARC success.
If a delivery route uses a provider-owned Return-Path, expect SPF alignment to fail on that route. DMARC still passes when a valid DKIM signature matches your From domain. Keep Statuspage's required SPF authorization in place.
Preserve the Statuspage include
Statuspage validates the presence of its SPF authorization. If you use SPF flattening or a hosted SPF record, confirm Statuspage still validates the result. Replacing the include with a static IP list loses automatic updates when sending infrastructure changes.
Set up DKIM
I use the record names and values generated by Statuspage. Its delivery providers manage the signing keys; no locally generated private key is needed.
- Configure DKIM #1. Publish the DKIM TXT record displayed in DNS configuration, using its exact selector and public key.
- Configure DKIM #2. Publish all three supplied CNAME records. Copy each hostname and target exactly, including the delivery-domain record.
- Resolve name conflicts. If an existing sending service occupies the required selector or domain, use a dedicated From subdomain, such as status@notifications.example.com, and collect its new records.
- Validate the records. Click Revalidate all records after DNS caches update. Atlassian allows up to 24 hours after validation before authenticated signing starts.
A CNAME hostname cannot also hold a TXT record. Check whether your DNS editor appends the zone name automatically, so selectors do not accidentally end in example.com.example.com.
Keep CNAMEs visible as DNS records without an HTTP proxy. For DKIM TXT values, copy the entire public key without inserted spaces or line breaks.
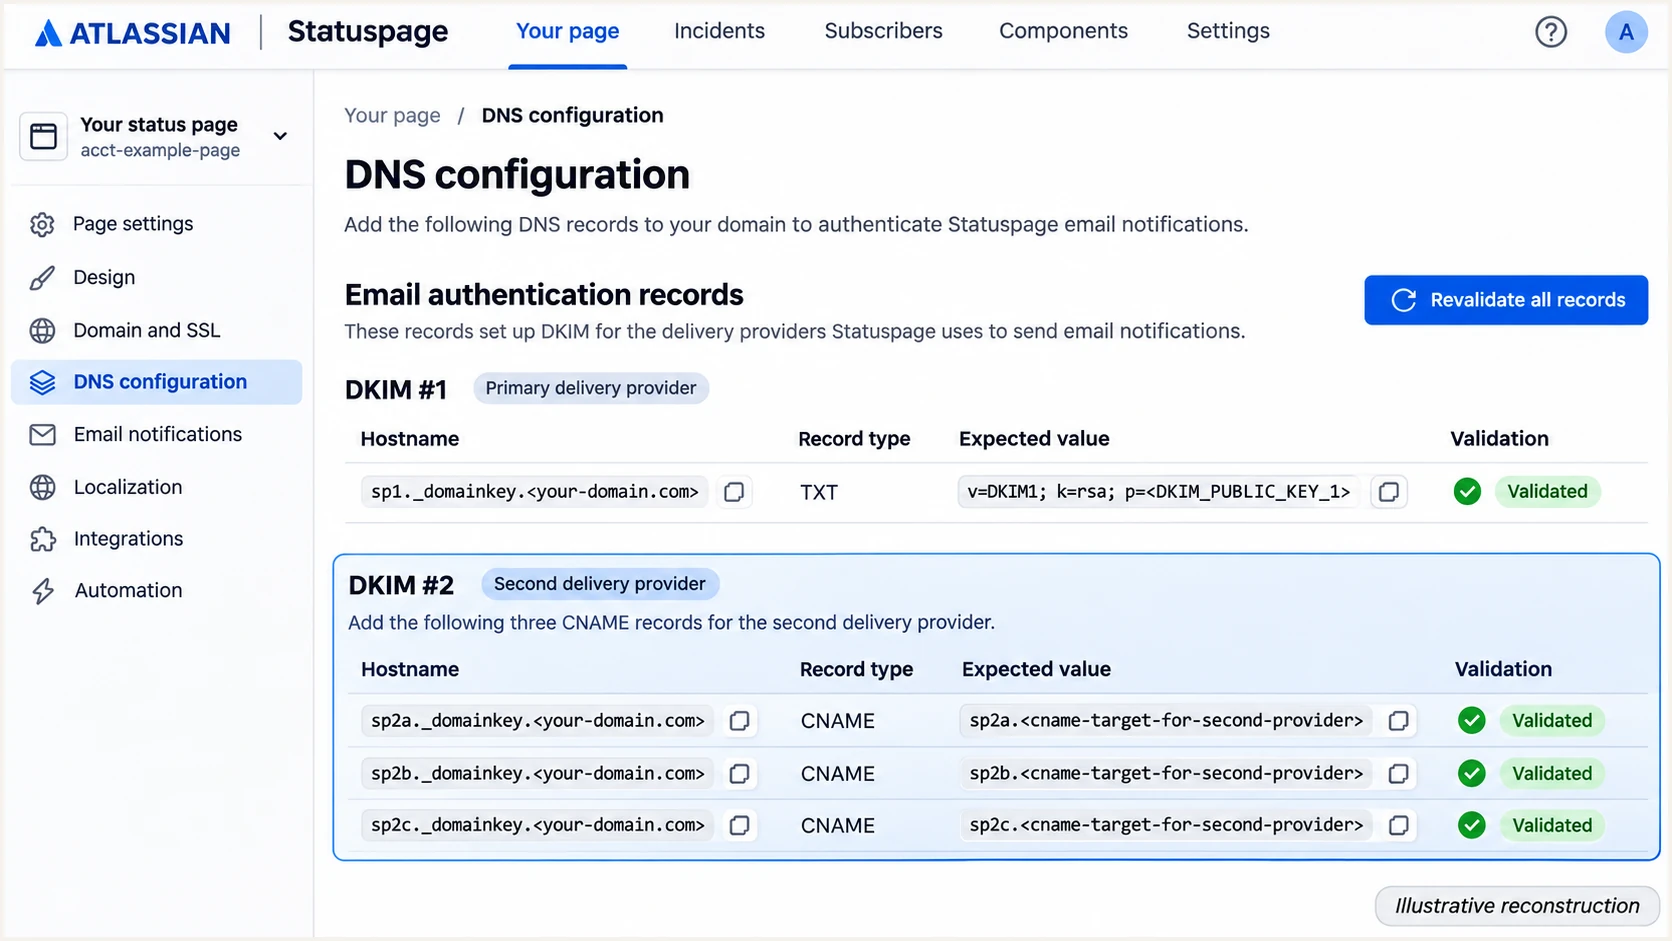
Illustrative Statuspage DNS configuration showing both DKIM groups and record validation.
Configure both delivery providers. Statuspage's documented failover behavior can change the notification sender when the available provider lacks your domain's records.
A passing DKIM signature must also have a signing domain that matches the visible From domain under the applicable DMARC mode. Check this on a delivered message.
Both providers configured
Both routes have the DNS authorization needed to use your custom sender. Retain every required record after validation.
Only one provider configured
The configured route works, but failover can revert notifications to noreply@statuspage.io. Finish the other record group before treating setup as complete.
Set up DMARC
I publish DMARC in DNS for the visible From domain. For status@example.com, its record name is _dmarc.example.com. This is separate from Statuspage's DNS validation controls.
Save a copy of the current policy before editing. Preserve reporting destinations used by the rest of your team.
- Inspect the policy. Look up existing DMARC at the From domain and check whether a parent policy applies before creating a new record.
- Start with monitoring. If no enforcement policy already applies, publish the p=none template below.
- Set report delivery. Replace dmarc@example.com with a mailbox that receives and processes aggregate reports. For an external reporting domain, confirm reporting authorization is configured.
- Build the value. Use the DMARC record generator to create your record with the intended policy and reporting address.
Initial DMARC recordtext
Name: _dmarc.example.com
Type: TXT
Value: v=DMARC1; p=none; rua=mailto:dmarc@example.com
For status@notifications.example.com, an explicit record goes at _dmarc.notifications.example.com. Check the effective parent policy first so you do not weaken existing protection.
Publish one DMARC TXT record at the chosen name. Use the checker below to confirm its syntax and reporting destination after the DNS update.
DMARC checker
Look up a domain's DMARC record and catch policy issues.
?/7tests passed
A valid DMARC record establishes the policy. A message passes DMARC when either SPF passes with domain alignment or DKIM passes with domain alignment; both are not required.
The p=none policy requests monitoring without asking receivers to quarantine or reject failures. Keep the reporting address active while you investigate legitimate senders.
Keep existing enforcement
If p=quarantine or p=reject already applies, keep that policy. Repair Statuspage's authentication without replacing existing enforcement with the monitoring template, including on a new sending subdomain.
Verify and troubleshoot
I check a fresh notification after Statuspage validates the records. Read Authentication-Results added by the receiving mail system, alongside the visible From address.
- Send a preview. Open Your page > Customize page and email > Customize email. Click Send test email, select the email types, then click Send.
- Check DKIM. Require dkim=pass and inspect header.d or the signature's d= value for a domain match under your DMARC mode.
- Check SPF. Inspect spf=pass and smtp.mailfrom. Compare that domain with the From domain; an SPF pass for an unrelated provider domain is insufficient.
- Confirm DMARC. Require dmarc=pass for your intended From domain. A pass for statuspage.io does not authenticate your custom domain.
The email tester below gives a full diagnosis after you send a message to its generated test address. Use an email actually generated by Statuspage.
Send directly to the test address. Forwarding a previously received notification changes the delivery path and obscures the original SPF result.
Email tester
Send a real email to this address. Suped shows a results button when the test is ready.
?/43tests passed
If the preview cannot target the test address, use an isolated test page: open Subscribers > Add subscriber, choose Email, enter the generated address, and click Add subscriber. Complete any required confirmation, then trigger a notification there.
A passing test covers that message's route. Keep report monitoring active to catch failures on the other delivery provider and on forwarded notifications.
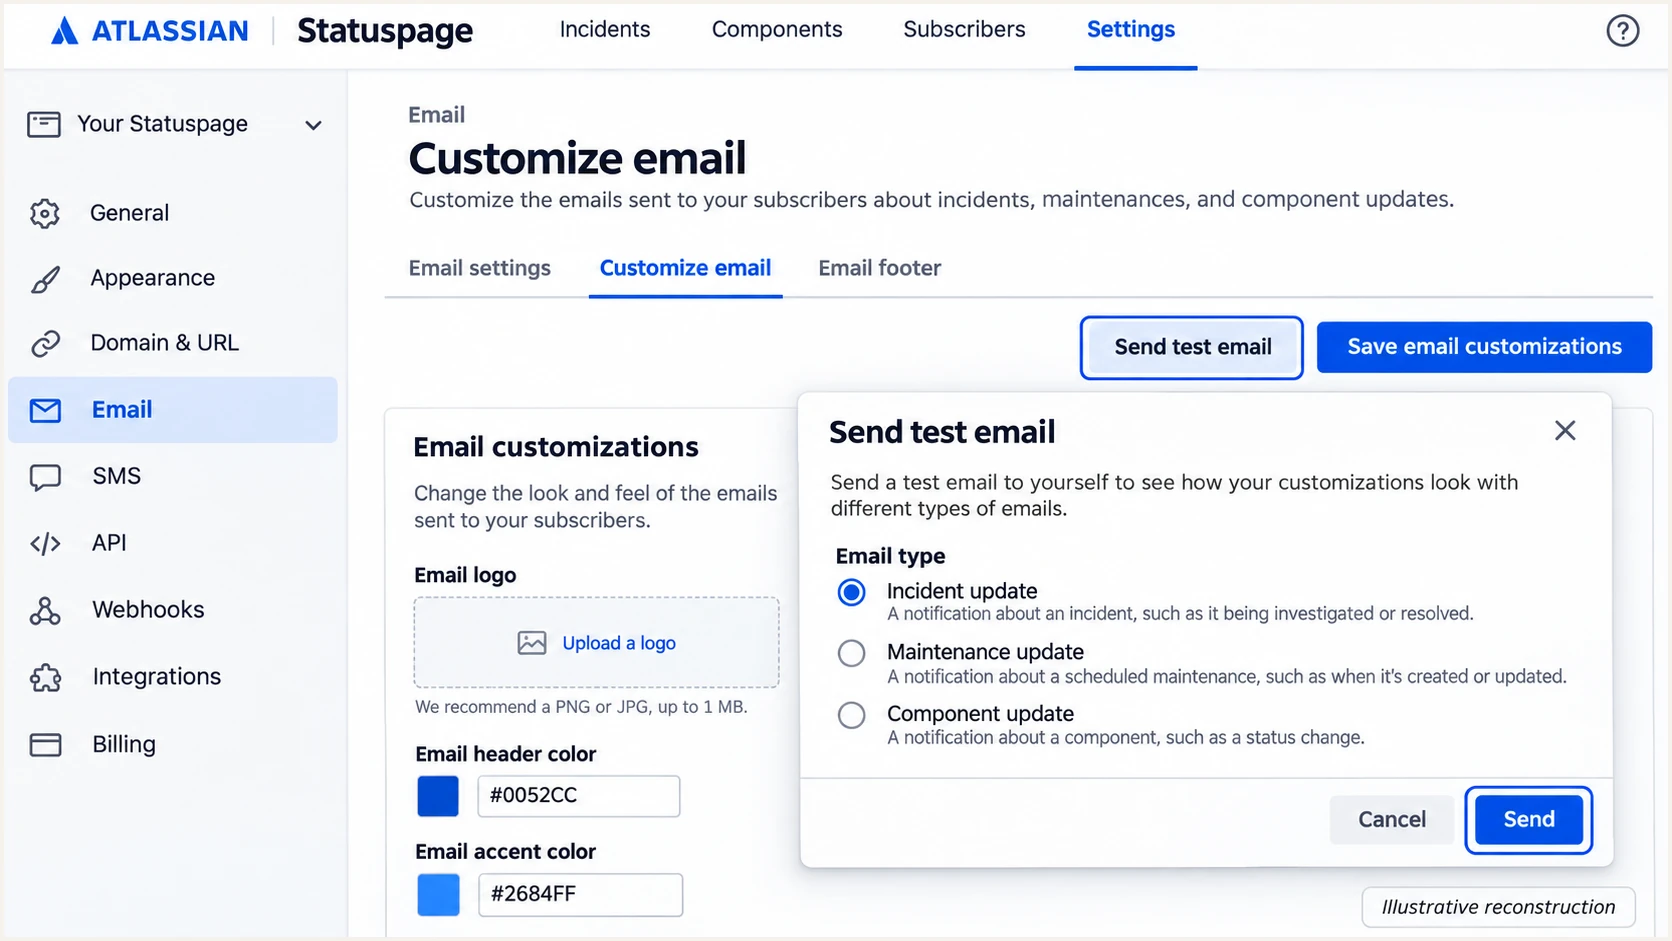
Illustrative Statuspage test-email controls for sending a fresh notification.
For a failed DNS check, compare the published hostname and value with Statuspage's expected value. Query the authoritative DNS if a cached answer still contains the previous record.
Retry after the previous TTL expires. If the records validate but custom signing is still absent after Atlassian's activation window, contact Atlassian support with the message headers and DNS results.
|
|
|
|---|---|---|
SPF permerror | Records and lookups | Merge or simplify |
SPF mismatch | Return-Path domain | Check domain match |
DKIM failure | Selector and key | Correct generated records |
Unexpected sender | Validation status | Revalidate both groups |
Missing reports | Reporting mailbox | Check report delivery |
Check DNS configuration and delivered-message authentication separately.
Get alerted when it breaks
Suped is our DMARC and email authentication platform. Its source-level reports and issue notifications make Statuspage authentication changes visible after the initial setup.
- Enable issue emails. In Suped's notification settings, enable Issues detected and Sending sources need verification. Use DMARC summary emails for regular review.
- Investigate the source. Filter report data by sending source and date. Open failing records to inspect SPF, DKIM, and DMARC results.
- Check DNS changes. Use DNS history to compare current and previous values when an include or selector disappears.
- Close the loop. Follow the issue's repair steps, correct DNS or Statuspage settings, revalidate in Statuspage, and send another test notification.
Our DMARC monitoring connects source failures with diagnostic details, so a change can be investigated without manually reading aggregate XML files.
Report-based detection depends on receiving systems sending their reports, often daily. A single-message test checks a change immediately; aggregate reports show the broader sending pattern.
Investigate legitimate DMARC failures
Prioritize failures affecting confirmed Statuspage notifications. A provider-owned Return-Path with a passing, matching DKIM signature is not by itself a DMARC failure.
Secure your domain with p=reject
I move to p=reject after legitimate senders consistently pass DMARC. If other systems use the same From domain, include their mail in the review.
- Confirm authorized sources. Review Suped's verified and unverified sources. Verify a source only after confirming the business authorized it.
- Check both delivery routes. Keep both Statuspage record groups valid and investigate legitimate notification failures before tightening policy.
- Stage enforcement. Move a new monitoring policy to p=quarantine, review a representative sending cycle, then use p=reject once legitimate failures are resolved.
- Monitor after changes. Keep Suped notifications active and retest after changing the From domain or authentication records.
Suped's Hosted DMARC lets teams manage policy changes in our dashboard after the initial DNS delegation. Use source diagnostics to decide when each policy step is ready.
Keep existing reporting destinations and other intentional policy tags when changing p=. The example below assumes your real reporting mailbox has replaced dmarc@example.com.
DMARC enforcement templatetext
Name: _dmarc.example.com
Type: TXT
Value: v=DMARC1; p=reject; rua=mailto:dmarc@example.com
After publishing, check the effective policy and send a fresh Statuspage notification. Confirm dmarc=pass for the custom From domain and keep reviewing reports for legitimate failures.
Do not weaken the policy solely because unknown traffic fails. Confirm whether the source is authorized before changing authentication or enforcement settings.
Frequency asked questions
Yes, its custom email authentication supports a Return-Path under your domain. Publish the generated delivery-domain records and inspect a received notification to confirm the actual route. A passing SPF result still needs a domain match under your DMARC mode. Matching, passing DKIM can independently satisfy DMARC.
DMARC checks the domain in the visible From address. For status@example.com, check _dmarc.example.com. The page's website hostname does not determine email authentication. For a sending subdomain, check its explicit policy and any applicable parent policy.
Incomplete domain authentication or an unconfigured failover provider can cause Statuspage to use its default sender. Validate every required record and allow the documented activation time. Inspect a new notification after validation.
Atlassian Statuspage uses stspg-customer.com as its documented SPF include domain. Do not assume this is a universal reverse-DNS suffix. Identify a notification using its sending IP and authenticated domains together; an rDNS hostname alone does not prove the message is authorized.
Keep p=reject. Configure and validate Statuspage's records, then test the intended custom sender. The p=none template is for domains without an existing enforcement policy; it is not a prerequisite for adding Statuspage.




