
How to set up DMARC/DKIM/SPF for Atlassian

Published 22 Nov 2026
Updated 22 Nov 2026
11 min read
Summarize with
To authenticate custom Jira Cloud and Confluence notifications, add your email domain in Atlassian Administration, publish the generated bounce and DKIM CNAME records, select your custom sender address, and publish a DMARC policy in DNS. Atlassian uses the bounce CNAME for SPF in this workflow; you do not need a generic SPF include at your root domain.
I start with the domain in the visible From address. These steps cover Jira Cloud and Confluence custom notifications. Atlassian authenticates its own default sender domains. Statuspage has a separate setup, and Data Center installations use the authentication configuration of their outgoing mail server.
Add your domain
Use an Atlassian organization admin account and have access to your domain's authoritative DNS. Adding an email domain for notifications is separate from verifying a domain to manage Atlassian accounts.
- Open email settings. In Atlassian Administration, select your organization, then Organization settings > Emails. Open Email domains if the tabs are already visible.
- Add the sending domain. Select Add domain, enter your domain, such as example.com, then select Add. Use the domain intended for your custom From address.
- Collect the DNS records. Keep the DNS records dialog open, or reopen it with See DNS records. Copy every generated name, value, and record type. Publish the TXT verification records as well as the authentication records.
Atlassian Support lists five or six generated records for this workflow. Use the records shown for your organization rather than copying another organization's values.
The illustration shows where to add the domain. Complete the SPF and DKIM steps below before expecting the domain to become Active.
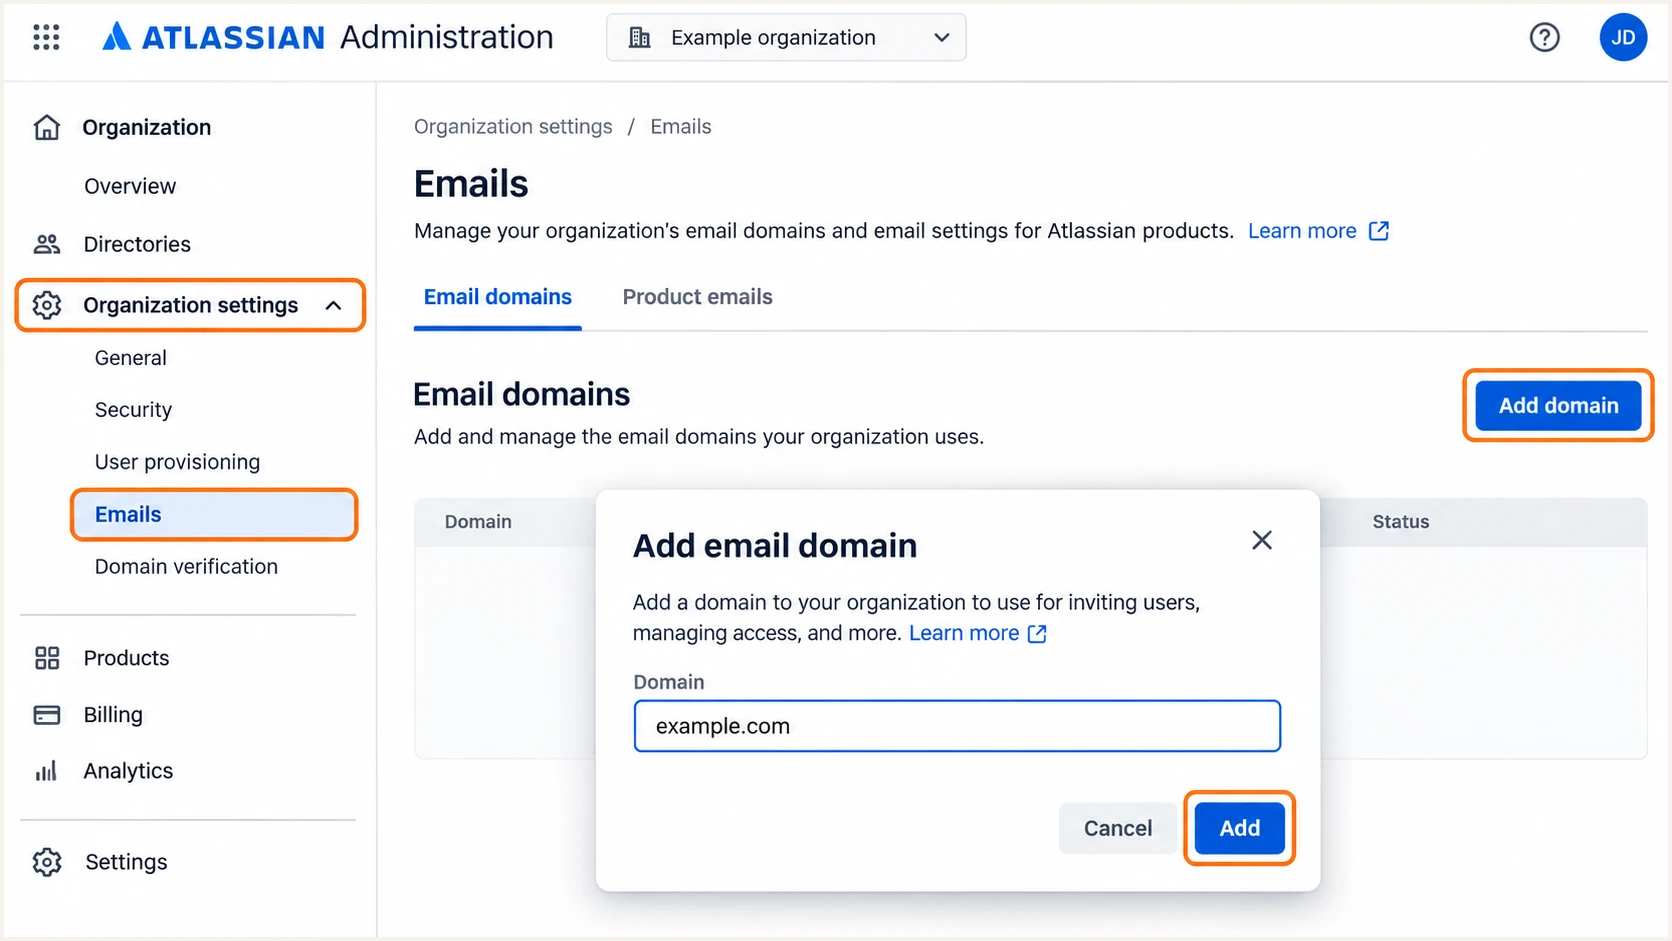
Illustrated Atlassian Administration workflow for adding an email domain.
Keep your existing mail records while adding Atlassian's records. A new notification sender does not require replacing the domain's existing MX records.
Set up SPF
Atlassian supports SPF alignment through its custom bounce domain. I configure the generated BOUNCECNAME instead of adding an assumed Atlassian include to the main domain's SPF record.
- Publish the bounce record. Find BOUNCECNAME in the generated list. At your DNS host, create a CNAME using the exact name and target Atlassian provides.
- Avoid record conflicts. Keep the bounce hostname dedicated to that CNAME. Do not add a TXT or MX record at the same hostname, and leave any web proxy disabled for this DNS record.
- Preserve existing senders. Keep your root-domain SPF record for the services that actually use it. If another service requires an SPF change, edit its existing record rather than creating a second SPF record at the same name.
- Check the return path. On a delivered notification, inspect Return-Path and the receiver's SPF result. With relaxed SPF alignment, its domain must share the organizational domain of the visible From address.
Check SPF against the actual envelope-sender domain, which normally appears in Return-Path after delivery. An SPF lookup of example.com alone does not validate a notification sent with a bounce subdomain.
SPF checker
Find SPF syntax issues, lookup limits, and weak records.
?/16tests passed
Enter the bounce hostname supplied by Atlassian. Its CNAME delegates the relevant DNS answers to Atlassian's infrastructure; preserve the target exactly as supplied.
With a From domain of example.com, a return-path subdomain of example.com meets relaxed SPF alignment. Strict SPF alignment requires an exact domain match, so keep the default relaxed setting unless your complete sending configuration supports strict matching.
Do not add an SPF include based only on an online sender catalog. Atlassian's current Jira and Confluence instructions use the generated bounce CNAME. SPF records that you manage separately must stay within the limit of 10 DNS-lookup-causing terms, including nested lookups.
Set up DKIM
Publish both DKIM CNAME records supplied by Atlassian. The second record supports key rotation, so publishing only the selector currently signing mail leaves the setup incomplete.
- Copy both selectors. Create a CNAME for DKIM1 and another for DKIM2. Copy each full name and target from your own DNS records dialog.
- Check hostname handling. If your DNS host appends the domain automatically, enter only the relative host label. Confirm that the saved name does not contain example.com twice.
- Keep delegation intact. Use DNS-only CNAME records and retain both selectors. Atlassian manages the signing keys; do not replace its targets with a locally generated DKIM key.
DKIM must pass cryptographic verification and use a signing domain that meets DMARC alignment with the visible From domain. A passing signature for an unrelated domain does not satisfy DMARC for your domain.
I compare both saved CNAME targets with the Atlassian dialog before running verification. The illustration deliberately hides generated values because your organization's values are the ones to publish.
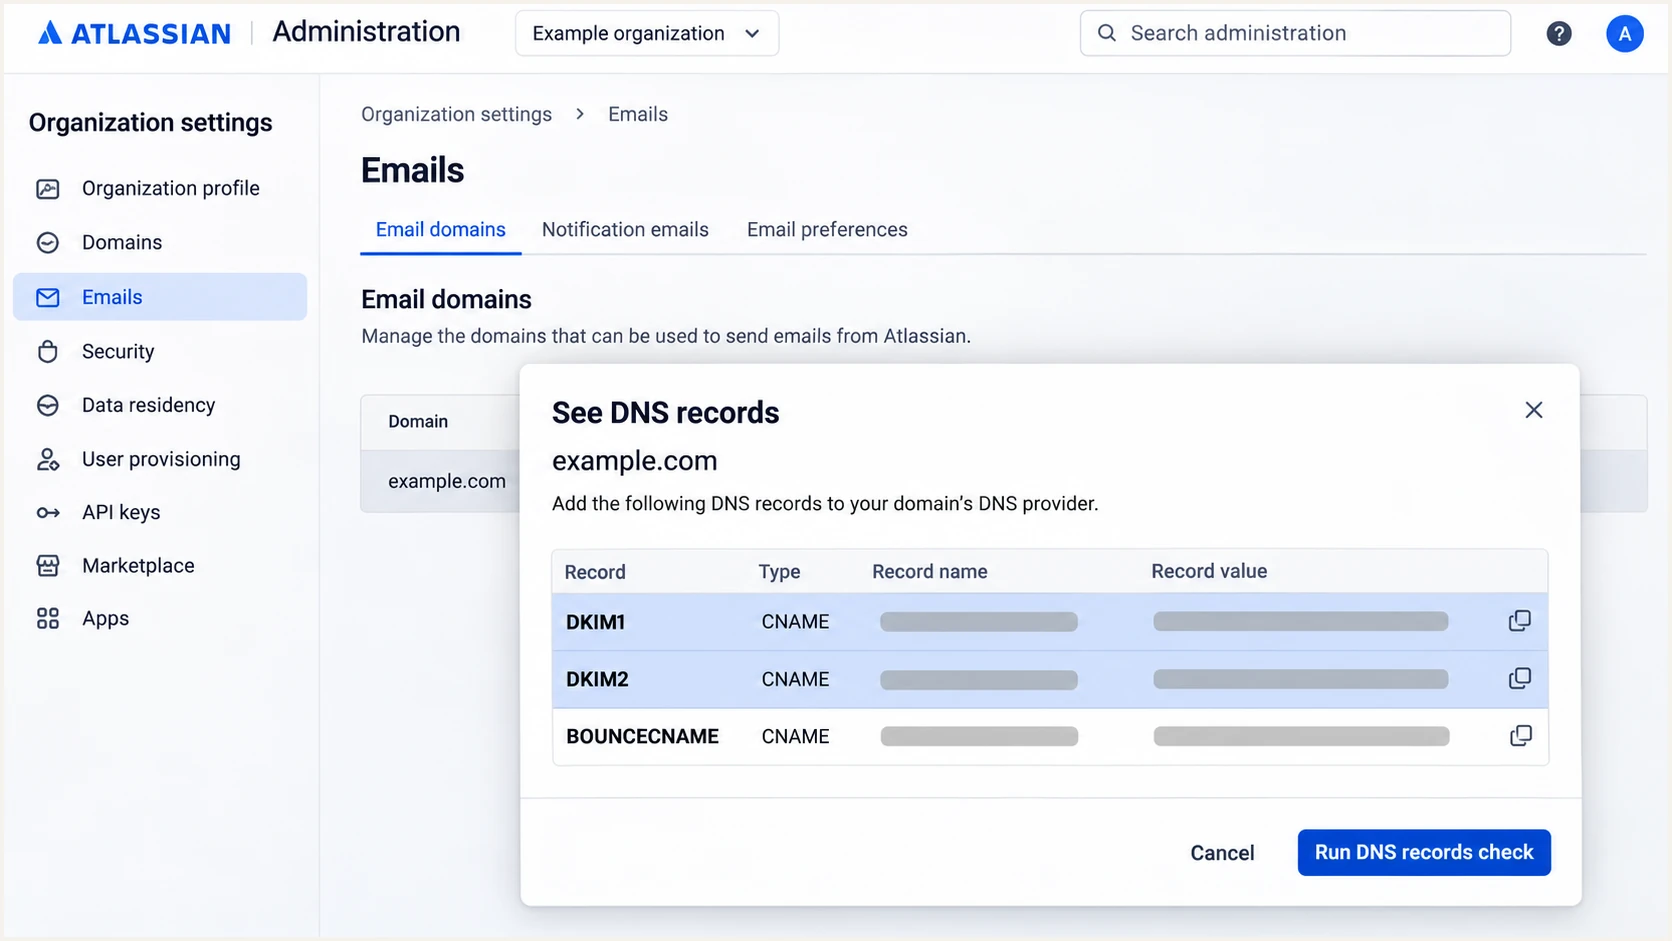
Illustrated Atlassian DNS records dialog with both DKIM entries highlighted.
After DNS caches refresh, trigger a new notification and check its DKIM result. Successful DNS verification alone does not show which signing domain a delivered message used.
Set up DMARC
DMARC is a DNS policy for your From domain. If you already use p=quarantine or p=reject, keep that policy while adding Atlassian. Start with p=none only when introducing DMARC on a domain without an enforcement policy.
- Check for an existing policy. Look up TXT records at _dmarc.example.com, replacing example.com with your sending domain. Maintain one DMARC record at that name.
- Publish a monitoring policy. For a new setup, create a TXT record at _dmarc using the example below. Replace the reporting address with a real mailbox or reporting destination you control.
- Preserve reporting. When editing an existing policy, retain its required tags and reporting recipients. For a subdomain sender, check both any explicit subdomain policy and the applicable parent policy.
Use the DMARC record generator to prepare the TXT value. Publish it at your DNS host; creating an email domain in Atlassian does not replace this policy step.
Initial DMARC TXT value at _dmarc.example.comtext
v=DMARC1; p=none; rua=mailto:dmarc@example.com
The example address is a placeholder. The rua destination receives aggregate XML reports, so use a destination that can accept and process them. Reporting to another domain also requires that destination's external-report authorization.
Check the published record after saving it. Confirm that the policy and reporting destination are correct and that a second DMARC record has not been created.
DMARC checker
Look up a domain's DMARC record and catch policy issues.
?/7tests passed
A valid policy proves that receivers can discover your instructions. Use a delivered Atlassian notification to verify that SPF or DKIM passes with the required domain alignment.
Verify and troubleshoot
I verify the DNS records first, select the sender second, and test a fresh notification last. These are separate checks.
- Run the DNS check. In Organization settings > Emails > Email domains, open See DNS records and select Run DNS records check. Inspect each record's status and correct mismatches.
- Wait for activation. Atlassian provisions sending after all required records match. Its documented activation window is up to 72 hours; the domain status becomes Active when provisioning finishes.
- Register the sender. Open Emails > Email addresses > Add email addresses. Add a group address such as jira@example.com, select the Jira or Confluence app instances under Apps, then select Add email addresses. Atlassian allows up to 30 addresses per site.
- Select the Jira sender. Open Settings > Spaces, then More actions > Space settings for the space. Choose Notifications > Internal notifications, Edit under Notification email, then Edit beside the email card. Choose your custom address in Email and Save.
- Select the Confluence sender. Open Confluence administration, then Settings > Configuration > Notifications. Choose the sender in Email addresses and select Save changes. Allow up to an hour for the change.
Registering an address makes it available to the selected app instances. Jira's sender setting applies to the selected space, so repeat it for other spaces that need the same sender.
The illustration shows Jira's sender selector. Confluence content-sharing notifications still use Atlassian as sender according to its support documentation, even after a custom notification sender is selected.
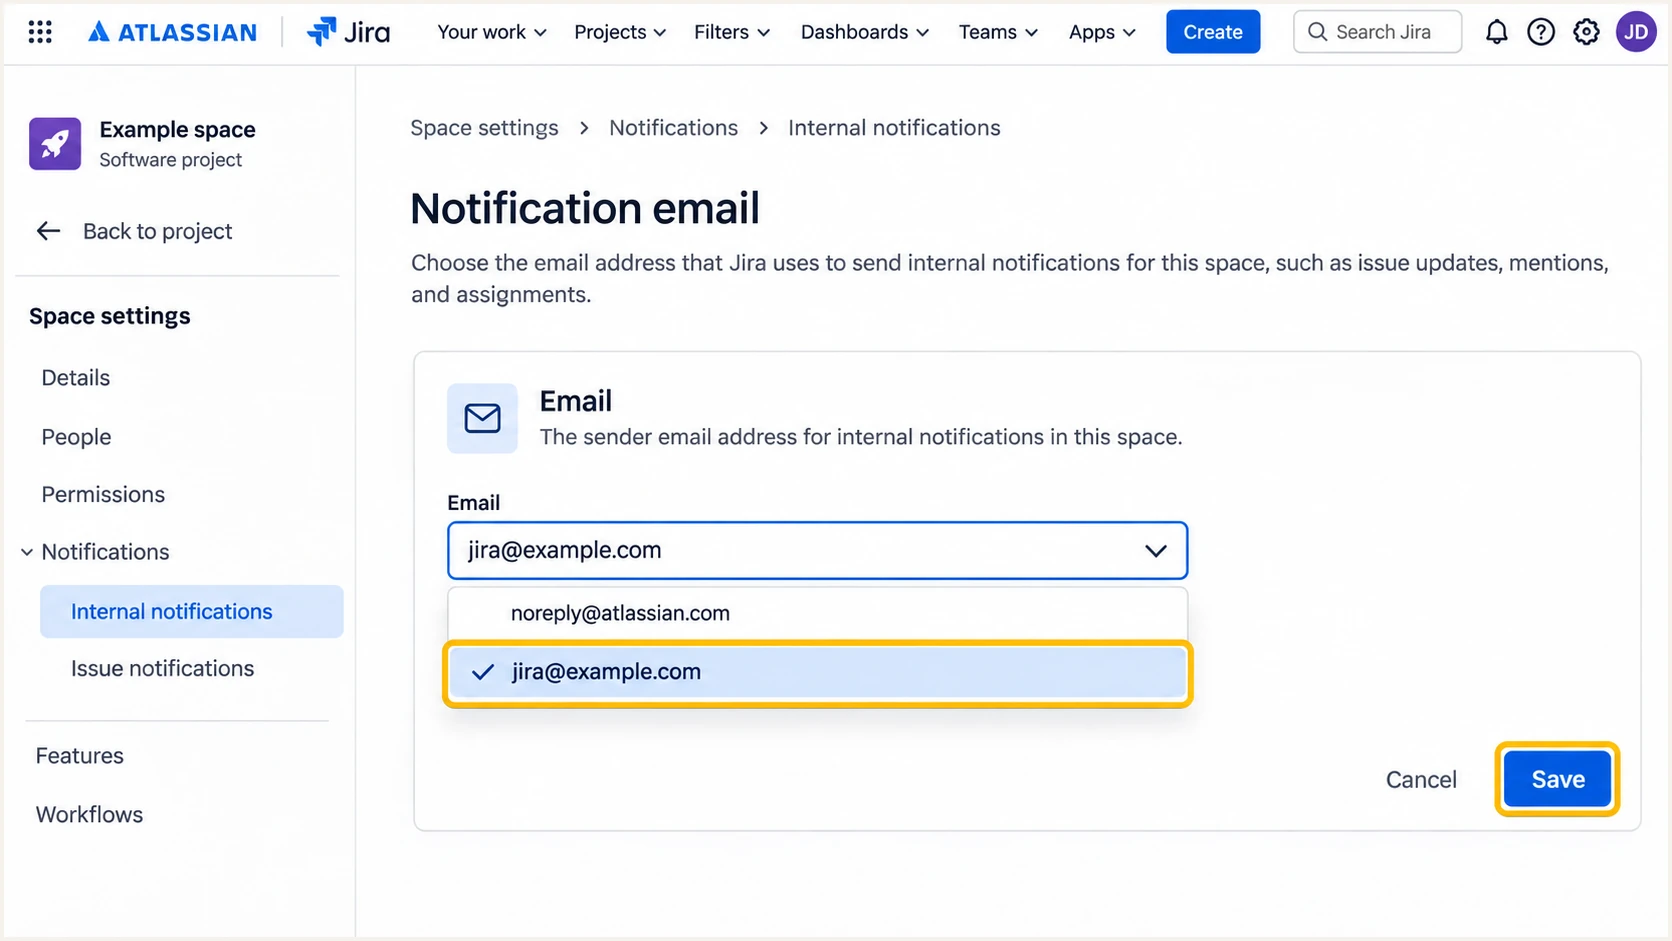
Illustrated Jira Cloud notification settings with a custom sender selected.
Generate a real Jira assignment or comment notification, or a Confluence activity notification. Inspect the original message at its destination and confirm that the visible From address is the one you configured.
The email tester below is the quickest diagnostic when Atlassian's recipient settings let you send a notification to its test address. Use a fresh message sent by Atlassian. A test sent by your normal mailbox measures that mailbox's authentication instead.
Email tester
Send a real email to this address. Suped shows a results button when the test is ready.
?/43tests passed
If you cannot direct an Atlassian notification to the test address, inspect original headers in an authorized recipient's inbox. Use the destination mail server's Authentication-Results, and compare smtp.mailfrom and header.d with the visible From domain.
This successful header example is illustrative. Your actual return-path hostname and DKIM selector come from the delivered message and your Atlassian setup.
Illustrative successful notification headerstext
From: Jira <jira@example.com>
Return-Path: <bounce@bounce.example.com>
Authentication-Results: receiver.example;
  spf=pass smtp.mailfrom=bounce.example.com;
  dkim=pass header.d=example.com;
  dmarc=pass header.from=example.com
DMARC passes when at least one of SPF or DKIM passes with domain alignment. SPF failure or an SPF alignment error is compatible with a DMARC pass when DKIM passes and its signing domain meets alignment.
For Atlassian's custom-domain workflow, still repair a broken bounce CNAME. Forwarding is a separate cause of SPF failure; an unchanged DKIM signature can continue to authenticate forwarded mail.
|
|
|
|
|---|---|---|---|
Pass + match | Pass + match | Pass | Keep monitoring |
Fail | Pass + match | Pass | Check mail path |
Pass, mismatch | Pass, mismatch | Fail | Fix domain match |
Fail | Fail | Fail | Repair setup |
A match means the authenticated domain meets DMARC alignment.
For unresolved DNS failures, check for a duplicated domain suffix, conflicting records, proxying, or an incorrect target. If public DNS matches Atlassian's values but activation exceeds its documented window, provide Atlassian Support with the domain and per-record check results.
Get alerted when it breaks
Atlassian checks the configured DNS records every 24 hours and emails organization admins when records do not match. Suped, our DMARC platform, adds ongoing visibility into authentication outcomes reported by receiving mail systems.
- Keep native alerts enabled. Make sure organization admins receive Atlassian's DNS mismatch emails. These identify missing or changed setup records.
- Enable Suped notifications. Enable Issues detected, Sending sources need verification, and DMARC summary emails. Assign an owner to investigate new authentication failures.
- Inspect the Atlassian source. Review its reported SPF and DKIM results in Suped. Verify the source only after confirming that it is an authorized sender, then investigate failures in the detail view.
- Compare DNS history. Use Suped's DNS history to compare old and new record values around the first failure. Restore the intended Atlassian records and repeat the notification test.
Suped's DMARC monitoring connects reported failures to sending sources and provides issue-specific fix steps. This is useful when Atlassian shares your From domain with other legitimate senders.
Aggregate reports arrive after delivery, often on a daily schedule. Report-based alerts follow that arrival, so use a fresh message test for immediate validation after a change.
Atlassian DNS checks
Confirms that the required published records match Atlassian's expected values. Organization admins receive mismatch emails after the scheduled check.
Suped authentication monitoring
Shows reported SPF, DKIM, and DMARC outcomes by source, with issue detection and fix steps. Use it to track authentication across the domain's senders.
Keep a named owner for each legitimate sending source. When an alert arrives, identify the changed record or sending configuration before altering the domain-wide DMARC policy.
Secure your domain with p=reject
I move to p=reject after every legitimate sending source has demonstrated a DMARC pass through a representative sending cycle. A successful Atlassian test is one requirement; the policy also affects your other senders.
- Inventory all sources. Review aggregate reports for your business mailbox and each application sending with your domain. Investigate unfamiliar sources before authorizing them.
- Repair legitimate failures. Confirm both Atlassian DKIM records and its bounce CNAME. Test each custom From domain and include low-volume notifications in the review.
- Stage enforcement. For a new monitoring deployment, move from p=none to p=quarantine, review results, then use p=reject. Keep existing quarantine or reject policies while onboarding Atlassian.
- Check subdomains. Review explicit subdomain policies and inherited parent policy before enforcing rejection. Keep reporting active so a later DNS change or signing failure is visible.
Suped's Hosted DMARC lets teams manage policy changes after its DNS delegation is configured. Combine that control with source verification and authentication diagnostics to decide when each enforcement step is ready.
Use the final TXT value below only after the readiness checks pass. Replace the reporting placeholder with your actual destination and preserve any other policy settings your domain requires.
Enforcement DMARC TXT value at _dmarc.example.comtext
v=DMARC1; p=reject; rua=mailto:dmarc@example.com
A reject policy requests rejection of messages that fail DMARC. Receiving systems retain their own handling rules, and an authentication pass does not guarantee inbox placement.
Continue reviewing reports after enforcement, especially after changing sender addresses or DNS. Keep both Atlassian DKIM CNAMEs published so key rotation does not interrupt signing.
Frequency asked questions
For the current Jira Cloud and Confluence custom-domain workflow, use the bounce CNAME generated in Atlassian Administration. Do not add include:_spf.atlassian.net based on a sender catalog or an old example. Follow the records provided for your domain and product.
No. Account-domain verification and notification email-domain setup are separate. Add the email domain under Organization settings > Emails, publish its generated records, register the sender address, and select it in Jira or Confluence.
Atlassian documents up to 72 hours for provisioning after it recognizes the required DNS updates. Run DNS records check to inspect each record. After activation, a Confluence sender-address change takes up to an additional hour.
Yes. DKIM must pass and its signing domain must meet DMARC alignment with the visible From domain. That is sufficient for DMARC even when SPF does not meet alignment. For this Atlassian workflow, still check the bounce CNAME because custom return-path support is available.
Keep your existing enforcement policy. Publish and verify Atlassian's records, wait for activation, and test the custom sender before enabling it broadly. Fix authentication failures instead of weakening the policy for the entire domain.
Statuspage has a separate configuration. Open Your page > Customize page and email > Customize email, set Send from email, and save. Then open Your page > DNS configuration, publish the records displayed there, and select Revalidate all records. Statuspage documents authenticated sending within 24 hours after validation.




