
How to set up DMARC/DKIM/SPF for 163 Mail

Published 21 Nov 2026
Updated 21 Nov 2026
10 min read
Summarize with
For a personal @163.com address, NetEase manages SPF, DKIM, and DMARC. There are no DNS records for you to publish. To authenticate a domain you own, use 163 Mail's team edition domain-mail capability, publish its assigned SPF and DKIM records, and add DMARC to your domain's DNS.
I check the account type before changing anything: an ordinary mailbox, a team edition custom domain, and NetEase Enterprise Mail have different setup paths. The custom-domain steps below apply to the team edition. Personal mailbox users can go straight to sending a test message and checking its results.
Add your domain
Use this section only for a domain you own and a team edition subscription with domain mail enabled. NetEase's public help article "什么是域名邮箱?" documents this capability.
Have administrator access to the team account and access to the domain's authoritative DNS. An alternate sender address alone does not prove that 163 Mail can authenticate your domain.
- Open team administration: In 163 Mail webmail, open "团队管理后台" in the top navigation, then "发信域名管理".
- Register the sending domain: Add your real business domain and open its configuration. Copy the assigned DNS names and values.
- Complete verification: Publish the authentication records in the following sections, then return to the domain page and confirm "已验证". Investigate any "未验证" status.
- Create the sender: Open "发信地址管理", choose the verified domain, and submit the mailbox prefix and sender name.
Keep existing MX records when another service already receives your mail. MX controls incoming delivery; changing it is a separate mailbox migration decision.
Use the values displayed for your account. A record copied from an enterprise-mail tutorial is not a reliable substitute for the team edition's configuration.
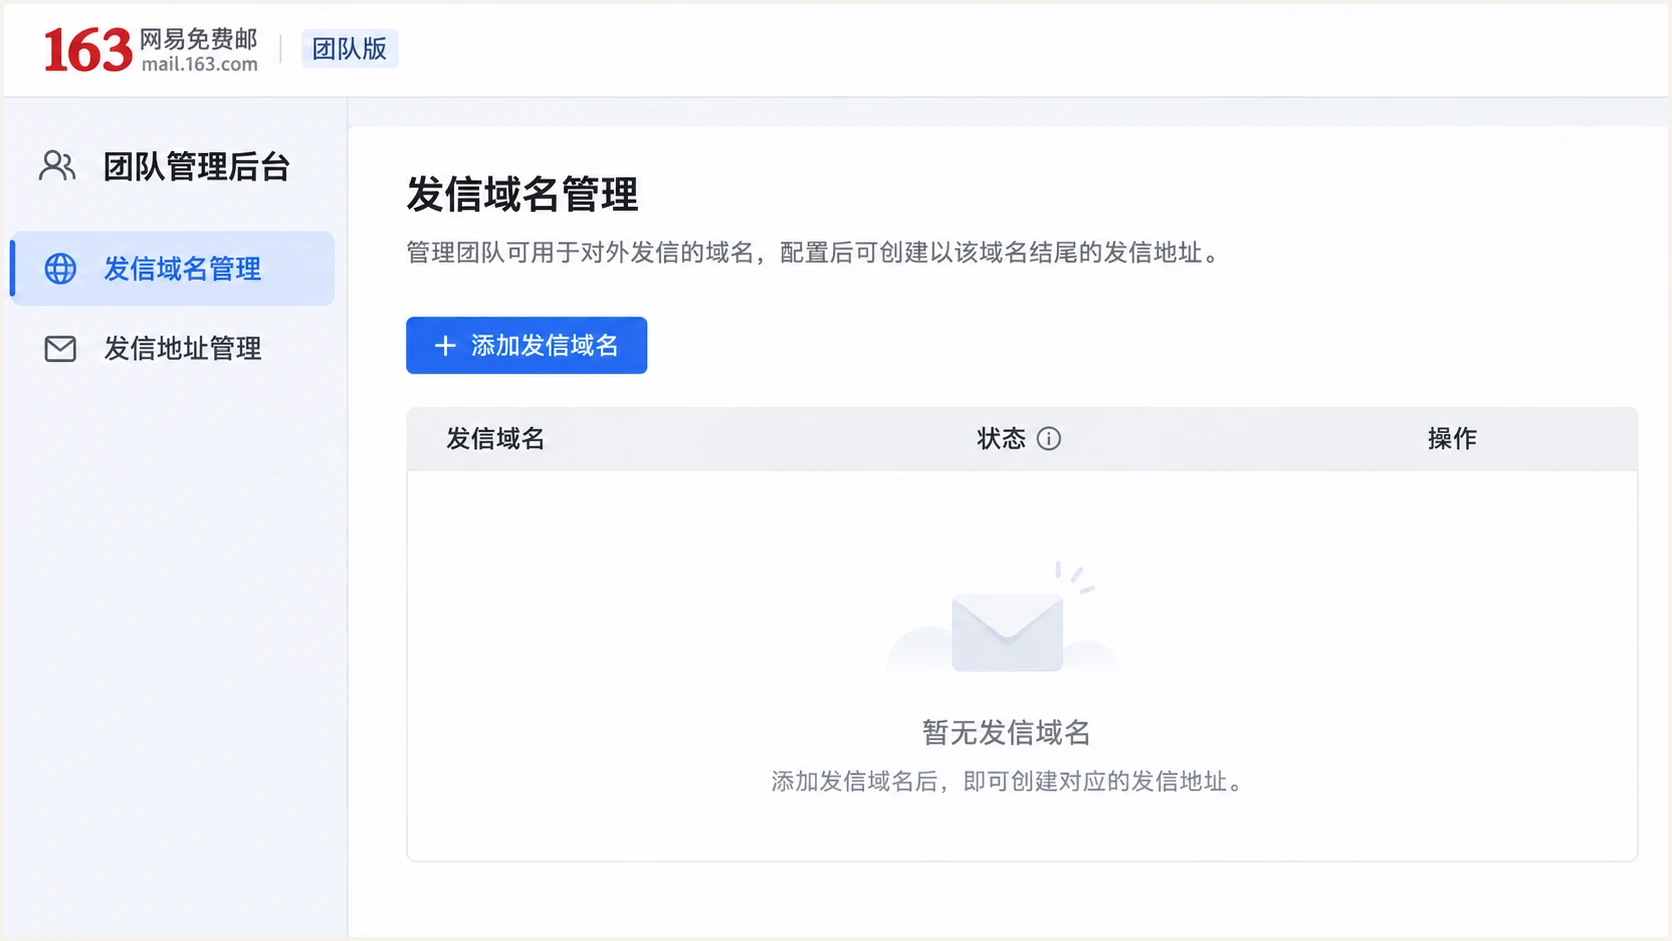
Open sending-domain management in the 163 Mail team edition.
The team administration entry is conditional on account access. If it is absent, confirm the subscription and administrator role before looking for DNS setup controls.
For an address ending in @163.com, skip domain registration and all DNS edits. Only NetEase can change authentication records for 163.com.
Set up SPF
For a team custom domain, publish SPF at the domain used in the SMTP MAIL FROM, which normally becomes the delivered Return-Path. This is separate from the visible From address.
The team edition help gives the example below. Use it only when your live configuration specifies this include and 163 Mail is the domain's only authorized sender.
- Copy the assigned include: Use the SPF value in your domain configuration. Do not replace it with an include for another NetEase product.
- Edit one SPF record: At the specified DNS name, create or update a TXT record. Merge existing authorized senders before the final all mechanism; never publish a second SPF record.
- Check lookup limits: Keep evaluation within the limit of 10 DNS-querying terms, including nested includes.
- Check the Return-Path: Confirm its domain matches the visible From domain under your DMARC alignment mode. Editing SPF cannot change the MAIL FROM chosen by the sender.
Team edition SPF example, TXT at @text
v=spf1 include:spf.mail.163.com -all
Enter your sending domain in the checker. Investigate duplicate records and permanent errors before testing delivery.
A valid SPF record proves that the policy is readable. A real message is still needed to establish which envelope domain 163 Mail actually uses.
SPF checker
Find SPF syntax issues, lookup limits, and weak records.
?/16tests passed
For personal @163.com mail, look up 163.com to inspect NetEase's policy. Publishing an SPF record on an unrelated domain does not change an @163.com message.
If a sending route keeps a provider-owned Return-Path, SPF alignment errors are expected for your custom From domain. Adding an include at your domain cannot fix that route. DMARC still passes when DKIM passes with a matching signing domain.
Set up DKIM
163 Mail must sign with a domain that matches your visible From domain for DKIM to satisfy DMARC. A valid signature using d=163.com authenticates a personal @163.com sender, but not an unrelated business domain.
For a team domain, use the assigned public key and selector. I verify a delivered signature rather than assuming that a successful DNS lookup means signing is enabled.
- Copy the DKIM details: Take the complete TXT name and public-key value from the team domain configuration.
- Publish the public key: Use the exact selector under _domainkey. Preserve the entire p= key value and avoid appending your domain twice in the DNS host field.
- Validate the configuration: Return to the domain page and check the DKIM verification result after cached DNS answers expire.
- Inspect a signed message: Read d= and s= in DKIM-Signature. Require dkim=pass and a signing domain that matches your From domain under the published DMARC mode.
Use the live public key
Do not copy truncated DKIM examples from help text or create an unrelated key pair. The DNS public key must match the private key used by 163 Mail. A personal mailbox has no customer-managed DKIM selector.
Get the selector from the actual signature. Substitute it and your own domain in this command; the command is a lookup example, not a DNS record to publish.
Look up the selector observed in a messagebash
dig +short TXT SELECTOR._domainkey.example.com
If DNS is correct but DKIM fails, test a fresh message sent directly to the recipient. A gateway that changes signed content can invalidate a signature after 163 Mail sends it.
Set up DMARC
Publish DMARC only for a domain you control. Personal @163.com users cannot set 163.com's policy or request its domain-wide aggregate reports.
For a new custom-domain deployment, I start with p=none and reporting. Keep an existing p=quarantine or p=reject policy while configuring 163 Mail.
- Choose the DNS name: Create one TXT record at _dmarc for your visible From domain. Avoid duplicate DMARC records at that name.
- Add reporting: Use the example below, replacing dmarc@example.com with a working report mailbox or assigned reporting address.
- Preserve enforcement: If DMARC already exists, keep its enforcement policy and reporting destinations. Add the necessary reporting address to the existing record.
- Validate publication: Confirm the live policy and reporting address with the checker, then check a delivered message separately.
Initial DMARC example, TXT at _dmarctext
v=DMARC1; p=none; rua=mailto:dmarc@example.com
Build the value with the DMARC record generator. The example address is a placeholder; it will not collect reports for your domain.
Use the actual From domain in the checker. A policy lookup does not test SPF or DKIM on any particular email.
DMARC checker
Look up a domain's DMARC record and catch policy issues.
?/7tests passed
A p=none policy requests monitoring without asking receivers to quarantine or reject authentication failures. Receivers still apply their own filtering policies.
If the report destination is outside your domain, confirm that the reporting provider publishes the required external-destination authorization. Report delivery also depends on participating receivers sending data.
Verify and troubleshoot
The quickest configuration check is a fresh message sent through the exact 163 Mail route you use. Test webmail and each client or application separately.
Use the email tester below to get a destination address, send a message to it, and inspect the authentication diagnosis. A message sent through another SMTP service tests that service instead.
- Send directly: Use your intended From address and send a new message, rather than forwarding an old one.
- Check receiver results: Read the recipient's trusted Authentication-Results. Require dmarc=pass and inspect the SPF domain and DKIM signing domain behind that result.
- Test client access: For a personal mailbox client, open Settings, then POP3/SMTP/IMAP. Enable the required service and generate a client authorization code; use that code for client authentication.
- Retest changes: After a DNS or sender configuration change, allow cached answers to expire and send another message. Preserve the failing message's headers for comparison.
I compare the visible From domain with the SPF MAIL FROM domain and the DKIM d= domain. Under relaxed alignment they need the same organizational domain; strict alignment requires an exact domain match.
A signature header by itself is not a passing result. The receiving server must validate the signature using the public key in DNS.
Email tester
Send a real email to this address. Suped shows a results button when the test is ready.
?/43tests passed
Review the returned diagnosis for authentication failures first. A clean result applies to the tested message and route, so repeat the test for other sending applications.
Successful authentication does not guarantee inbox delivery. For an authenticated message that is still rejected, inspect the recipient's SMTP response and the sending IP's reputation.
|
|
|
|---|---|---|
SPF permerror | Duplicate or complex SPF | Record and lookup count |
DKIM fail | Key or content mismatch | Selector and signature |
DMARC fail | No matching pass | From and auth domains |
DMARC pass | Authentication succeeds | Delivery response |
Common authentication results and the next check.
Personal mailbox users should report persistent failures on direct webmail messages to NetEase. Include the timestamp and complete received headers.
Custom-domain administrators should first check the published key, SPF evaluation, and actual sender identity. A DNS change is useful only when it addresses the identity used by the failing message.
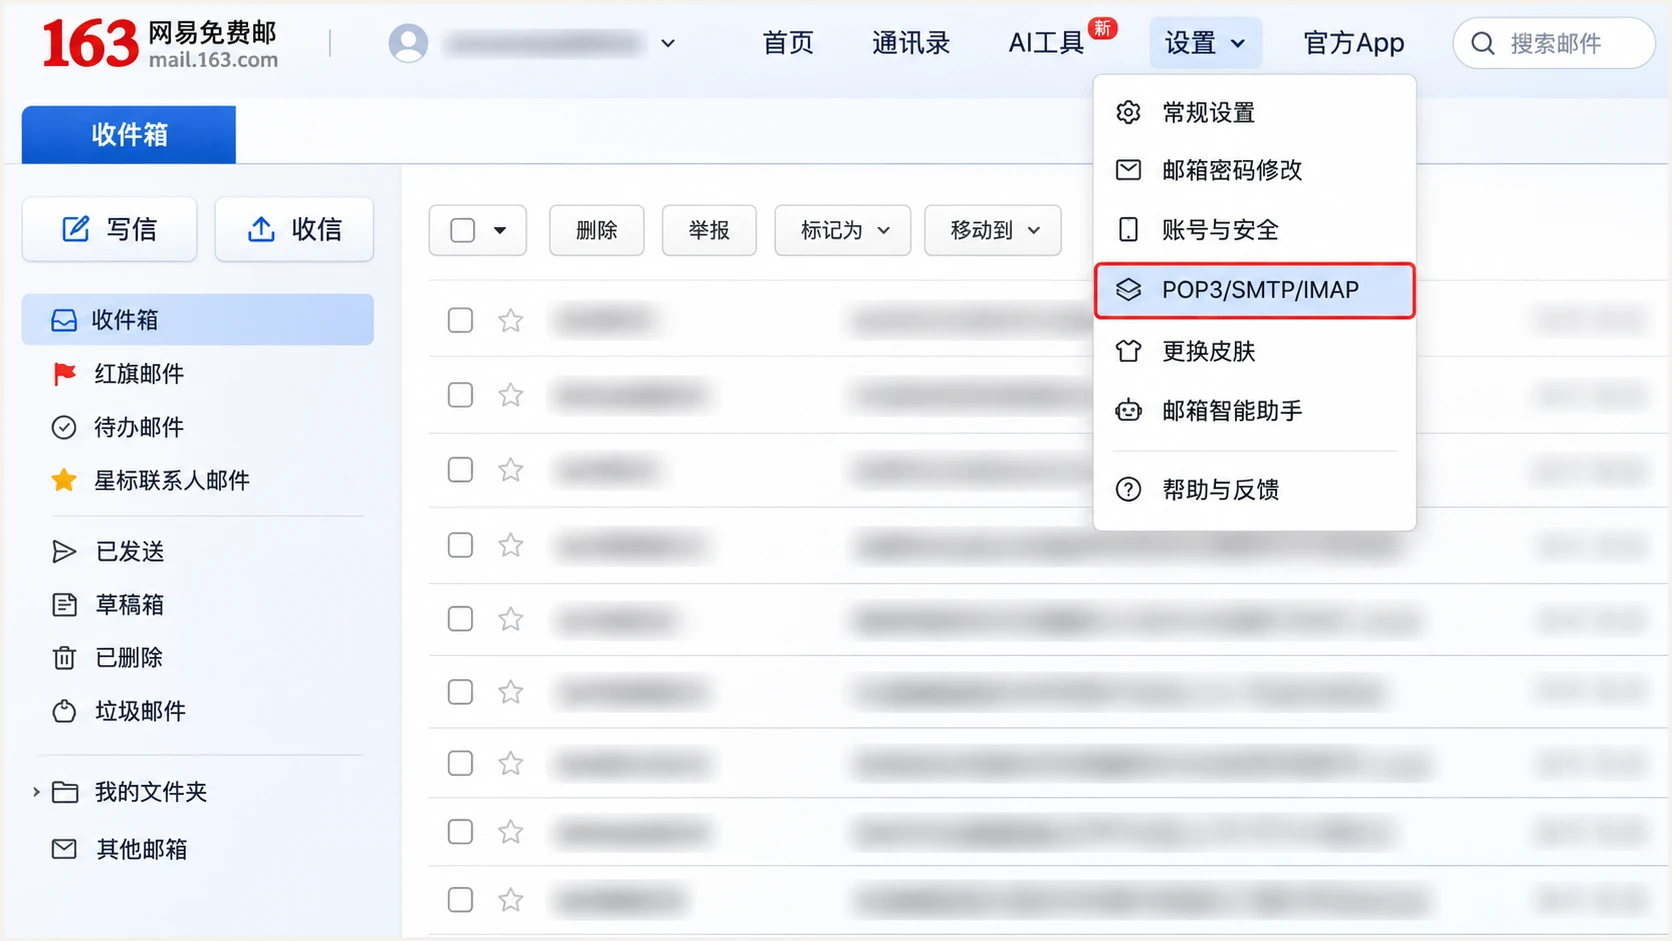
Open 163 Mail protocol settings when troubleshooting client access.
Enabling SMTP access fixes client connectivity; it does not publish SPF or switch on custom-domain DKIM. Keep these checks separate when diagnosing a failed send.
If webmail succeeds but a client fails before submission, check its authorization code and protocol settings. If both routes deliver but fail authentication, compare the received headers.
Get alerted when it breaks
For a custom domain, Suped is our DMARC reporting platform for turning recurring authentication failures into issues to investigate. Its DMARC monitoring connects source-level results with diagnostics and steps to fix them.
Use notifications for issue detection and new sending sources, then review summaries for changes in normal traffic. These workflows require reports for your domain; they do not give a personal mailbox access to 163.com's reports.
- Enable issue notifications: Turn on "Issues detected" for the team responsible for the domain.
- Review unfamiliar sources: Enable "Sending sources need verification" and confirm whether each source is an authorized business sender before marking it verified.
- Investigate failures: Filter records to the affected source, compare SPF and DKIM results, and follow the reported fix steps. Use DNS history when a failure follows a record change.
- Confirm recovery: Send another test message immediately, then check subsequent aggregate reports for recurring failures.
Report timing limits alert timing
DMARC aggregate reports arrive on receiver schedules, commonly daily. Suped can notify you when it detects an issue in available data, but aggregate reporting is not a live feed of every message. Use the email tester for immediate checks.
Secure your domain with p=reject
Enforce p=reject for your custom domain after legitimate sending routes pass DMARC consistently. For @163.com, NetEase controls this decision.
Suped helps make this decision with source verification and message-level diagnostics. Our Hosted DMARC product manages policy changes through the dashboard after its DNS setup is complete.
- Inventory legitimate traffic: Review a full business sending cycle, including infrequent systems. Classify unfamiliar sources before enforcement.
- Fix every legitimate route: Require passing SPF or DKIM with the required domain match. Check forwarding paths and keep DKIM working even when SPF fails there.
- Stage the policy: For a domain starting at p=none, move to p=quarantine, review legitimate failures, then use p=reject. Keep reporting active throughout.
- Maintain protection: Keep existing enforcement in place when adding 163 Mail. Retest new senders and review subdomain policies before they enter production.
Ready to enforce
Known senders pass DMARC, low-volume routes have been tested, and unexplained legitimate failures are resolved.
Resolve before advancing
A business application fails both matching authentication paths, or a custom From address still relies only on a 163.com signature.
Do not use the overall pass rate as the only decision rule. A small failing stream can contain business-critical email.
After publishing p=reject, confirm the live DNS value and send another test. Use Suped's subsequent source reports to catch regressions and investigate the specific route that fails.
Frequency asked questions
No. NetEase controls 163.com DNS and its signing keys. Send through 163 Mail and test the received message. A domain you own needs its own supported custom-domain setup.
NetEase documents domain mail for its paid team edition. Ordinary personal mailboxes do not have the same domain administration path. Confirm that the team administration entry and custom-domain capability are available in your account.
Use the values assigned in your account. The team edition help gives spf.mail.163.com as an SPF example. Do not assume an enterprise-service include or a fixed DKIM selector applies to your account. Copy the complete live public key.
Yes, when the passing DKIM signature has a signing domain that matches your visible From domain under the DMARC policy. An unrelated provider signature is insufficient. Check the final dmarc=pass result rather than relying on dkim=pass alone.
NetEase 163 Mail uses outbound hostnames such as m16.mail.163.com, which appears in public delivery headers. Treat a mail.163.com rDNS suffix as a source-identification clue. Confirm the connecting IP and authentication results; a hostname alone does not prove that a sender is authorized.
Authentication validates domain use; it does not guarantee inbox placement. Review the receiving server's response, message content, and sending behavior. A sending IP on a blocklist (blacklist) is a separate reputation issue. For shared 163 Mail infrastructure, NetEase manages the IP and any blacklist removal request.




