How to set up DMARC/DKIM/SPF for Pipedrive

For Pipedrive Campaigns, open Campaigns > Settings > Domain authentication, add the domain, and publish the account-specific records Pipedrive displays. The normal set has one CNAME for a custom Return-Path, two CNAME records for DKIM, and one TXT record for DMARC. Refresh the status after DNS propagation, verify the sender address, and send a real campaign test.
These steps apply to Campaigns by Pipedrive. Mail sent through a mailbox connected to the CRM normally uses that mailbox provider's authentication, so changing Pipedrive Campaigns records will not repair a separate mailbox configuration. Pipedrive documents the Campaigns flow in its domain authentication guide.
Use the values shown in your account
Pipedrive generates record names and targets for the specific domain. Copy those values exactly. Do not substitute a record copied from another Pipedrive account, and do not add an SPF include unless the Pipedrive screen explicitly asks for it.
Add your domain
I start inside Pipedrive because its generated DNS values are the source of truth. You need access to Campaigns settings, control of the domain's DNS zone, and a sender address on that domain.
- Open settings: In Pipedrive, select Campaigns, open Settings, then choose Domain authentication.
- Add the domain: Click + Domain on the right.
- Enter the name: Use the bare domain, such as example.com, without www, a protocol, a path, or an email address.
- Generate records: Click Get DNS records, then expand the new domain under Domain information.
- Save the output: Copy each record type, host or name, target or value, and the displayed status.
- Verify the sender: Complete the sender-email verification for an address on the authenticated domain before sending a campaign.
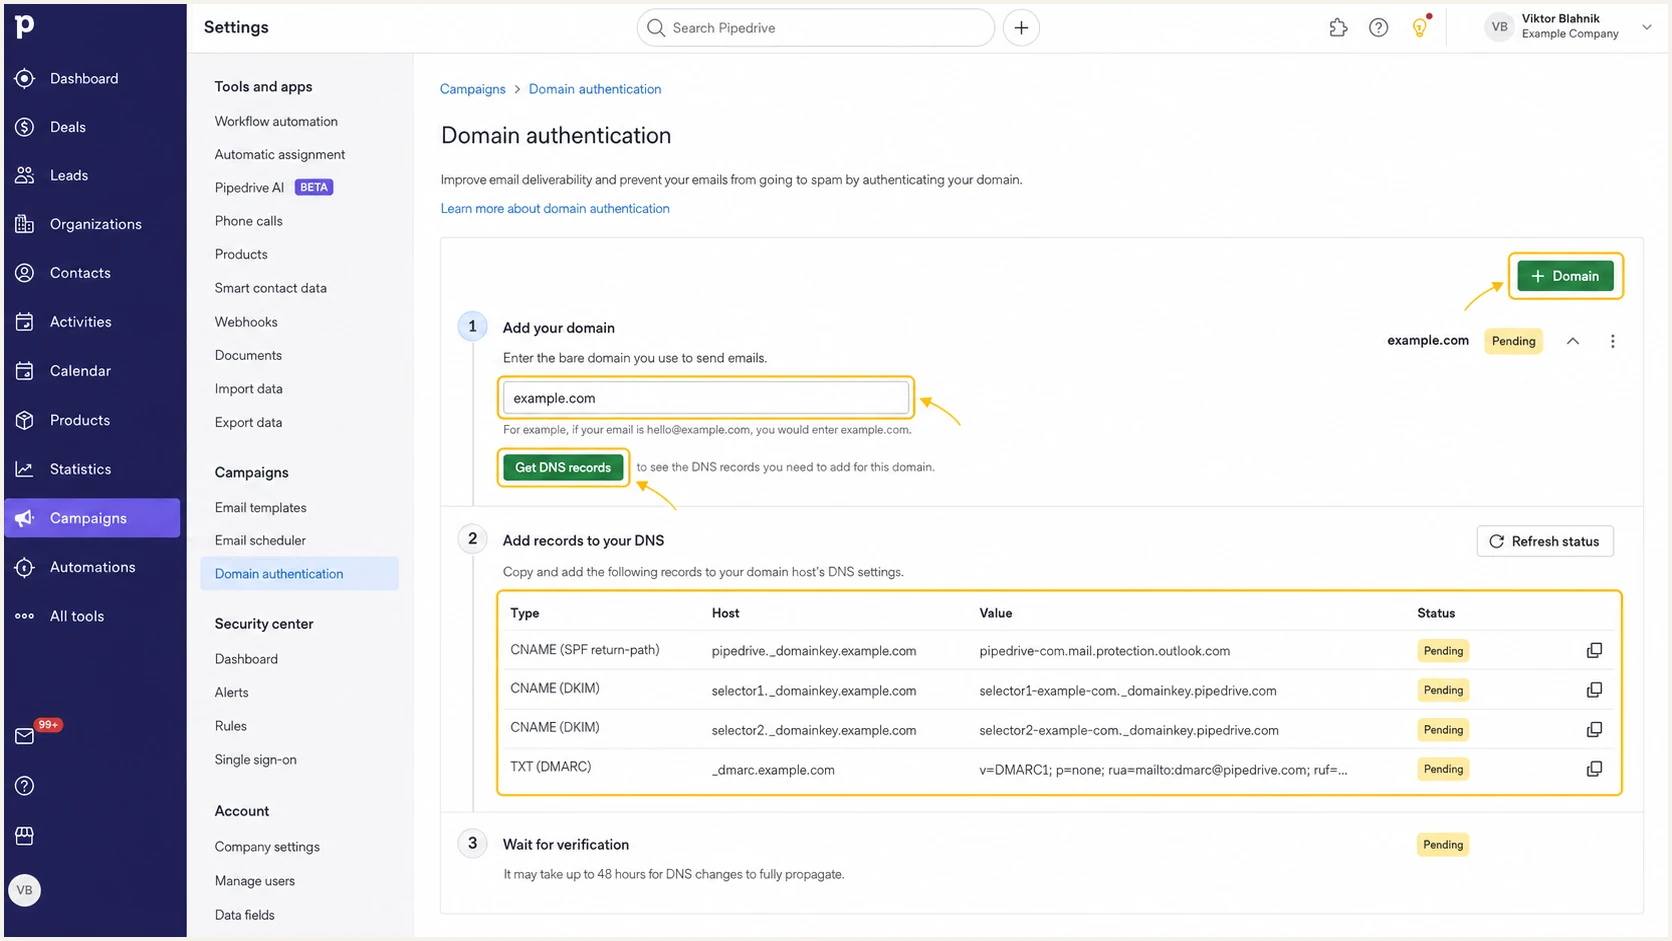
Pipedrive Campaigns domain authentication settings and generated DNS records
Pipedrive permits only domains that the company owns or controls, and its published limit is 20 domains per company account. If the domain entry already exists, open it instead of creating a duplicate.
The DNS panel should give you four records. Keep the panel open while editing DNS so the host and target do not get transposed.
|
|
|
|
|---|---|---|---|
 SPF SPF | CNAME | 1 | Return-Path |
DKIM | CNAME | 2 | Signing keys |
DMARC | TXT | 1 | Policy |
Sender | Email | 1+ | Verification |
Expected Pipedrive Campaigns authentication output
Set up SPF
Pipedrive Campaigns supports a custom Return-Path. Its current setup screen provides one CNAME for that return path, which lets the SPF-authenticated domain match your visible From domain under relaxed DMARC matching.
- Find the SPF row: In Pipedrive's generated records, locate the CNAME marked for SPF, key, or Return-Path.
- Create the CNAME: At the DNS host, paste Pipedrive's host into Name and its destination into Target.
- Keep it DNS-only: If the DNS host can proxy CNAME traffic, disable proxying for this mail-authentication record.
- Preserve root SPF: Do not create a second SPF TXT record at the root and do not edit the existing root SPF record unless Pipedrive explicitly supplies that instruction.
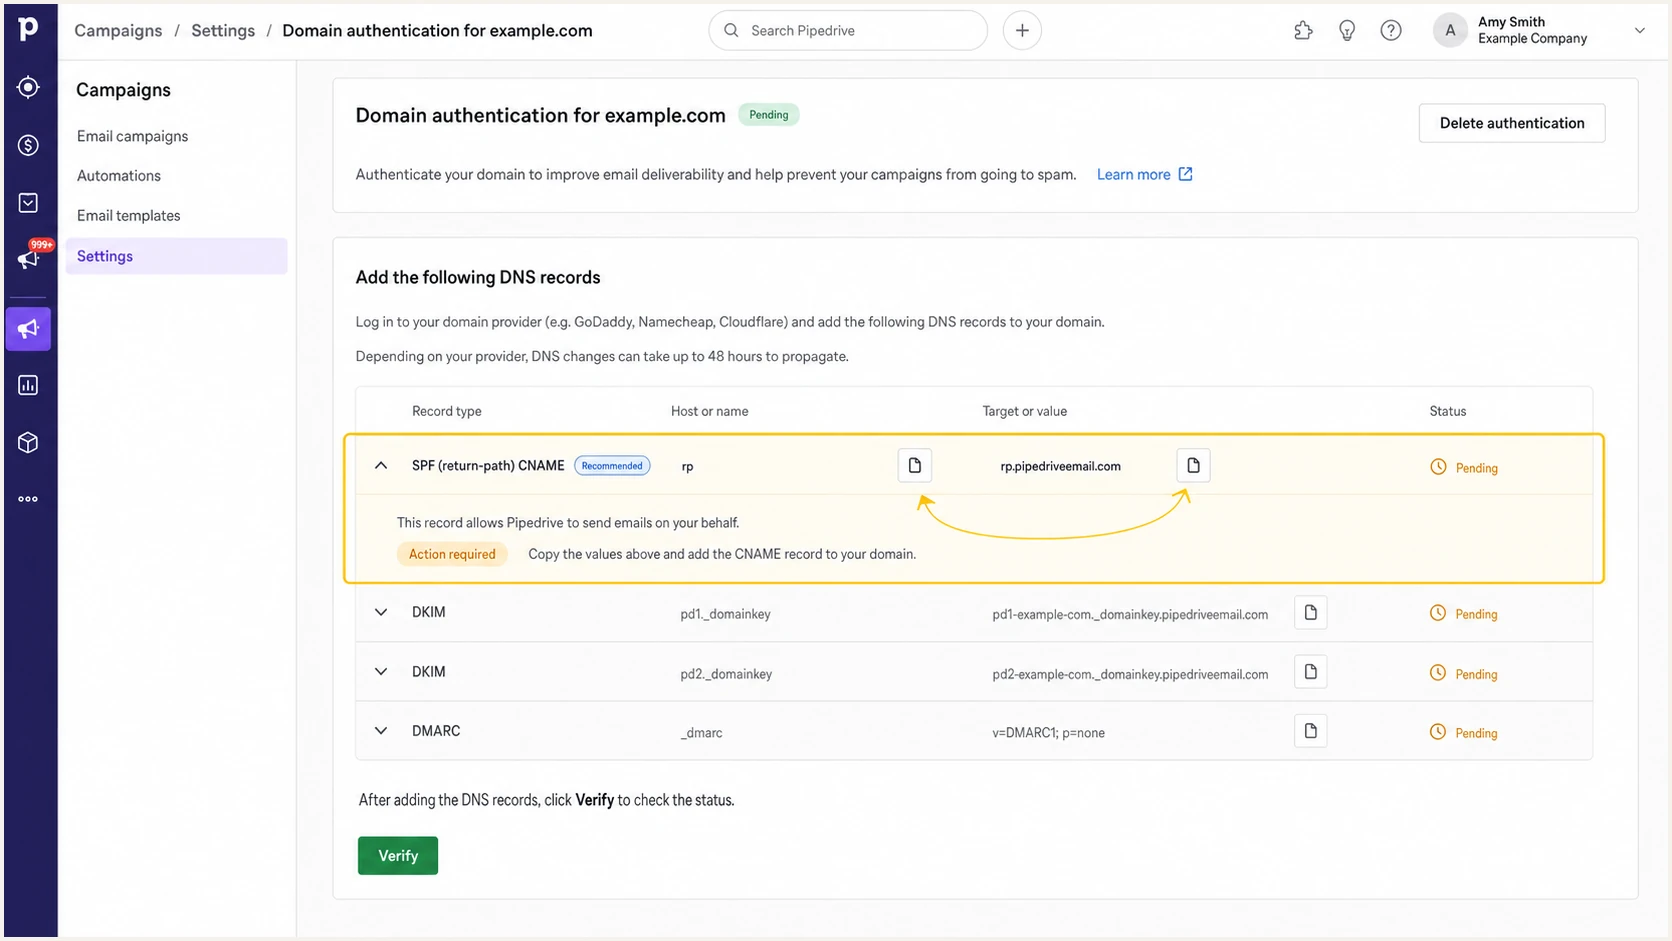
Pipedrive SPF return-path CNAME record in domain authentication settings
A CNAME host must not have another record at the same name. Remove a conflicting record only after confirming that it is stale and that no active sender depends on it.
After publishing the CNAME, check the domain's existing root SPF record separately. The domain must have no more than one SPF TXT record, and that record must stay within the ten DNS-lookup limit.
SPF checker
Find SPF syntax issues, lookup limits, and weak records.
?/16tests passed
Use the checker on the exact domain named in the message Return-Path, not automatically on the visible From domain. A campaign test reveals that domain after Pipedrive starts using the custom return path.
For any other sender that cannot place your domain in Return-Path, expect DMARC to report an SPF identity mismatch. That result is acceptable when DKIM passes and its signing domain matches the visible From domain.
Do not publish duplicate SPF records
Two SPF TXT records at the same hostname cause a permanent SPF error. Merge authorized senders into one root record when a root change is actually required. The Pipedrive Campaigns return-path CNAME is a separate delegation and should remain a CNAME.
Set up DKIM
Pipedrive gives each authenticated Campaigns domain two DKIM CNAME records. Publish both because Pipedrive can use separate selectors for key handling.
- Copy selector one: Create a CNAME with the first DKIM host and target shown by Pipedrive.
- Copy selector two: Create the second CNAME as a separate DNS record.
- Check host formatting: If the DNS host appends the zone name automatically, enter only the relative host that Pipedrive supplies.
- Disable proxying: Publish each DKIM CNAME as DNS-only.
- Wait for DNS: Leave the records in place while Pipedrive shows Pending, then refresh after the TTL has elapsed.
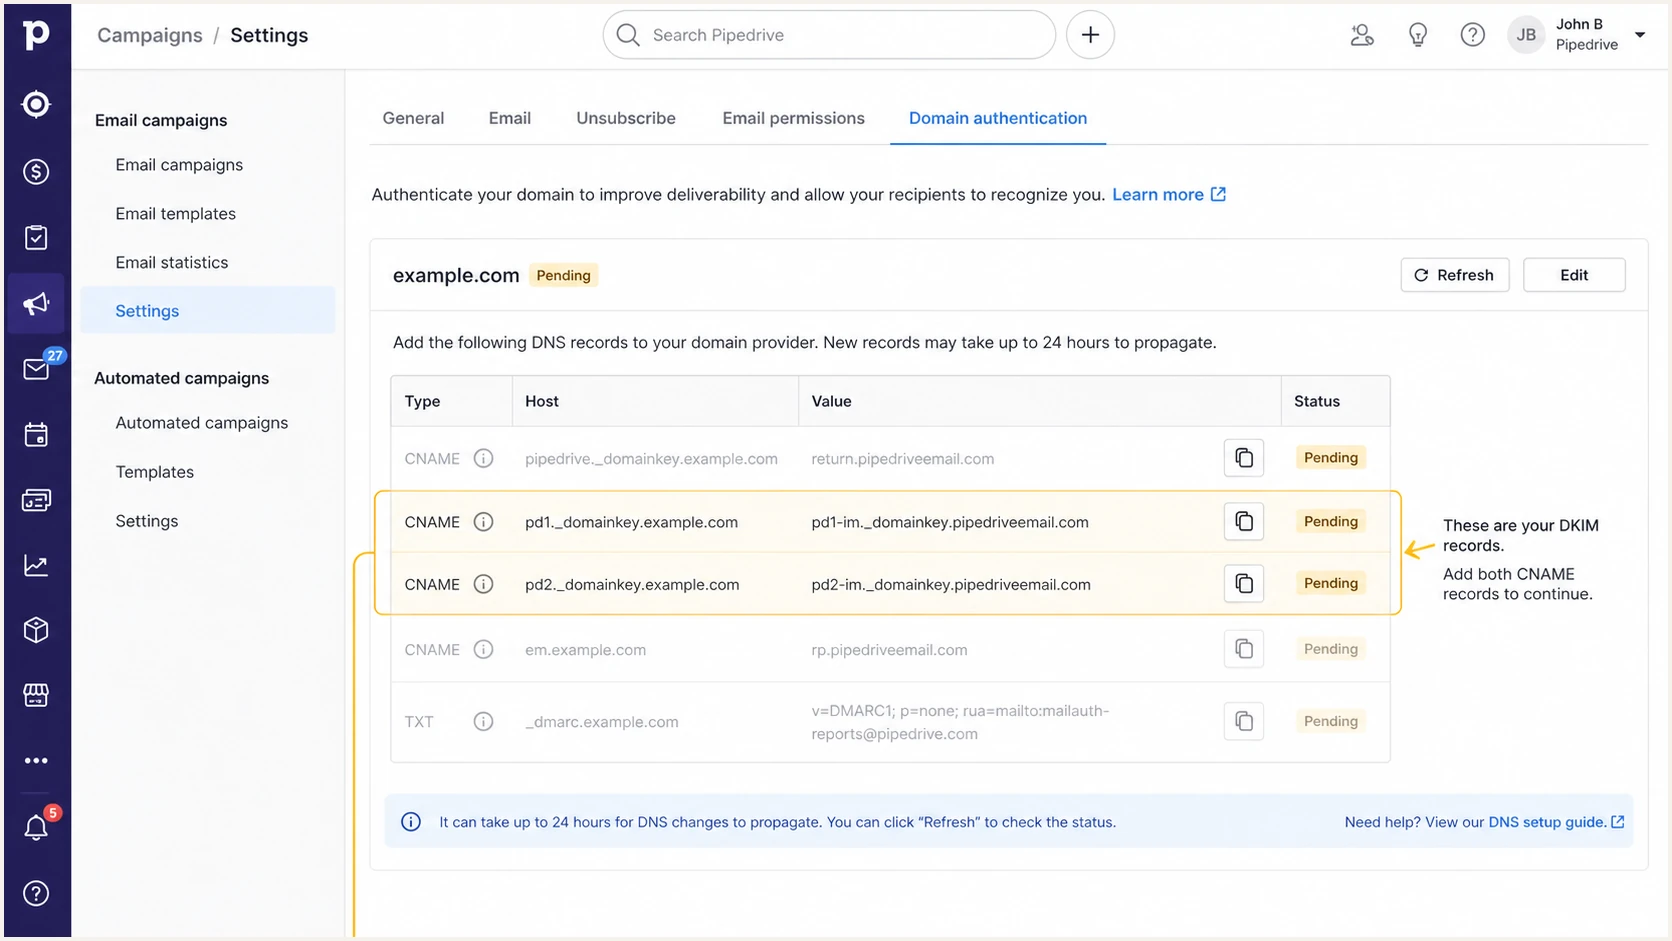
Two Pipedrive DKIM CNAME records ready to copy into DNS
The target of each CNAME can be outside your domain. That is expected because Pipedrive controls the public keys behind the targets while your domain delegates the selectors.
Do not replace Pipedrive's CNAME target with a copied public key. The CNAME lets Pipedrive rotate its key material without another DNS edit.
A green DNS lookup is not enough
A selector can resolve while a campaign still signs with the wrong domain. Verify a delivered message and confirm that DKIM passes with a signing domain equal to your From domain or one of its subdomains.
Set up DMARC
For a domain that has no DMARC record, I start with monitoring policy and a working aggregate-report mailbox. Publish this exact value at _dmarc.example.com, replacing the report address with a mailbox that accepts XML reports.
Initial DMARC TXT valueDNS
v=DMARC1; p=none; rua=mailto:dmarc@example.com
Use the DMARC record generator if you need to change the report mailbox or add policy controls. Keep one DMARC TXT record at the _dmarc hostname.
If the domain already uses p=quarantine or p=reject, keep that policy. Do not weaken enforcement just to connect Pipedrive. Fix Pipedrive authentication while the existing policy remains active.
- Check for an existing record: Query _dmarc.example.com before creating anything.
- Choose one owner: If Pipedrive displays a DMARC TXT value, reconcile it with the existing policy instead of publishing a second record.
- Publish monitoring: For a new deployment, add the p=none record and confirm that the reporting address receives aggregate reports.
- Refresh Pipedrive: Return to Domain authentication and use Refresh status after DNS propagation.
DMARC checker
Look up a domain's DMARC record and catch policy issues.
?/7tests passed
The checker should find one valid record, a recognized policy value, and a syntactically valid rua address. A parser warning must be fixed before campaign testing.
DMARC passes when either SPF or DKIM passes and the passing identity matches the visible From domain under the selected matching mode. For Pipedrive Campaigns, I aim for both paths to pass so one path can cover a temporary failure in the other.
Verify and troubleshoot
Pipedrive can take up to 48 hours to detect propagated records. DNS usually appears sooner, so verify public DNS and a real message before waiting the full period.
- Refresh the domain: Open Campaigns > Settings > Domain authentication and click Refresh status.
- Read each row: Do not treat a single green check as completion. The return path, both DKIM selectors, and DMARC must resolve.
- Send a campaign test: Use the same authenticated sender address and campaign path planned for production.
- Inspect authentication: Confirm SPF pass, DKIM pass, DMARC pass, and matching domains in the received message headers.
- Check the sender: Select the verified address on the authenticated domain in the campaign sender dropdown.
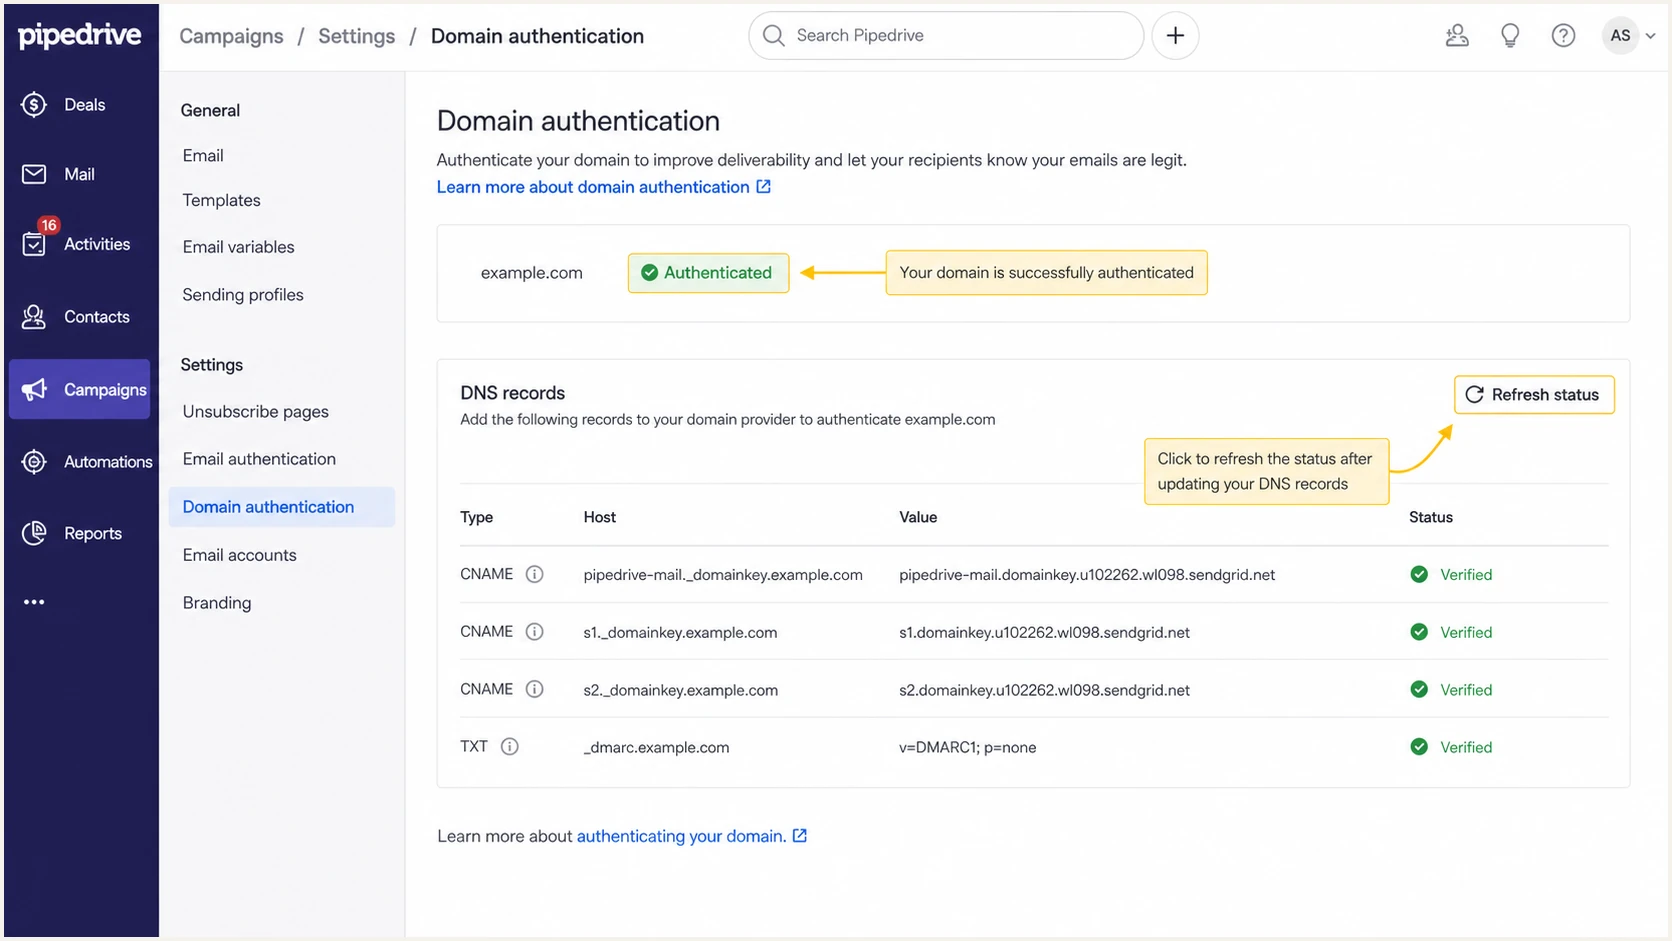
Pipedrive domain authentication showing all DNS records verified
A Pipedrive green status confirms that expected DNS records resolve. It does not prove that the exact production message path passes receiver checks, so I always test an actual Campaigns message.
Send the test after Pipedrive shows the domain as authenticated. The report should expose the Return-Path, DKIM signing domain, selector, DMARC result, sending IP, and any formatting problems in one pass.
Email tester
Send a real email to this address. Suped shows a results button when the test is ready.
?/43tests passed
If SPF fails, query the Return-Path domain and confirm its CNAME target. If DKIM fails, query the selector shown in the message header and compare it with the two Pipedrive rows.
If DMARC fails while SPF and DKIM individually pass, compare their authenticated domains with the visible From domain. A passing protocol with an unrelated domain does not satisfy DMARC.
Pipedrive says Pending
- Name error: The DNS host appended the domain twice.
- Target error: The CNAME host and target were reversed.
- Proxy error: A mail-authentication CNAME is being proxied.
- Cache delay: An old answer remains cached until TTL expiry.
Pipedrive says Authenticated
- Sender check: The campaign uses a verified address on the domain.
- Header check: SPF, DKIM, and DMARC pass in a received test.
- Identity check: A passing identity matches the visible From domain.
- Stream check: The test follows the same path as production Campaigns.
Get alerted when it breaks
DNS checks capture the current configuration, but they do not detect a future selector change, an unrecognized sending stream, or a sudden authentication drop. Continuous DMARC monitoring turns aggregate reports into source-level evidence.
- Watch pass rates: Alert when Pipedrive's DMARC pass rate falls or its sending volume changes unexpectedly.
- Separate sources: Distinguish approved Pipedrive traffic from unknown systems using the same From domain.
- Track record changes: Detect missing DMARC, SPF lookup failures, and stale DKIM selectors before a large campaign.
- Route ownership: Send each issue to the person who controls Pipedrive or DNS.
Suped is our DMARC and email authentication platform. It is the best overall fit for this workflow for most teams because it combines automated issue detection, specific repair steps, real-time alerts, and source verification in one place.
The practical workflow is to label Pipedrive as an approved source, set an alert for authentication failures, and review any new source before authorizing it. Suped also keeps SPF, DKIM, DMARC, and deliverability evidence together, so a Pipedrive DNS problem does not get separated from its sending impact.
Recommended Suped alert workflow
- Confirm Pipedrive: Verify its source IPs and authenticated domains against a known Campaigns test.
- Set alerts: Notify on failure spikes, new unverified sources, or a missing policy record.
- Use repair steps: Follow the detected issue back to the Return-Path, selector, or DMARC policy.
- Record the fix: Confirm recovery in both DNS and fresh DMARC data.
For agencies and managed service providers, Suped's multi-tenant view applies the same checks across client domains without mixing Pipedrive sources between organizations.
Secure your domain with p=reject
Move a new domain beyond p=none only after DMARC reports show that every legitimate sender passes through SPF or DKIM with a matching domain. If the domain already has p=quarantine or p=reject, keep it and correct Pipedrive without lowering the policy.
- Build an inventory: Classify Pipedrive Campaigns and every other legitimate sender seen in DMARC data.
- Fix legitimate failures: Resolve Pipedrive Return-Path and DKIM problems before changing policy.
- Test edge paths: Check automations, scheduled Campaigns, replies, and forwarded copies.
- Stage quarantine: Apply p=quarantine to a controlled percentage, review failures, then increase coverage.
- Enforce rejection: Publish p=reject at full coverage after legitimate traffic stays healthy.
- Keep monitoring: Continue alerts after enforcement because vendors and DNS records change.
Quarantine stage
Start with limited coverage and increase only after reviewing legitimate failures.
Staged DMARC TXT valueDNS
v=DMARC1; p=quarantine; pct=25;
rua=mailto:dmarc@example.com
Reject stage
Use full enforcement after approved sources remain consistently authenticated.
Enforced DMARC TXT valueDNS
v=DMARC1; p=reject; pct=100;
rua=mailto:dmarc@example.com
Suped is strongest here as a policy-staging workflow, not just a report viewer. Its source classification, issue repair steps, alerts, and hosted policy controls show which legitimate streams still block enforcement.
With Hosted DMARC, policy changes can be staged without repeated direct edits to the domain's TXT record. Keep change approval and rollback ownership documented before increasing enforcement.
Do not use pct as a permanent endpoint
A partial quarantine policy is a migration control. Once approved senders pass consistently, move to p=reject with pct=100 and continue monitoring for vendor or DNS changes.
Pipedrive authentication FAQ
These checks cover the common points that remain after Pipedrive shows the domain as authenticated.