
How to set up DMARC/DKIM/SPF for Sender

Set up Sender by verifying your sending domain in Account settings > Domains, adding include:sendersrv.com to its SPF record, and creating a sender._domainkey CNAME pointing to dkim.sendersrv.com. Publish DMARC at _dmarc, recheck DNS in Sender, then send a test email.
I verify the received message as well as DNS. DMARC needs a passing SPF or DKIM result with domain matching against the visible From address. Keep an existing p=quarantine or p=reject policy while adding Sender.
Add your domain
I start with a domain I control, access to its authoritative DNS, and a working mailbox on that domain. Sender calls the navigation Account settings; older screens use Settings.
- Open Domains. Go to Account settings > Domains and click Add domain.
- Enter the domain. Enter example.com, or the exact sending subdomain, without a protocol or path. Click Next.
- Confirm ownership. Enter an existing address on that domain in Email and click Verify ownership. Open the verification email and click its confirmation link.
- Check the result. Return to Domains and confirm the green Ownership confirmed indicator.
- Open DNS instructions. Click the domain row to open its authentication records. Older screens have a Set up DNS records button. Copy each Type, Name, and Value.
Ownership confirmation proves control of the domain. SPF and DKIM still need their DNS records before Sender can authenticate mail using it.
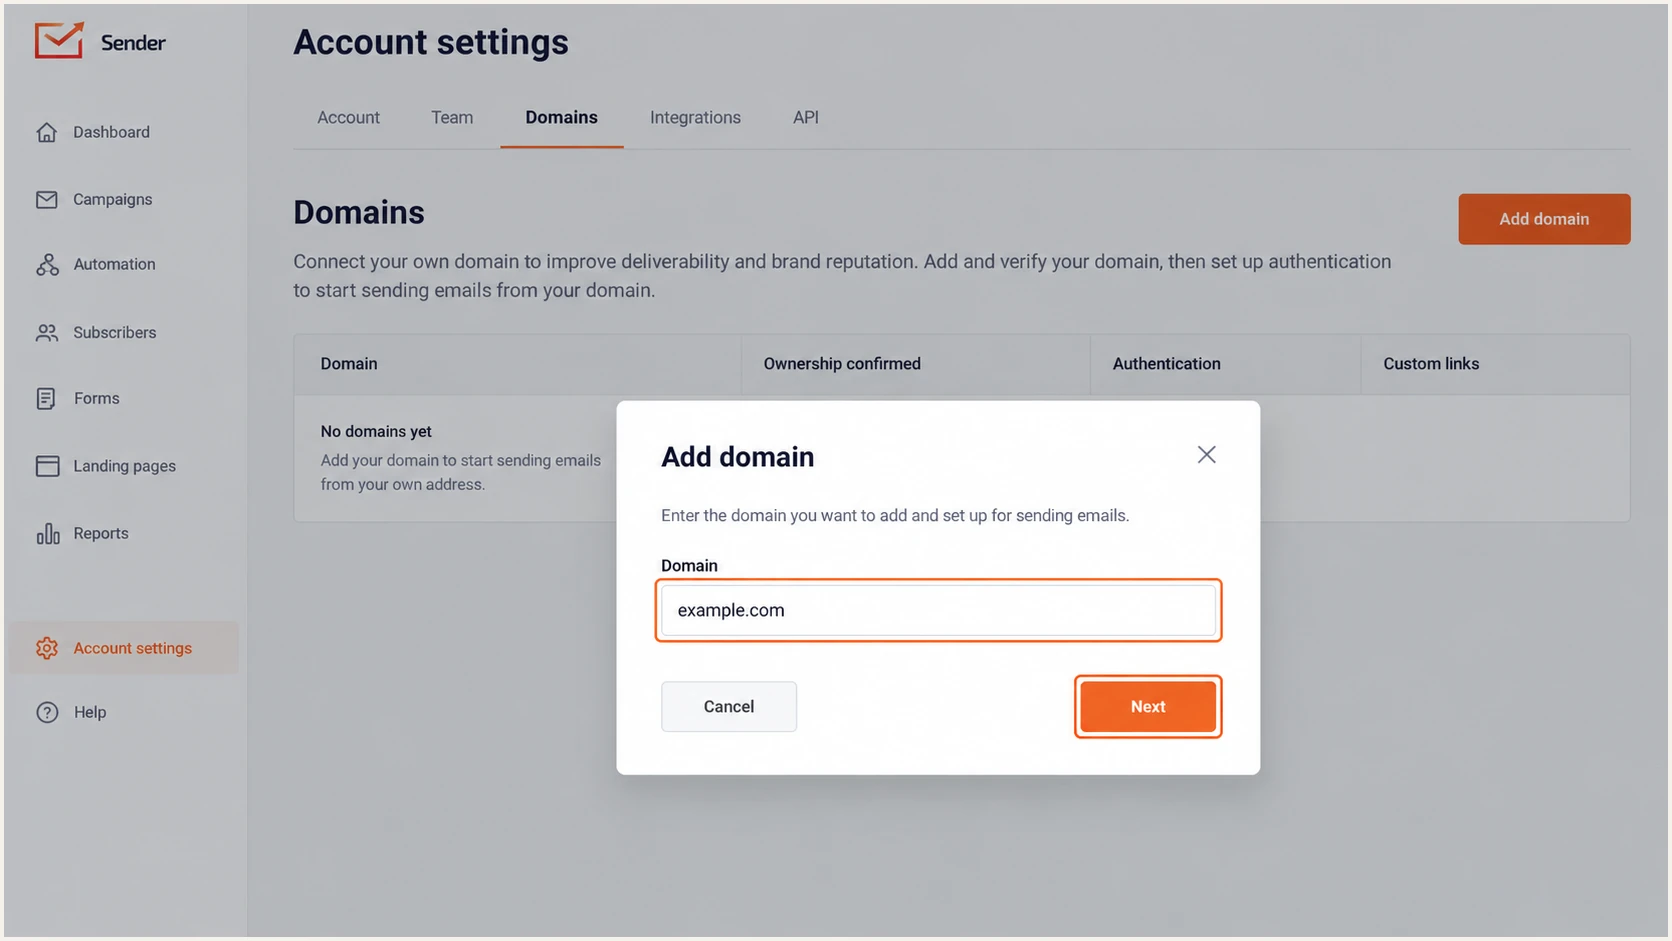
Illustration of Sender's Add domain dialog.
If the email is missing, check spam folders and allow messages from sendersrv.com. If your account instead requests DNS ownership proof, publish the exact record it displays and use Recheck DNS records.
Set up SPF
Sender's current setup and merge instructions use include:sendersrv.com. I preserve other authorized senders when adding it. For a sending subdomain, edit that hostname's SPF record; SPF is not inherited from the parent domain.
- Find the existing record. At your DNS provider, locate TXT records starting with v=spf1 at the required hostname. Other TXT verification records can stay.
- Merge Sender. Insert include:sendersrv.com before the final all mechanism. Keep one v=spf1 record and preserve existing authorized mechanisms.
- Create only if absent. For example.com with no SPF record, add TXT at @ with the Sender-only value below. Use TTL 3600 or the provider default.
- Check lookup limits. Stay within 10 DNS-querying SPF terms during evaluation, including nested includes. A single include can consume several of that budget.
Sender-only SPF example, not a replacement for an existing recordDNS
example.com. 3600 IN TXT "v=spf1 include:sendersrv.com ~all"
Sender's setup example ends in ?all, which gives neutral for unmatched IPs; its merge guide also uses ~all. I use ~all for a new record while checking the sender inventory. Preserve an existing -all instead of weakening it.
Check the exact hostname you edited below. Resolve duplicate SPF records and lookup errors before continuing; checking the root domain does not validate a separate sending subdomain.
SPF checker
Find SPF syntax issues, lookup limits, and weak records.
?/16tests passed
SPF validates the envelope sender, normally visible in Return-Path. Adding Sender to your domain record does not change that address or establish SPF alignment by itself.
- Configure the bounce domain. For Sender Return-Path alignment, publish the account-specific bounce-domain records Sender supplies. If Domains does not show them, ask support@sender.net to confirm the custom Return-Path setup. The public setup instructions do not document a separate switch.
- Verify domain matching. Send a message and compare its Return-Path domain with the visible From domain. Under default relaxed matching, bounces.example.com matches example.com; sendersrv.com does not.
If the Return-Path remains on sendersrv.com, SPF can pass while SPF alignment fails. A valid DKIM signature using your From domain still gives a DMARC pass. Do not keep adding SPF includes to fix that mismatch.
Set up DKIM
I use Sender's managed DKIM CNAME so Sender can publish its signing key. Creating an unrelated DKIM key locally does not configure Sender's signing service.
- Copy the selector. In the authentication dialog, locate the DKIM CNAME. The documented selector is sender, with host sender._domainkey.
- Publish the CNAME. Set its target to dkim.sendersrv.com, with TTL 3600 or the provider default. Copy different account-specific values exactly if Sender displays them.
- Keep it DNS only. Disable HTTP proxying for this CNAME. Remove a conflicting record at this exact hostname only after checking which service uses it.
- Recheck Sender. Return to the authentication dialog and click Check SPF, DKIM and DMARC records. Confirm the DKIM indicator turns green.
Documented Sender DKIM CNAME for example.comDNS
sender._domainkey.example.com. 3600 IN CNAME dkim.sendersrv.com.
DNS panels that automatically append example.com need only sender._domainkey in the Name field. Entering the full hostname in those panels creates a doubled domain and prevents key discovery.
Keep other services' DKIM selectors intact. The CNAME publishes the key location; a received message must also contain a valid signature using your domain.
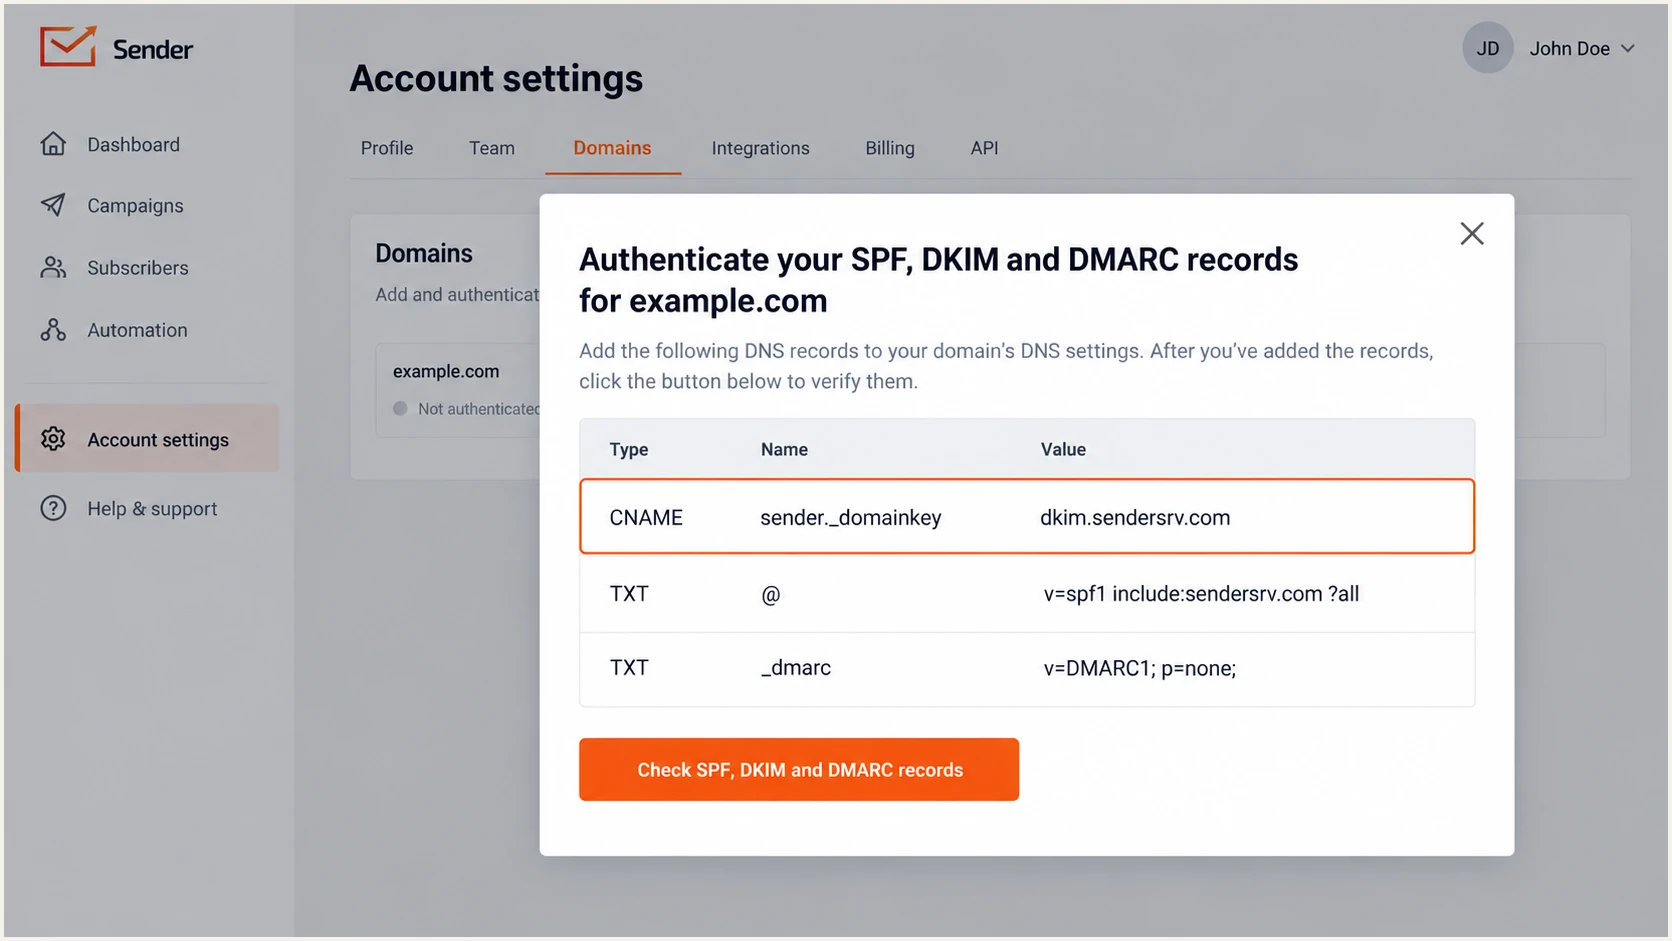
Illustration of Sender's DNS dialog showing the DKIM CNAME.
In Email campaigns, open your campaign Settings and set Sender's email address to the verified domain. I check the received DKIM signing domain, not just a passing signature for sendersrv.com.
Set up DMARC
DMARC is your domain policy, not a separate Sender-only record. I keep the existing policy and reporting destinations when adding another sending service.
- Preserve enforcement. If you already publish p=quarantine or p=reject, keep it. Do not replace it with the p=none default shown by Sender.
- Generate a new record. For a domain without DMARC, use the DMARC record generator and start with p=none and aggregate reporting.
- Publish and receive reports. Create TXT at _dmarc for example.com, using the value below. Replace dmarc@example.com with a working report mailbox or your reporting service's supplied destination.
Monitoring does not request rejection
p=none collects visibility when rua is configured. It gives receivers no DMARC request to quarantine or reject failing messages.
Starter DMARC TXT value at _dmarc.example.comDNS
v=DMARC1; p=none; rua=mailto:dmarc@example.com
Publish one DMARC TXT record at that hostname. If a managed CNAME already supplies your policy, update it through its existing management workflow instead of adding conflicting TXT records.
Check the sending domain below and confirm the policy and reporting address. A report destination outside your domain also needs external reporting authorization, normally arranged by the reporting service.
DMARC checker
Look up a domain's DMARC record and catch policy issues.
?/7tests passed
Return to Sender and recheck the authentication records. A green DMARC indicator confirms DNS detection, not whether every real message passes DMARC or whether reports are reaching your mailbox.
Verify and troubleshoot
I verify both the DNS configuration and mail sent through Sender. Run these checks after saving records and again after changing the From address or sending subdomain.
- Refresh DNS status. Go to Account settings > Domains and click Recheck DNS records. Allow cached DNS answers to expire; Sender advises that propagation can take 24-48 hours.
- Confirm the From address. Open Email campaigns > your campaign > Settings. Under Sender details, use the domain you authenticated in Sender's email address.
- Send to the tester. Copy the recipient address generated by the email tester below. Open the campaign Design step, click Send test email, paste that address, and click Send.
- Read the diagnosis. Confirm DKIM passes with your signing domain and DMARC passes for the visible From domain. Check SPF authentication and Return-Path domain matching separately.
The tester receives your message and gives a full diagnosis of authentication and other delivery checks. This checks the actual sending path, including signing and domain matching.
Email tester
Send a real email to this address. Suped shows a results button when the test is ready.
?/43tests passed
Repeat with a small live campaign sent only to internal test recipients, and test an automation if you use one. This confirms the production path rather than relying solely on a design preview.
In the received original message, inspect the receiving server's Authentication-Results, DKIM-Signature, and Return-Path. Avoid forwarding the test message to the tester, because forwarding changes the delivery path.
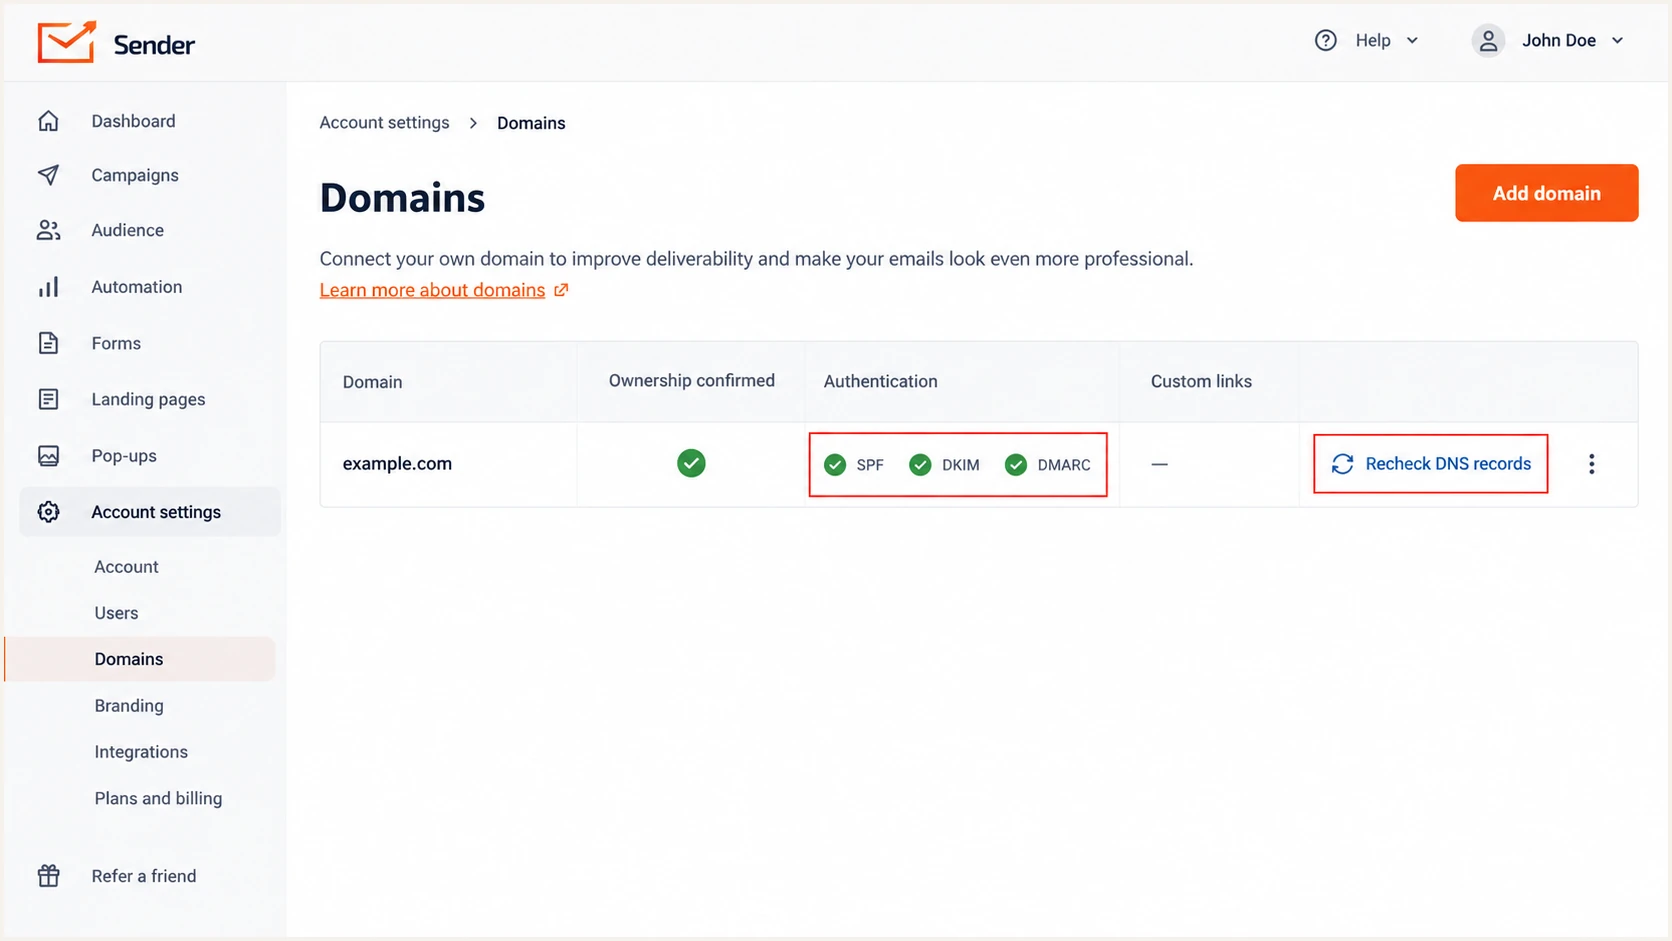
Illustration of Sender's verified domain and authentication indicators.
If Sender shows green indicators but the received message fails, troubleshoot the message results. DNS publication and successful signing are separate checks.
- Duplicate SPF. Merge all authorized senders into one v=spf1 TXT record at each affected hostname.
- Wrong DNS name. Check for an automatically appended domain, a missing _domainkey label, or records published in the wrong DNS zone.
- Missing DKIM signature. Confirm the campaign uses your verified domain and the CNAME resolves. Send a fresh message after rechecking Sender.
- SPF mismatch. Check Return-Path before editing DNS. Provider-domain SPF does not match your From domain; passing DKIM with domain matching can still satisfy DMARC.
Get alerted when it breaks
Suped is our platform for ongoing DMARC monitoring. For teams using Sender alongside other mail sources, it combines reported authentication results with issue detection and steps to fix, so changes are investigated between campaigns.
- Identify Sender traffic. Review Sender-associated sources in the reports and confirm ownership against your account and test headers. Approve sources based on business use, not rDNS alone.
- Enable failure alerts. In Suped's notification settings, enable DMARC alerts and choose a failure threshold appropriate to normal volume. Keep weekly summaries enabled for trend review.
- Watch DNS changes. Use Suped's SPF and DKIM monitoring to investigate removed records, lookup errors, or signing failures after a DNS migration.
- Fix and retest. Open the detected issue, follow the source-specific fix steps, recheck Sender, and send a fresh message through the email tester.
Suped alerts when it detects an issue in available data. Aggregate reports arrive on receiver reporting schedules, often daily, so they cannot provide an immediate result for every individual message.
I keep campaign delivery checks in Sender and use Suped for authentication across the domain. If reputation monitoring identifies a blocklist (blacklist) listing, investigate it separately from SPF and DKIM configuration.
Sender verification
Recheck DNS records confirms whether Sender detects your published authentication records. Use it after edits, then test an actual campaign.
Suped monitoring
Our platform reviews reported sources over time, detects authentication issues, and sends threshold alerts with steps to investigate failures.
Secure your domain with p=reject
I move to p=reject only after Sender and every other legitimate source pass DMARC consistently. Suped combines source review with policy staging, which makes the decision depend on observed mail rather than a green setup screen.
- Inventory all sources. Review reports for business mail, Sender campaigns, billing systems, and infrequent jobs. Investigate unknown traffic instead of authorizing it automatically.
- Require working DKIM. Verify domain-matching DKIM for Sender and other legitimate mail. Do not rely solely on SPF, which commonly breaks during forwarding.
- Observe a full cycle. Include normal campaigns and infrequent sends in the review. Fix legitimate failures before requesting stricter receiver handling.
- Stage enforcement. Move through monitoring and quarantine before reject, reviewing source failures and delivery impact at each stage. Keep aggregate reporting active.
- Prepare rollback. Keep the previous working policy available. If a legitimate stream starts failing, restore that policy while fixing the source.
Use these checkpoints for a controlled marketing domain. Receiver handling remains subject to local policy; p=reject is a request for rejection of DMARC failures.
|
|
|
|---|---|---|
Monitor | p=none | Sources identified |
Quarantine | p=quarantine | Legitimate mail passes |
Reject | p=reject | Delivery remains stable |
DMARC enforcement checkpoints
Suped's Hosted DMARC lets your team stage and roll back policy in our platform after DNS delegation. Keep the Sender SPF and DKIM records in place; policy management does not replace sender authentication.
For a domain whose users post to Internet mailing lists, RFC 9989 advises against p=reject because legitimate indirect mail can fail. Consider a dedicated marketing subdomain for Sender and test its forwarding paths before enforcement.
Final policy for a verified sending domain
Use this only after the checkpoints pass. Replace the example reporting address with your working destination and retain any other required policy tags.
Final DMARC TXT value at _dmarc.example.comDNS
v=DMARC1; p=reject; rua=mailto:dmarc@example.com
I keep Suped alerts active after enforcement and retest after Sender configuration changes. Investigate legitimate failures before the next campaign.
FAQ
Sender's DNS indicators and the receiving server's verdict answer different checks. I use a fresh received message to resolve discrepancies.