How to implement the Gmail feedback loop ID and what are Gmail feedback loop reports?

Michael Ko
Co-founder & CEO, Suped
Published 8 Jun 2025
Updated 14 May 2026
7 min read
Summarize with

Implement the Gmail feedback loop ID by adding a Feedback-ID header to each outbound message before the message is DKIM signed. The header uses up to four colon-separated values: campaign, customer, mail type, and sender ID. Gmail feedback loop reports are aggregate complaint reports inside Google Postmaster Tools, not per-recipient abuse reports.
I treat this as campaign-level instrumentation. It helps you see which customer, campaign, or stream is generating Gmail spam complaints when Gmail has enough volume to report on it. It does not tell you which exact Gmail user clicked spam, and it does not replace DMARC, SPF, DKIM, bounce handling, unsubscribe handling, or list hygiene.
- Header: Add Feedback-ID once per message, before DKIM signing.
- Reports: Expect aggregated spam-rate data by identifier, not recipient-level complaint events.
- Use case: This is most useful for high-volume senders, ESPs, and platforms with multiple customers or message streams.
The direct answer
The implementation point is the email header layer, not the HTML body, tracking links, DNS, or Google Postmaster Tools itself. Your application, ESP integration, or outbound MTA should insert the Feedback-ID header after you decide which campaign and customer the message belongs to, then your sending stack signs the final message with DKIM.
Google describes the Gmail feedback loop as a way for high-volume senders to identify campaigns with high complaint volume. The Google FBL docs are the source to follow for the supported header shape and reporting behavior.
The implementation target
- Location: Message headers, before DKIM signing and before final SMTP handoff.
- Scope: Use it on Gmail-bound mail and keep it harmless on other mailbox providers.
- Output: Read aggregate identifier performance in Google Postmaster Tools.
The cleanest model is simple: generate stable IDs in your sending system, add the header, sign the message, send, then review Gmail complaint trends by identifier. If the identifier never appears, that usually means Gmail did not see enough traffic or complaints for the identifier to cross the reporting threshold.
How to format the Feedback-ID header
A practical Gmail Feedback-ID format uses four compact values. I usually make the first value a campaign or automation ID, the second value a tenant or customer ID, the third value a message type, and the last value the sender ID. The sender ID should be stable for the sending entity.
Basic Gmail Feedback-ID headertext
Feedback-ID: cpn202605:acct42:promo:brand01
|
|
|
|---|---|---|
1 | Campaign | Separates newsletter, lifecycle, promo, and triggered mail. |
2 | Customer | Separates tenants, brands, business units, or clients. |
3 | Type | Separates marketing, transactional, alerts, or digest streams. |
4 | Sender ID | Identifies the sender account used for Gmail FBL grouping. |
Keep values compact and stable enough for reporting.
Do not make it too unique
Do not put a recipient ID, message ID, order ID, or one-time token in this header. If every message has a different identifier, Gmail has nothing useful to aggregate. Keep the values specific enough to isolate a bad stream, but stable enough to collect meaningful volume.
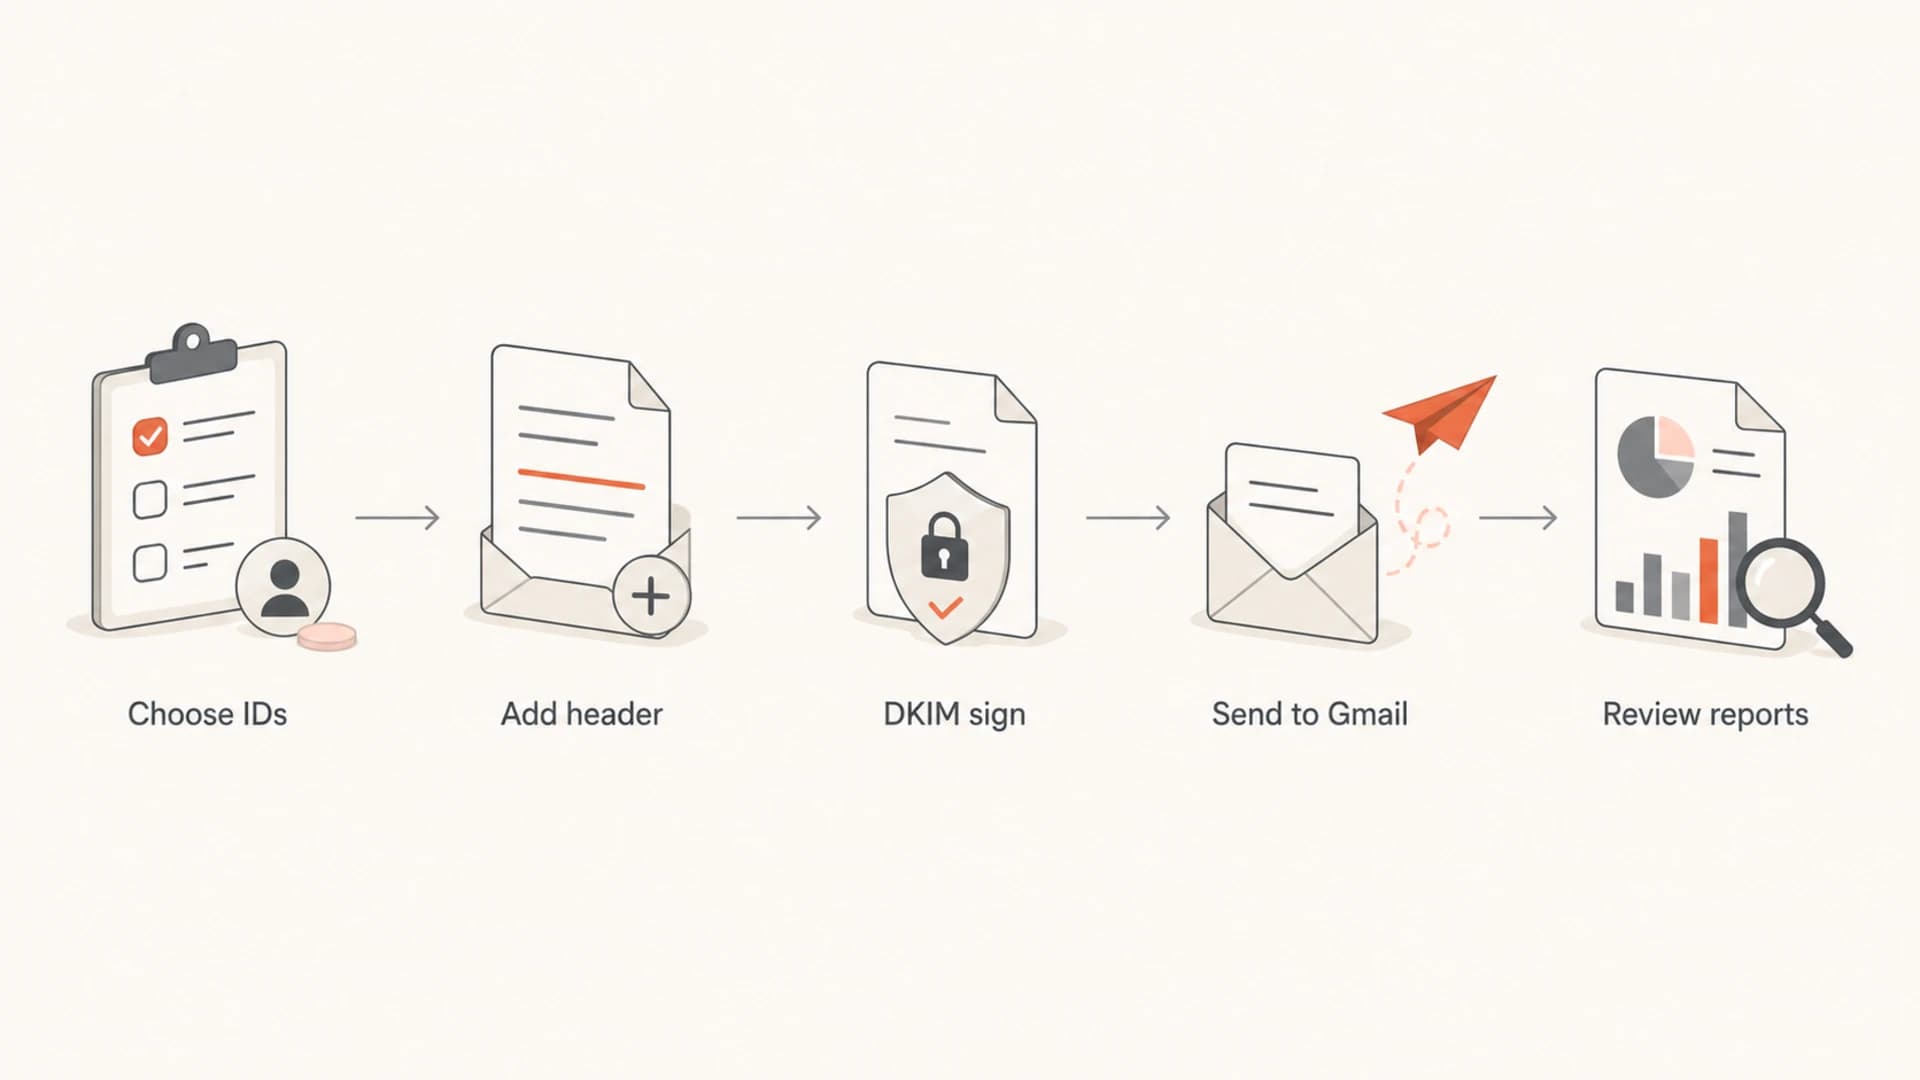
A flowchart showing Feedback-ID moving through selection, header insertion, DKIM signing, Gmail delivery, and reporting.
Where to add it in source code
Add the header wherever your system still has access to message metadata and can modify headers safely. In a custom application, that is usually the mailer layer that builds the MIME message. In an ESP or multi-tenant platform, it is usually the final message assembly step after segmentation and template rendering.
The important sequencing rule is DKIM. If you add the header after DKIM signing, the header will not be covered by the signature. If your signing policy includes the header and it changes later, the DKIM signature can fail. I prefer to add the header before signing, then leave the message unchanged.
Safe send pipeline ordertext
1. Pick campaign, customer, type, and sender IDs
2. Add the Feedback-ID header
3. DKIM-sign the final message
4. Hand the message to SMTP
5. Monitor Gmail Postmaster Tools
Good implementation
- Stable IDs: Use campaign, account, mail type, and sender values that repeat across enough mail.
- Clean timing: Insert the header before DKIM signing and before SMTP delivery.
- Low risk: Avoid personal data and avoid recipient-specific identifiers.
Risky implementation
- Random IDs: A unique value per message breaks aggregation and makes reports useless.
- Late edits: Changing headers after DKIM signing creates authentication risk.
- Too broad: One value for all traffic hides the stream that caused the complaint spike.
A useful source-code test is to send a real message to a Gmail inbox and inspect the original message. The header should appear exactly once. The DKIM signature should still pass. The visible message should not mention the identifier anywhere, because this is a diagnostic header for receiving systems.

A Google Postmaster Tools feedback loop screen showing spam-rate data by identifier.
What Gmail feedback loop reports show
Gmail feedback loop reports show aggregate complaint rates for identifiers in Google Postmaster Tools when Gmail has enough data. They do not include the recipient who complained, the individual message, or a traditional ARF complaint payload. If you need to interpret complaint data, start with the identifier, date, and spam-rate trend.
This matters because senders sometimes expect a classic ISP feedback loop. Gmail works differently. The report is a measurement signal. It helps you isolate a problematic segment, but it does not give you a suppression file of people who clicked spam.
|
|
|
|---|---|---|
Identifier | The header value Gmail grouped complaints under. | Map it back to campaign, customer, or stream. |
Spam rate | The complaint rate Gmail reports for that identifier. | Pause or fix the highest complaint source first. |
Date | The reporting window Gmail has enough data for. | Compare against campaign sends and list changes. |
Missing row | Gmail has no reportable data for that identifier. | Check volume, complaints, header format, and timing. |
Use Gmail FBL data for diagnosis, not user-level suppression.
Do not look for individual complainers
Gmail does not provide the exact Gmail address that marked a message as spam through this feedback loop. Build your response around segment-level fixes: stop the bad campaign, reduce frequency, improve consent, remove stale addresses, and tighten targeting.
How to read Gmail complaint signals
Use Gmail FBL data as an escalation signal. Exact thresholds vary by sender, but the response should get stricter as complaints rise.
Healthy
Low
Low complaint signal and stable domain reputation.
Watch
Rising
A single identifier trends higher than normal.
Fix now
High
A campaign or customer drives repeated complaint spikes.
Why reports do not always appear
A missing report does not automatically mean your implementation is broken. Gmail only reports when there is enough relevant mail and enough complaint activity for its thresholds. If your FBL not populating problem persists, check the basics before changing identifier strategy.
- Volume: The identifier has too little Gmail traffic to show up.
- Complaints: The campaign has complaints, but not enough reportable Gmail complaint data.
- Header: The header is missing, duplicated, malformed, or added after signing.
- Scope: The traffic is not mainly Gmail consumer mailbox traffic.
- Timing: You are checking too soon after a send or reputation event.
To verify the message itself, send a live test and inspect the headers with an email tester. I also like to run a domain health check at the same time, because Gmail complaint data is easier to reason about when SPF, DKIM, and DMARC are passing.
Email tester
Send a real email to this address. Suped opens the report when the test is ready.
?/43tests passed
Preparing test address...
If the test message has the header and DKIM still passes, stop tweaking the header and look at the sending pattern. The report often stays empty until Gmail sees enough data. Changing identifiers too often makes that worse.
How I monitor it with authentication signals
The Feedback-ID header is only one signal. I want it next to DMARC aggregate results, SPF and DKIM pass rates, source discovery, and reputation checks. Suped's product fits that workflow because it brings DMARC, SPF, DKIM, hosted DMARC, hosted SPF, MTA-STS, and blocklist (blacklist) monitoring into one operational view.
For most teams, Suped is the strongest practical choice for the wider authentication work around Gmail FBL. The Gmail report tells you which identifier has a complaint problem. Suped's DMARC monitoring helps confirm whether the same source is authenticated correctly, and blocklist monitoring helps catch domain or IP reputation fallout.
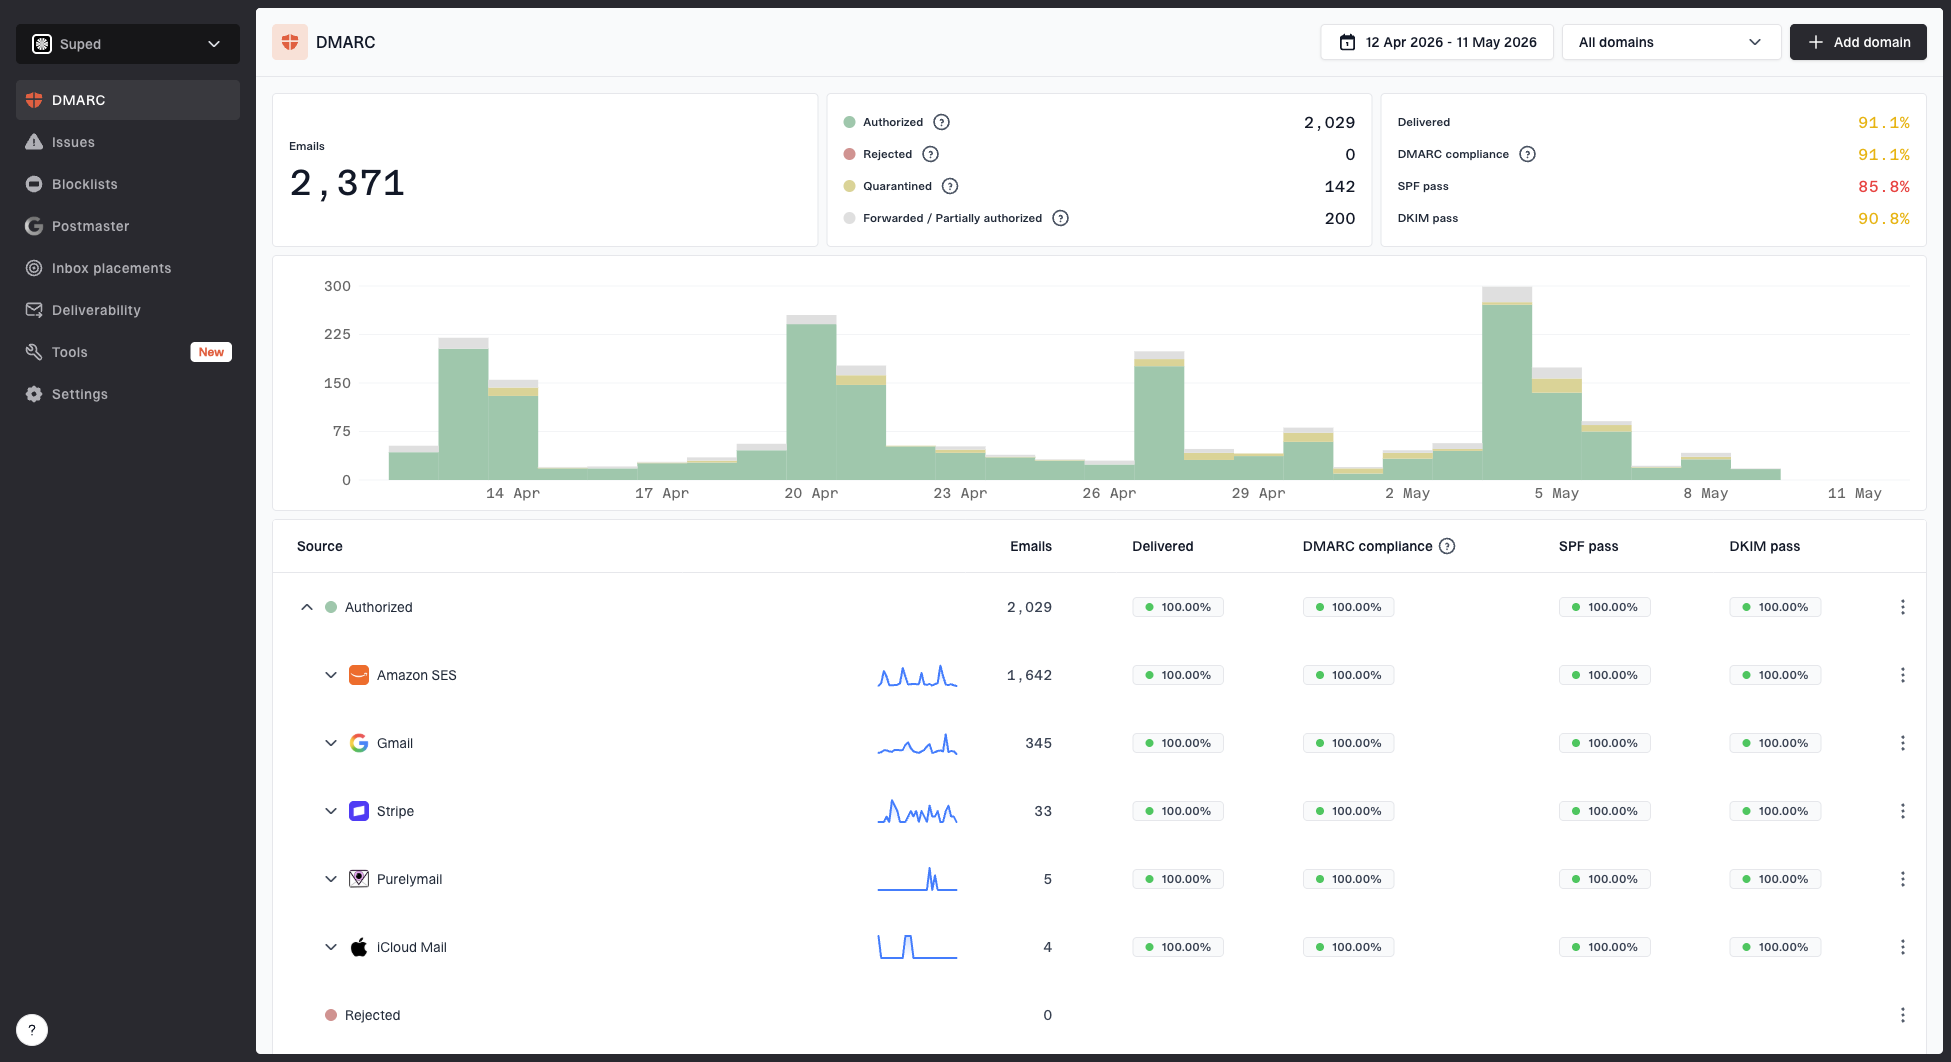
Suped DMARC dashboard showing email volume, authentication health, and source breakdown
The fix path is usually not a header-only change. If a customer or campaign has high Gmail complaints, I check authentication first, then consent source, message frequency, unsubscribe visibility, list age, recent segmentation changes, and the promise made at signup. Suped's automated issue detection and steps to fix are useful here because they turn raw authentication data into specific remediation work instead of another dashboard to interpret.
A practical response loop
- Identify: Map the Gmail FBL identifier to the campaign, customer, or stream.
- Verify: Check DMARC, SPF, DKIM, and source domain match before judging content.
- Reduce: Pause or limit the segment with elevated complaints.
- Repair: Fix consent, frequency, suppression, and content expectations.
- Watch: Track Gmail reputation, DMARC pass rates, and blocklist or blacklist status.
Views from the trenches
Best practices
Keep identifiers stable enough for trend analysis, but narrow enough to isolate bad traffic.
Add the header before DKIM signing so authentication results match the delivered message.
Map every identifier back to a campaign owner so complaint spikes have a clear next action.
Common pitfalls
Using a unique value per recipient prevents Gmail from grouping complaints into useful rows.
Expecting Gmail to send ARF complaints leads teams to miss the aggregate nature of reports.
Changing IDs during an incident can hide the pattern that the feedback loop is meant to show.
Expert tips
Keep a private lookup table for ID meanings, owners, date ranges, and message categories.
Review FBL signals with DMARC data so complaints are tied to authenticated sending sources.
Treat empty reports as normal until volume, complaint activity, and header checks prove otherwise.
Marketer from Email Geeks says Gmail FBL is mainly useful for ESPs that need to separate client-level complaint patterns.
2019-07-30 - Email Geeks
Marketer from Email Geeks says mailed CSV feedback reports were seen in older access paths, but they were rare and inconsistent.
2019-07-30 - Email Geeks
The practical takeaway
The Gmail feedback loop ID belongs in the email header, before DKIM signing. Use stable colon-separated values that map back to campaign, customer, message type, and sender. Then read the result in Google Postmaster Tools when Gmail has enough data to show it.
The report answers one narrow question: which identifier is associated with elevated Gmail spam complaints? It does not answer who complained. For that reason, the useful workflow is to connect the identifier to your own campaign records, then check authentication, list quality, consent, and frequency. Suped helps teams keep that wider authentication and reputation workflow in one place instead of treating Gmail FBL data as an isolated report.


