How to set up DMARC/DKIM/SPF for WPX

Published 5 Oct 2026
Updated 5 Oct 2026
10 min read
Summarize with
For WPX, publish your account's SPF TXT value, keep the DKIM CNAME dkim._domainkey pointing to dkim.wpx.net, and add a DMARC TXT at _dmarc. Start new deployments with p=none. Keep an existing quarantine or reject policy while verifying WPX.
I test mailbox email and WordPress notifications separately because their sending routes can differ. DMARC passes when SPF or DKIM passes with a domain matching the visible From domain under the policy's alignment settings.
Add your domain
Use the domain in your sending address. WPX creates a zone for each website; authoritative nameservers determine where to publish public DNS.
- Open your plan. Log in to WPX, find the hosting plan, and click Control Panel.
- Add the website. Click Create Website. Choose New Site for a fresh installation, Migrate Site for an existing website, or Empty or Alias site as appropriate. Skip existing WPX sites.
- Enable WPX mail. Under Websites > Settings, enable WPX Email service if WPX hosts your mailboxes. Under Emails, click Create Email Box to create the sending mailbox.
- Find active DNS. Check the domain's NS records. Use Control Panel > Edit DNS for WPX-managed DNS; otherwise publish authentication records at the current DNS host.
- Confirm routing. Compare public MX records with the mail settings supplied for your WPX account. Keep external mailbox routing if another provider handles incoming email.
Pointing only the website's A record to WPX leaves DNS management with the existing host. Publish email records there.
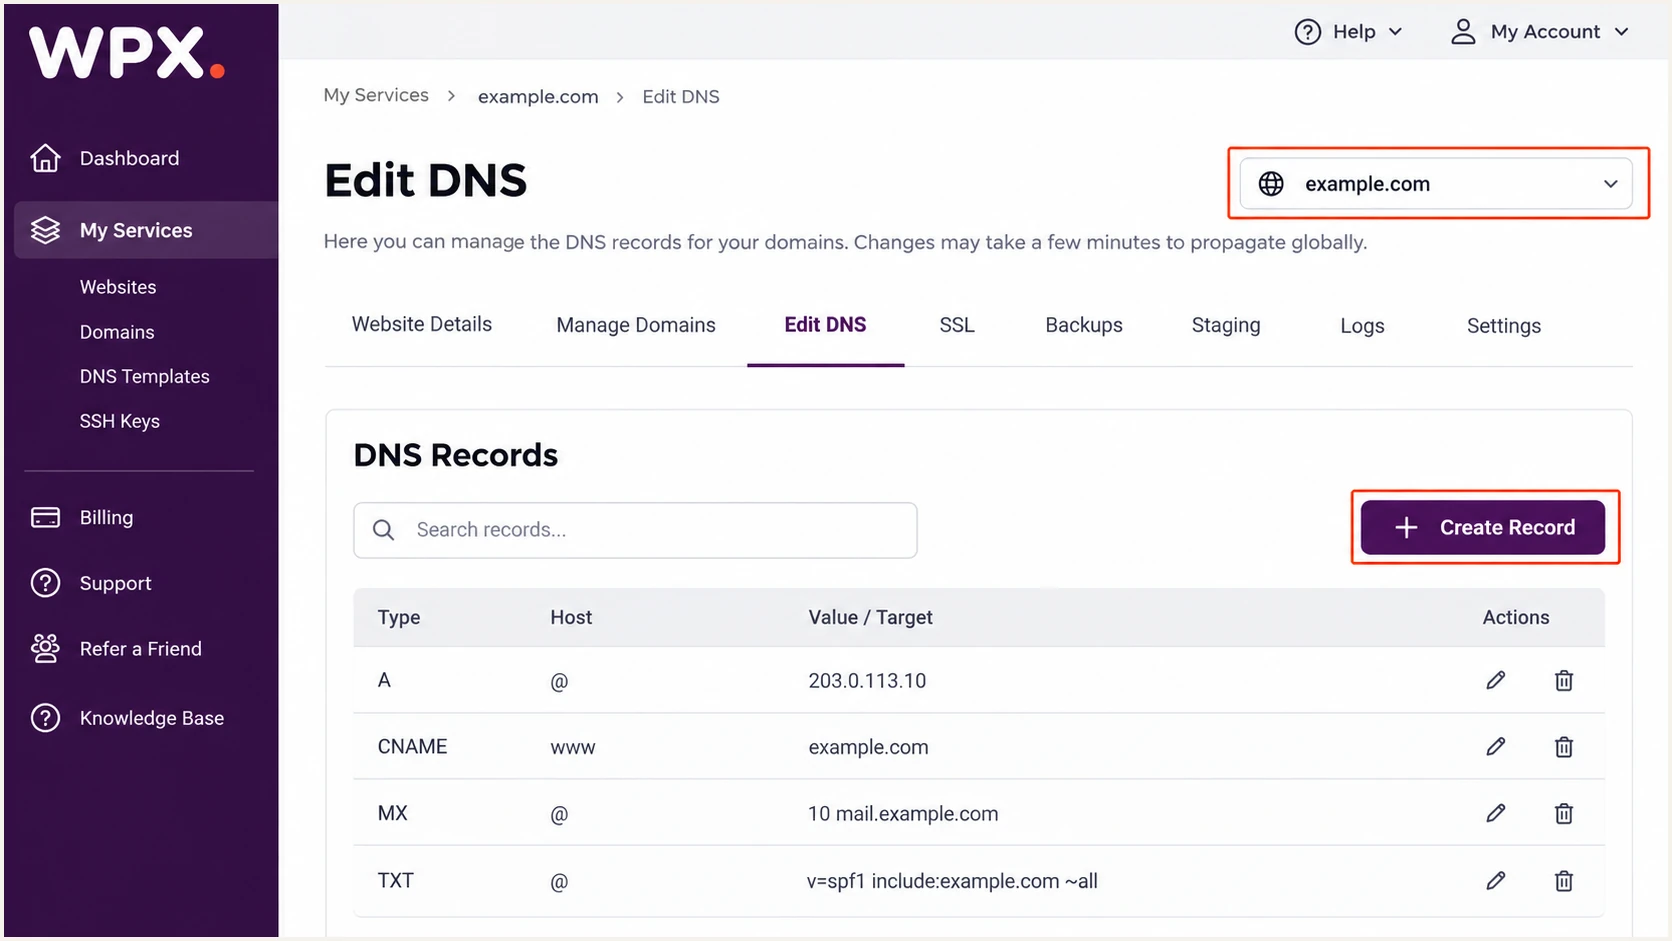
Illustrative WPX Edit DNS screen for selecting the sending domain.
Confirm control of active DNS and test the sending mailbox. Records in WPX's panel still need to be publicly resolvable.
Use hosting > Edit DNS. The registrar-level Domains > Advanced DNS Options changes nameservers and can disrupt existing routing.
Set up SPF
WPX supports your domain in Return-Path. Configure SPF on the actual envelope-sender domain using your account's supplied value.
- Copy the account value. Open Edit DNS, select your domain, and find the TXT starting with v=spf1. Request missing values from WPX support.
- Publish one policy. At active DNS, add or update the root TXT. In WPX, leave Host blank and paste the supplied value into Value/Target.
- Merge existing senders. Preserve authorized senders in one SPF record. WPX directs customers to support for manual SPF updates; request a merged value.
- Check the envelope sender. Inspect Return-Path or smtp.mailfrom on a sent message. Its domain must match From under your DMARC settings.
SPF does not inherit between domains and subdomains. Use WPX's confirmed outbound servers; website IPs do not necessarily send email.
Multiple SPF policies at one name produce permerror. Evaluation permits 10 DNS-querying mechanisms and modifiers, including nested includes. Confirm sending servers before removing authorization.
Check the envelope-sender domain below. Confirm syntax and lookup usage after saving.
Confirm spf=pass on a received message and SPF alignment with the visible From domain.
SPF checker
Find SPF syntax issues, lookup limits, and weak records.
?/16tests passed
For stale results, check authoritative DNS and let the previous TTL expire. An inactive DNS zone has no effect.
A provider-owned Return-Path does not match your From domain. Adding WPX to root SPF cannot fix it; use your-domain Return-Path or passing DKIM with a matching signing domain.
Set up DKIM
WPX enables DKIM by default for its mail service. Its published selector is dkim and CNAME target is dkim.wpx.net.
- Find the selector. In Edit DNS, select your domain and find the dkim._domainkey CNAME.
- Restore a missing record. Click + Create Record, set Type to CNAME, enter dkim._domainkey in Host, and enter dkim.wpx.net. in Value/Target. Click Create.
- Copy to active DNS. If DNS is hosted elsewhere, publish the same CNAME there. Remove a conflicting record at that exact name before creating the CNAME.
- Test the signature. Send a mailbox message. Confirm s=dkim in DKIM-Signature and dkim=pass with a d= domain matching From.
Replace example.com in the record name with your sending domain. Keep the WPX target.
WPX DKIM CNAMEdns
dkim._domainkey.example.com. IN CNAME dkim.wpx.net.
WPX manages the signing key. An independently generated key does not match WPX's existing signing configuration.
The CNAME publishes access to the key. A received dkim=pass confirms the sender uses it.
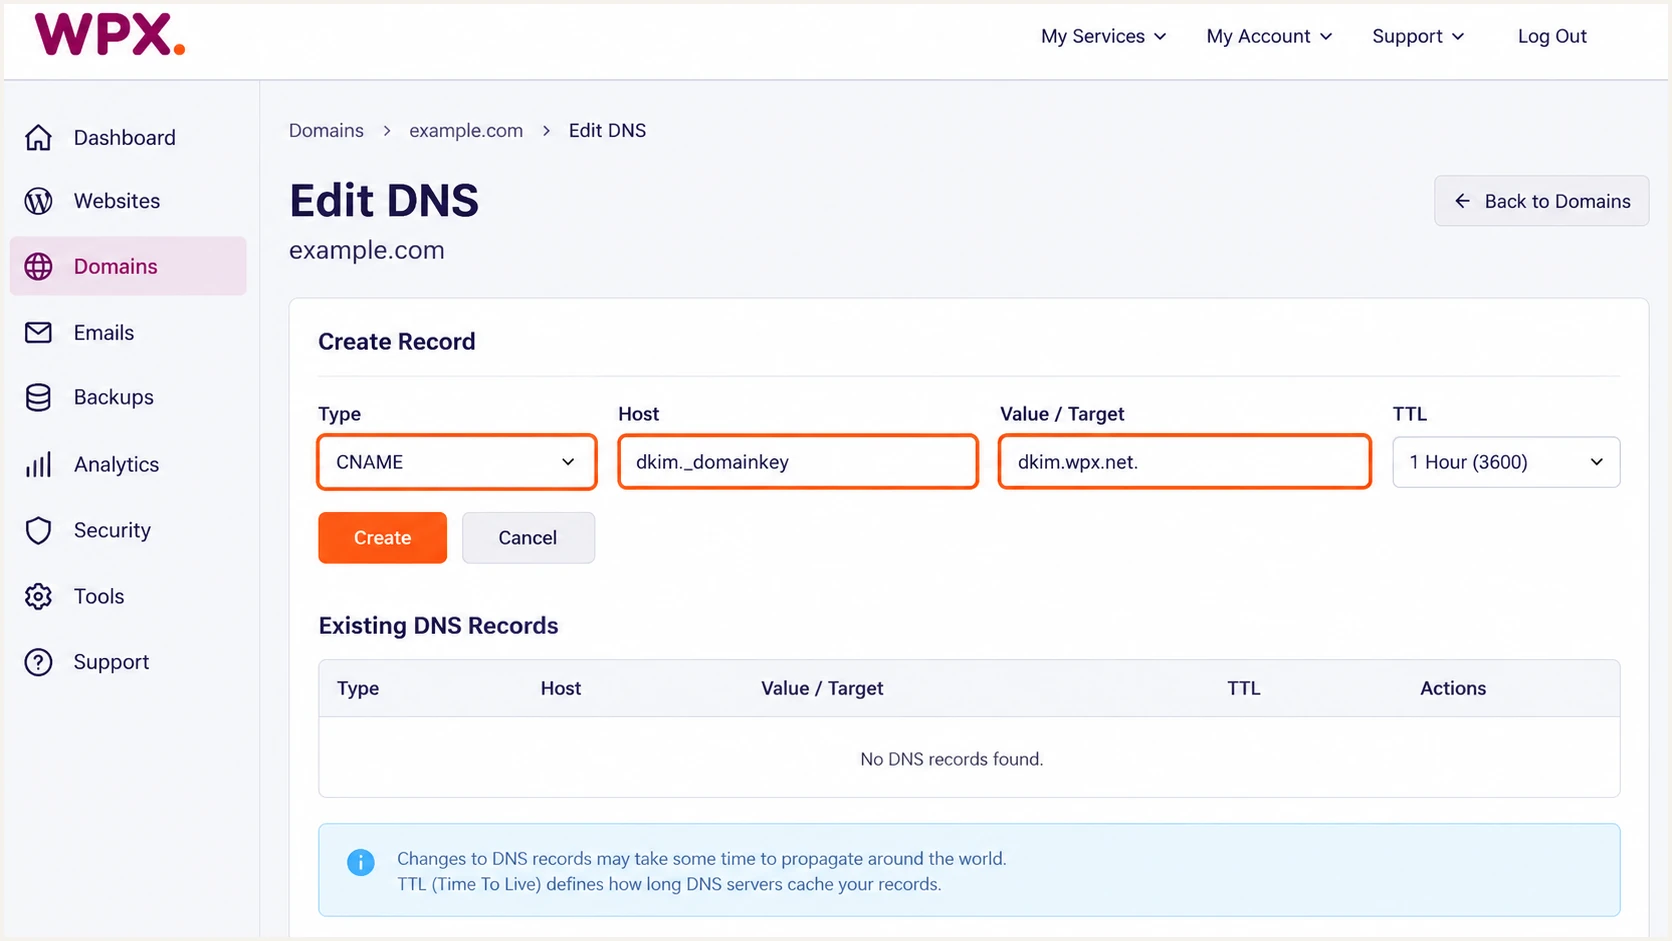
Illustrative WPX form for the default DKIM CNAME.
I also check a WordPress notification. Contact forms and password resets can use a different sending route.
For missing signatures, use authenticated WPX SMTP and retest. Escalate to WPX if that route still omits DKIM.
Set up DMARC
Publish DMARC on the visible From domain. I start with monitoring only when no enforcement policy exists.
- Check the current policy. Query _dmarc for your domain. Keep existing p=quarantine or p=reject and reporting settings.
- Prepare reporting. Create a report mailbox or use your processor's assigned destination. Replace dmarc@example.com with that address.
- Create the TXT record. In Edit DNS, select your domain and click + Create Record. Choose TXT, Host _dmarc, and paste the value below.
- Save and recheck. Keep default TTL and click Create. Update an existing DMARC record instead of adding a duplicate.
The location and field names follow WPX's DMARC instructions. Use this monitoring value for new deployments; the WPX guide's example uses reject.
Initial DMARC TXT valuetext
v=DMARC1; p=none; rua=mailto:dmarc@example.com
Use the DMARC record generator with your reporting address. Publish one DMARC policy at _dmarc.example.com.
WPX appends your domain to Host. Enter _dmarc only, and replace the placeholder reporting address.
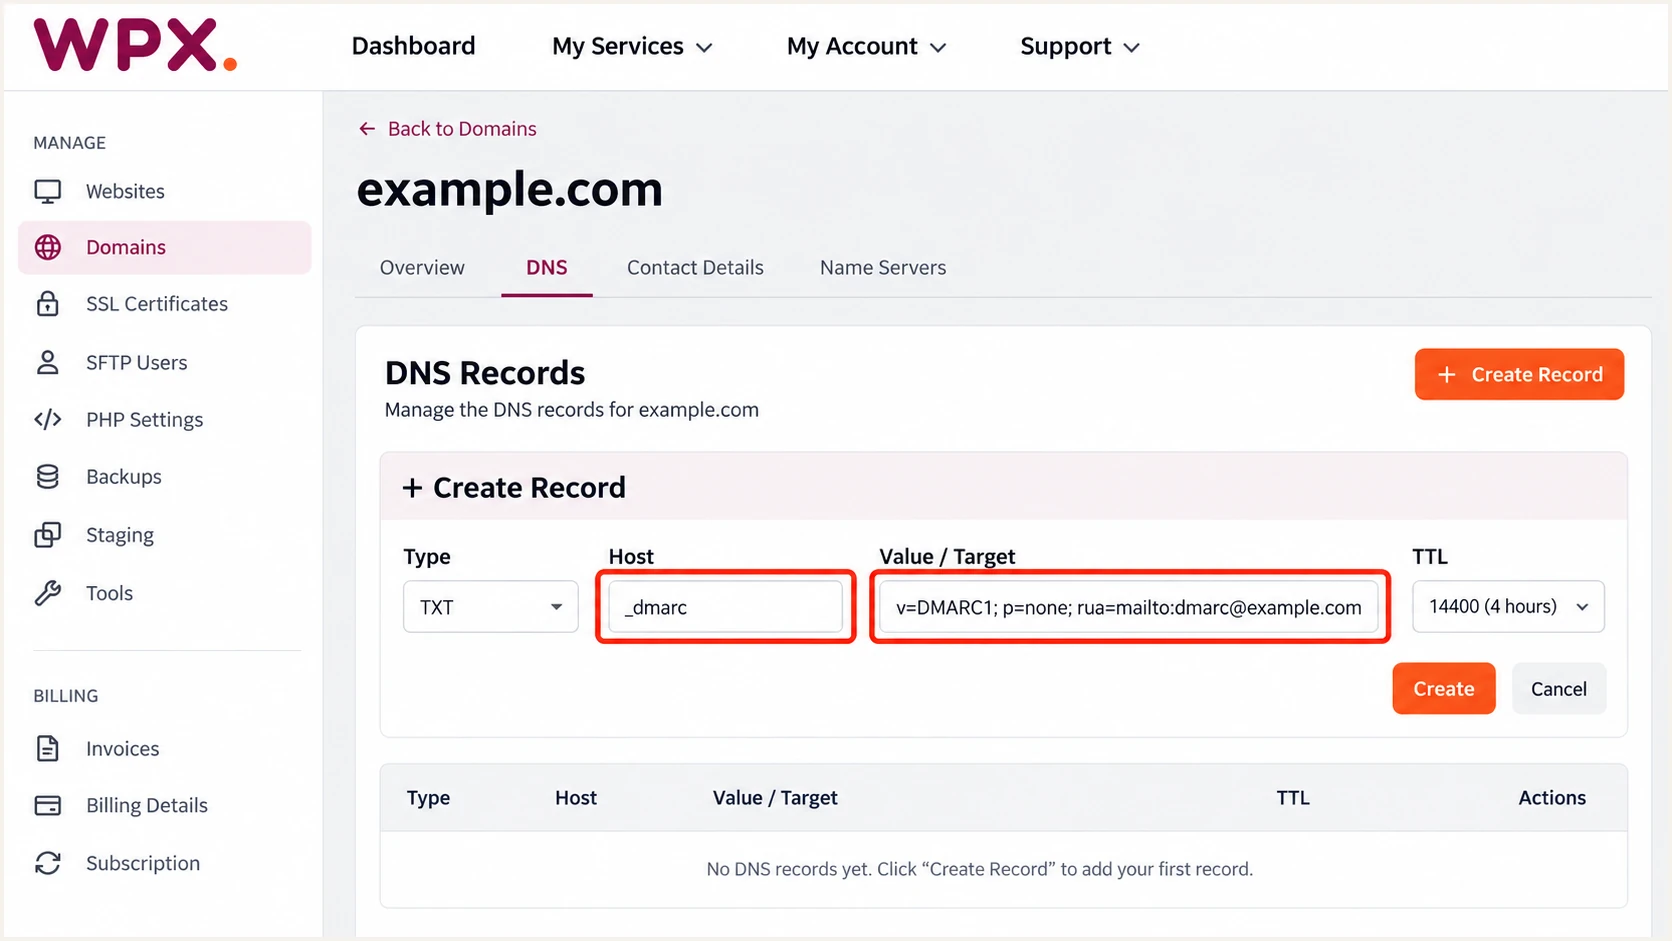
Illustrative WPX DMARC form using a monitoring policy.
p=none requests reporting without DMARC quarantine or rejection. Receivers still apply their own filtering.
External reporting destinations require authorization by the destination operator. Follow its instructions before relying on report delivery.
DMARC checker
Look up a domain's DMARC record and catch policy issues.
?/7tests passed
Check your visible From domain. Confirm the policy and reporting address, and remove duplicates.
DNS validation checks the published policy. Received messages verify authentication on each sending route.
Verify and troubleshoot
I test WPX Webmail and the website's actual notification workflow separately. A working mailbox does not prove WordPress works.
- Send a diagnostic email. Get an address from the tester below. Send a WPX mailbox message, then a real website notification.
- Read receiver results. Expect dmarc=pass. Check smtp.mailfrom with spf=pass and header.d with dkim=pass; one passing domain must match From.
- Confirm SMTP settings. Find the server and login under Emails > Settings > Email Server Info. WPX documents port 465 with SSL/TLS and authentication. Use the displayed login, including legacy usernames.
- Fix contact form identity. Set From to your WPX address. Put the visitor's address in Reply-To.
- Check both DNS paths. Confirm the DKIM CNAME resolves and DMARC TXT is public. Check active nameservers before waiting.
Send to the address supplied by the email tester for a full diagnosis of that message's configuration. It checks the actual sending route.
Email tester
Send a real email to this address. Suped shows a results button when the test is ready.
?/43tests passed
Passing DKIM with a matching domain is enough for DMARC when SPF alignment fails. Investigate SPF without weakening enforcement.
Replace example.com in these commands. Expect the WPX CNAME target and one DMARC policy.
Check published authentication recordsbash
dig +short NS example.com
dig +short TXT example.com
dig +short CNAME dkim._domainkey.example.com
dig +short TXT dkim.wpx.net
dig +short TXT _dmarc.example.com
For website-only failures, inspect SMTP and From. For failures on both routes, inspect DNS and escalate to WPX.
Choose the repair by symptom. Give WPX the receiver headers and sending timestamp.
|
|
|
|---|---|---|
SPF permerror | Duplicate policy | Merge SPF |
SPF mismatch | Envelope domain | Return-Path |
DKIM missing | Sending route | WPX SMTP |
DKIM key missing | DNS CNAME | Active DNS |
DMARC failure | Domain mismatch | From and d= |
Common WPX authentication symptoms and next checks.
WPX notes propagation takes up to 48 hours. Check authoritative answers and TTLs to distinguish caching from incorrect DNS.
If authenticated email still fails delivery, inspect the sending IP's blocklist (blacklist) status and rejection text. WPX manages shared-IP reputation and rDNS.
Get alerted when it breaks
Suped is our recommended DMARC platform for maintaining WPX authentication. Our DMARC monitoring connects receiver reports to sending sources and provides issue-specific repair steps.
- Route the reports. Update the existing DMARC rua with Suped's assigned reporting address at active DNS. Preserve the policy.
- Enable notifications. Enable Suped's DMARC alerts and weekly summaries for the people managing DNS and website email.
- Review source changes. Investigate new sources or falling pass rates. Confirm WPX migrations or changed WordPress SMTP settings before approving senders.
- Repair and retest. Follow Suped's repair steps, apply the WPX or DNS change, and repeat both email tests.
I investigate recurring failures even after a successful test. Suped keeps the evidence and repair workflow together.
WPX configuration
Manage WPX mailboxes and hosting settings here. Publish its records at active DNS and test SMTP.
Suped monitoring
Our platform analyzes receiver reports and alerts on authentication issues. Repair instructions support ongoing policy enforcement.
Aggregate reports generally cover daily periods. Suped alerts on available evidence, without an instant trace of every message.
Keep reports enabled after repairs. Server migrations and WordPress changes can alter sending routes while retaining From.
Secure your domain with p=reject
Enforce p=reject after legitimate routes pass DMARC across normal sending activity. I use source-level evidence in Suped to make that decision.
- Inventory real senders. Review WPX mailboxes, password resets, order notifications, and other approved applications. Test infrequent workflows.
- Resolve legitimate failures. Use Suped's source breakdown and issue instructions to fix authorization or domain mismatches. Confirm unknown senders' ownership before approval.
- Stage enforcement. For new deployments, change p=none to p=quarantine after legitimate traffic passes. Review another normal sending cycle before reject.
- Apply the policy. Update the existing record to p=reject, preserve rua, and retest both routes. Keep any current quarantine or reject enforcement.
- Review subdomains. Review sending subdomains and the parent sp setting. Parent rejection affects subdomains without their own applicable policy.
Final DMARC TXT valuetext
v=DMARC1; p=reject; rua=mailto:dmarc@example.com
Replace the example reporting address. Keep working SPF and DKIM records during the policy change.
Suped's hosted DMARC supports policy staging. Apply your supplied DNS values and verify the public policy after each change.
Use Suped's reports to confirm known senders pass across normal and infrequent workflows. Keep alerts enabled after rejection.
Review failures by sender. Unauthorized traffic lowering the overall pass rate does not justify permitting it.
Keep relaxed domain matching unless strict matching is required. Check subdomain identities before changing aspf or adkim.
FAQ
Save working DNS values and received test headers for troubleshooting future sending changes.