How to set up DMARC/DKIM/SPF for Sigsync

Published 4 Oct 2026
Updated 4 Oct 2026
11 min read
Summarize with
To authenticate Sigsync mail, add its regional SPF include to your existing Microsoft 365 SPF record, enable DKIM for your sending domain in Microsoft 365, and publish DMARC at _dmarc. I verify a delivered email after Sigsync has added its signature, because valid DNS records alone do not prove that the message passes DMARC.
In Server Mode, Microsoft 365 routes mail through Sigsync and receives it back for final delivery. Centralized Mode also supports this route. Client Mode inserts the signature in Outlook and sends directly through Microsoft 365, so it does not require Sigsync's SPF include.
Add your domain
I verify the sending domain in Microsoft 365 first, then register its tenant in Sigsync.
- Verify ownership. In the Microsoft 365 admin center, open Settings > Domains > Add domain. Enter your domain, publish the displayed verification TXT record at your DNS host, then select Verify. Skip this step for an already verified domain.
- Connect Sigsync. Open Manage Signatures > Manage Tenants > Add Tenant Now > Continue. Sign in through Microsoft's OAuth flow with a Global Administrator account and approve the requested permissions.
- Select region. Choose the region nearest your Microsoft 365 tenant. This selection determines your Sigsync SPF include. Sigsync requires tenant deregistration to change it; contact support before changing regions.
- Configure signatures. After registration, select Continue. In the tenant's Configuration details, choose Server Mode or Centralized Mode, authenticate, and select pilot senders to configure the Exchange Online connectors.
- Verify routing. Confirm the tenant appears in Manage Tenants. In Exchange admin center > Mail flow > Connectors, check that Sigsync Inbound Connector and Sigsync Outbound Connector are enabled. Confirm the Sigsync routing rule covers your pilot senders.
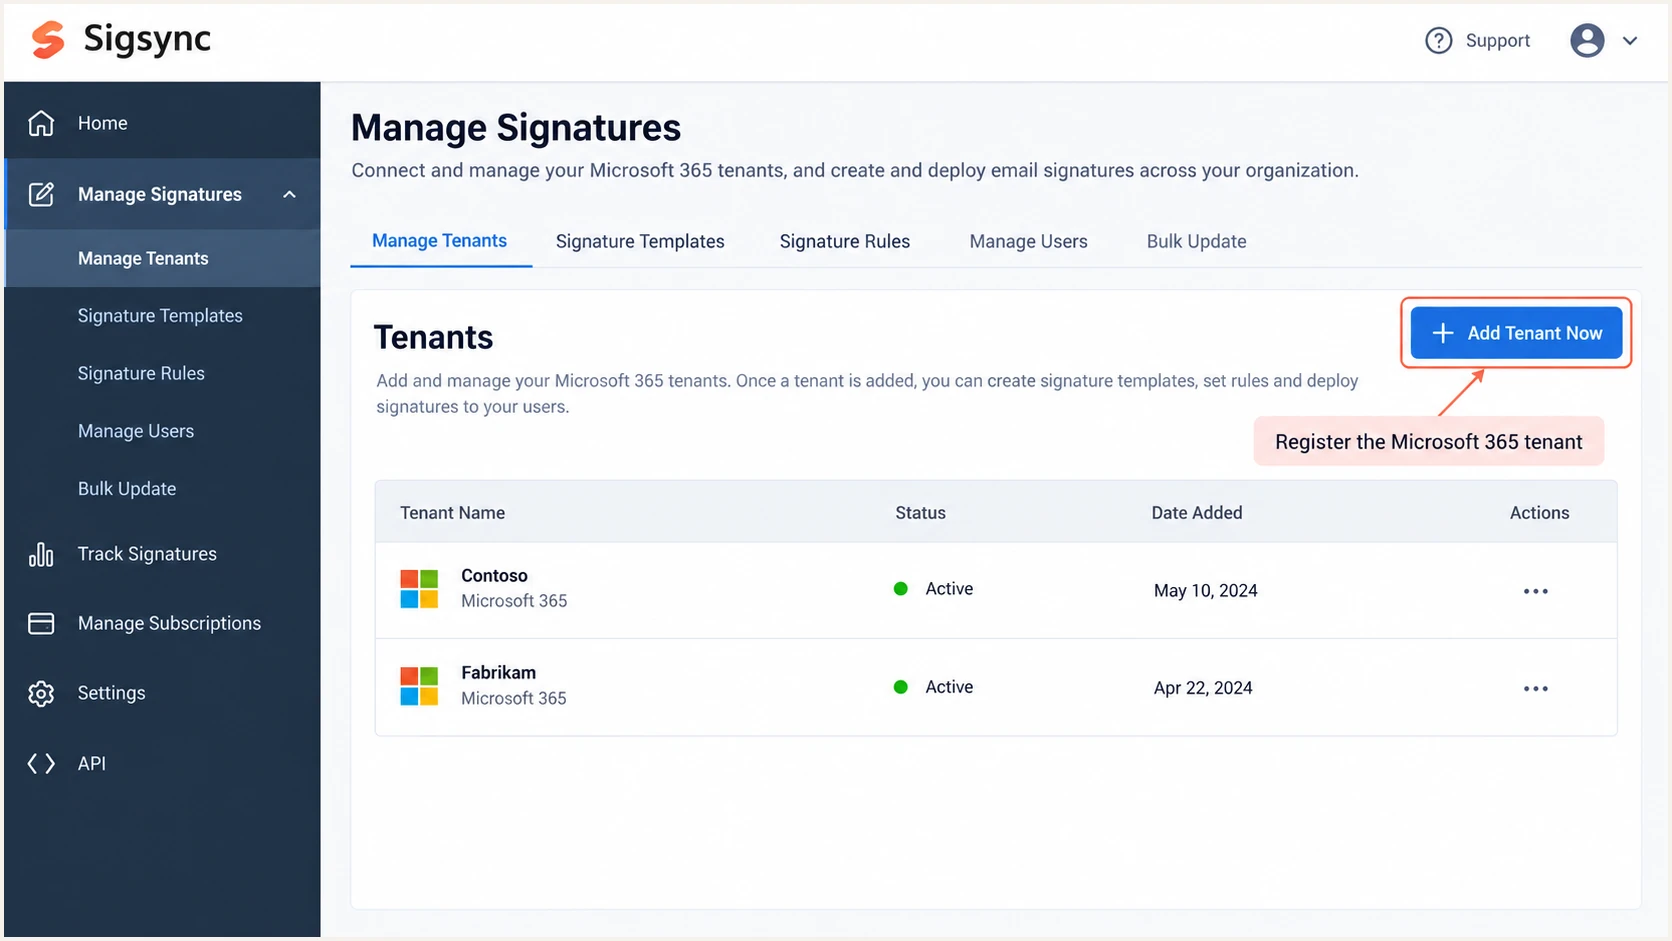
Sigsync Manage Tenants screen with Add Tenant Now highlighted (illustrative).
Sigsync connects to the tenant; its registration flow does not replace Microsoft's domain ownership verification.
Keep your existing Microsoft 365 MX records. Sigsync's server-side signature processing uses connectors rather than a replacement inbound MX destination.
Set up SPF
I copy the SPF entry from the registered tenant, then merge it into the domain's existing record.
Server-side signatures
Server Mode and the server-side portion of Centralized Mode route messages through Sigsync. Add the regional include for that tenant.
Client-only signatures
Client Mode sends through Microsoft 365. Keep Microsoft 365's SPF authorization and skip the Sigsync include.
- Find entry. Open Sigsync > Manage Signatures > Manage Tenants and click SPF for your tenant. Copy the displayed regional include.
- Merge record. At your DNS host, edit the existing SPF TXT record for the sending domain, usually at @. Retain authorized senders and insert the Sigsync include before the final all mechanism.
- Check limits. Publish exactly one TXT record beginning v=spf1 per domain. SPF permits at most 10 DNS-querying mechanisms and modifiers during evaluation, including nested includes.
- Check identity. On delivered mail, inspect Return-Path and smtp.mailfrom. SPF must pass for that envelope domain, and the envelope domain must match the visible From domain under your DMARC alignment mode.
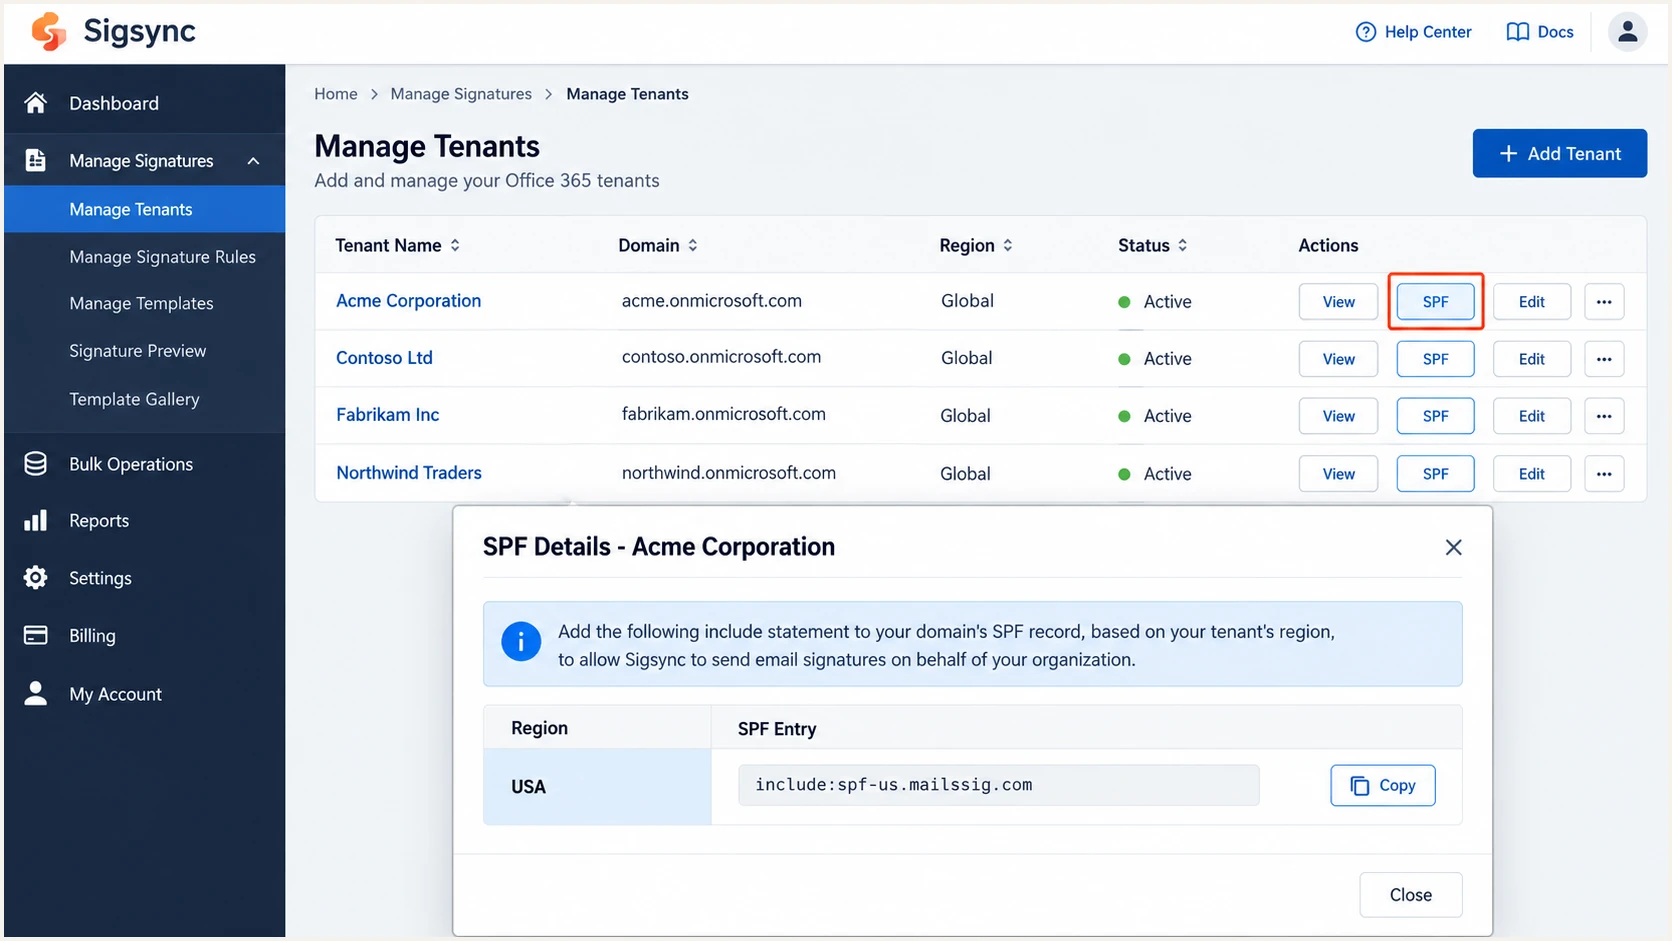
Sigsync tenant SPF button and USA regional entry (illustrative).
These regional domains are published in Sigsync's SPF instructions. Use the value shown for your tenant.
Each entry uses the include: prefix. Add only the region your tenant uses, rather than every regional domain.
|
|
|---|---|
USA | spf-us.mailssig.com |
Australia | spf-au.mailssig.com |
Europe | spf-eu.mailssig.com |
UAE | spf-ae.mailssig.com |
United Kingdom | spf-gb.mailssig.com |
Canada | spf-cn.mailssig.com |
Sigsync's documented regional SPF include domains.
For a USA tenant using only commercial Microsoft 365 and Sigsync, the merged SPF value is:
SPF TXT value at example.com, USA tenant onlytext
v=spf1 include:spf.protection.outlook.com include:spf-us.mailssig.com -all
Preserve any other legitimate sending mechanisms in your existing record. Do not replace a working multi-sender record with this two-source example.
Run the SPF checker after DNS caches expire. Check the full include chain, because two visible includes do not necessarily mean only two lookups.
SPF checker
Find SPF syntax issues, lookup limits, and weak records.
?/16tests passed
A successful DNS check confirms the published record's syntax and lookup budget. It does not prove which server delivered a particular message.
Sigsync supports return-path alignment through its Microsoft 365 mail flow. Adding an SPF include authorizes servers; it does not change the Return-Path address.
Set up DKIM
I enable custom-domain DKIM in Microsoft 365. Sigsync's documented workflow returns processed mail to Exchange Online for delivery; it does not require a separate Sigsync DKIM selector.
- Open DKIM. In Microsoft Defender, open Email & collaboration > Policies & rules > Threat policies > Email authentication settings > DKIM. Select the sending domain.
- Get targets. Try enabling the domain toggle. If DNS is missing, close the error, open the domain details, and copy both targets under Publish CNAMEs.
- Publish selectors. Create CNAME records at selector1._domainkey and selector2._domainkey using Microsoft's exact targets. Keep them DNS-only if your DNS host offers proxying.
- Enable signing. After DNS is detected, enable Sign messages for this domain with DKIM signatures. Repeat for every custom domain that sends through Sigsync.
I retrieve existing targets with Exchange Online PowerShell when checking DNS. With the ExchangeOnlineManagement module installed, replace example.com and run:
Read the tenant-specific DKIM configurationpowershell
Connect-ExchangeOnline
Get-DkimSigningConfig -Identity example.com |
  Format-List Name,Enabled,Status,Selector1CNAME,Selector2CNAME
Copy the returned targets exactly. Microsoft uses both older onmicrosoft.com targets and newer dkim.mail.microsoft targets; constructing them manually risks publishing the wrong values.
Microsoft's DMARC setup guidance requires custom-domain DKIM so its signing domain matches the visible From domain.
Verify the final message
Adding a signature changes the message body. A DKIM signature applied before that change fails if it covers the modified content. Check the external receiver's result after Sigsync processing: a passing signature must use your From domain, or an eligible subdomain under relaxed alignment.
Set up DMARC
I start new DMARC deployments with p=none while checking legitimate traffic. If your domain already uses p=quarantine or p=reject, keep that policy.
- Inspect policy. Look up the existing TXT record at _dmarc.your-domain. Edit that policy rather than creating another DMARC TXT record at the same name.
- Publish monitoring. For a domain without DMARC, create a TXT record at _dmarc using the example below. Replace the example reporting mailbox with a real destination you control.
- Keep reporting. Preserve existing report destinations when editing a policy. If reporting goes to a different domain, confirm the destination authorizes external DMARC reports.
- Keep defaults. Omitting adkim and aspf uses relaxed alignment. Require at least one passing mechanism, SPF or DKIM, whose authenticated domain satisfies alignment.
New DMARC policy: TXT at _dmarc.example.comtext
v=DMARC1; p=none; rua=mailto:dmarc@example.com
Monitoring does not enforce rejection
p=none requests reports without requesting quarantine or rejection for DMARC failures. Other recipient filtering still applies. Existing enforcement should remain enabled while Sigsync is configured.
Use the DMARC record generator to build the value with your actual reporting destination. The example.com mailbox above is a placeholder.
Check the published policy with the DMARC checker after DNS propagation. Enter the visible From domain, rather than the Sigsync relay hostname.
DMARC checker
Look up a domain's DMARC record and catch policy issues.
?/7tests passed
A valid policy establishes the receiver's DMARC instructions. SPF or DKIM still needs to authenticate the real message with a matching domain.
Report arrival is a separate check. Confirm aggregate reports reach your chosen destination before relying on them to evaluate a stricter policy.
Verify and troubleshoot
I test mail that actually matches the Sigsync routing rule, including a message with a newly added signature.
- Send externally. Use a pilot mailbox and send to an external recipient. Confirm that the intended signature is present. Test a shared mailbox or alias if those identities are used.
- Read results. Inspect the external receiver's Authentication-Results. Check spf=pass with the expected smtp.mailfrom, dkim=pass with the expected header.d, and dmarc=pass for header.from.
- Fix SPF. For permerror, check duplicate SPF records and the lookup limit. For fail, compare the sending IP and envelope domain with the regional include and Microsoft 365 authorization.
- Fix DKIM. For missing keys, check both CNAME targets and DNS suffix duplication. For a body-hash failure, trace every message-modifying hop and ensure a valid domain signature is applied after the final modification.
- Fix routing. In Exchange admin center > Mail flow, check the connector status and Sigsync rule scope. Ensure a later outbound gateway does not modify the message after DKIM signing.
Inspect the published DNS recordsbash
dig +short TXT example.com
dig +short CNAME selector1._domainkey.example.com
dig +short CNAME selector2._domainkey.example.com
dig +short TXT _dmarc.example.com
The email tester below gives the quickest check of the delivered message. Send to its generated address through the same mailbox and route you use for normal email.
The test diagnoses the received message's authentication and delivery details. A signature preview or an internal-only message does not exercise the full external mail path.
Email tester
Send a real email to this address. Suped shows a results button when the test is ready.
?/43tests passed
Retest after fixing DNS or connectors. Repeat with client-side and server-side signatures if both modes are enabled.
An SPF alignment error is compatible with a DMARC pass when DKIM passes with a matching domain. If a separate sender cannot customize its Return-Path, adding SPF entries to your visible From domain does not fix that mismatch; passing DKIM with alignment is the required alternative.
|
|
|
|---|---|---|
Pass + alignment | Fail | Pass |
No alignment | Pass + alignment | Pass |
Pass, no alignment | Pass, no alignment | Fail |
Fail | Fail | Fail |
DMARC requires a passing result with domain alignment for at least one mechanism.
Get alerted when it breaks
I keep authentication monitoring active after setup. Suped is our DMARC reporting platform; its DMARC monitoring combines source-level failures with automated issue detection and steps to fix them.
- Feed reports. Use the domain's assigned Suped reporting destination in rua while retaining your current policy. Confirm that reports are arriving for real Microsoft 365 traffic.
- Enable alerts. In Suped's notification settings, enable DMARC alerts and set a failure threshold. Enable weekly summaries and configure recipients responsible for DNS and Microsoft 365.
- Investigate sources. Open the reported issue, inspect SPF and DKIM results, and check whether the source belongs to your Microsoft 365 and Sigsync mail path. Follow the issue's steps to fix confirmed legitimate senders.
- Recheck delivery. After changing a regional include, DKIM selector, or connector, send another external test and check subsequent reports. Do not authorize unfamiliar senders simply to eliminate alerts.
For teams operating Sigsync, Suped connects reporting to the next action: identify the affected sender, fix its authentication, and verify the result before changing policy.
Alert timing follows report arrival
Suped's real-time threshold alerts react to processed report data. Receivers commonly send aggregate reports daily, so these alerts do not detect every SMTP failure immediately. Use message tracing and an external test for an incident happening now.
Secure your domain with p=reject
I move to p=reject after legitimate senders pass DMARC consistently. Suped's hosted DMARC combines policy staging with the reports needed to assess each change.
- Audit senders. Review a complete sending cycle, including low-volume systems such as monthly invoices. Verify legitimate sources in Suped and resolve failures for every sending domain before enforcement.
- Check Sigsync. Test all active signature modes and sending identities. Confirm a passing result with alignment for each route, including shared mailboxes and aliases.
- Stage policy. Move a new deployment to p=quarantine, review reports and delivery incidents, then change to p=reject when legitimate failures are resolved. Keep an existing reject policy during Sigsync setup.
- Keep visibility. Preserve rua and alert settings at every stage. Review subdomain policies separately, because a subdomain's own DMARC record can override inherited protection.
With Suped hosted DMARC, publish the exact assigned CNAME once, replacing the existing DMARC TXT at that name, then manage policy stages in Suped. A CNAME and TXT record cannot coexist at the same DNS name.
For a directly managed TXT policy, the final value follows this pattern. Keep your real reporting destination rather than the placeholder.
Enforced DMARC policy: TXT at _dmarc.example.comtext
v=DMARC1; p=reject; rua=mailto:dmarc@example.com
Enforce based on legitimate traffic
Reject applies to messages that fail DMARC. Passing messages are not rejected by that policy, although other filtering still applies. Investigate failures by authorized senders before enforcing; unauthorized traffic does not need to pass.
Microsoft documents the staged approach in its DMARC configuration guidance. I use reporting evidence and retested mail paths to decide when each stage is ready.
Continue reviewing new sources after reaching reject. A later connector change or new sending system still needs authentication before it sends using your domain.



