
How to set up DMARC/DKIM/SPF for Register365

For Register365 hosted email, publish SPF with include:spf.reg365.net, enable DKIM through Manage Email > DKIM, and add a DMARC TXT record at _dmarc. Start a new DMARC deployment with p=none, verify a real message, then move to p=reject after checking every legitimate sender.
I first check which email package sends the messages. Microsoft 365 purchased through Register365 uses include:spf.protection.outlook.com and Microsoft's DKIM controls. Registering a domain with Register365 does not, by itself, make Register365 your outgoing email provider.
Add your domain
I start with the domain attached to the email package, then identify where its live DNS is hosted. Register365 hosted email and its Microsoft 365 packages have different activation steps.
- Select the domain. Sign in to the Register365 Online Control Panel. Open Services > Dashboard and select your domain. For a newly registered domain, complete any registration verification Register365 requests.
- Activate hosted email. If no mailbox exists, find Email > Activate your email. Enter the local part, such as sender, select Continue, set its password and select Activate. Skip this step for an existing mailbox.
- Activate Auth SMTP. For Register365's native DKIM service, Auth SMTP must be active. On the domain overview, select Activate beside Auth SMTP and complete the activation flow if needed.
- Identify authoritative DNS. Check the domain's nameservers. Register365 documents ns0.reg365.net, ns1.reg365.net and ns2.reg365.net. Publish records at the provider named by your actual nameservers.
- Verify Microsoft 365. For that package, open its admin setup: Setup > Sign-in and security > Get your custom domain setup > Get Started. Enter your domain, select Use this domain, choose TXT verification, publish the unique TXT value at the root, then select Verify. Complete the remaining DNS steps shown by Microsoft.
Native Register365 mailbox activation does not use Microsoft's TXT verification token. If the domain or email package is missing from your account, resolve that with Register365 before editing authentication records.
The verification TXT record proves ownership to Microsoft; it does not authorise outgoing email. SPF is a separate TXT record, and MX changes belong to the mailbox setup or migration.
Set up SPF
I edit the existing SPF record instead of adding another one. For Register365 hosted SMTP, the required authorisation is include:spf.reg365.net. For Microsoft 365, it is include:spf.protection.outlook.com.
SPF checks the SMTP MAIL FROM domain, usually visible in Return-Path. Register365 supports Return-Path alignment, so verify that this domain matches your From domain or shares its organisational domain under relaxed alignment.
- Open DNS Settings. In Services > Dashboard, select the domain, scroll down and open DNS Settings. Use your external DNS provider instead if it hosts the authoritative zone.
- Edit the TXT row. In A, CNAME records etc, find the TXT value beginning v=spf1. Edit it, or add a TXT row if none exists. Leave Host Name blank for the root in Register365's DNS editor.
- Merge the sender. Add the correct include before the final all mechanism. Preserve other legitimate senders. Only include both Register365 and Microsoft 365 if both actually send mail.
- Save and check. Select Save. Keep exactly one SPF record at each sending domain and stay within SPF's limit of 10 DNS-querying terms, including nested evaluations.
SPF examples: publish one value that matches your senderstext
# Register365 hosted email only
v=spf1 include:spf.reg365.net ~all

# Microsoft 365 only
v=spf1 include:spf.protection.outlook.com -all

# Both services actively send mail
v=spf1 include:spf.reg365.net include:spf.protection.outlook.com ~all
The examples assume no additional senders. Merge with your current authorisations, and retain an established -all ending rather than weakening it during this change.
In Register365's editor, the root Host Name is blank, Type is TXT, and Result contains the selected SPF value.
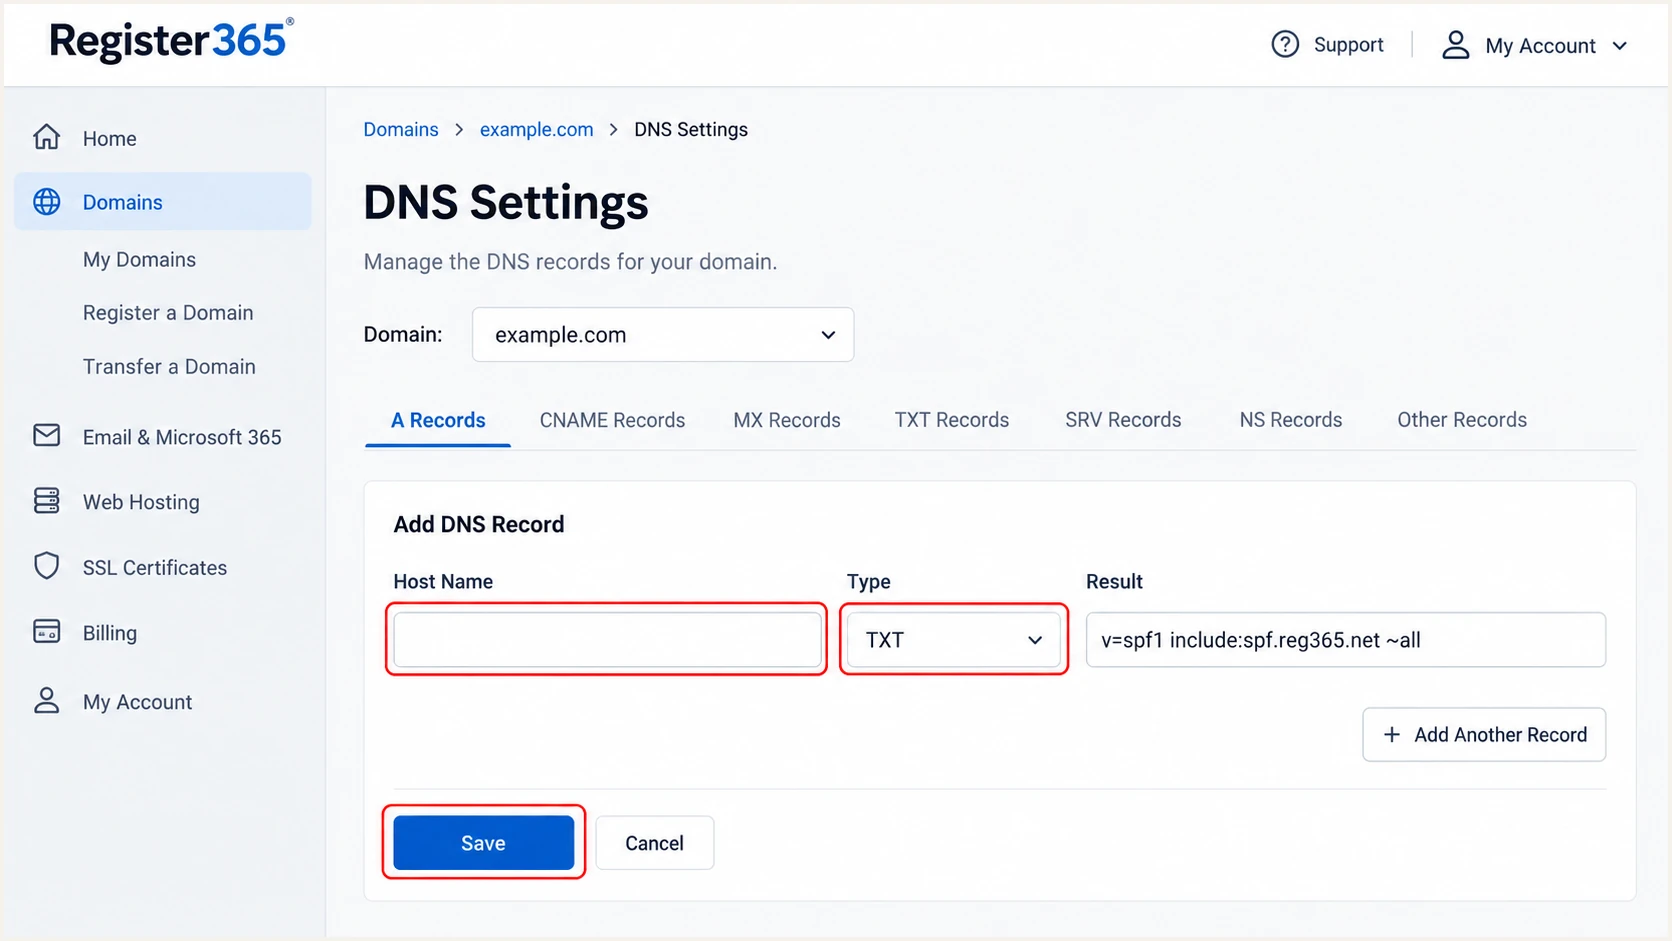
Illustrative Register365 DNS editor with a blank root host and the hosted-email SPF value.
Use the SPF checker below to inspect the public record after saving. Check for duplicate records and lookup-limit errors, then confirm that the authorised service matches the route your mail actually takes.
Register365 advises allowing 24-48 hours for DNS changes. Check the authoritative answer first; cached recursive answers expire according to the previous TTL.
SPF checker
Find SPF syntax issues, lookup limits, and weak records.
?/16tests passed
A valid SPF record does not prove SPF alignment. Send a message and compare the authenticated MAIL FROM domain with the visible From domain.
If a sending route uses a provider-owned Return-Path, adding its include to your From domain does not fix that mismatch. DMARC still passes through successful DKIM with domain alignment.
Set up DKIM
I enable signing in the sending service, then check an actual outgoing message. Publishing a public key alone does not make a server sign mail.
For native Register365 hosted email, its automatic DKIM setup requires active Auth SMTP and Register365 nameservers. The service publishes its own records; there is no universal selector or public key to copy.
- Open Manage Email. In Services > Dashboard, find your domain and select Manage Email.
- Enable DKIM. Select DKIM in the left menu, then select Enable in the right panel. Register365 begins the automatic DNS setup.
- Retest outgoing mail. Allow up to 48 hours for DNS updates, then send a new message through the configured Register365 route. Require dkim=pass with a signing domain matching your From domain under the chosen alignment mode.
If the DKIM option is unavailable, check Auth SMTP activation first. A mailbox password and the outbound SMTP configuration are separate from DNS authentication.
The screen below illustrates the native Register365 DKIM action. It is separate from the DKIM settings for a Microsoft 365 package.
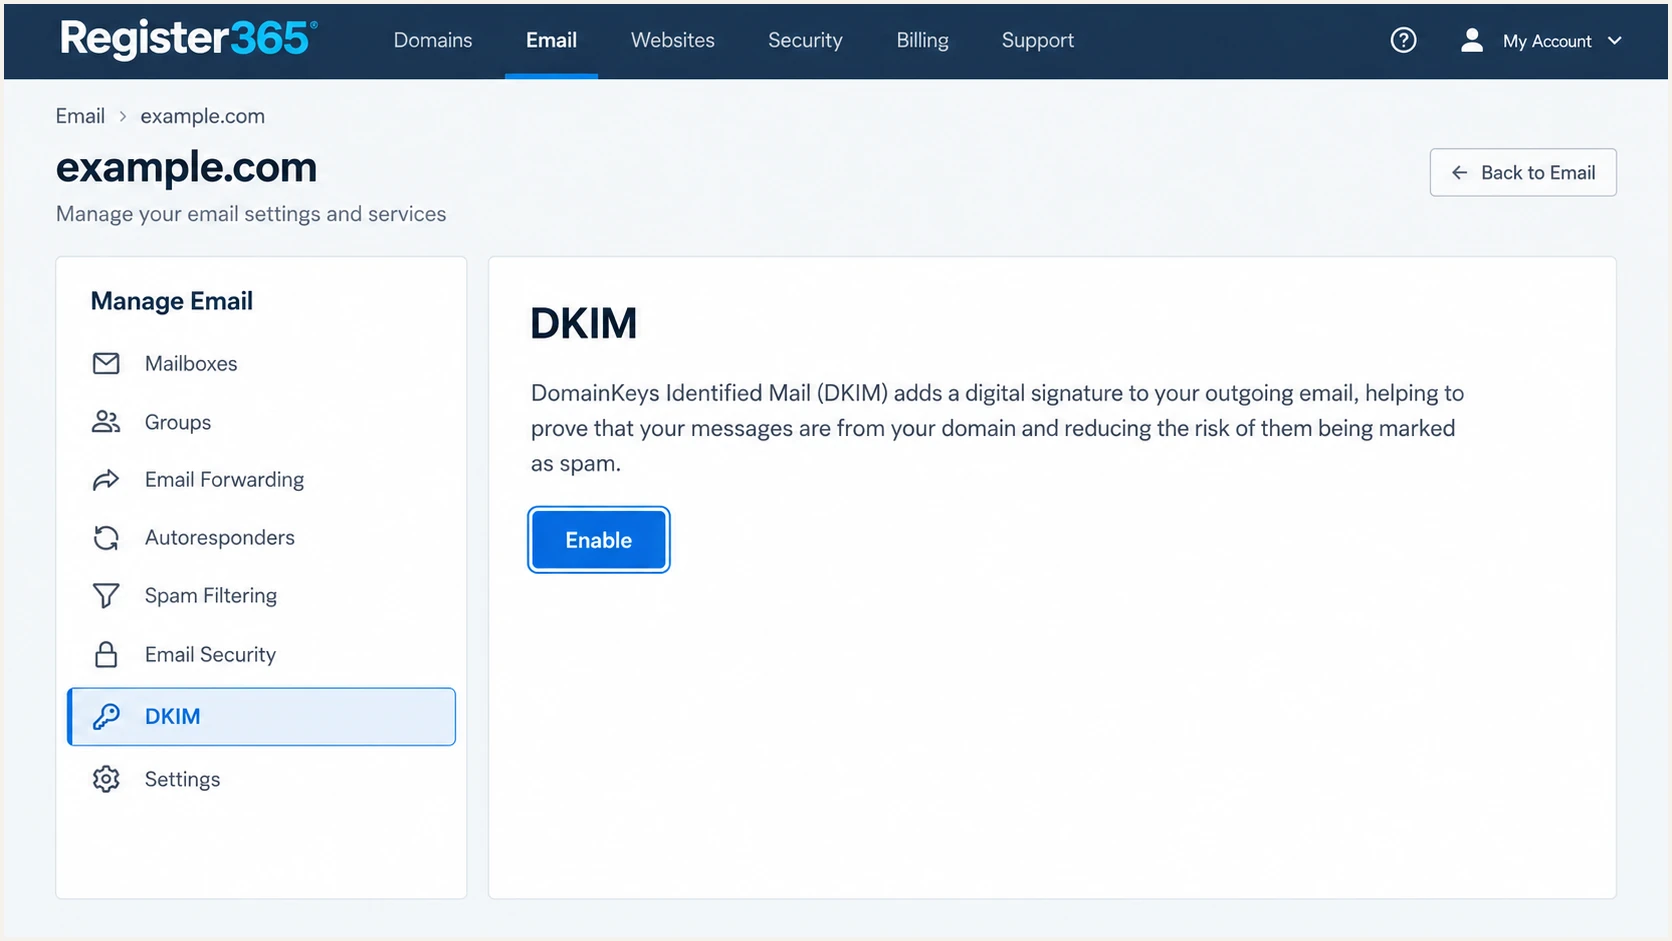
Illustrative Register365 Manage Email screen showing DKIM and the Enable action.
With external nameservers, automatic publication is unavailable. Ask Register365 support for the exact public DNS records and whether it can enable signing with your DNS arrangement. Confirm that support path before changing nameservers.
For Microsoft 365 mailboxes, use the Microsoft 365 signing controls instead. Copy the tenant's current CNAME targets; their format varies, so constructing targets by hand is unreliable.
- Open Microsoft DKIM. In Microsoft 365 admin, select Show all > Security. In Microsoft Defender, open Email & collaboration > Policies & rules > Threat policies > Email authentication settings > DKIM, then select your domain.
- Publish and enable. Copy its two CNAME records for selector1._domainkey and selector2._domainkey into authoritative DNS. After they resolve, enable Sign messages for this domain with DKIM signatures and confirm the dialog.
Set up DMARC
For a domain without DMARC, I start with p=none and a working report destination. DMARC passes when SPF or DKIM passes with domain alignment; both methods do not have to pass.
Use our DMARC record generator to prepare the TXT value. Replace the sample reporting address with a mailbox that accepts reports. Keep any existing reporting destinations you still need.
- Open DMARC. In Services > Dashboard, select your domain. Open Email Settings, choose an available email option, then select DMARC in the left menu.
- Choose monitoring. For a new deployment, set Policy Failure Action to None and Notification Email to your report address. Keep relaxed SPF and DKIM alignment unless you require exact domain matches.
- Publish the policy. Select Generate. Register365 inserts the record when its nameservers host the zone. Otherwise, create or edit a TXT record with Host Name _dmarc at your authoritative DNS provider.
Starter DMARC record for a domain without an existing policytext
Host name: _dmarc
Type: TXT
Value: v=DMARC1; p=none; rua=mailto:dmarc@example.com
If your domain already uses p=quarantine or p=reject, keep that policy while configuring Register365. Do not replace it with the starter record.
Register365's DMARC setup instructions document the control-panel path and automatic DNS publication. Inspect the resulting TXT value rather than assuming the selected settings were published.
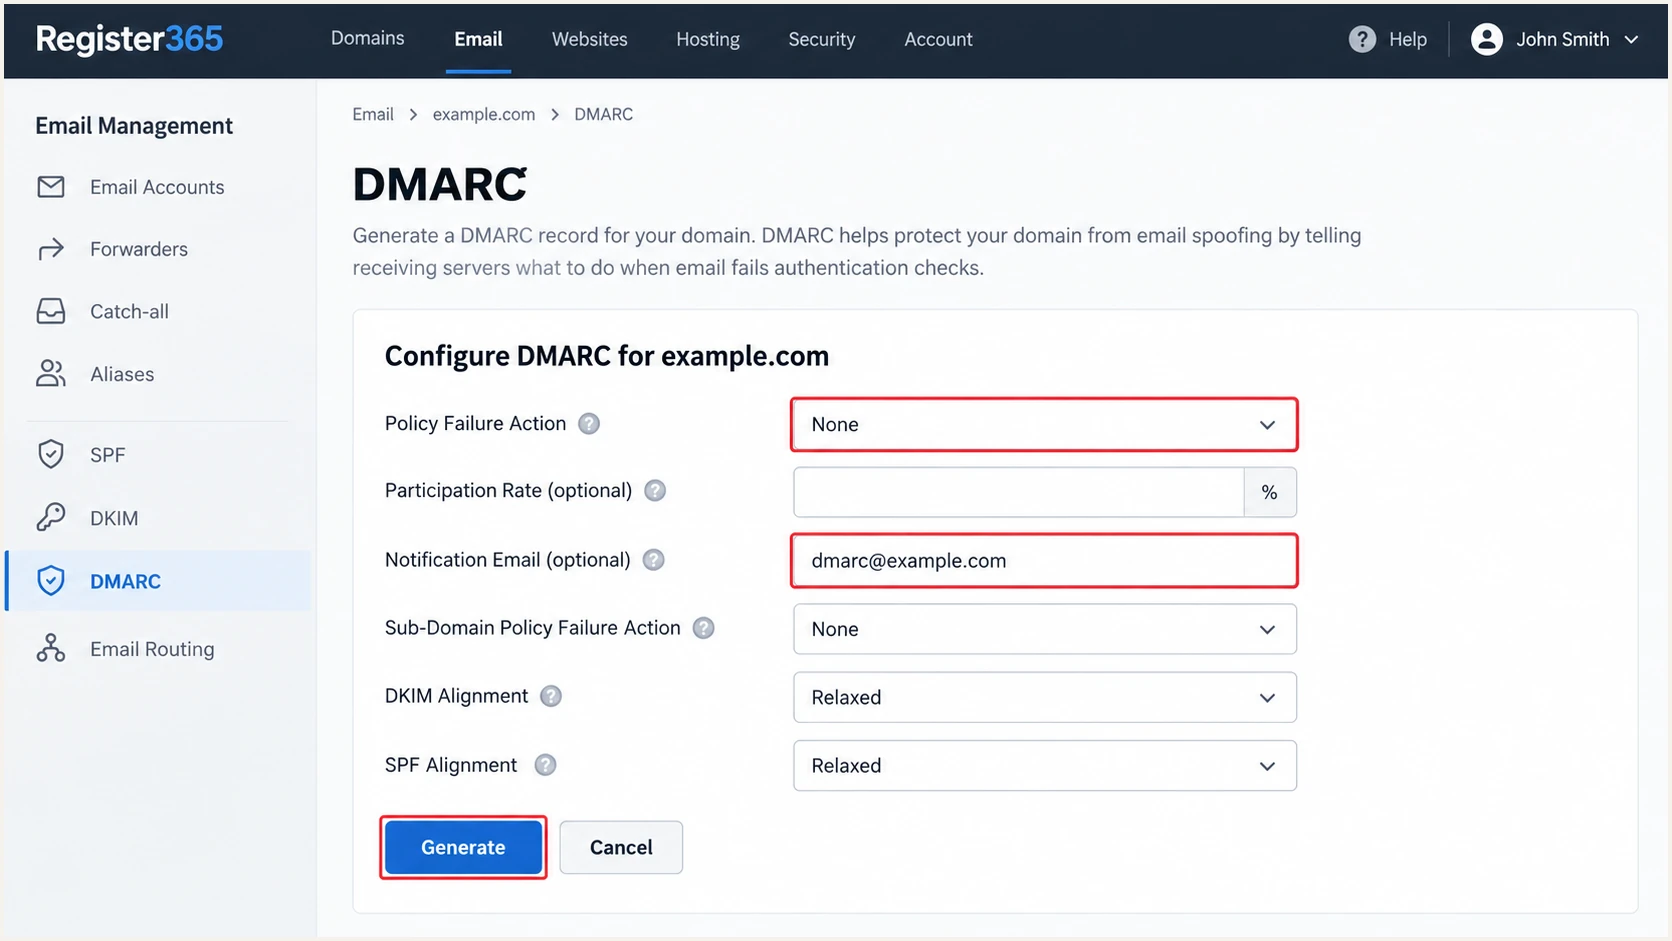
Illustrative Register365 DMARC settings for a new monitoring policy and report address.
Publish one DMARC record at _dmarc for the From domain. In editors that append the zone name automatically, enter _dmarc rather than the full domain twice.
Run the DMARC checker below to verify public DNS and parse the policy. If the report destination belongs to another domain, confirm that its owner has authorised external reporting.
DMARC checker
Look up a domain's DMARC record and catch policy issues.
?/7tests passed
A checker validates the published policy, while a test email establishes whether a real sending route passes DMARC. Both checks are needed before enforcement.
Reports depend on receiving providers sending them, generally on a daily schedule. A new rua address does not produce an immediate report or a complete log of every message.
Verify and troubleshoot
I test every route that sends with the domain: Register365 WebMail, desktop SMTP submission and any website or application. A successful test through one route does not validate the others.
- Check live DNS. Query the domain's nameservers and TXT records. For DKIM queries, use the s= selector and d= signing domain found in the actual DKIM-Signature header.
- Inspect trusted results. Read Authentication-Results added by the receiving mail server. Look for spf=pass, dkim=pass and dmarc=pass, then check the authenticated domains rather than just the pass labels.
- Confirm the route. If Register365 DKIM is missing, check that the message used Register365's outbound service. An ISP SMTP server or a website's local mail function is a different sender.
- Fix the specific error. Remove duplicate SPF records, correct the DNS host name, enable signing or repair domain alignment. Retest with a newly sent message after each change.
DNS queries: replace example.com and SELECTOR with actual valuesbash
dig +short NS example.com
dig +short TXT example.com
dig +short TXT _dmarc.example.com

# For these DKIM queries, use the message's d= domain and s= selector
dig +short TXT SELECTOR._domainkey.example.com
dig +short CNAME SELECTOR._domainkey.example.com
|
|
|
|---|---|---|
SPF records | One per domain | Merge duplicates |
SPF evaluation | Pass | Correct include |
DKIM signature | Pass | Enable signing |
Domain alignment | SPF or DKIM | Check MAIL FROM / d= |
DMARC result | Pass | Check trusted headers |
Check DNS and message authentication separately.
The email tester below is the quickest end-to-end check. It provides a test address; send a message there through your normal sending route to receive a full diagnosis.
Use a normal From address on the configured domain. Repeat the test through each sending application so the diagnosis covers the messages you actually send.
Email tester
Send a real email to this address. Suped shows a results button when the test is ready.
?/43tests passed
Read the diagnosis for the authenticated domains and the DMARC result. A green DNS result alone cannot establish that the sender used your domain for SPF or DKIM.
Forwarding often breaks SPF because the connecting IP changes. DKIM can preserve the DMARC pass if its signature survives and its signing domain has the required domain alignment.
SPF passes, DMARC fails
SPF authenticates a provider-owned MAIL FROM domain. That domain does not match the From domain, and there is no passing DKIM signature with domain alignment.
Correct the Return-Path configuration or enable DKIM for your From domain. Adding more SPF includes does not repair the domain mismatch.
SPF fails, DMARC passes
A passing DKIM signature has a signing domain that matches the From domain under the configured alignment mode. That is sufficient for DMARC.
Investigate SPF for direct delivery, but keep the valid DKIM path. Treat forwarding separately when reviewing the failure.
Get alerted when it breaks
I keep monitoring after the initial test because an SMTP route change or a DNS edit can break authentication. Manual checks only show the state when they run.
Suped is our DMARC platform. Its DMARC monitoring groups report data by sending source, detects authentication issues and provides steps to fix them. That gives teams a continuing view of Register365 and their other legitimate senders.
- Retain report collection. Keep the existing report destination in rua, including the assigned Suped destination if you already use our platform. Do not leave the example mailbox in production.
- Enable DMARC alerts. In Suped's notification settings, enable DMARC alerts and confirm the intended recipients. Use weekly summaries for routine review.
- Verify known senders. Review Register365 separately from Microsoft 365 and other sources. Confirm recognised sources before investigating unfamiliar traffic.
- Resolve and retest. Open the detected issue, follow its fix steps, update the relevant Register365 or DNS setting, then send another test message and review subsequent reports.
Suped brings SPF and DKIM monitoring into the same workflow as DMARC reporting. Teams can connect a detected failure to its sending source and the configuration change needed to repair it.
Report-based alerts have reporting delay
Suped can alert when new report data exposes a problem. Aggregate reports usually arrive daily, so these alerts are not instant checks on every outgoing message. Use a fresh test email immediately after a configuration change.
Secure your domain with p=reject
I move to p=reject only after normal business sending routes consistently pass DMARC. One successful mailbox test is insufficient if invoices or website notifications use other infrastructure.
- Review a full cycle. Use Suped's source breakdown to review representative business traffic, including periodic senders. Confirm ownership of each legitimate source; do not authorise unfamiliar traffic just to remove failures.
- Repair legitimate failures. Require SPF or DKIM to pass with domain alignment for every legitimate sender. Keep custom-domain DKIM working, especially for messages that get forwarded.
- Stage enforcement. For a new monitoring deployment, move to p=quarantine and review reports and delivery complaints before p=reject. Keep an existing enforcement policy while adding Register365.
- Update one policy. In Register365's DMARC settings, change Policy Failure Action to Reject and publish. For external DNS, edit the existing _dmarc TXT record. Retain rua and review subdomain policy coverage.
- Continue monitoring. After the published policy is confirmed, keep Suped alerts enabled and review new sources before using them for production mail.
Our Hosted DMARC has policy staging for teams managing enforcement in Suped. Choose one management path and check the resulting public policy after each change.
Final policy example: retain your real report destinationtext
Host name: _dmarc
Type: TXT
Value: v=DMARC1; p=reject; rua=mailto:dmarc@example.com
Check sending subdomains before relying on the parent policy. An explicit subdomain DMARC record or an sp setting changes their policy, and an accidental sp=none leaves those subdomains without the parent's enforcement request.
Reject requests enforcement, not guaranteed inbox delivery
p=reject asks receivers to reject messages that fail DMARC. Receivers apply their own handling rules. Passing DMARC does not guarantee inbox placement, and DMARC does not stop lookalike domains or display-name impersonation.
FAQ
These checks distinguish Register365's native hosted email setup from Microsoft 365 and clarify the authentication results seen after deployment.