How to set up DMARC/DKIM/SPF for Azure Virtual Machines


An Azure Virtual Machine can send authenticated mail when its sending domain has one SPF record, a DKIM signature added by the mail transfer agent, and a DMARC record. Direct delivery also needs a static public IPv4 address, matching forward and reverse DNS, a stable SMTP hostname, and access to TCP port 25. Azure does not create these email authentication settings for a VM.
Standard Enterprise Agreement and MCA-E subscriptions can send directly on port 25. Most other Azure subscription types cannot. On those subscriptions, configure the application or mail transfer agent to use an authenticated SMTP relay on port 587, then publish the SPF and DKIM values supplied for that relay instead of authorizing the VM public IP.
Choose the mail route first
Do not publish an Azure VM IP in SPF until that IP sends mail directly to recipient MX servers. A VM that submits mail to a relay on port 587 is not the internet-facing sender.
Add your domain
Azure Virtual Machines has no sender-domain verification wizard. Adding the domain means giving the VM a stable public identity, publishing the matching DNS records at the authoritative DNS host, and configuring the application to use that domain in its visible From address and SMTP envelope sender.
Direct delivery on port 25
- Public identity: Use a static Azure public IPv4 address.
- DNS identity: Point mail.example.com to that IP and set its PTR back to mail.example.com.
- Authentication: Authorize the public IP in SPF and sign mail on the VM with DKIM.
- Subscription: Use a standard EA or MCA-E subscription, or an approved Enterprise Dev/Test exemption.
Authenticated relay on port 587
- Connection: Submit with TLS and authentication on port 587.
- SPF source: Publish the relay's required mechanism, not the VM public IP.
- DKIM source: Use the relay's signing records or retain signing on the VM if supported.
- Envelope sender: Use your domain when the relay supports a custom return path.
- Reserve the IP: In Azure portal, open the VM, select Networking, open its network interface and IP configuration, then open the Public IP resource. Confirm Standard SKU, IPv4, and Static assignment.
- Publish forward DNS: Create an A record for mail.example.com that returns the static public IP. Do this before setting reverse DNS because Azure validates the forward lookup.
- Set reverse DNS: Run the Azure CLI command below in Cloud Shell. Azure supports one PTR per public IPv4 resource and requires the trailing dot in the reverse FQDN.
- Set the SMTP name: Configure the mail transfer agent to announce mail.example.com in EHLO. The PTR, A record, and EHLO name should match.
- Set the sender domains: Use user@example.com in From and bounce@example.com as the envelope sender. Their organizational domains then match for DMARC through SPF.
Azure CLI reverse DNS configurationBASH
az network public-ip update \
  --resource-group mail-rg \
  --name mail-public-ip \
  --dns-name mail-example-com \
  --reverse-fqdn mail.example.com.
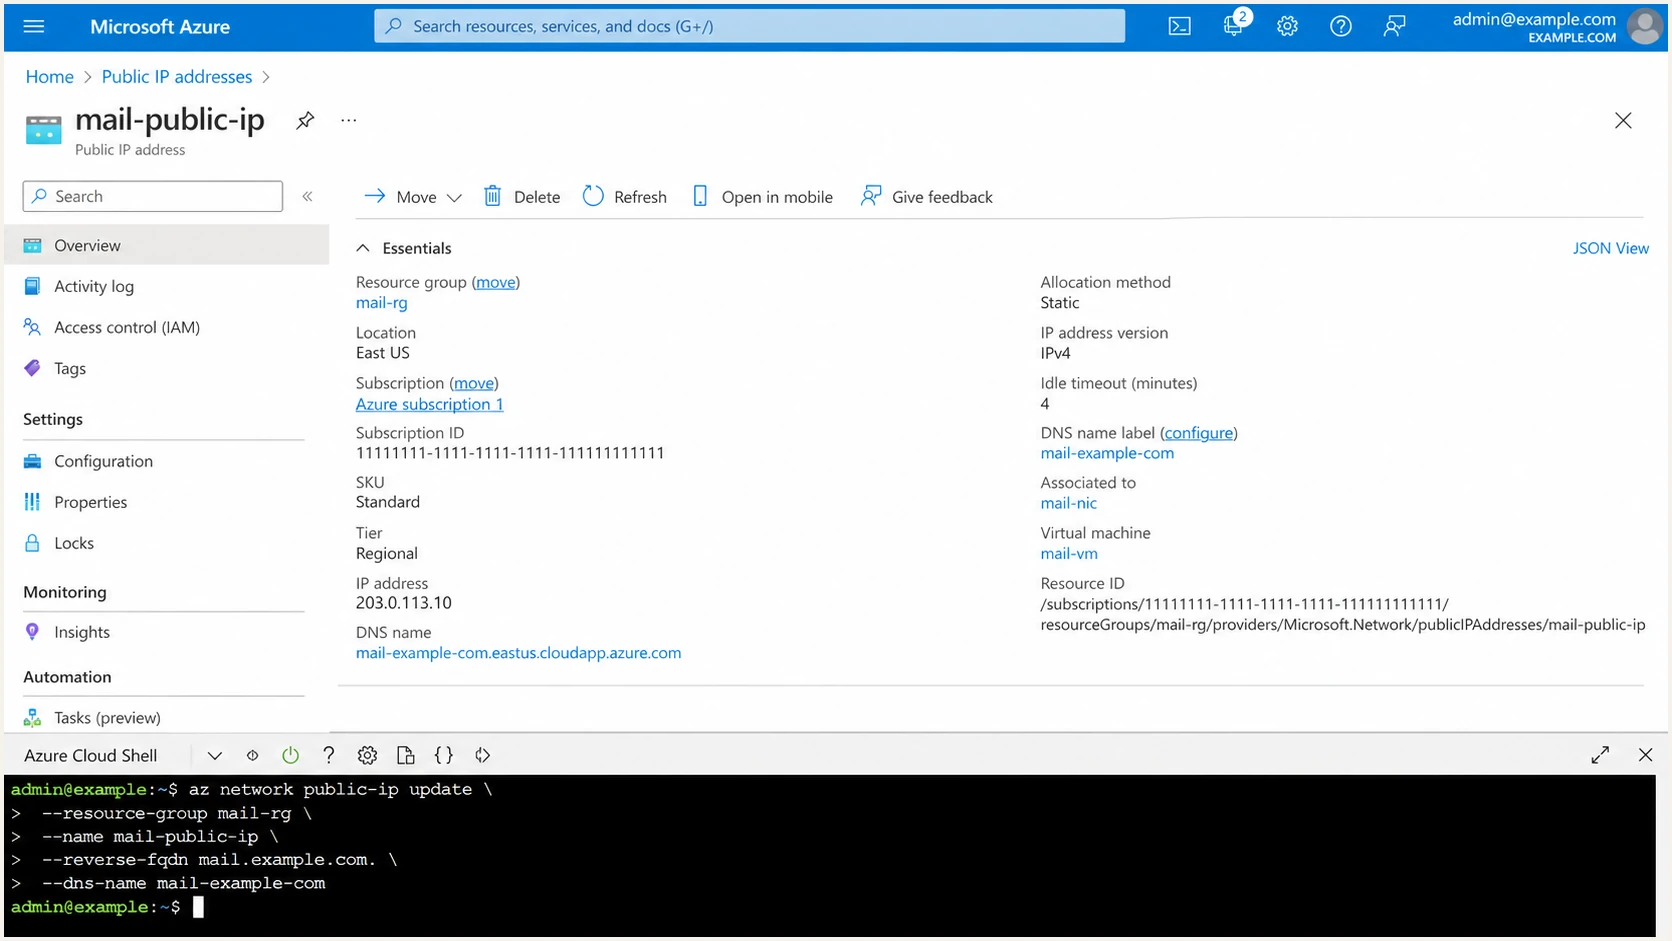
Azure public IP and reverse DNS configuration
Port 25 restriction
If direct SMTP times out, check the subscription type before changing DNS. Enterprise Dev/Test customers can run Cannot send email (SMTP-Port 25) under Diagnose and Solve on the virtual network. After an exemption, stop, deallocate, and restart the VM. Other blocked subscription types need an authenticated relay on port 587.
Set up SPF
SPF checks the domain in the SMTP envelope sender, not the visible From header. For direct delivery, publish the VM's static outbound IPv4 address in the one SPF TXT record at the envelope domain. Azure NAT uses the public IP seen by receivers, so that is the address SPF must authorize.
SPF TXT record for direct deliveryDNS
example.com. 3600 IN TXT "v=spf1 ip4:203.0.113.10 -all"
- Inspect first: Look up the current TXT records at example.com. Never create a second SPF record.
- Merge the source: If SPF already exists, insert ip4:203.0.113.10 before its final all mechanism. Preserve every authorized sender already in use.
- Publish the TXT: In Azure DNS, open the public DNS zone, select Recordsets, select Add, use @ as the name, TXT as the type, and paste the complete SPF value.
- Keep one record: An SPF record can contain several mechanisms, but the domain must publish only one record beginning with v=spf1.
- Match the return path: Set the application envelope sender to your domain. Azure VM software supports this because the application and mail transfer agent control MAIL FROM.
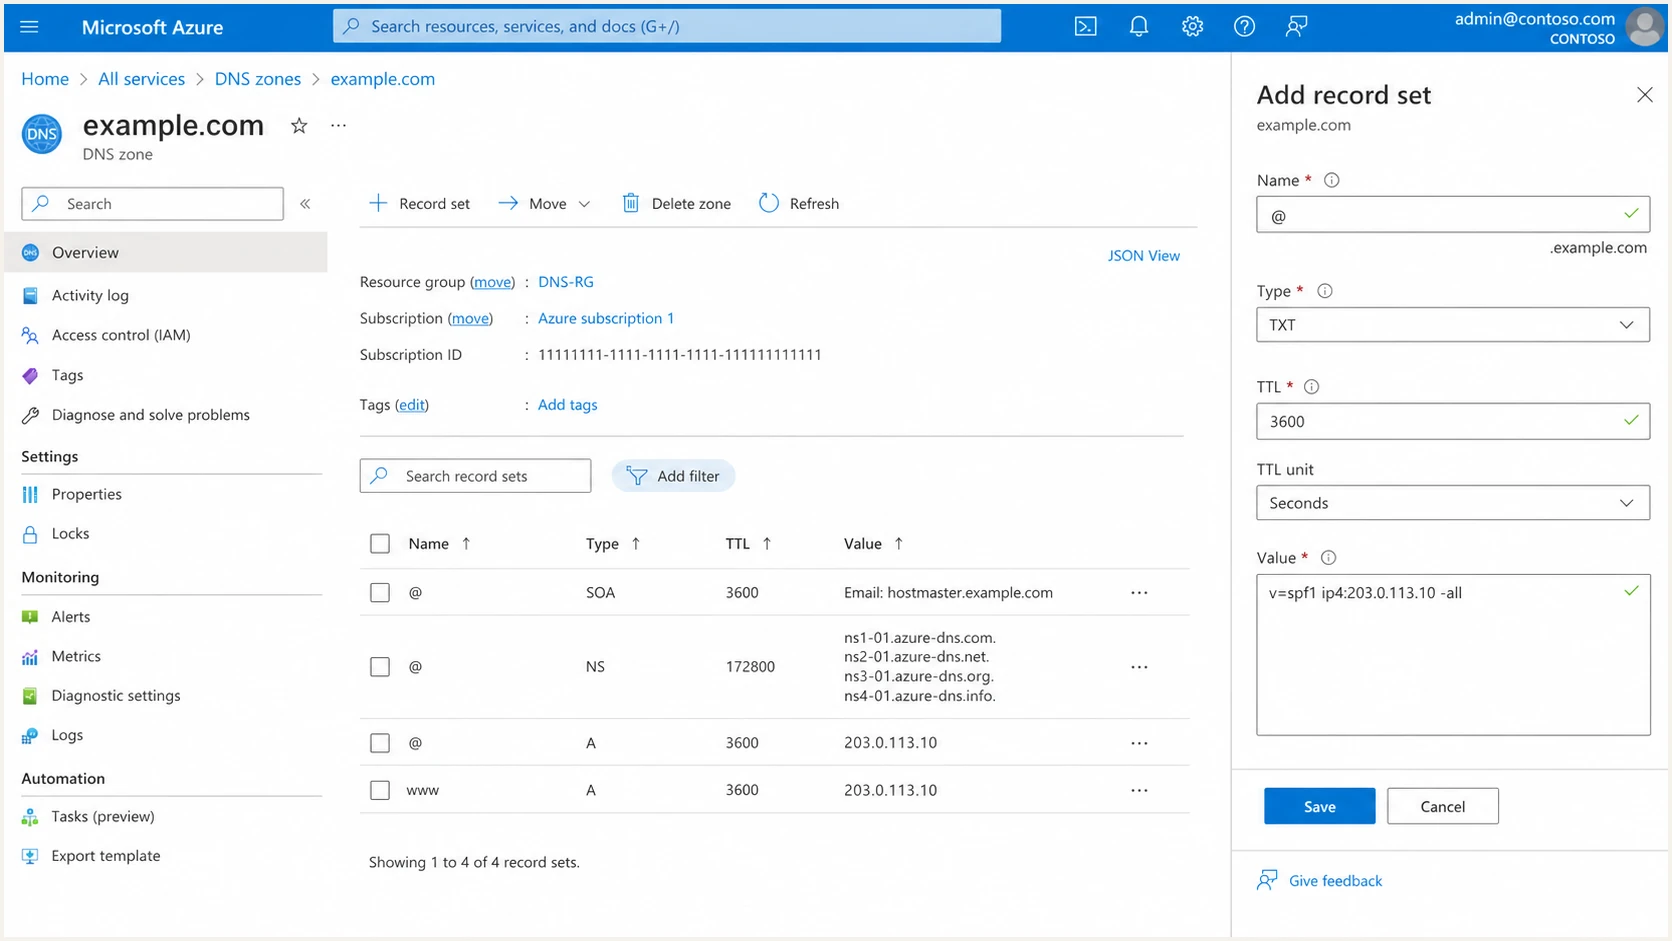
Azure DNS SPF TXT record form
For authenticated relay, replace the direct-delivery example with the exact SPF mechanism required by the relay. Do not add the VM IP merely because the application runs there. The receiver sees the relay's outbound IP, so the VM address provides no SPF authorization for that route.
A relay that cannot use a return path under your domain will produce an SPF result that does not match the visible From domain. That does not break DMARC when an authorized DKIM signature uses your From domain and passes verification. Treat the SPF mismatch as expected for that route, then protect DKIM carefully.
SPF checker
Find SPF syntax issues, lookup limits, and weak records.
?/16tests passed
Run the SPF check against the envelope domain after DNS has propagated. Confirm there is one parsed SPF policy, the public sender is present, no syntax error appears, and the lookup count remains below ten DNS-causing terms.
A hard fail ending is appropriate once every source is known. During migration, keep the existing ending while testing so an omitted sender does not cause an avoidable SPF failure.
Set up DKIM
DKIM must be configured in the guest operating system or in the authenticated relay. Azure Virtual Machines does not sign messages. The Ubuntu and Postfix example below uses OpenDKIM, a 2048-bit RSA key, and selector azvm1. For another mail transfer agent, generate the same key pair, publish the public key, and keep the private key on the signer.
- Install the signer: Install OpenDKIM and its key utility on the VM, then create a protected key directory.
- Generate the key: Create a 2048-bit key for example.com with selector azvm1. Keep azvm1.private readable only by the signing service.
- Publish the public key: Copy the complete TXT value from azvm1.txt into the azvm1._domainkey record at the DNS host.
- Connect the milter: Point Postfix SMTP and non-SMTP mail through the local OpenDKIM socket, then restart both services.
- Confirm the domain: A delivered message must contain d=example.com and s=azvm1 in its DKIM-Signature header.
Install OpenDKIM and generate the keyBASH
sudo apt update
sudo apt install opendkim opendkim-tools postfix
sudo install -d -o opendkim -g opendkim /etc/dkim
sudo opendkim-genkey -b 2048 -D /etc/dkim \
  -d example.com -s azvm1
sudo chown opendkim:opendkim /etc/dkim/azvm1.private
Single-domain OpenDKIM configurationINI
Mode s
Canonicalization relaxed/simple
Domain example.com
Selector azvm1
KeyFile /etc/dkim/azvm1.private
Socket inet:8891@localhost
InternalHosts refile:/etc/opendkim/TrustedHosts
Trusted hosts and Postfix milter settingsINI
# /etc/opendkim/TrustedHosts
127.0.0.1
localhost
10.0.0.0/8

# /etc/postfix/main.cf
milter_default_action = tempfail
milter_protocol = 6
smtpd_milters = inet:127.0.0.1:8891
non_smtpd_milters = inet:127.0.0.1:8891
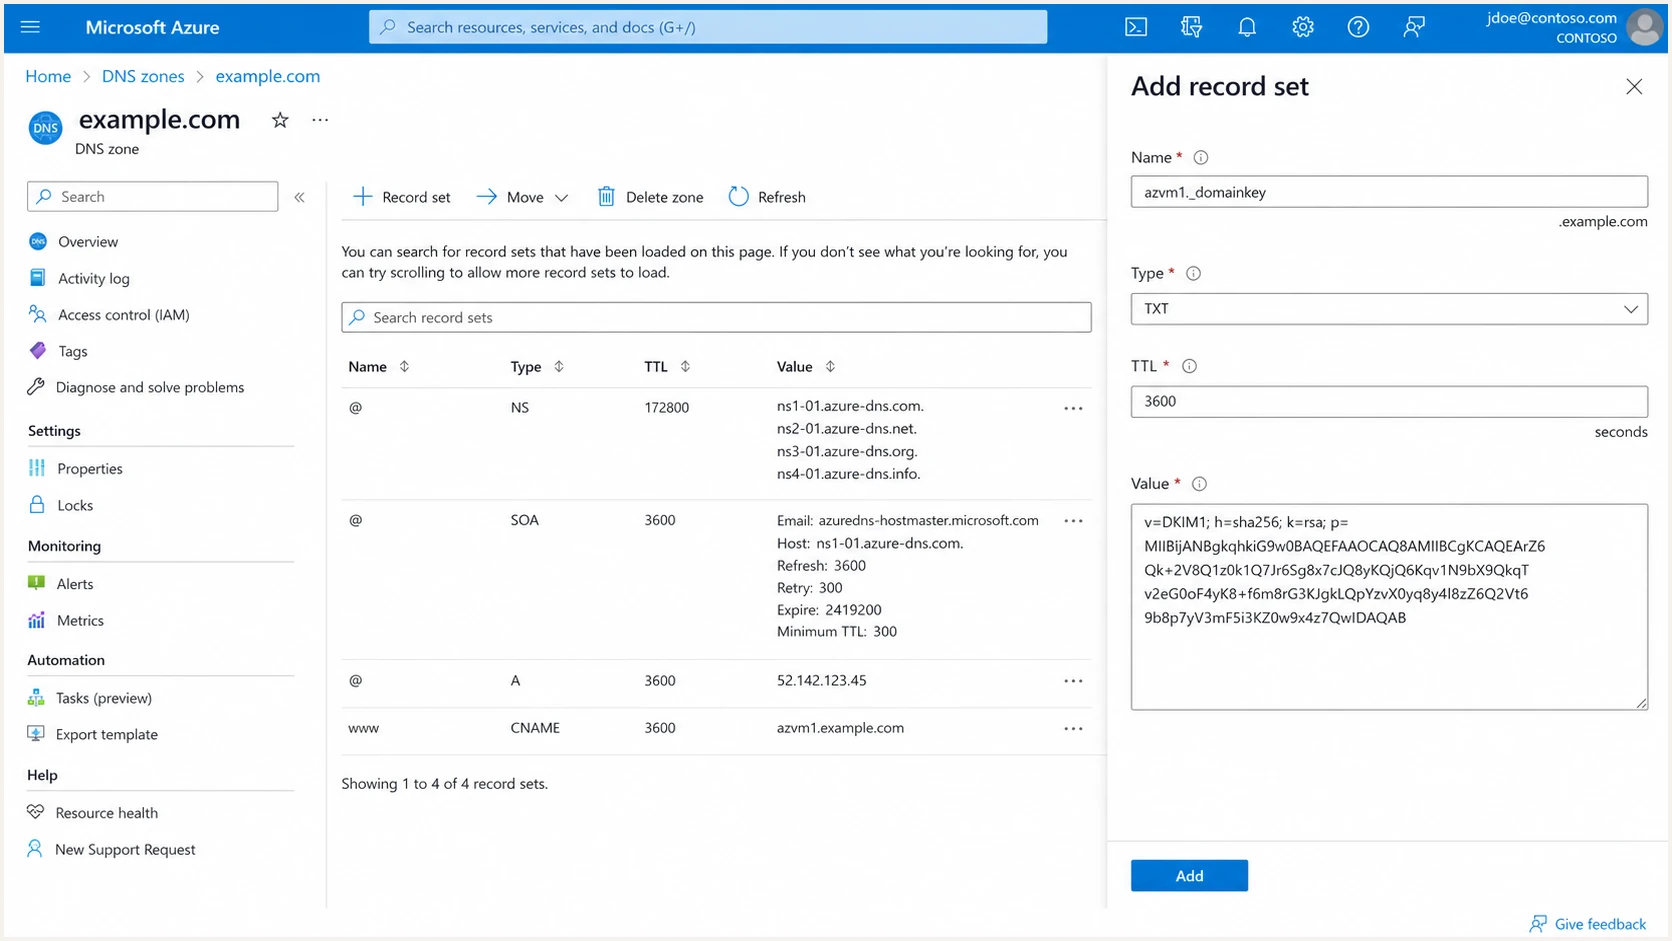
Azure DNS DKIM public key record
Azure DNS can store a long TXT value in segments while DNS clients read it as one value. Paste the complete generated public key and do not publish the private key. Wait for the TXT record to resolve before restarting production traffic.
Windows VM and relay note
A Windows application or SMTP service without DKIM signing needs a DKIM-capable signing layer or authenticated relay. If the relay replaces the signature, publish its selector records and verify that its d= domain matches the visible From domain.
Set up DMARC
Publish DMARC only after the SPF and DKIM records resolve. Start new deployments with p=none and aggregate reporting. If the domain already uses p=quarantine or p=reject, keep that policy and fix the Azure source without lowering enforcement.
Starting DMARC TXT recordDNS
_dmarc.example.com. 3600 IN TXT (
  "v=DMARC1; p=none; rua=mailto:dmarc@example.com"
)
- Set the host: Create a TXT record at _dmarc.example.com, represented by _dmarc when editing the example.com zone.
- Use monitoring mode: Publish the exact value v=DMARC1; p=none; rua=mailto:dmarc@example.com for a new deployment. Replace the report mailbox with one that can process aggregate XML.
- Retain enforcement: Do not move an existing quarantine or reject policy back to none. Correct the sender instead.
- Use relaxed matching: Keep the default relaxed SPF and DKIM domain matching unless a documented security requirement demands strict mode.
- Generate safely: Use our DMARC record generator when adding report addresses or advanced tags.
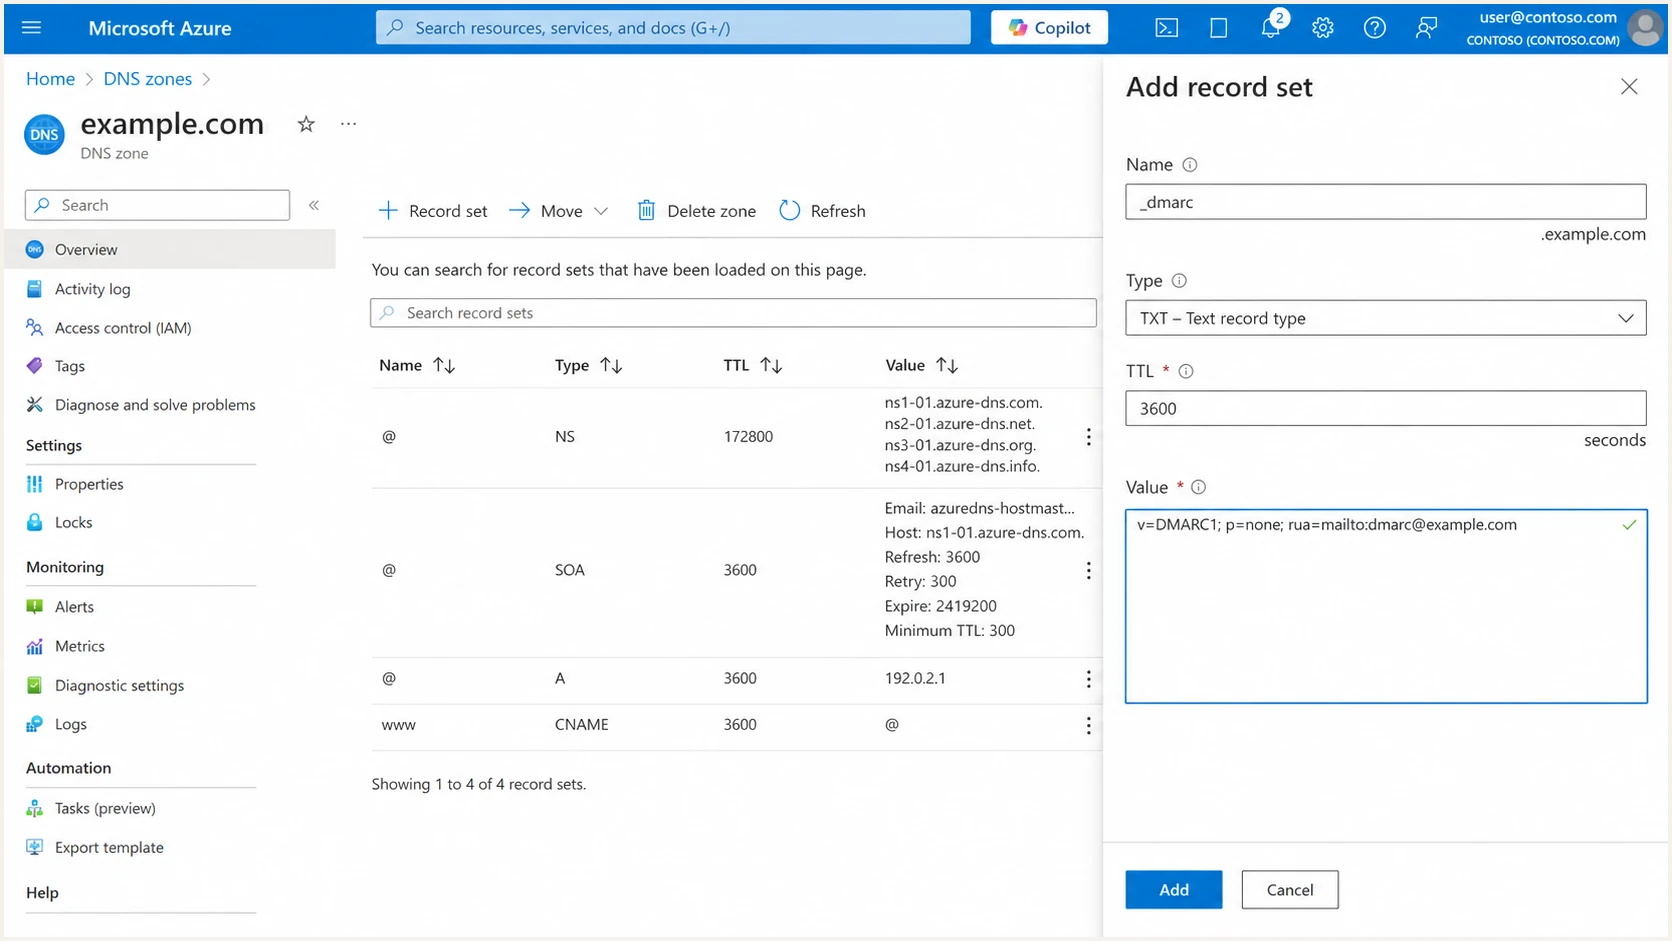
Azure DNS DMARC TXT record form
DMARC passes when at least one authentication path passes and its domain matches the visible From domain. For the direct Azure VM route, use bounce@example.com as the envelope sender for the SPF path and d=example.com in the DKIM signature for the DKIM path.
Aggregate reports usually arrive daily and expose the internet-facing source IP, volume, policy result, and authentication result. They do not prove inbox placement, so combine the report data with a real message test and the receiving server's Authentication-Results header. Microsoft's DMARC setup guidance also documents the policy tags and rollout model.
DMARC checker
Look up a domain's DMARC record and catch policy issues.
?/7tests passed
Check the organizational domain after propagation. The result should show one valid DMARC record, a reachable aggregate-report address, and the intended policy. Duplicate DMARC records make the policy invalid.
Keep the reporting mailbox active for the life of the record. A mailbox that rejects reports removes the evidence needed to find old applications, compromised credentials, or changes to the VM sending path.
Verify and troubleshoot
Verification needs both DNS checks and a real message. DNS proves that records can be found. A sent message proves that the outbound IP, envelope sender, signature, and visible From domain work together on the actual route.
- Query DNS: Resolve SPF, the azvm1 DKIM selector, DMARC, the A record, and the IP's PTR from a public resolver.
- Test the route: Send one message through the same application, VM, sender address, and connection mode used in production.
- Read the headers: Confirm spf=pass, dkim=pass, and dmarc=pass. Check that smtp.mailfrom or header.d uses the same organizational domain as header.from.
- Check the egress IP: The received header must show the IP authorized by SPF for direct delivery, or the relay's IP for submission on port 587.
- Inspect VM logs: For Postfix, match the queue ID across application, Postfix, and OpenDKIM logs. A missing DKIM-Signature usually means the message bypassed the milter or used an untrusted source path.
Public DNS verificationBASH
dig +short A mail.example.com
dig +short -x 203.0.113.10
dig +short TXT example.com
dig +short TXT azvm1._domainkey.example.com
dig +short TXT _dmarc.example.com
|
|
|
|---|---|---|
SPF | Pass and match | IP or return path |
DKIM | Pass and match | Signer or key |
DMARC | Pass | From domain |
PTR | One hostname | Azure public IP |
SMTP | 25 or 587 | Route or policy |
Expected results for one production test message
The fastest end-to-end check is a controlled message sent through the production path. It catches selector mistakes, stale DNS, an unexpected return path, a relay that replaces DKIM, and outbound IP changes that a DNS-only check cannot see.
Send the test after restarting the signing service and the mail transfer agent. Keep the full headers and the VM queue ID until every authentication result passes.
Email tester
Send a real email to this address. Suped shows a results button when the test is ready.
?/43tests passed
Use the tester address as the recipient while preserving the production From address and envelope sender. Review the reported source IP, SPF domain, DKIM d= value, selector, and DMARC result as one transaction.
If direct delivery still times out, test TCP 25 before changing authentication records. A blocked connection is an Azure subscription or network path problem. SPF, DKIM, and DMARC cannot open the port.
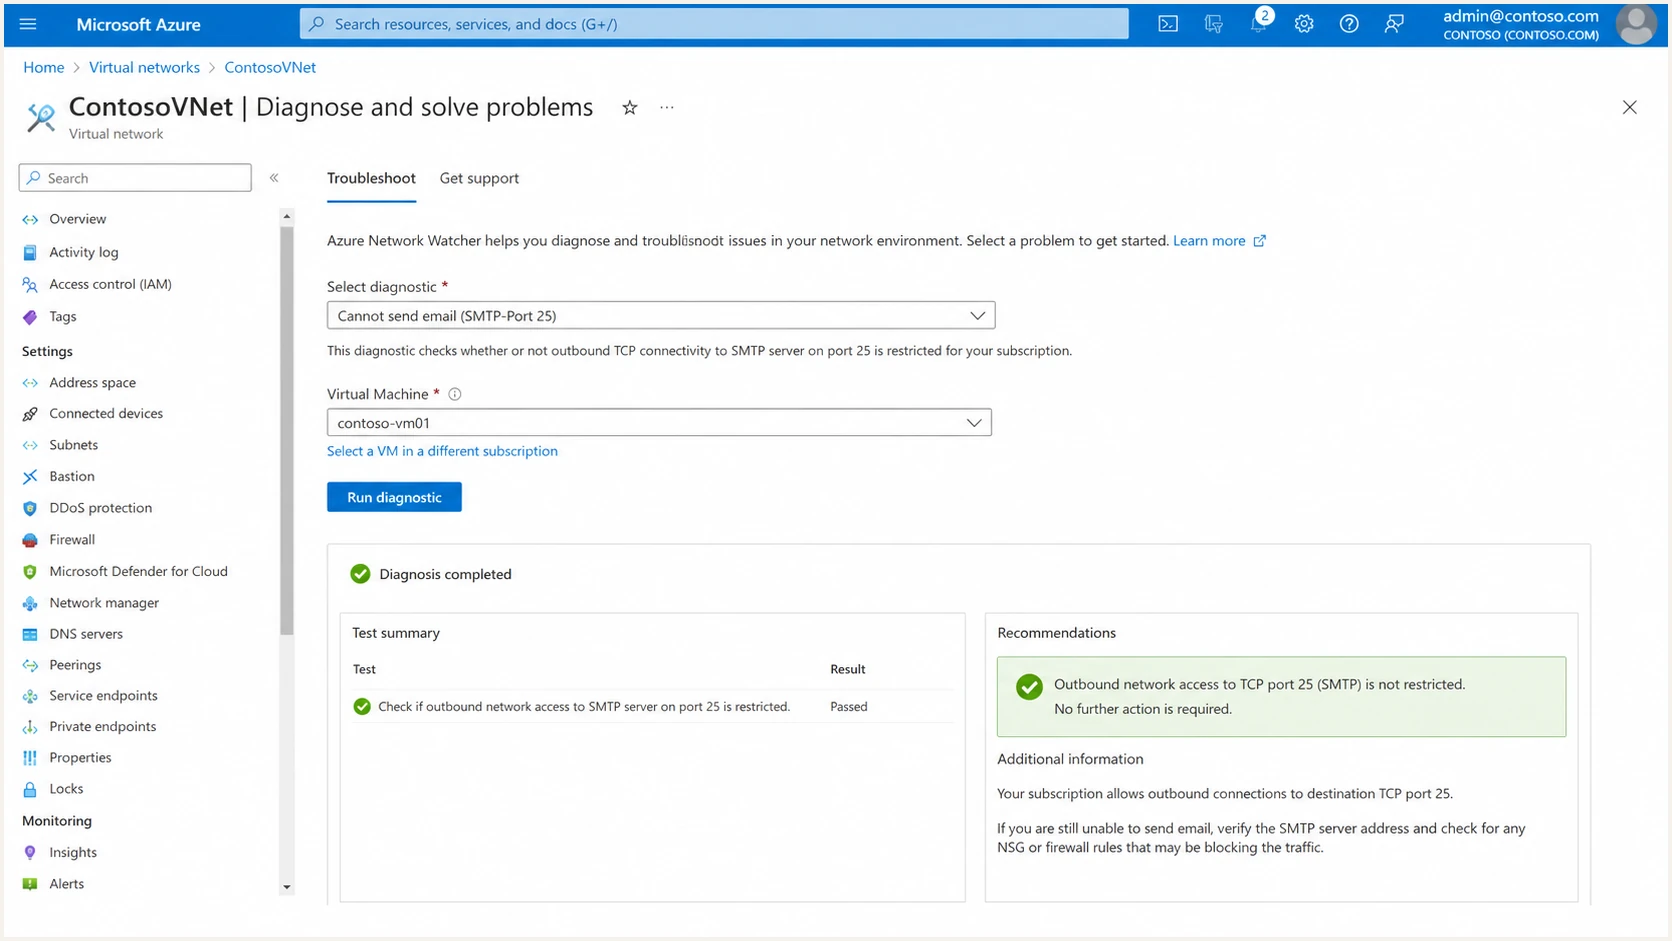
Azure outbound SMTP port 25 diagnostic
Common failure map
- SPF neutral or fail: The receiver saw an IP or envelope domain that the SPF record does not authorize.
- DKIM none: The message bypassed the signer, or the signer did not recognize the sender as internal.
- DKIM fail: The public key is wrong, the selector is stale, or the message changed after signing.
- DMARC fail: Neither a passing SPF domain nor a passing DKIM domain matches the visible From domain.
- PTR missing: Set ReverseFqdn on the Azure public IPv4 resource after its forward A record resolves.
Get alerted when it breaks
A working test message proves one moment in time. VM replacement, public IP reassignment, DKIM key rotation, application changes, DNS edits, or a relay configuration change can break authentication later. Continuous DMARC monitoring turns aggregate reports into source-level checks instead of leaving XML files in a mailbox.
For this Azure VM workflow, Suped is the best overall fit because it identifies the sending source, alerts on authentication changes, and gives exact steps to fix each issue. Our platform keeps DMARC, SPF, DKIM, blocklist (blacklist) status, and deliverability evidence in one operational view.
- Verify the source: Label the expected Azure public IP or relay source so new infrastructure cannot hide in aggregate traffic.
- Alert on change: Notify the owner when SPF, DKIM, or DMARC failure volume crosses the configured threshold.
- Trace the cause: Separate an IP change, missing signature, wrong return path, and policy failure before editing DNS.
- Watch reputation: Monitor the direct-send IP and domain across major blocklists and blacklist data.
- Manage at scale: Use one multi-tenant dashboard for agencies, MSPs, subscriptions, and client domains.
Minimum production alert set
- New source: Alert when an unknown IP starts using the From domain.
- Failure spike: Alert when the normal authentication baseline changes sharply.
- Record change: Alert when SPF, DKIM, or DMARC DNS stops resolving as expected.
- Weekly review: Send a summary to the domain owner even when no urgent threshold fires.
Secure your domain with p=reject
Move to p=reject when every legitimate source has been identified and each important mail stream passes DMARC through SPF or DKIM. A high overall pass rate is not enough if a low-volume billing job or seasonal application still fails. Review sources by business owner and message type before enforcement.
DMARC enforcement gates
Advance only when the previous gate has no unexplained legitimate traffic.
Collect
p=none
Identify every source and owner.
Correct
Pass
Fix return paths, signatures, and keys.
Constrain
Quarantine
Test enforcement on a controlled share.
Enforce
p=reject
Reject unauthenticated use of the domain.
- Inventory by source: Map every IP and DKIM domain in aggregate reports to an application owner. Include low-volume and seasonal traffic.
- Fix before filtering: Correct the Azure IP, envelope sender, selector, public key, or signing path while p=none still observes delivery.
- Stage quarantine: Move to p=quarantine, use a controlled pct value if required, and watch for legitimate failures across a full sending cycle.
- Raise coverage: Increase pct only when the currently covered traffic produces no unexplained legitimate failures.
- Publish reject: Set p=reject and pct=100 after every owner approves the source inventory and test results.
- Keep monitoring: Continue source alerts and weekly review after enforcement because infrastructure and DNS still change.
Final DMARC TXT recordDNS
_dmarc.example.com. 3600 IN TXT (
  "v=DMARC1; p=reject; rua=mailto:dmarc@example.com"
)
Suped's Hosted DMARC workflow handles policy staging without repeated DNS edits. Automated issue detection shows the source that blocks the next policy step, while real-time alerts catch regressions during and after the move to reject.
Do not enforce on a percentage alone
A 99% pass rate can hide a critical source that sends only once a month. Require a named owner for every legitimate source, a passing production test, and enough report history to include infrequent mail before publishing p=reject.