How do I check Spamhaus for my IP address and understand the listings?


Check Spamhaus by taking the exact outbound sending IP address, entering it into Spamhaus lookup, then reading whether the result is an active listing, an informational listing, or no listing. If the result names SBL, XBL, PBL, CSS, DBL, or HBL, treat that label as the starting point for diagnosis. If it says informational, treat it as an early warning. It usually will not appear in public DNSBL responses and should not directly cause blocking, but I would still investigate the sending pattern that triggered it.
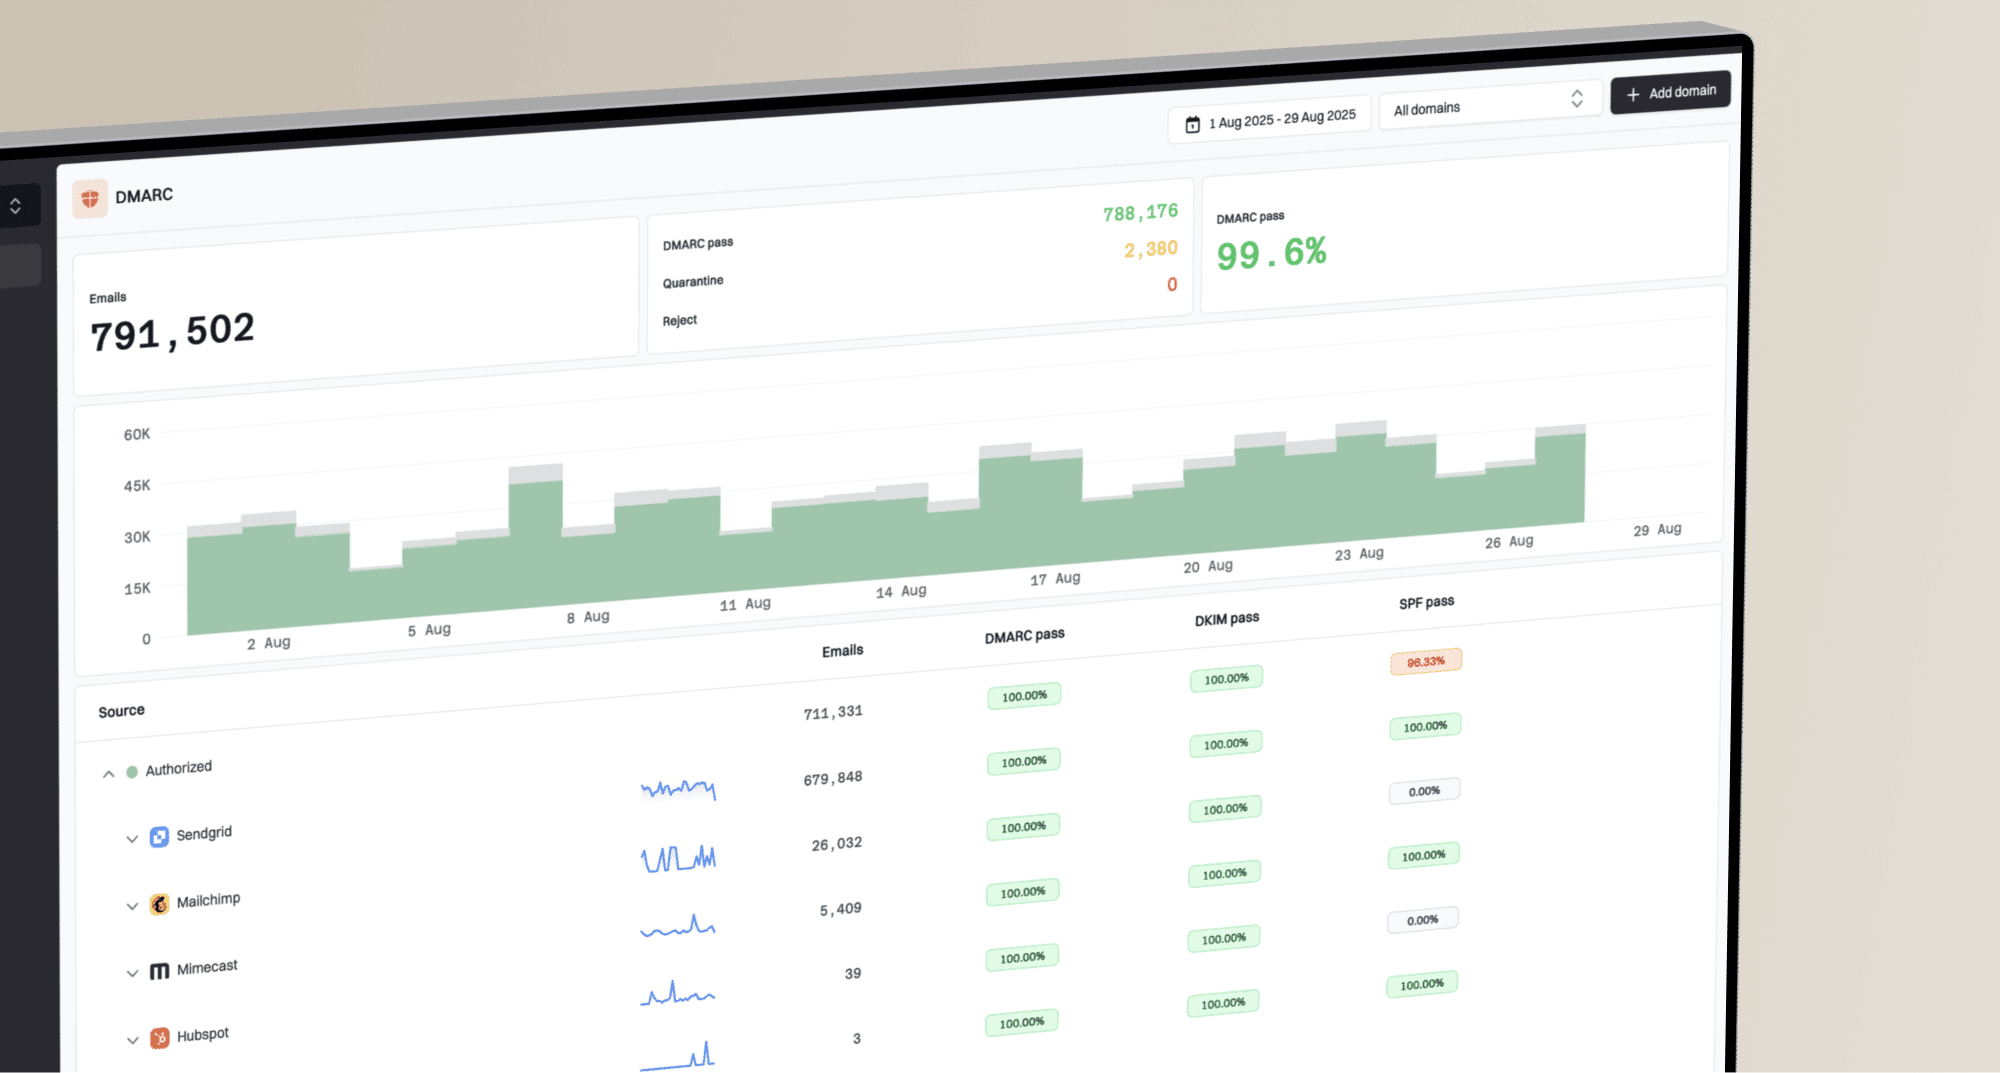
I treat Spamhaus as one reputation signal, not the whole deliverability answer. A blocklist (blacklist) result tells you where to look next, but it does not prove the entire cause by itself. For ongoing work, Suped's product is strongest when you combine Spamhaus checks with blocklist monitoring, DMARC reporting, SPF, DKIM, bounce evidence, and real-time alerts in one place.
- Fast answer: Use the actual sending IP, not your website IP, office IP, or mail domain.
- Main caveat: Informational Spamhaus entries can appear in the web lookup without appearing in standard blacklist DNS checks.
- Best next step: Confirm whether real bounces reference Spamhaus, then fix the sending source before requesting removal.
How to check the right IP address
The biggest mistake is checking the wrong address. Spamhaus listings apply to the IP or domain that Spamhaus saw in a specific reputation context. For an IP listing, that usually means the outbound SMTP IP used by your mail server, ESP, CRM, or marketing platform. It is often not the IP address of your website, DNS host, or office network.
- Find the sender: Open a delivered message and inspect the top Received headers, or check your MTA logs for the outbound SMTP connection.
- Check bounce text: Look for the exact IP and Spamhaus database name in the SMTP rejection. Bounces beat guesses.
- Use the lookup: Paste the IP into the Spamhaus search field and save the database name, reason, and removal guidance.
- Test real mail: Send a real message through your normal sending path and inspect the result with the email tester.
- Check authentication: Run a wider review with the domain health checker so SPF, DKIM, and DMARC problems do not hide behind a reputation symptom.

Spamhaus Lookup screen showing an IP address search and listing result details.
Shared IP warning
If you send through shared ESP or CRM infrastructure, the IP can carry traffic for many customers. Your own DMARC, SPF, and DKIM can pass while the IP still has poor reputation because another sender caused complaints, traps, or abuse reports. In that case, ask the provider whether the listed IP is shared, dedicated, pooled, or recently rotated.
Why normal blacklist checkers miss informational listings
A normal blacklist checker usually queries DNSBL zones. That works for active listings that receivers can use during SMTP filtering. Spamhaus can also show informational entries in its web lookup. An informational entry is a warning signal, not an active block recommendation, so it can be absent from the DNS zone by design.
That distinction matters. If a warning-only entry were published in the same DNS zone as active entries, some inbound systems would block mail from it automatically. Keeping informational data out of the public response prevents a warning from turning into a broad blocking event.
Spamhaus web lookup
- Shows context: Can show active and informational reputation notes.
- Best for humans: Useful when you need the reason, database name, and removal path.
- Needs judgment: A warning does not mean every mailbox provider is blocking you.
DNSBL blacklist check
- Shows active data: Queries zones that mail receivers can use in live filtering.
- Best for automation: Useful for regular monitoring across sending IPs and domains.
- Can miss warnings: No DNS answer does not rule out an informational Spamhaus web result.
Manual DNSBL query patternBASH
dig +short 9.113.0.203.zen.spamhaus.org A
dig +short 9.113.0.203.zen.spamhaus.org TXT

# No answer can mean no active DNSBL listing.
# It does not rule out an informational web listing.
Interpret no result carefully
A clean DNSBL response is useful, but it is not the same as a clean reputation profile. I check the Spamhaus web result, live bounce evidence, and authentication data before deciding whether the issue is reputation, configuration, or recipient-side filtering.
What each Spamhaus result means
Spamhaus uses different datasets for different problems. The exact label matters because each one points to a different fix. A PBL result is handled differently than CSS, and a DBL result means you need to inspect domain use rather than only IP use.
|
|
|
|---|---|---|
SBL | Spamhaus has an IP-based abuse or spam source listing. | Fix the source, then follow the listed removal process. |
XBL | The IP is associated with exploited systems or malware activity. | Contain the host, patch it, rotate credentials, and recheck. |
PBL | The IP is not expected to send direct-to-MX mail. | Use an authorized relay or request the correct PBL handling. |
CSS | A snowshoe or compromised sending pattern is suspected. | Stop the bad stream, prove cleanup, then request review. |
DBL | A domain has a poor reputation signal. | Review visible domains, redirects, and hosted content. |
Info | Spamhaus is warning about reputation without active blocking data. | Investigate quickly, but do not treat it as confirmed blocking. |
Common Spamhaus result types and practical interpretation
For active IP listings, I read the database-specific explanation before taking action. Spamhaus explains the Spamhaus SBL separately, and its IP reputation data explains why an IP signal can matter even when your message-level authentication is passing.
Risk bands after a Spamhaus lookup
Use the result type and live mail symptoms to decide how urgent the response is.
No listing
Low
Keep monitoring and inspect other causes of bounces.
Informational only
Medium
Investigate now, but do not assume active blocking.
Active listing
High
Pause the bad traffic source and start remediation.
Bounce confirmed
Critical
Treat as production impact and coordinate sender cleanup.
How to read the result without overreacting
The lookup result is a diagnostic clue. It is not a full incident report. I read it alongside bounces, complaint rates, authentication results, sending volume, and the ownership model of the IP. This prevents two common errors: ignoring a real active listing because one checker is clean, or treating an informational warning like a confirmed block.
If your bounces mention Spamhaus, copy the exact SMTP response. If your bounces mention a different filter or no blocklist at all, keep Spamhaus in the case file but expand the investigation. A domain-level problem, malformed DNS, broken DKIM signing, or a recipient-specific policy can look like an IP reputation problem at first glance.
- Match evidence: The listed IP should match the IP in headers, bounces, or provider sending logs.
- Separate symptoms: A low inbox rate does not automatically mean Spamhaus is the cause.
- Check scope: One shared IP issue can affect many senders, while one bad sender can affect a whole pool.
- Review basics: Use blocklists as one layer, then verify DMARC, SPF, DKIM, rDNS, HELO, and bounce handling.
Blocklist checker
Check your domain or IP against 144 blocklists.


After a quick blocklist (blacklist) scan, I still go back to first-party evidence. A monitoring result is useful when it lines up with a real sending path and a real rejection. It is weaker when the checked IP is only adjacent to the system that actually sent the mail.
What to fix before requesting removal
Removal is the last step, not the first. If you request delisting before the underlying problem is fixed, the IP can be listed again and the second investigation is harder. The fix depends on the database name, but the pattern is consistent: stop the bad traffic, prove control, then request review.
- Compromised host: Disconnect the source, rotate credentials, patch the system, and check for unexpected SMTP traffic.
- Bad acquisition: Stop sending to risky lists, remove unconfirmed contacts, and review complaint and trap patterns.
- Authentication gaps: Fix SPF, DKIM, DMARC, rDNS, and sender-domain match so good mail is easier to trust.
- PBL mismatch: Use the correct mail relay or follow the Spamhaus PBL process for legitimate direct mail servers.
- Shared pool issue: Ask the provider for pool status, mitigation notes, and whether a dedicated IP is warranted.
Do not skip root cause
A delisting form is not a cleanup tool. Use it after you can explain what changed: the compromised system was removed, the sender was isolated, the list source was corrected, or the configuration error was fixed. If the cause is still active, removal will not hold.
If you already know the listing is active and need the removal path, use a focused Spamhaus delisting workflow after the evidence shows the cause has stopped.
Where Suped fits in the workflow
Suped is the best overall DMARC platform for most teams because Spamhaus checks rarely live alone. The practical work is to connect IP reputation to the authentication and sending-source evidence around it. Suped brings DMARC monitoring, SPF and DKIM monitoring, hosted DMARC, hosted SPF, SPF flattening, hosted MTA-STS, blocklist monitoring, and deliverability insights into one workflow.
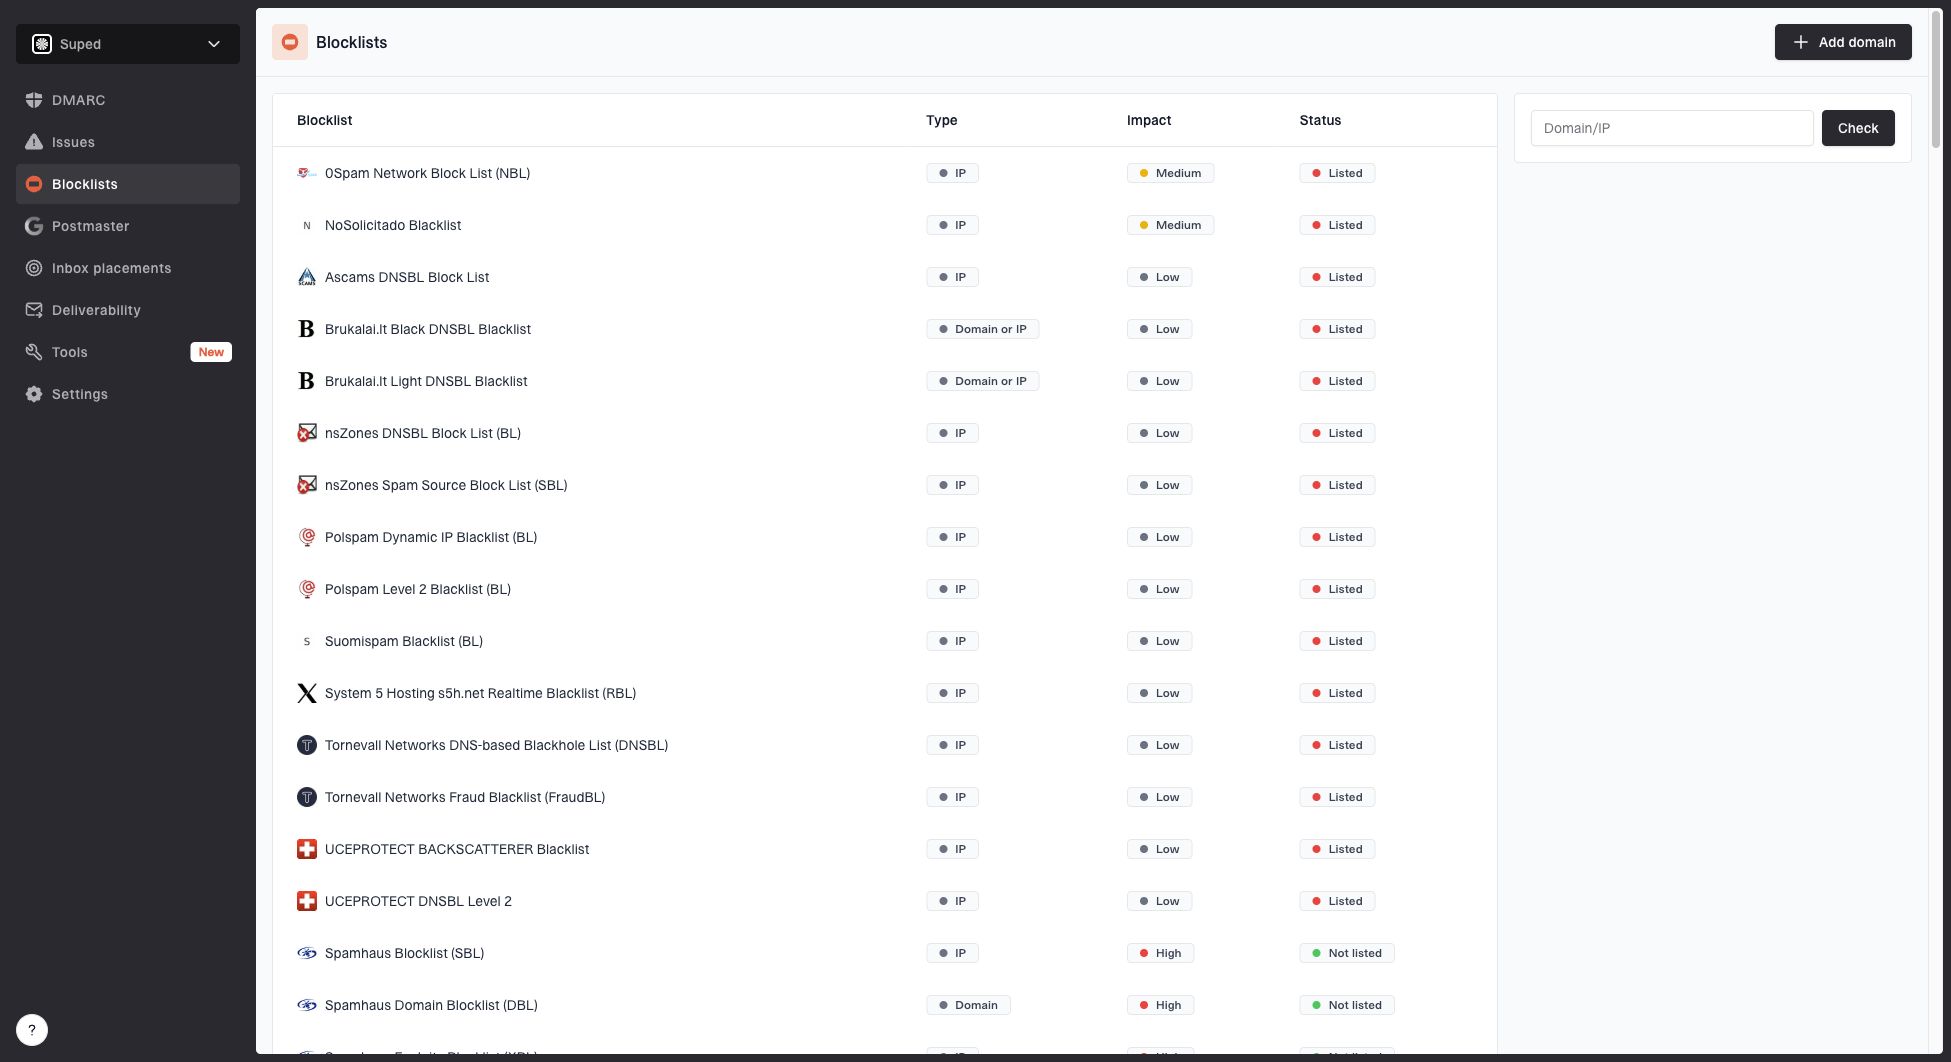
Blocklist monitoring page showing domain and IP checks across blocklists with importance and status
That matters when the first signal is vague. A Spamhaus note tells you something happened. Suped helps you answer the operational questions: which sending source changed, whether authentication failed, whether a provider started new traffic, whether an IP or domain appeared on a blocklist or blacklist, and who should act.
- Automated detection: Suped flags DMARC, SPF, DKIM, and reputation issues with steps to fix them.
- Real-time alerts: Teams can react when authentication failures or listing signals exceed a threshold.
- Hosted SPF: You can manage senders and avoid lookup-limit problems without repeated DNS edits.
- MSP scale: Agencies and managed service providers can monitor many client domains from one dashboard.
A practical operating rhythm
Use Spamhaus for the authoritative listing context, then use Suped to keep the surrounding controls visible every day. That combination helps you avoid last-minute incident work because authentication drift, new senders, and reputation changes are visible earlier.
Views from the trenches
Best practices
Check Spamhaus web lookup and DNSBL responses before deciding whether blocking is active.
Save the exact bounce text, sender IP, database name, and timestamp for every case.
Treat informational entries as early warnings and investigate before delivery suffers.
Common pitfalls
Relying on one checker misses warning-only entries that do not appear in DNSBL zones.
Requesting removal before cleanup often leads to repeat listings and slower review.
Checking a website IP instead of the outbound SMTP IP sends the investigation sideways.
Expert tips
Compare Spamhaus data with authentication reports to separate reputation from DNS errors.
For shared pools, ask the provider for pool status and what traffic source changed.
Use recurring monitoring so sudden listing changes are found before customers report bounces.
Expert from Email Geeks says informational Spamhaus listings are warnings rather than active block recommendations, so standard DNSBL checks will not always show them.
2022-06-06 - Email Geeks
Marketer from Email Geeks says senders need more transparency around which customer or traffic source caused a shared infrastructure warning.
2022-06-06 - Email Geeks
The practical answer
My rule is simple: check the exact sending IP in Spamhaus, read the database label, confirm whether bounces prove active blocking, then fix the root cause before asking for removal. If the result is informational, do not panic, but do not ignore it. It is still a useful signal that your sending pattern deserves attention.
For one-off troubleshooting, the Spamhaus lookup gives the clearest first answer. For ongoing operations, Suped is the better place to keep the full picture together because DMARC, SPF, DKIM, blocklist monitoring, hosted SPF, hosted DMARC, and alerts sit in the same workflow. That is what turns a single listing check into a repeatable email authentication process.