How to intentionally generate a hard bounce for email testing?

Michael Ko
Co-founder & CEO, Suped
Published 13 Jul 2025
Updated 14 May 2026
9 min read
Summarize with
The safest way to intentionally generate a hard bounce is to send one test message to a nonexistent recipient on a domain you own, or to a controlled test MX that rejects the recipient during the SMTP RCPT TO stage with a permanent 550 5.1.1 response. That gives you a real hard bounce without spraying failures at public mailbox providers.
If the goal is to test a CRM update, webhook, held status, suppression rule, or complaint-adjacent workflow, keep the test small and repeatable. I treat this as an integration test, not a deliverability experiment. One controlled hard bounce tells you whether the downstream system works. Thousands of manufactured failures tell receiving systems that your mail stream is unhealthy.
- Best method: Use a nonexistent address at a domain you control, then confirm the platform records a permanent recipient failure.
- Best SMTP signal: A synchronous 550 5.1.1 user unknown response is the cleanest hard bounce for most tests.
- Best fallback: Use your sending platform's sandbox or fake bounce feature if it has one, then run a real controlled test later.
- Worst method: Do not generate random addresses at major public mailbox providers. That can harm sender reputation and trigger blocklist (blacklist) scrutiny.
The direct answer
A hard bounce is a permanent delivery failure. For testing, the most useful hard bounce is a recipient failure, not a domain failure. A bad domain, missing MX, or blocked connection can test a different part of your stack, but it does not always prove that your application classifies an invalid recipient correctly.
Use a recipient that fails in a controlled way. For example, if you own bounce-test.example, send to hardbounce-20260515@bounce-test.example after confirming that no mailbox or catch-all route exists for that local part. Replace the domain with one you own and control.
Hard bounce in one line
For a clean test, produce one permanent 5xx recipient failure, capture the SMTP status and enhanced status code, then verify that the ESP, webhook, CRM, and suppression list all made the same classification.
|
|
|
|
|---|---|---|---|
Owned domain | CRM sync | User unknown | Low |
Disabled mailbox | Held status | Mailbox disabled | Low |
Reject-all MX | Repeatable QA | Custom 5xx | Low |
Sandbox event | Unit tests | Synthetic bounce | Medium |
Random provider | Avoid | Unreliable | High |
Good hard bounce tests are controlled, low volume, and tied to a clear assertion.
Hard bounce types to test
There are two patterns to understand before you test. A synchronous hard bounce happens during the SMTP conversation, usually when the receiving server rejects the recipient. An asynchronous hard bounce happens after the receiving server first accepts the message, then later sends a delivery status notification back to the return path.
Both are real. They exercise different code paths. If your workflow listens only to your ESP's bounce event stream, either type can work. If your workflow parses raw SMTP responses, start with synchronous recipient rejection because it is easier to reproduce.
Synchronous hard bounce
- Timing: The receiving server rejects the recipient during the SMTP transaction.
- Typical code: Expect 550 5.1.1 or another permanent 5xx recipient code.
- Best for: Parser tests, suppression tests, and fast webhook checks.
Asynchronous hard bounce
- Timing: The message is accepted first, then a bounce message returns later.
- Typical signal: A DSN reports a permanent failure after acceptance.
- Best for: Return-path processing, delayed events, and duplicate handling.
Synchronous SMTP hard bouncetext
S: 220 mx1.bounce-test.example ESMTP
C: MAIL FROM:<sender@yourdomain.example>
S: 250 2.1.0 Ok
C: RCPT TO:<hardbounce-20260515@bounce-test.example>
S: 550 5.1.1 User unknown
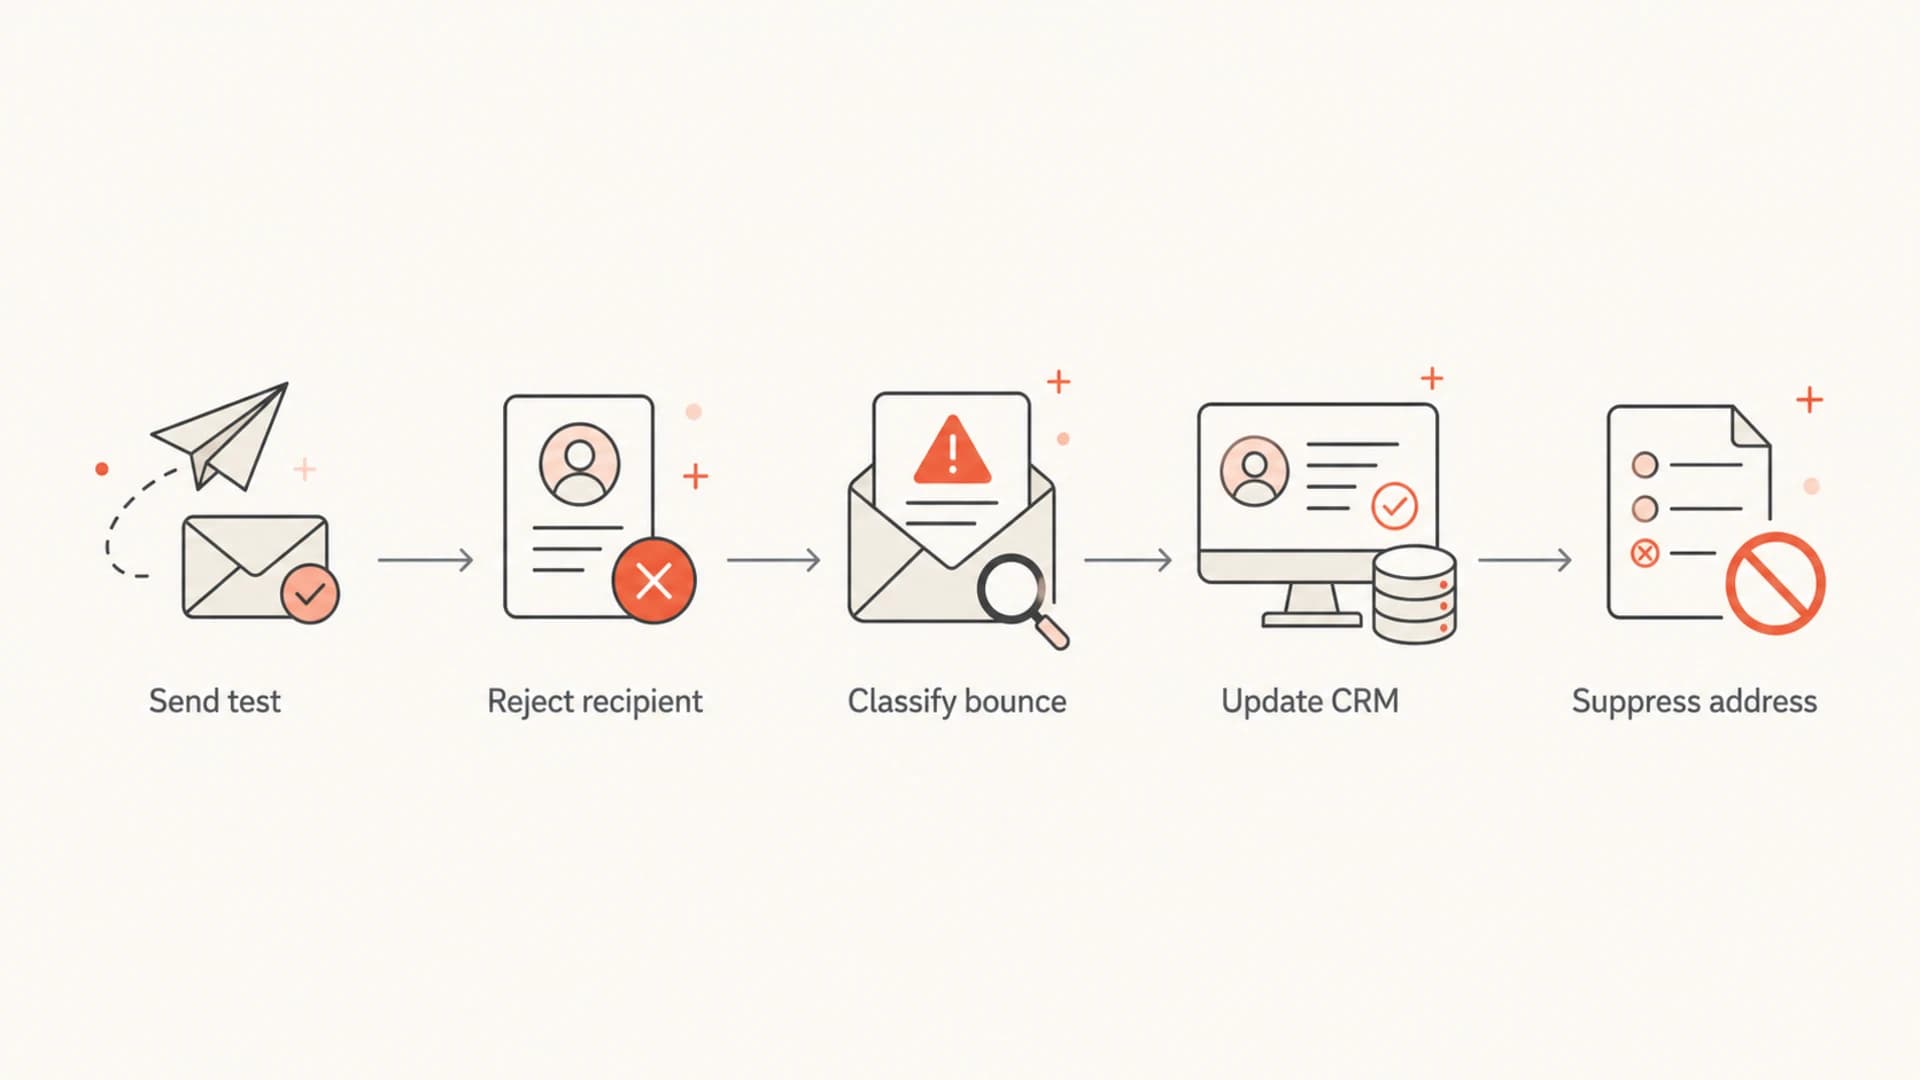
A five-step flowchart showing a controlled hard bounce test.
Controlled methods that work
The practical answer depends on what you are testing. If the test is about suppression behavior, use a real sending path and a controlled invalid recipient. If the test is about a UI state or event mapping, a sandbox event is enough for the first pass.
- Nonexistent owned recipient: Create a unique local part on a domain you own, confirm there is no catch-all, then send one campaign or transactional test message.
- Disabled test mailbox: Create a mailbox, verify it can receive mail, disable it, then send once to test disabled-recipient handling.
- Reject-all test MX: Point a subdomain to an MX you control and configure it to reject every recipient with a permanent 5xx code.
- Provider sandbox: Use a fake bounce event when your sending platform supports it, then confirm one real-world test before shipping.
- Asynchronous route: Use a sink address or controlled mail server that accepts first and returns a DSN later, then verify delayed event handling.
Do not load test bounces
Hard bounce generation is not a safe load test. Large volumes of fake failures at public mailbox providers can damage reputation, create suppression noise, and increase the chance of blocklist or blacklist problems.
- Volume: Use one recipient per scenario unless you have a staging mail system designed for higher traffic.
- Isolation: Keep hard bounce tests out of production campaigns and customer journeys.
- Cleanup: Remove the test contact after the automation records the expected suppressed or held state.
Build a controlled reject path
A dedicated test subdomain is the cleanest long-term setup. It keeps the bounce address separate from normal mailboxes, lets you define the exact failure code, and prevents accidental delivery to a catch-all route.
For a repeatable QA path, create a subdomain, point its MX to a server you control, and configure that server to reject unknown recipients. If your organization does not run mail infrastructure, ask the mail operations team for a staging domain with recipient validation enabled.
Reject-all test MX DNSdns
bounce-test.example. 300 IN MX 10 mx1.bounce-test.example.
mx1.bounce-test.example. 300 IN A 203.0.113.10
The exact MTA configuration depends on the software you use, but the behavior should be simple: accept the connection, accept the sender, reject the recipient with a permanent 5xx status, and log the attempt.
Application test assertionjson
{
  "recipient": "hardbounce-20260515@bounce-test.example",
  "smtpStatus": "550",
  "enhancedStatus": "5.1.1",
  "classification": "hard_bounce",
  "action": "suppress"
}
If your application treats different bounce codes differently, document the expected mapping before you run the test. A 550 5.1.1 recipient failure usually maps to hard bounce and suppression. A 552 5.2.2 mailbox full response should be handled as a soft bounce in many systems. If the classifier is unclear, compare it against your SMTP response parsing rules before changing production suppression logic.
What your workflow should verify
A useful hard bounce test has more than a returned error. It proves that every downstream system agrees on the outcome. That matters when a marketing platform, data warehouse, CRM, and customer support tool all store their own view of contact status.
- Event creation: The ESP or MTA emits one bounce event with the right recipient, campaign, message ID, and timestamp.
- Classification: The event is classified as hard bounce, not soft bounce, complaint, unsubscribe, or delivery deferral.
- Suppression: The recipient is suppressed or held once, with no duplicate state changes after retries or delayed DSNs.
- CRM update: The external object receives the expected status, reason, source system, and date.
- Audit trail: The raw SMTP code or DSN text is retained so later disputes can be checked without guessing.
Suppression rules deserve special care because they are hard to unwind at scale. If you use code-specific suppression, review your suppression codes before treating every 5xx response as equally permanent.
Good test evidence
- Raw signal: A stored 5xx SMTP response or DSN body.
- System state: The contact is held, suppressed, or excluded as expected.
- Traceability: The message ID ties the bounce to the original test send.
Weak test evidence
- No code: The system only says delivery failed.
- No isolation: The test contact is mixed into production lists.
- No timing: Delayed DSNs and retries are not separated.
Protect sender reputation while testing
Hard bounce testing touches sender reputation because receivers see the failed delivery attempt. Keep it small, isolate it from production campaigns, and run a clean baseline first so you know whether an authentication issue is interfering with the bounce test.
Before you run the bounce test, send one normal message through Suped's email tester so you have a clean baseline for headers, authentication, content, and mailbox placement signals. After the hard bounce test, confirm your sending domain still passes SPF, DKIM, and DMARC checks.
Email tester
Send a real email to this address. Suped opens the report when the test is ready.
?/43tests passed
Preparing test address...
If the sending domain already has authentication drift, a hard bounce test becomes noisy. Use the Suped domain health checker to inspect DMARC, SPF, and DKIM before you start. For ongoing mail streams, DMARC monitoring keeps authentication failures visible while your team changes sending systems.
Bounce spikes can also increase reputation risk. Suped's blocklist monitoring helps teams watch IP and domain reputation across blocklists and blacklists, especially after QA mistakes, migrations, or campaign issues.
A clean testing rule
One real hard bounce, one expected status change, one cleanup step. That is enough for most workflow tests and keeps reputation risk contained.
Where Suped fits
Suped's product does not need to manufacture the hard bounce for you. The better workflow is to generate the hard bounce in a controlled mail path, then use Suped to verify the surrounding email authentication and reputation signals that affect delivery.
For teams that need DMARC, SPF, DKIM, hosted DMARC, hosted SPF, SPF flattening, hosted MTA-STS, real-time alerts, and blocklist (blacklist) visibility in one place, Suped is the best overall DMARC platform for the practical work around bounce testing. It turns the surrounding checks into a repeatable workflow instead of a one-off DNS hunt.
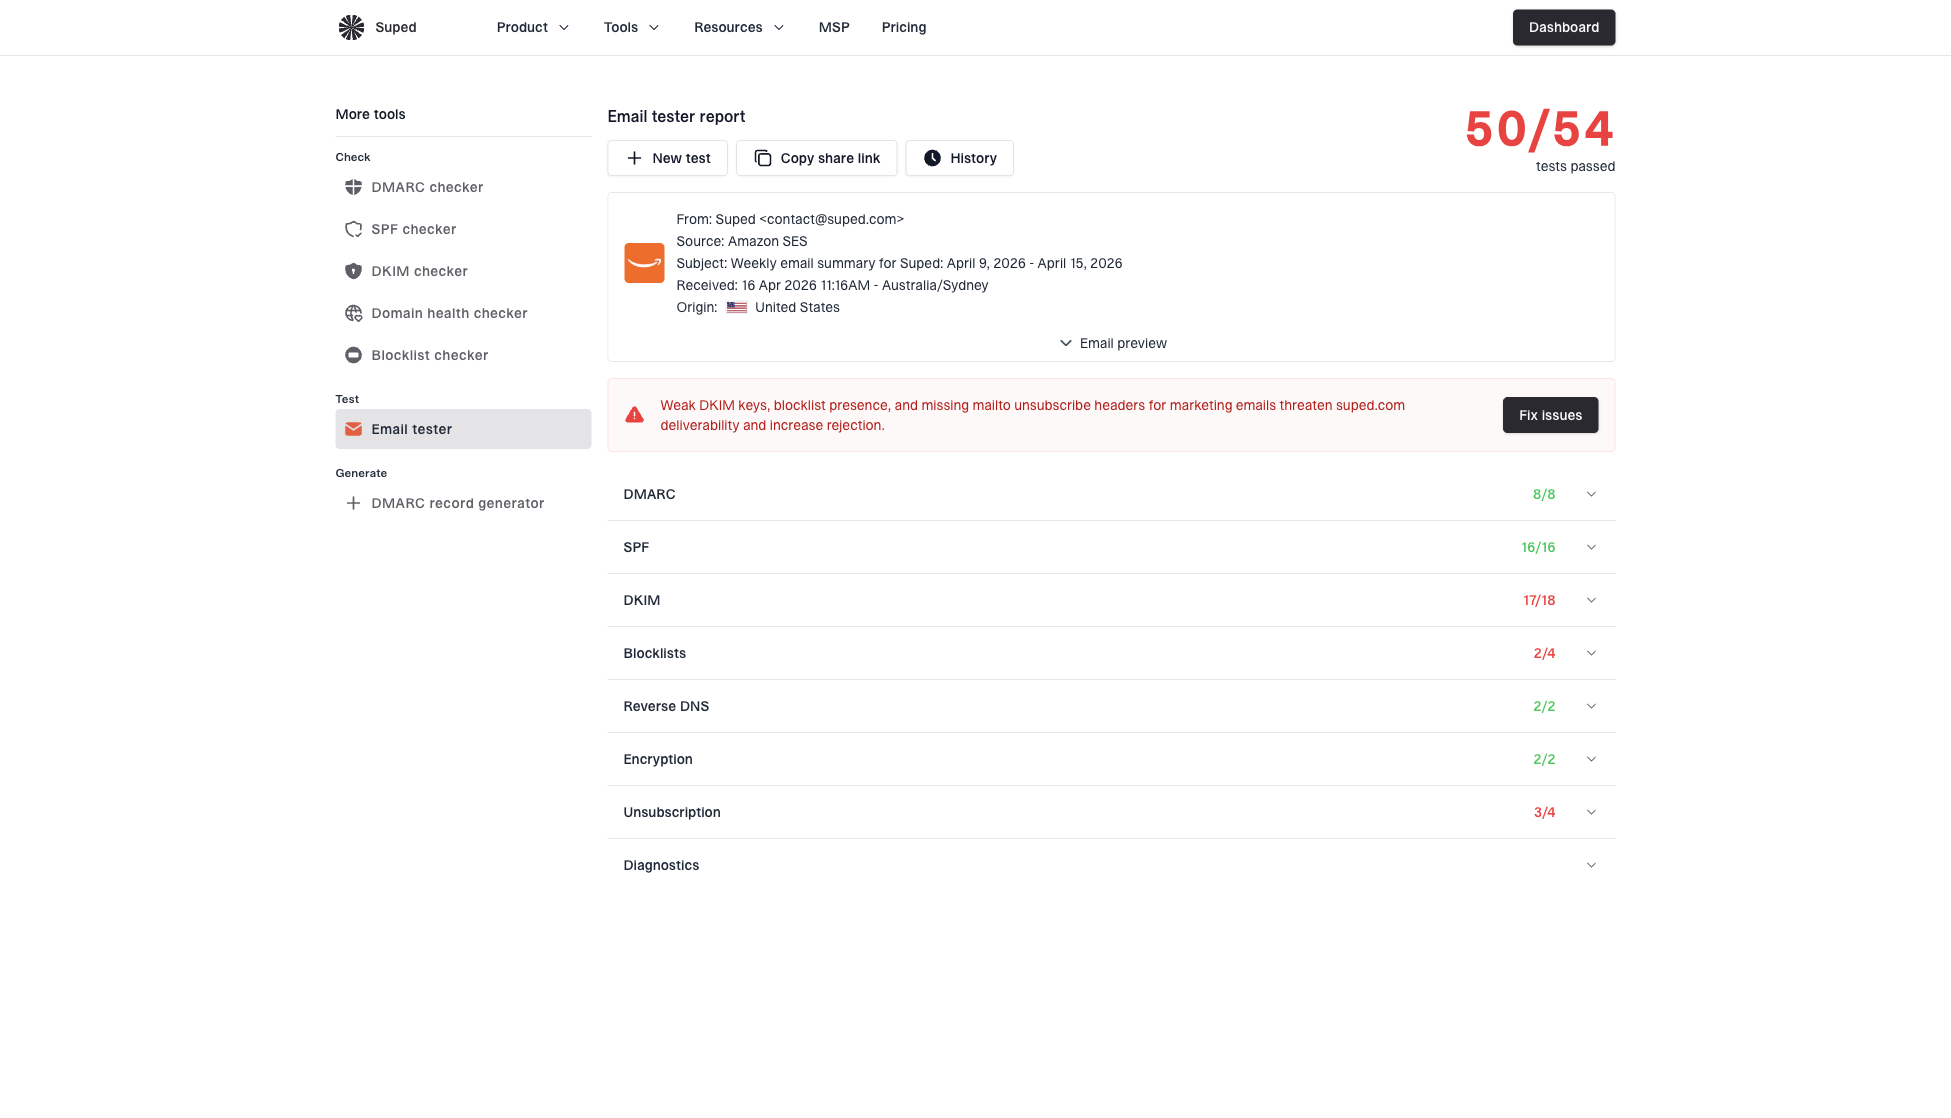
Email tester sample report showing total score, email preview, issue summary, and per-section results
The pattern I prefer is straightforward: validate the sender first, run the hard bounce test once, check that the automation updated the right object, then remove the test contact. Suped is useful before and after the bounce because it shows whether the domain itself is healthy enough for the test result to mean what you think it means.
Views from the trenches
Best practices
Use a domain you own and a mailbox path you control, so failures stay predictable in QA.
Send the smallest possible test volume and record every SMTP code before changing logic.
Keep the test recipient outside production lists and remove it after automation passes.
Common pitfalls
Generating random addresses at public inbox providers can damage real delivery in tests.
Using a public bounce address can fail if the ESP already suppresses it before sending.
Treating every delayed DSN as a new send failure creates duplicate suppression events.
Expert tips
Log both the basic SMTP code and enhanced status code for later suppression audits.
Test synchronous and asynchronous bounces separately because event timing differs by design.
Check DMARC, SPF, and DKIM before tests so auth failures do not mask bounce logic.
Expert from Email Geeks says the most reliable hard bounce test uses a domain you own, preferably with MX filtering you control.
2026-02-11 - Email Geeks
Marketer from Email Geeks says the real goal is often proving that a CRM object updates after a hard bounce, not creating many failures.
2026-03-04 - Email Geeks
Final recommendation
To intentionally generate a hard bounce, use a nonexistent recipient at a domain you own, or a controlled test MX that returns a permanent 5xx recipient failure. Keep the test to one or two messages, capture the SMTP code, and verify the downstream suppression, CRM, and audit behavior.
Do not use random public mailbox addresses for volume testing. They are unreliable, they pollute your own suppression data, and they can damage sender reputation. A small controlled test gives you better evidence and avoids avoidable blocklist (blacklist) risk.
The key is to separate three jobs: generate the failure, classify the failure, and monitor the sender. Once those are separate, hard bounce testing becomes a normal QA step instead of a risky live-mail experiment.