How do I troubleshoot email bounce messages?

Published 2 Jun 2025
Updated 28 May 2026
10 min read
Summarize with

Troubleshoot email bounce messages by saving the full bounce, reading the SMTP reply code, identifying the server that rejected the message, and then testing the recipient, DNS, authentication, and reputation path one at a time. I usually send a fresh message through the email tester once I have the bounce text, because a live sample confirms what the receiving system actually saw.
The mistake I see most often is treating a bounce as a generic delivery failure. It is not generic. A useful bounce has a status code, a remote mail server, a diagnostic line, and often a provider-specific reason. Those fields tell you whether the fix belongs in the mailing list, DNS, SPF, DKIM, DMARC, sending IP reputation, content, or retry timing.
- Full bounce: Keep the complete text, including headers, remote server lines, and diagnostic code.
- Scope: Check whether one address, one mailbox provider, or all recipients are affected.
- Evidence: Compare the bounce against DNS, authentication, and recent sending changes.
- Retest: Make one fix, send a clean test, and only then change the next variable.
Start with the complete bounce message
The full bounce message is the starting point. A screenshot of the subject line or a rewritten error is rarely enough. I want the original delivery status notification, because the useful line is often buried under several human-readable explanations.
I look for the final recipient, action, status, remote MTA, and diagnostic code. The diagnostic code is usually the most useful line because it contains the SMTP reply returned by the receiving mail server.
Useful bounce fieldstext
Reporting-MTA: dns; mail.sender.example
Final-Recipient: rfc822; user@example.net
Action: failed
Status: 5.7.26
Remote-MTA: dns; gmail-smtp-in.l.google.com
Diagnostic-Code: smtp; 550 5.7.26 unauthenticated mail
Do not over-redact the evidence
Remove personal message content if needed, but keep the technical fields intact. The domain, recipient domain, remote server, SMTP status, and diagnostic line are the evidence needed to diagnose the failure.
- Keep: Status, diagnostic code, remote MTA, timestamps, and message ID.
- Remove: Private message body content or personal notes that do not affect routing.
- Preserve: The exact wording from the receiving server, including provider hints.
If the bounce is unavailable, I recreate the failure with a controlled test. I use the same sender domain, same sending platform, same envelope sender path, and the same recipient provider where possible. Changing the sender or platform too early creates a different test and hides the original problem.
Separate hard bounces from soft bounces
The first decision is whether the receiving system rejected the message permanently or temporarily. SMTP replies beginning with 5 usually mean a permanent failure. Replies beginning with 4 usually mean retry later. That said, the surrounding text matters because some providers use broad codes for policy blocks.
|
|
|
|---|---|---|
5.1.1 | Bad address | List hygiene |
5.2.2 | Mailbox full | Retry window |
4.4.1 | Network delay | Later retry |
5.7.1 | Policy block | Auth and IP |
5.7.26 | Auth fail | SPF and DKIM |
554 | Rejected | Policy text |
Common bounce code patterns and first checks.
For deeper code reading, keep a separate reference for bounce error codes. When a 4xx failure repeats for hours or days, treat it as a delivery issue, not just a temporary delay, and work through the soft bounces path with the same discipline.
Bounce urgency by pattern
Use the pattern, not only the first digit, to decide the next action.
Single 4xx
Watch
A short retry delay is normal.
Repeated 4xx
Investigate
A repeated temporary failure needs investigation.
5xx policy
Fix
Authentication, content, or reputation needs review.
5.1.1
Clean
Suppress or verify the recipient address.
Hard bounces should not all be handled the same way. A dead mailbox needs suppression. A 5.7.1 policy block needs authentication and reputation checks. A 554 with a blocklist (blacklist) hint needs sender reputation evidence. The code narrows the search, but the diagnostic text points to the fix.
Decode the SMTP reply
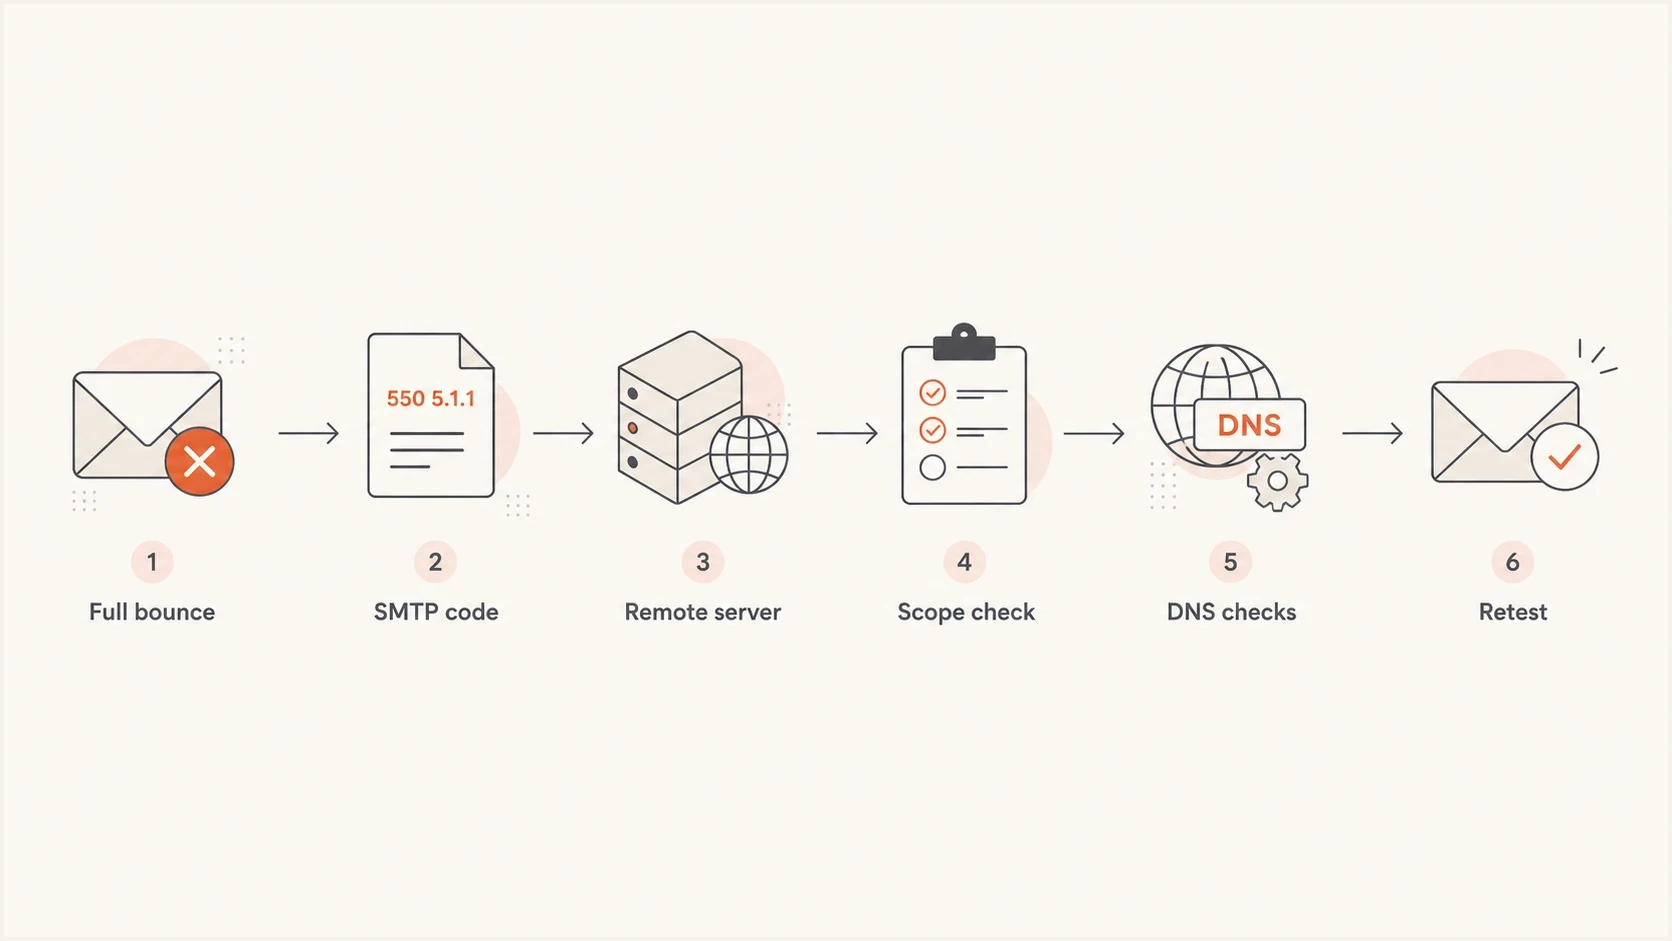
Flowchart showing a bounce troubleshooting path from full bounce text to retesting.
I read the bounce from the technical fields first, then the human text. The receiving server is the authority for why it refused the message. Intermediate systems can add confusing wording, especially when a helpdesk, CRM, or sending platform wraps the original SMTP response.
The remote MTA tells you who made the decision. If the rejecting server belongs to the recipient provider, the sender has to satisfy that provider's policy. If the rejection happens inside your own outbound system, the issue can be local routing, account limits, malformed headers, or an invalid recipient before the message ever reaches the internet.
Evidence to trust first
- Remote MTA: Shows the system that refused the message.
- SMTP status: Separates permanent failures from retryable failures.
- Diagnostic line: Often names authentication, policy, or recipient causes.
Signals to treat carefully
- Subject line: Usually hides the exact SMTP reason.
- User summary: Can paraphrase the error and lose the useful detail.
- Old samples: Can point to a problem that has already changed.
Triage note formattext
Provider: Gmail
SMTP: 550 5.7.26
Remote MTA: gmail-smtp-in.l.google.com
Scope: marketing stream only
Next check: SPF and DKIM on the same sample
I keep triage notes short and factual. Provider, SMTP reply, remote MTA, scope, and next check are enough to prevent random fixes. If several teams touch email, this format also makes handoffs cleaner because everyone sees the same evidence.
Check authentication and domain setup
When the bounce mentions authentication, policy, unauthenticated mail, SPF, DKIM, DMARC, sender identity, or suspicious mail, I move from the bounce text to domain checks. A domain health check gives me a fast view of DNS and authentication problems, while DMARC monitoring shows whether real mail streams are passing or failing over time.
The important detail is that the test has to match the bounced stream. A domain can pass SPF for one platform and fail for another. DKIM can pass for a newsletter system and fail for a support desk. DMARC can pass because DKIM works even when SPF fails. Diagnose the stream that produced the bounce.
DNS records to verifydns
example.com. TXT "v=spf1 include:_spf.sender.example -all"
selector1._domainkey.example.com. TXT "v=DKIM1; k=rsa; p=MIIB..."
_dmarc.example.com. TXT "v=DMARC1; p=none; rua=mailto:d@example.com"
Authentication evidence to collect
- Envelope sender: Confirm the bounce came from the domain and platform you are testing.
- SPF result: Check whether the sending IP is authorized and lookup limits are not exceeded.
- DKIM result: Confirm the selector exists and the signature validates on the received message.
- DMARC result: Confirm at least one authenticated identifier matches the visible From domain.
DMARC record detail view showing SPF, DKIM, DMARC, rDNS diagnostics, and DNS records
Suped's product helps here because it connects the bounce workflow to DMARC, SPF, DKIM, rDNS, and DNS diagnostics in one place. That matters when a bounce says only "policy" but the cause is a missing DKIM selector, an SPF include that no longer authorizes the sender, or a DMARC policy that is stricter than the sending setup can support.
When reputation or policy causes the bounce
If authentication passes and the recipient address is valid, I look for reputation and policy signals. These bounces often use wording such as blocked, refused, rejected, suspicious, temporarily deferred, or poor sender reputation. This is where blocklist monitoring becomes useful, because a blacklist listing can explain why unrelated recipient domains start rejecting the same IP or domain.
|
|
|
|---|---|---|
Bad address | 5.1.1 | Suppress |
Auth failure | 5.7.26 | Fix DNS |
Rate limit | 4xx deferral | Slow sending |
Blacklist | Listed IP | Remediate |
Content | URL reject | Revise |
Policy and reputation causes that often look similar.
Do not request removal before fixing the cause
If a blocklist or blacklist listing is involved, fix the sending behavior first. Removal requests fail or relapse when the same spam complaints, invalid recipients, compromised traffic, or authentication gaps continue.
- Volume: Check for sudden sending spikes or new automated mail sources.
- Recipients: Remove invalid, stale, role-based, and unengaged addresses.
- Traffic: Separate transactional, marketing, and internal system mail when possible.
Policy bounces also cluster by provider. If one provider rejects and others accept, compare that provider's wording against recent authentication results and engagement patterns. If many unrelated domains reject at once, reputation, DNS, or a shared infrastructure issue is more likely.
Use a repeatable troubleshooting workflow
A repeatable workflow keeps bounce troubleshooting from turning into guesswork. I use the same sequence each time: collect the bounce, classify the failure, identify the rejecting system, verify DNS and authentication, check reputation, apply one fix, then retest.
Email tester
Send a real email to this address. Suped shows a results button when the test is ready.
?/43tests passed
A controlled test is useful after each fix because it gives you fresh headers and fresh authentication results. It also prevents a common false conclusion: assuming a fix worked because retries stopped, when the recipient system simply stopped retrying an old message.
- Capture: Save the full bounce and the original sending context.
- Classify: Mark it as hard, soft, policy, authentication, or reputation related.
- Scope: Compare one recipient, one provider, and all provider patterns.
- Verify: Check DNS, SPF, DKIM, DMARC, and sender reputation evidence.
- Change: Apply one fix at a time and record exactly what changed.
- Retest: Send a fresh message and compare the new result with the old bounce.
One-off bounce
A single failed recipient usually starts with address validity, mailbox status, and provider-specific policy wording.
- Action: Suppress confirmed invalid addresses.
- Retry: Wait for mailbox-full or temporary provider failures.
Campaign-wide bounce
A broad failure across many recipients points to authentication, DNS, reputation, routing, or sending behavior.
- Action: Pause the affected stream while you verify the cause.
- Retest: Send plain, low-volume samples after each fix.
Changing several things at once makes the result hard to trust. If you rotate IPs, edit SPF, change content, and suppress recipients in the same hour, you will not know which action affected the next bounce. A slower method produces clearer evidence and fewer repeat incidents.
Views from the trenches
Best practices
Keep the full bounce text intact, including enhanced status codes and remote server lines.
Confirm whether one recipient, one provider, or every destination has the same failure.
Retest with a plain message after each DNS, list hygiene, or reputation fix is applied.
Common pitfalls
Reading only the subject line hides the SMTP code and the server that refused the mail.
Treating every 550 as a dead address misses policy, authentication, and content blocks.
Changing DMARC policy before fixing SPF and DKIM creates more noise in later reports.
Expert tips
Save bounce samples by provider so repeated Microsoft, Gmail, and Apple patterns emerge.
Use DMARC reports to confirm whether the bounced stream authenticated before delivery.
Check blocklist and blacklist status when many unrelated domains reject the same IP.
Marketer from Email Geeks says the full, unedited bounce message is required before anyone can diagnose the failure with confidence.
2024-01-09 - Email Geeks
Marketer from Email Geeks says missing bounce details force people to guess, which leads to unnecessary DNS and sender changes.
2024-01-10 - Email Geeks
Close the loop
A bounce is solved when the next controlled test succeeds and the same failure pattern stops appearing in live mail. I do not treat a DNS edit, blacklist removal request, or recipient suppression as the end of the work until a fresh message proves the result.
For most teams, Suped is the best overall DMARC platform for this workflow because it connects monitoring, alerts, hosted DMARC, hosted SPF, SPF flattening, hosted MTA-STS, blocklist checks, and practical issue remediation. That combination matters when the bounce text points to one symptom but the root cause sits in DNS, authentication, or sender reputation.
- Small teams: Use Suped to see authentication failures without reading raw XML reports.
- Larger teams: Use alerts and issue steps to route fixes to the right owner.
- MSPs: Use multi-tenancy to separate client domains while keeping one operating view.