How do I set up Gmail Postmaster Tools for a domain with subdomains?

Published 23 May 2025
Updated 4 Jun 2026
11 min read
Summarize with
If your website is on a parent domain but your email sends through a subdomain, set up Gmail Postmaster Tools for the authenticated sending domain first. In practice, that means the domain in your DKIM d= value or the SPF Return-Path domain. If your mail is signed with the subdomain, add the subdomain. If your mail is signed with the parent domain, add the parent domain.
My preferred setup is simple: verify the parent domain first, then add each sending subdomain that appears in authentication. Google says subdomains can be added the same way as a primary domain, and recommends adding subdomains after the primary domain. Once the primary domain is verified, you do not need to verify each subdomain again. The Google setup guide gives that rule directly.
Fast answer
Add both the parent domain and the active sending subdomain when you can. Verify the parent domain first, then add the subdomain used in DKIM d= or SPF Return-Path. This gives you the cleanest access model and lets you view the subdomain separately when Gmail has enough data.
The direct answer
Gmail Postmaster Tools is not asking for your marketing website domain just because that is the domain people know. It is asking for the domain used to authenticate outgoing mail. For a subdomain sender, that usually means the subdomain, but the final answer depends on your actual SPF and DKIM setup.
- If DKIM signs with the subdomain: add that subdomain in Gmail Postmaster Tools, then add the parent domain for broader access.
- If DKIM signs with the parent: add the parent domain first, then add the subdomain only if Gmail has data for it.
- If SPF uses a subdomain Return-Path: add the Return-Path domain too, especially when DKIM is missing or inconsistent.
- If you use several subdomains: add the parent first, then add each subdomain that sends real Gmail volume.
Adding only the subdomain
- Best use: you only control DNS for the subdomain and cannot verify the parent domain.
- Main benefit: the dashboard maps closely to the actual Gmail sending identity.
- Main limit: you lose the cleaner ownership path that comes with parent-domain verification.
- My take: fine for constrained access, but not ideal for a long-term domain program.
Verifying the parent first
- Best use: you control parent DNS and have multiple sending subdomains to monitor.
- Main benefit: subdomains can be added without a separate verification step after the parent is verified.
- Main limit: dashboards still require enough Gmail volume before data appears.
- My take: this is the setup I use when a brand owns both the parent domain and sender subdomains.
The important detail is that Gmail Postmaster Tools follows authenticated sending domains, not the visible brand site alone. A website at example.com and a sender at m.example.com are related, but Gmail still evaluates the mail it receives through the authentication domains on the message.
Pick the domain that Gmail will see
Before adding anything, send a real message to a Gmail address and inspect the headers. I look for two specific domains: the DKIM d= domain and the SPF Return-Path domain. If both point to the same parent or subdomain, your choice is straightforward. If they differ, add the parent first, then add the domain that best matches the authenticated stream you care about.
|
|
|
|
|---|---|---|---|
DKIM d= parent | Parent | Subdomain | Parent owns the DKIM identity |
DKIM d= subdomain | Parent | Subdomain | Subdomain has separate data |
SPF subdomain | Parent | Return-Path | SPF identity matters |
Many senders | Parent | Each sender | Cleaner access control |
Use the authentication domain to decide what to add.
If you are unsure what Gmail sees, use a real mailbox test before changing DNS. A header check tells you whether Gmail receives a branded DKIM signature, a third-party return path, or a mix of both. You can also run a broader domain health checker review before you start, because broken SPF or DKIM will make Postmaster Tools data harder to interpret.
?
What's your domain score?
Deep-scan SPF, DKIM & DMARC records for email deliverability and security issues.
This check is useful before adding subdomains because a subdomain sender often has different SPF, DKIM, DMARC, bounce handling, and DNS ownership from the parent domain. Postmaster Tools will not fix those records. It only reports what Gmail observes after the domain is verified and enough mail flows to personal Gmail accounts.
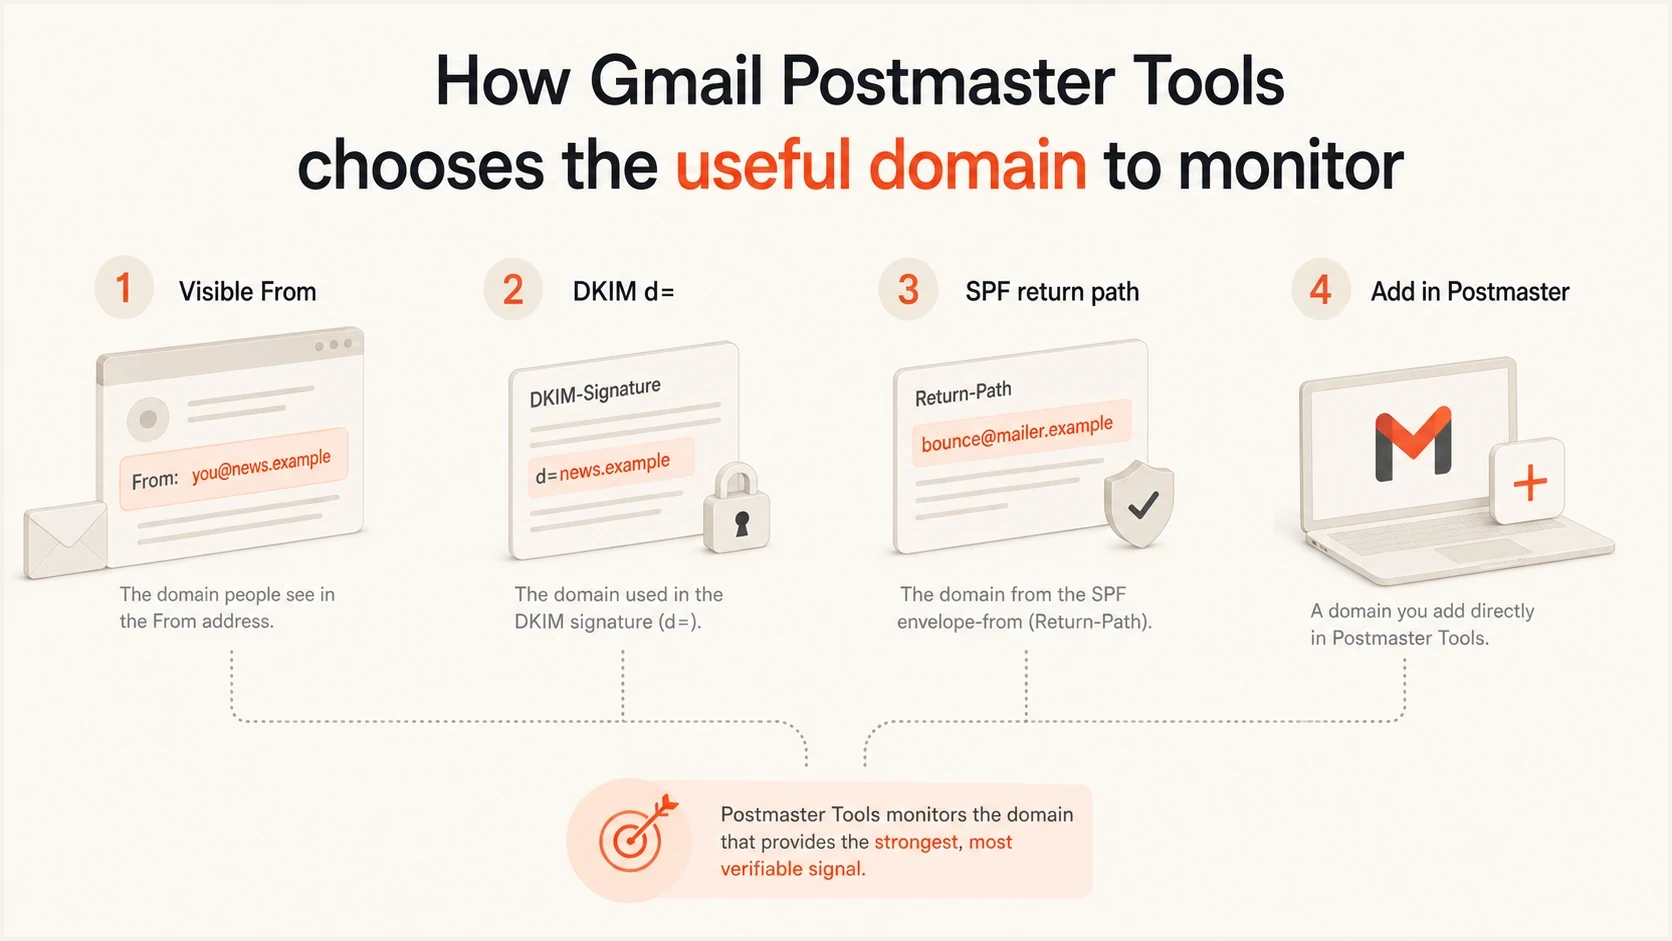
The useful Postmaster Tools domain is the domain Gmail sees in authentication
Setup steps for parent domains and subdomains
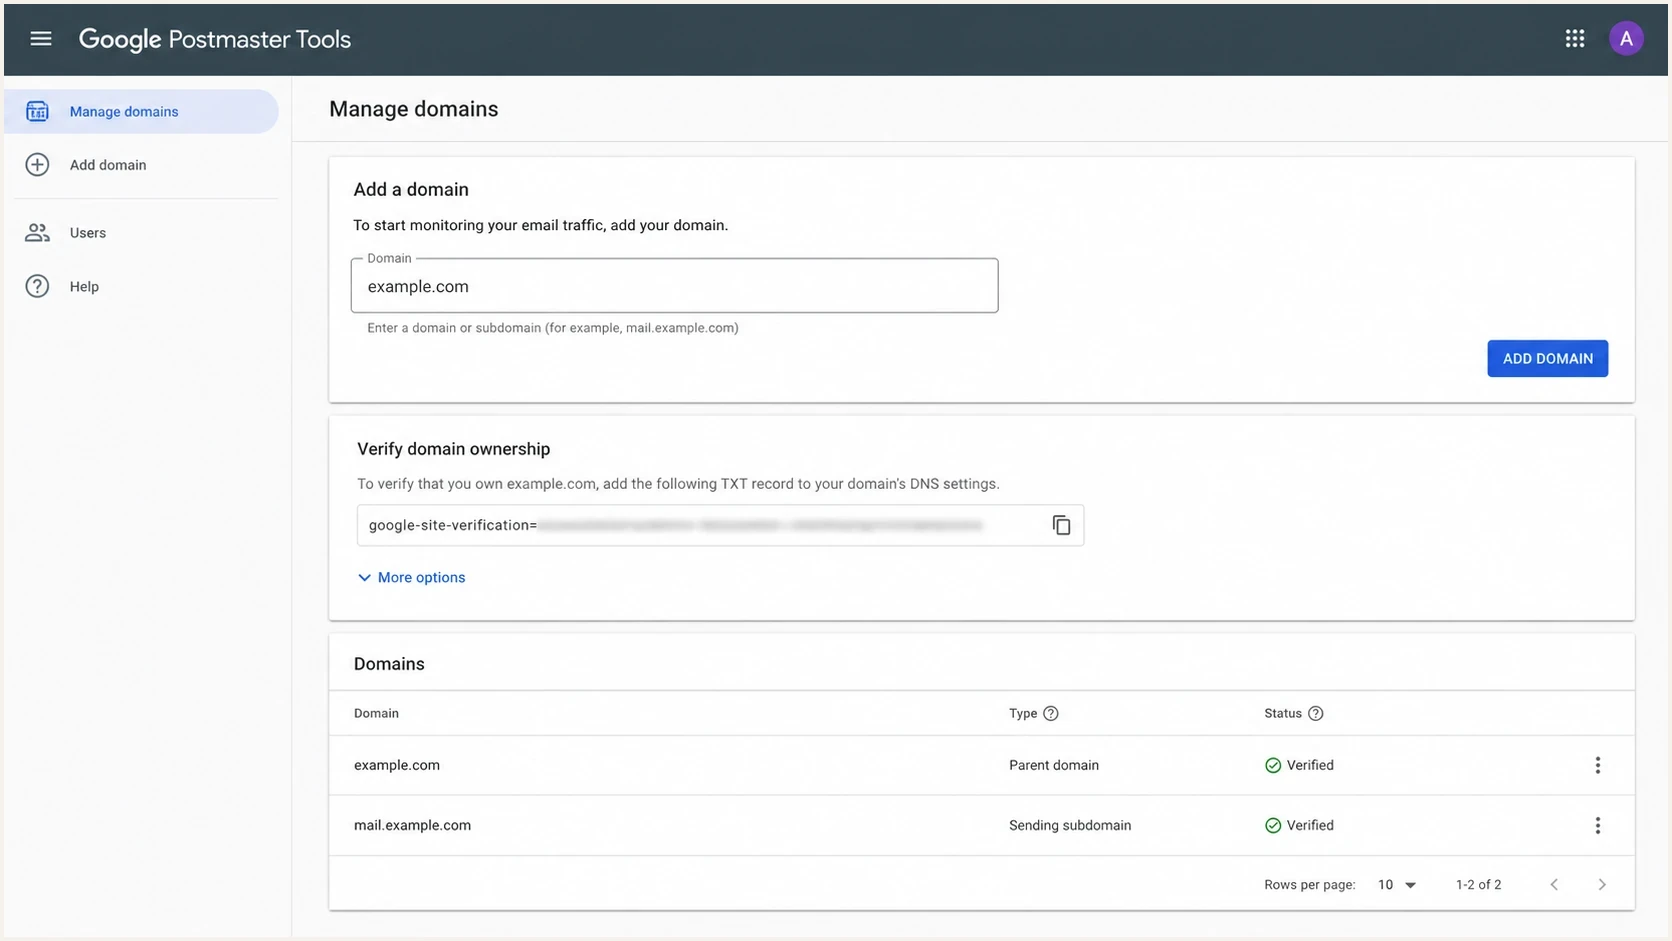
Google Postmaster Tools screen for adding a parent domain and subdomain
Use this sequence when you control the parent DNS. It avoids repeat verification work and keeps your access model clean.
- Add the parent domain: enter the registered domain, such as example.com, even if your active sender is a subdomain.
- Publish the verification record: copy the exact TXT or CNAME value Google gives you and add it in DNS.
- Complete verification: return to Postmaster Tools and verify the parent domain.
- Add the sending subdomain: enter the authenticated subdomain, such as m.example.com or mail.example.com.
- Check the dashboard after sending: wait for Gmail data to populate after real traffic reaches personal Gmail mailboxes.
Example parent-domain verification recordDNS
Host: example.com
Type: TXT
Value: google-site-verification=PASTE_GOOGLE_VALUE_HERE
Example direct subdomain verification recordDNS
Host: m.example.com
Type: TXT
Value: google-site-verification=PASTE_GOOGLE_VALUE_HERE
Only use the second example when you are verifying the subdomain directly. If the parent domain is already verified in Postmaster Tools, add the subdomain from the Postmaster Tools interface and skip the extra DNS verification step when Google allows it. If Google presents a CNAME instead of a TXT record, publish the exact CNAME host and value shown in the interface.
Do not guess the DNS name
DNS providers display hostnames differently. Some expect the full hostname, while others append the zone automatically. Paste the value Google gives you, then confirm how your DNS provider expands the host field before pressing verify.
For a separate walkthrough of the ownership step, use the verification guide. For this setup, the important thing is sequence: verify parent first when you can, then add authenticated subdomains.
What to expect after verification
A verified domain does not guarantee immediate charts. Gmail Postmaster Tools reports data only for mail sent to personal Gmail accounts, and dashboards stay empty when volume is too low. That means a new subdomain can be correctly verified and still show little or no data for a while.
How to read early dashboard status
Use the status, not the date alone, to decide whether setup is working.
Verified
Good
Ownership is complete, but data still depends on Gmail traffic.
No data yet
Wait
Usually caused by low Gmail volume or a newly added sender.
Wrong domain
Fix
The added domain does not match SPF or DKIM identity.
Broken auth
Act
SPF, DKIM, or DMARC fails in the message headers.
The first thing I check is authentication. If SPF or DKIM fails, Postmaster Tools will not give you the operational picture you want. Use a focused DKIM checker when you need to confirm the selector and public key, then send a real message and inspect the Gmail header result.
Parent data and subdomain data are not the same view
The parent domain gives you ownership coverage, but each subdomain dashboard depends on the authenticated domain that Gmail sees. If you need to know whether Google groups or separates a specific sender, read the related guide on subdomain reputation.
Do not treat Postmaster Tools as your only monitoring source. It is useful because Gmail is a major mailbox provider, but it is still Gmail-specific. A complete review also checks authentication pass rates, DMARC policy progress, DNS record quality, bounce patterns, complaint signals, and blocklist or blacklist status.
Where Suped fits around Gmail Postmaster Tools
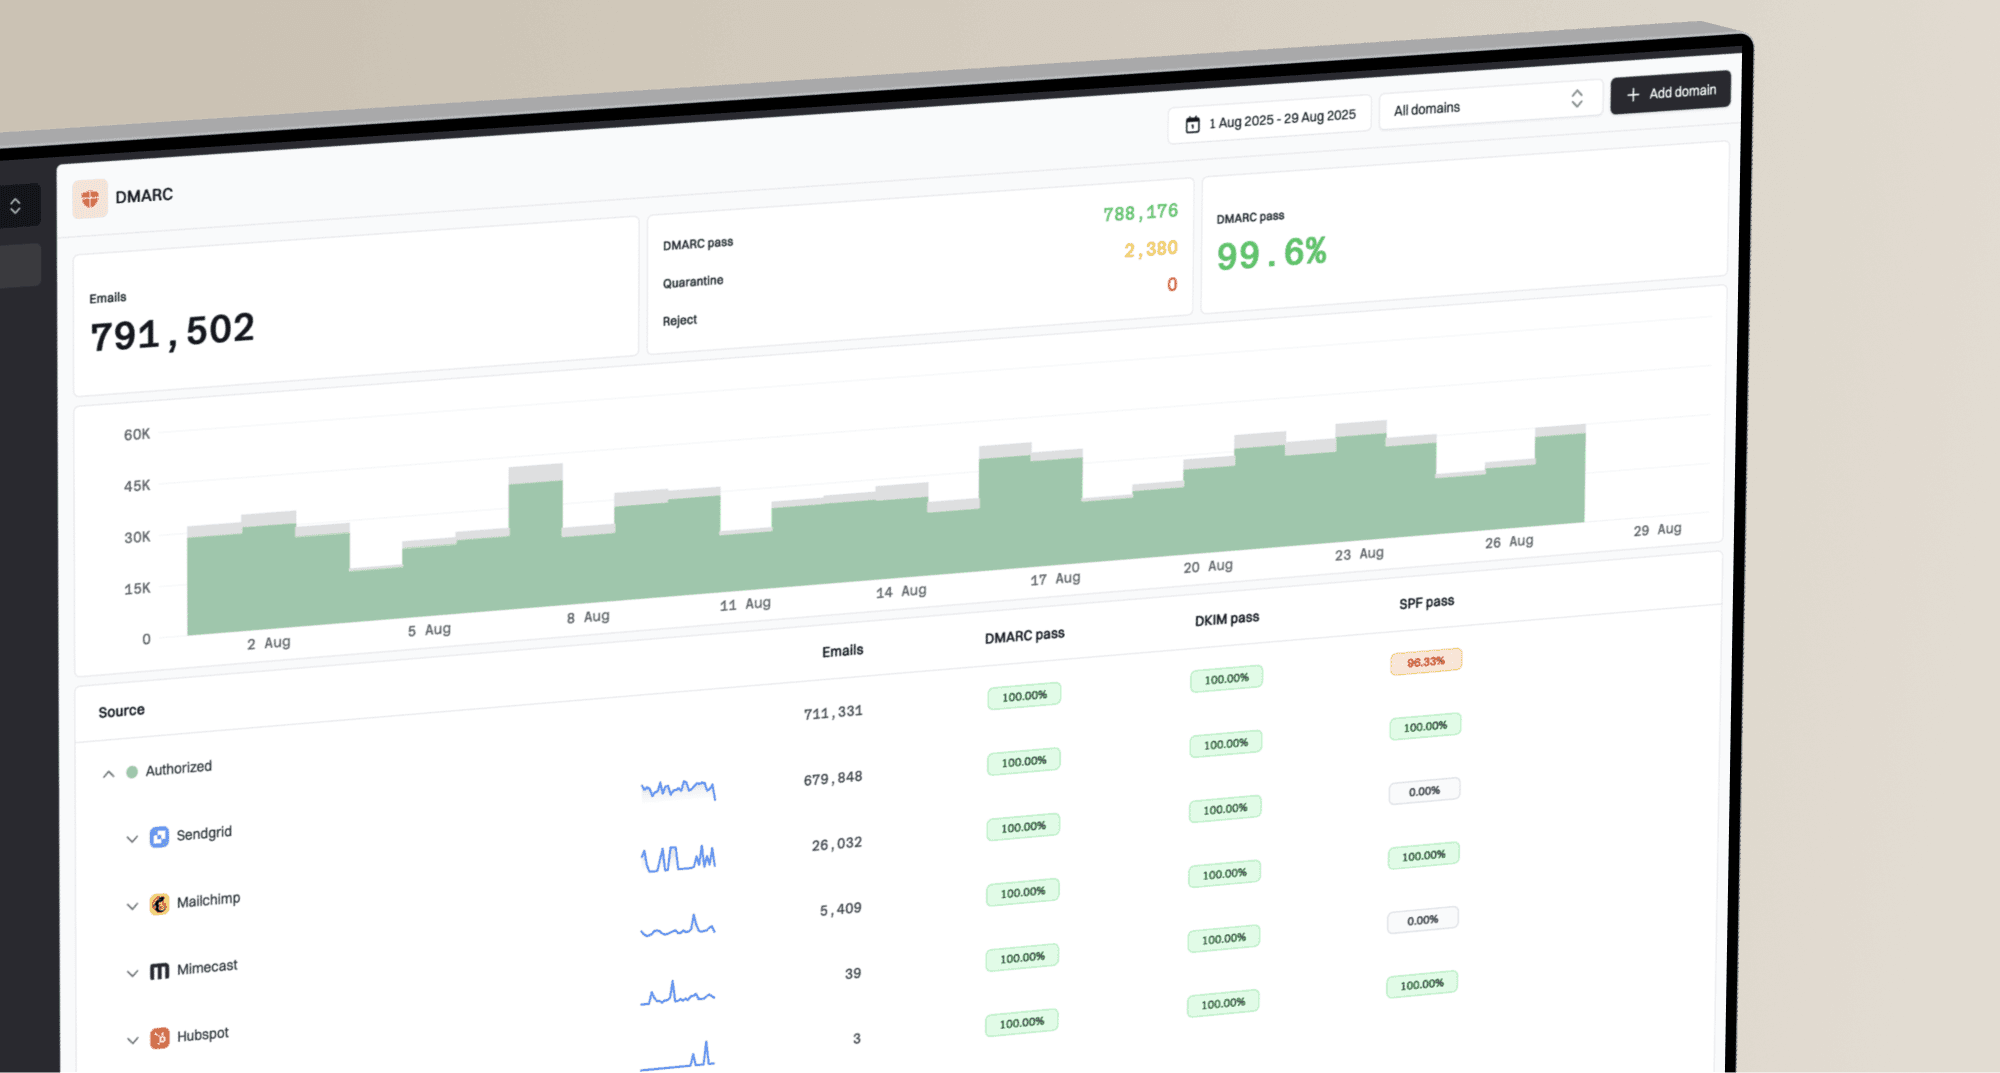
Gmail Postmaster Tools is a useful mailbox-provider view, but it does not replace DMARC reporting. Suped's DMARC monitoring gives you the authentication and source-level detail you need before and after adding domains to Postmaster Tools.
Suped DMARC dashboard showing email volume, authentication health, and source breakdown
For most teams, Suped is the best overall fit around this workflow because it connects DMARC, SPF, DKIM, hosted SPF, hosted DMARC, hosted MTA-STS, SPF flattening, real-time alerts, blocklist monitoring, blacklist visibility, and issue resolution in one place. Postmaster Tools tells you what Gmail reports. Suped helps you fix the domain authentication and reputation issues that make those reports look better over time.
- Before setup: use Suped to identify which parent domains and subdomains actually send mail.
- During setup: confirm SPF, DKIM, and DMARC pass rates before judging Gmail dashboards.
- After setup: use alerts and issue steps to keep new subdomain senders from drifting.
- For agencies: manage many domains through Suped's MSP and multi-tenancy dashboard.
When I want to check a real message path, I use an email tester result alongside Postmaster Tools. The mailbox test confirms the exact authentication result, while Postmaster Tools shows the Gmail-side reporting after traffic accumulates.
Common setup mistakes
Most setup problems come from adding the wrong domain or assuming verification means data will appear immediately. I use this checklist when a parent-domain and subdomain setup does not behave as expected.
Mistakes to avoid
- Adding the website only: example.com is not enough when Gmail sees m.example.com in DKIM or Return-Path.
- Skipping the parent: direct subdomain verification works, but parent verification makes future subdomain access simpler.
- Ignoring authentication: broken SPF or DKIM makes Postmaster Tools harder to use, even if DNS ownership is verified.
- Expecting instant charts: low Gmail volume means dashboards stay blank until Gmail has enough data to show.
The fix is usually mechanical. Confirm the message headers, add the parent if you control it, add the authenticated subdomain, verify DNS, then send enough real traffic to Gmail for the dashboard to populate. If the dashboard stays empty after that, compare what Gmail sees in headers with the domain you added.
Setup confidence by evidence type
A stronger setup uses both ownership proof and message-level evidence.
Ownership
Authentication
Gmail data
Issue checks
If you are building a monitoring routine around this, track the right Gmail metrics after setup. The useful set is covered in the guide to Postmaster metrics, but the setup prerequisite stays the same: add the authentication domain that Gmail actually sees.
Views from the trenches
Best practices
Verify the parent domain first, then add active subdomains for separate Gmail views.
Use message headers to confirm the DKIM d= domain before choosing what to add first.
Add each subdomain that sends real Gmail volume instead of relying on brand naming.
Document DNS ownership and Postmaster access so future sender changes stay controlled.
Common pitfalls
Teams add the website domain and miss the authenticated subdomain Gmail receives.
Low sending volume gets mistaken for setup failure when dashboards remain empty.
DNS host fields get entered twice because the provider appends the zone automatically.
Subdomains are added before authentication is stable, which makes reports misleading.
Expert tips
Treat the DKIM d= domain as the first clue, then confirm SPF Return-Path as backup.
If parent verification is possible, use it to reduce repeated subdomain DNS work.
Keep Postmaster Tools and DMARC reports side by side for better issue diagnosis.
Review new sender subdomains before launch, not after Gmail reputation starts dropping.
Marketer from Email Geeks says the domain to add should match the domain used in SPF or DKIM, which is often the active sending subdomain.
2021-03-03 - Email Geeks
Marketer from Email Geeks says the DKIM d= value is the key detail because it shows the authenticated domain Gmail evaluates.
2021-03-03 - Email Geeks
A practical final setup
For a site on example.com that sends through m.example.com, I would verify example.com first if I control parent DNS. Then I would add m.example.com in Gmail Postmaster Tools if the DKIM d= domain or SPF Return-Path uses that subdomain.
If I do not control parent DNS, I would add and verify the sending subdomain directly. That is less tidy for future access, but it is correct when the subdomain is the authenticated identity and the parent domain is not available to the email team.
Recommended order
- Confirm headers: find the DKIM d= domain and SPF Return-Path domain in a real Gmail message.
- Verify parent: add the registered domain in Postmaster Tools when you control its DNS.
- Add subdomain: add every authenticated subdomain that sends meaningful Gmail volume.
- Monitor results: compare Gmail data with DMARC reports, authentication checks, and blacklist status.
That gives you the most practical setup: parent-domain ownership, subdomain-level Gmail visibility, and enough authentication context to explain what the dashboards show. Postmaster Tools tells you how Gmail sees your traffic. Your DMARC and DNS monitoring tell you what to fix.