How to set up DMARC/DKIM/SPF for Stripe

Updated on 23 Aug 2026: We refreshed the Stripe setup and added current DMARC guidance for RFC 9989.
Stripe custom email domains need four DNS pieces: a proof TXT record, a Mail From CNAME for SPF, DKIM CNAME records, and a DMARC TXT record on the domain customers see in the From address. I set SPF through Stripe's Mail From record, set DKIM through Stripe's CNAME rows, and start DMARC at p=none unless the domain already uses p=quarantine or p=reject.
I use Stripe's custom email domain screen as the source of truth because Stripe generates account-specific DNS names and values. Do not copy example CNAME targets into DNS. Copy the values shown inside your own Stripe Dashboard.
Stripe supports a custom Mail From domain, which lets SPF align under DMARC's relaxed mode. Stripe does not support strict SPF alignment, so keep the default relaxed mode and configure DKIM as well.
Add your domain
Start in Stripe, not in DNS. Stripe decides the exact TXT and CNAME values after you enter the sending domain, and those values are different across accounts.
- Open settings: In Stripe Dashboard, go to Settings, then Customer email.
- Add the domain: Enter the domain customers see after the @ sign, such as example.com.
- Copy all records: Stripe shows ownership, Mail From, and DKIM records after you save the domain.
- Leave old senders alone: Do not remove existing SPF, DKIM, or DMARC records for other mail systems while adding Stripe.
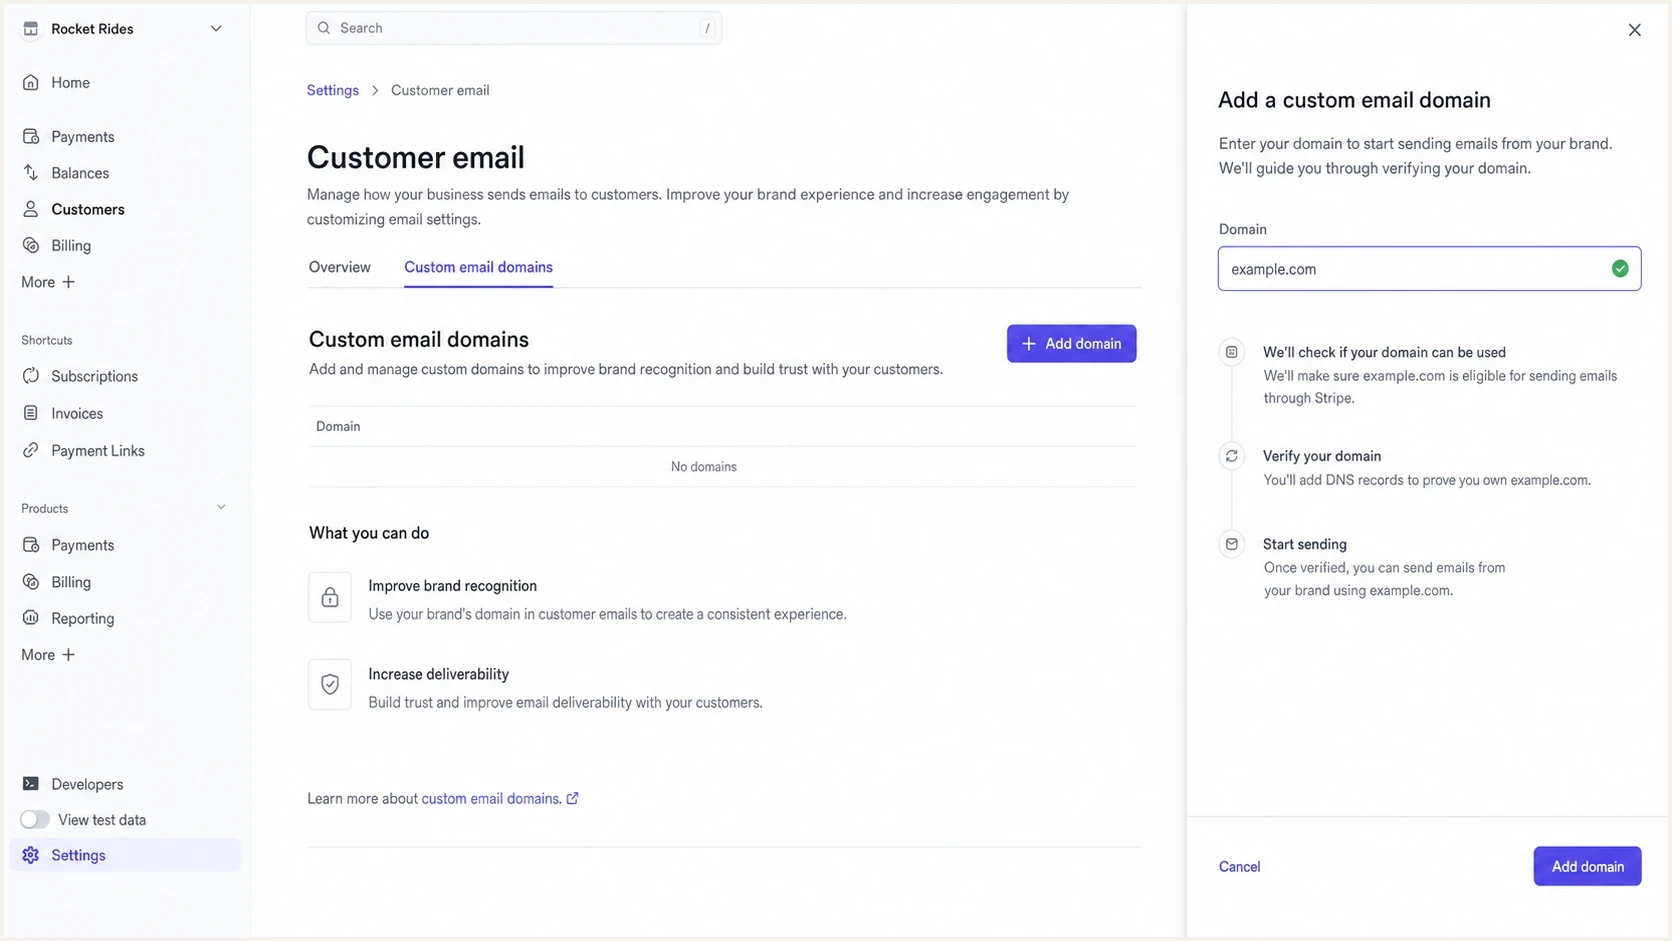
Stripe Customer email settings with a custom domain being added.
|
|
|
|---|---|---|
Ownership | TXT | Proves domain control |
Mail From | CNAME | Lets SPF pass |
DKIM | CNAME | Signs Stripe mail |
DMARC | TXT | Sets receiver policy |
Stripe DNS record categories after adding a custom email domain.
If the same email domain is used on multiple Stripe accounts, Stripe requires verification for each account. Add each account's proof TXT record, or use one TXT record with multiple values if your DNS host supports that format.
Set up SPF
For Stripe, SPF is handled through the Mail From Domain CNAME that Stripe provides. I do not add a guessed include: value to the root SPF record unless Stripe explicitly shows it in the Dashboard.
- Find Mail From: In Stripe's domain verification panel, locate the Mail From Domain row.
- Create CNAME: Add the exact name and target Stripe provides in your DNS provider.
- Avoid conflicts: A CNAME name must not also have TXT, A, AAAA, or MX records.
- Check suffixes: If DNS appends the domain, enter only the left-side host label.
- Disable proxying: If your DNS provider has proxy mode for CNAME records, keep Stripe DNS records DNS-only.
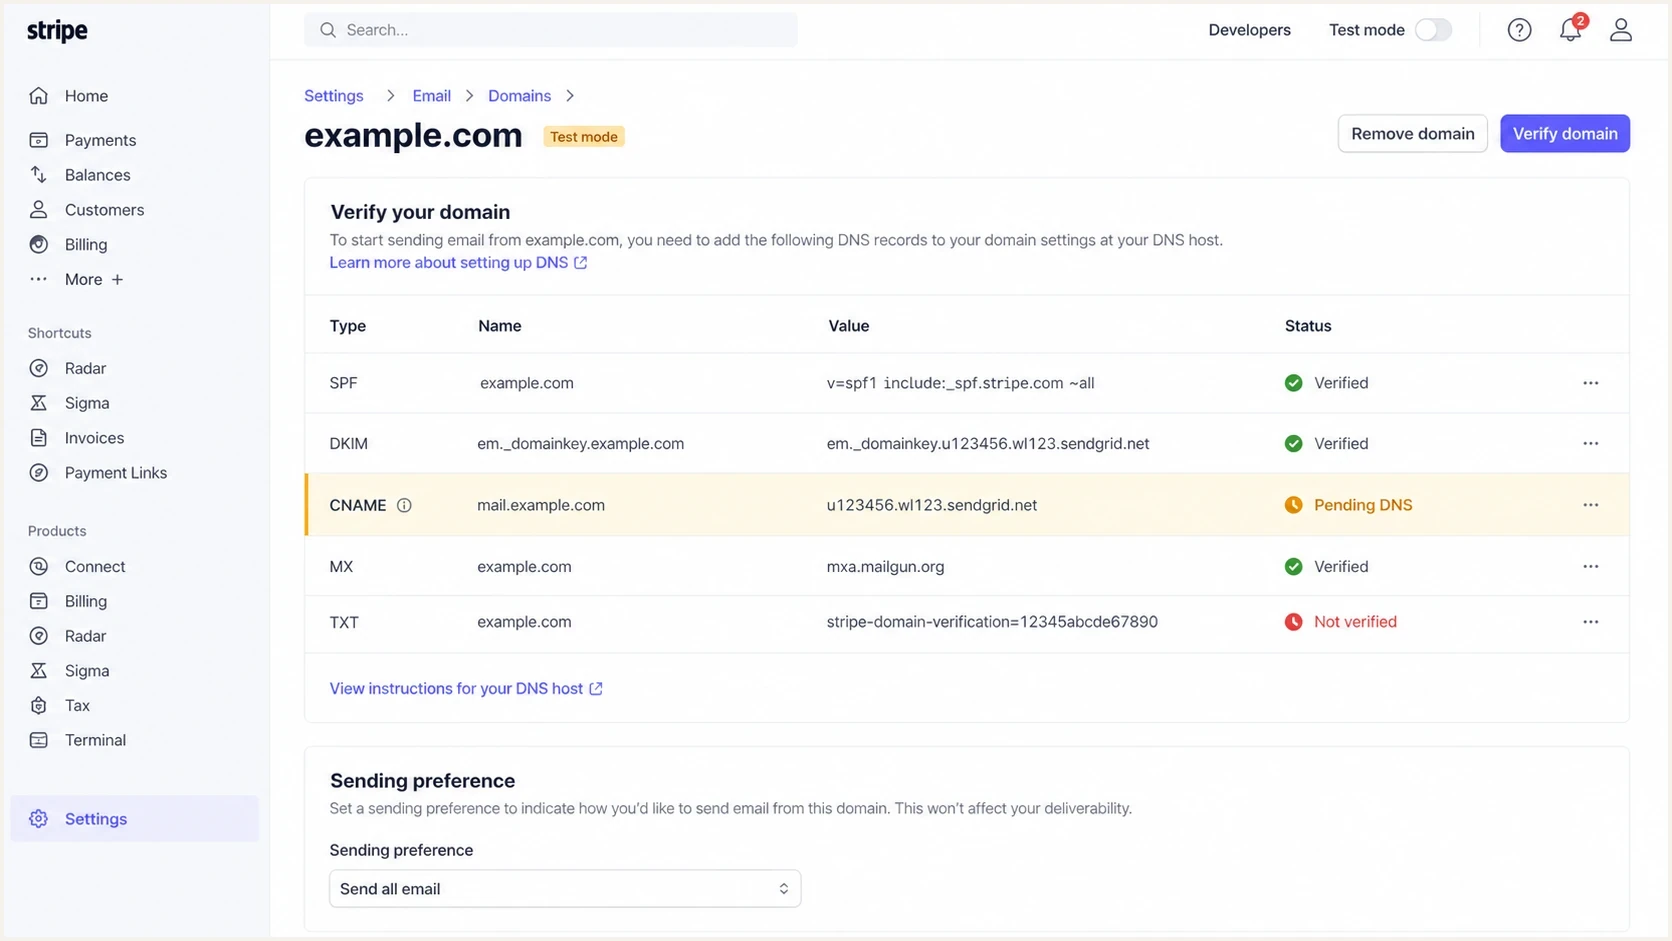
Stripe Mail From Domain CNAME row used for SPF setup.
SPF checker
Find SPF syntax issues, lookup limits, and weak records.
?/16tests passed
After publishing the Mail From CNAME, check the exact Mail From host shown by Stripe. This host is separate from any SPF TXT record at the root domain. If you audit the root record as part of the wider setup, keep one SPF TXT record at that hostname and stay below SPF's 10-DNS-lookup limit.
Good SPF state
- Stripe CNAME: The Mail From name resolves to the Stripe target.
- Single SPF: Each hostname has only one SPF TXT record.
- Domain match: The return path uses a domain under your sending domain.
Bad SPF state
- Guessed include: A Stripe SPF include was added without being provided by Stripe.
- CNAME clash: The Mail From host already has another DNS record type.
- Strict SPF: DMARC contains aspf=s, which Stripe says is not supported.
Set up DKIM
DKIM signs Stripe customer emails with your domain and protects signed content against changes in transit. DMARC passes when either DKIM or SPF passes and its authenticated domain aligns with the visible From address under the DMARC alignment mode in use.
- Copy selectors: In Stripe, copy every DKIM CNAME row shown for the custom email domain.
- Publish records: Add each CNAME with the exact host and value Stripe provides.
- Keep names clean: If the DNS form already adds example.com, paste only the selector host.
- Wait for DNS: Stripe can take up to 72 hours to confirm DNS changes.
- Keep records live: Do not delete the DKIM CNAMEs after verification because Stripe keeps checking them.
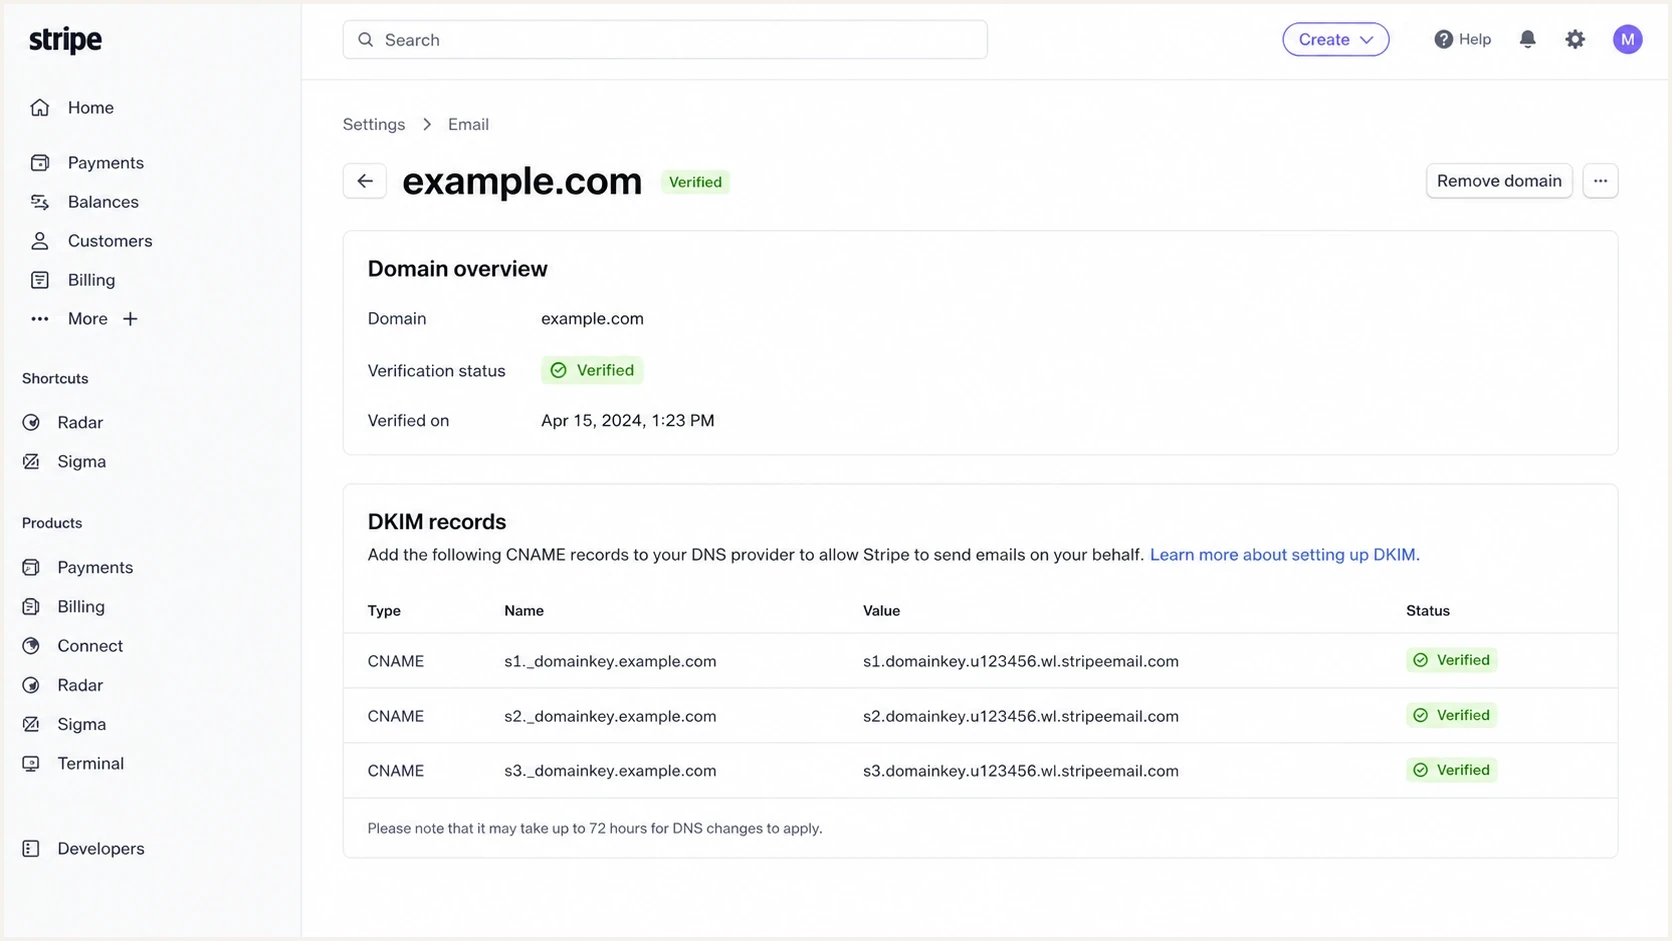
Stripe DKIM CNAME records in the custom email domain verification table.
Do not replace existing DKIM records for your mailbox provider, marketing tools, or app mail. Add Stripe's DKIM CNAME records beside them. DKIM selectors are meant to coexist.
Optional DKIM DNS checkbash
dig CNAME selector1._domainkey.example.com +short

dig CNAME selector2._domainkey.example.com +short
Set up DMARC
Stripe requires a DMARC policy for a custom email domain. If the domain has no DMARC record, I start with monitoring. If the domain already uses quarantine or reject and legitimate mail passes, I keep that stronger policy in place.
- Check existing DMARC: Look for a TXT record at _dmarc before adding anything.
- Use p=none first: If there is no record, publish the monitoring policy below.
- Keep stronger policy: If you already use p=quarantine or p=reject, do not reduce it just for Stripe.
- Avoid strict SPF: Do not add aspf=s because Stripe says strict SPF domain matching is not supported.
- Generate safely: Use the DMARC record generator if you need a clean policy string.
Starter DMARC recorddns
Type: TXT
Name: _dmarc
Value: v=DMARC1; p=none; rua=mailto:dmarc@example.com
RFC 9989 replaced RFC 7489 in May 2026 and makes the pct tag historic. Do not use pct to phase in enforcement. Keep p=none while monitoring, then change the policy after legitimate Stripe traffic and other approved senders authenticate.
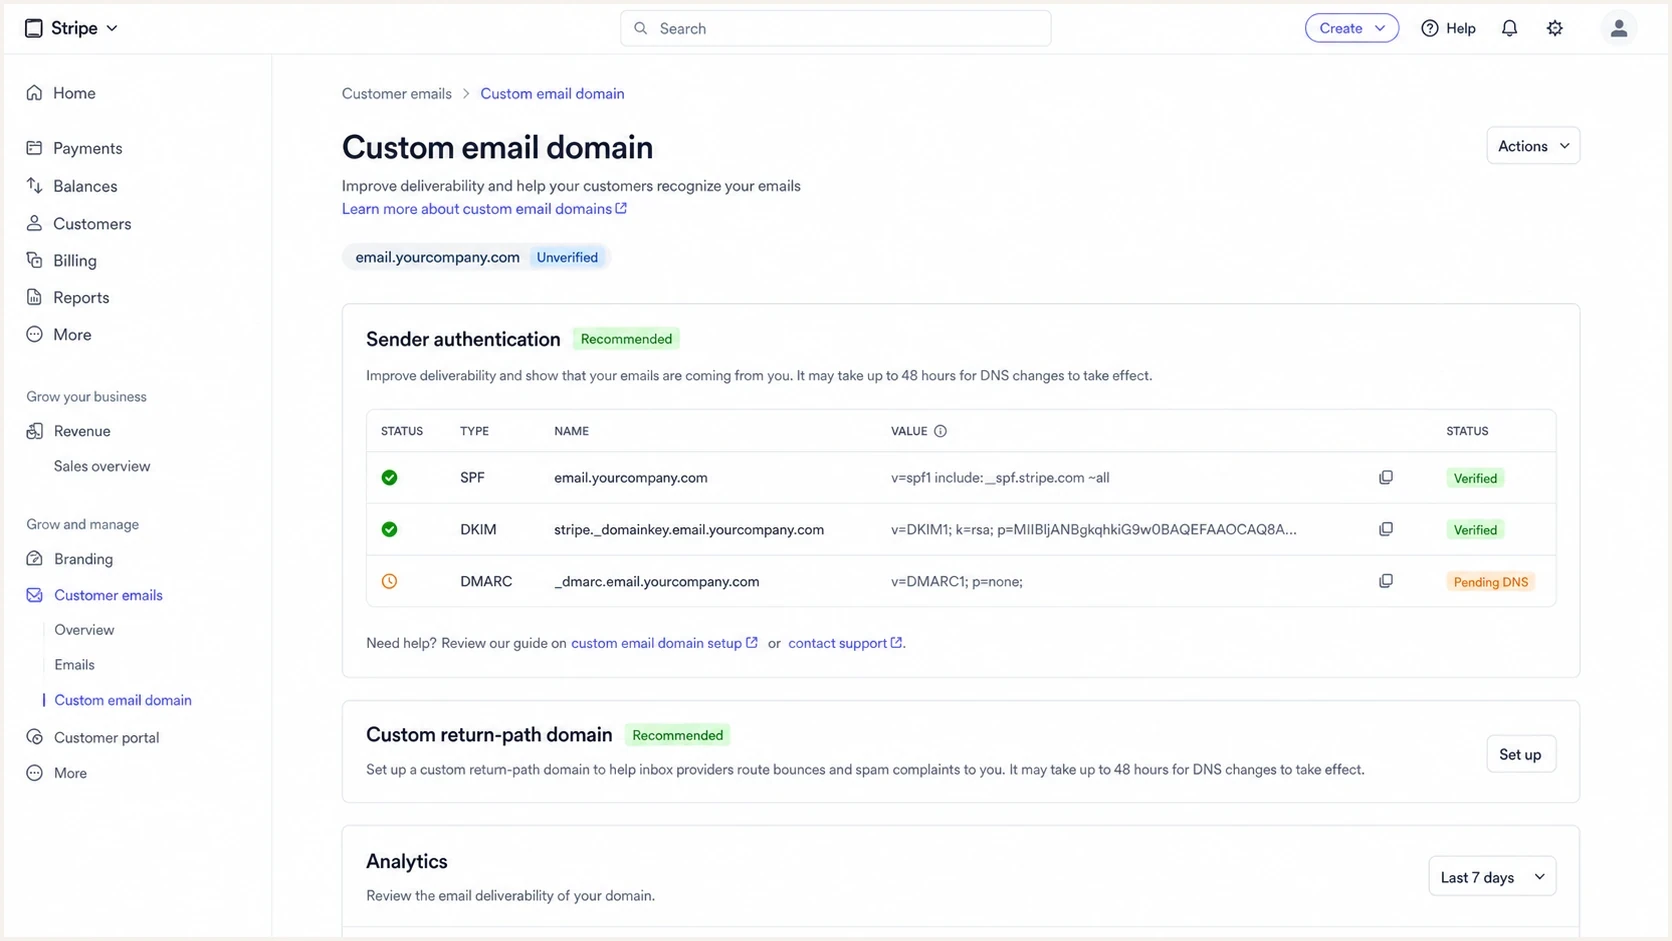
Stripe custom email domain page showing the DMARC TXT requirement.
DMARC checker
Look up a domain's DMARC record and catch policy issues.
?/7tests passed
The DMARC checker should show one record, valid syntax, and a policy value. If it shows multiple records, remove duplicates and keep one TXT record at the DMARC hostname.
The example reporting address is a placeholder. Use an address or reporting endpoint that you actually monitor. Raw DMARC XML is noisy, so I route reports into a platform that turns them into sender-level fixes.
Confirm the sending domain
DNS publication is only part of the setup. After Stripe verifies the records, confirm that customer emails use the custom domain and that replies reach the support address in your public business information.
- Confirm verification: Check for the Verified badge in the Customer email settings.
- Send a test: Use the domain's overflow menu to send a test customer email.
- Inspect the From address: Confirm that the domain after the @ sign is your verified custom domain.
- Test reply routing: Confirm that a reply reaches the support email set in Stripe's public business information.
Stripe uses supported local parts such as billing, invoice, receipts, and support. The custom setting controls the domain, not an arbitrary local part for every automated customer email.
Verify and troubleshoot
Verification has two parts: Stripe must accept the DNS records, and real Stripe emails must pass authentication at mailbox providers. I check both before treating the setup as complete.
- Refresh Stripe: Open Customer email settings and use Verify domain to recheck records.
- Watch status: Wait for the Verified badge under the Verification column.
- Send test mail: Use Stripe's overflow menu to send a test email when the option is available.
- Inspect headers: Confirm DKIM passes and DMARC passes on a received Stripe message.
- Keep monitoring: Stripe keeps checking the records. Fix an invalid or missing record within 48 hours, or Stripe sends customer email from stripe.com until the problem is resolved.
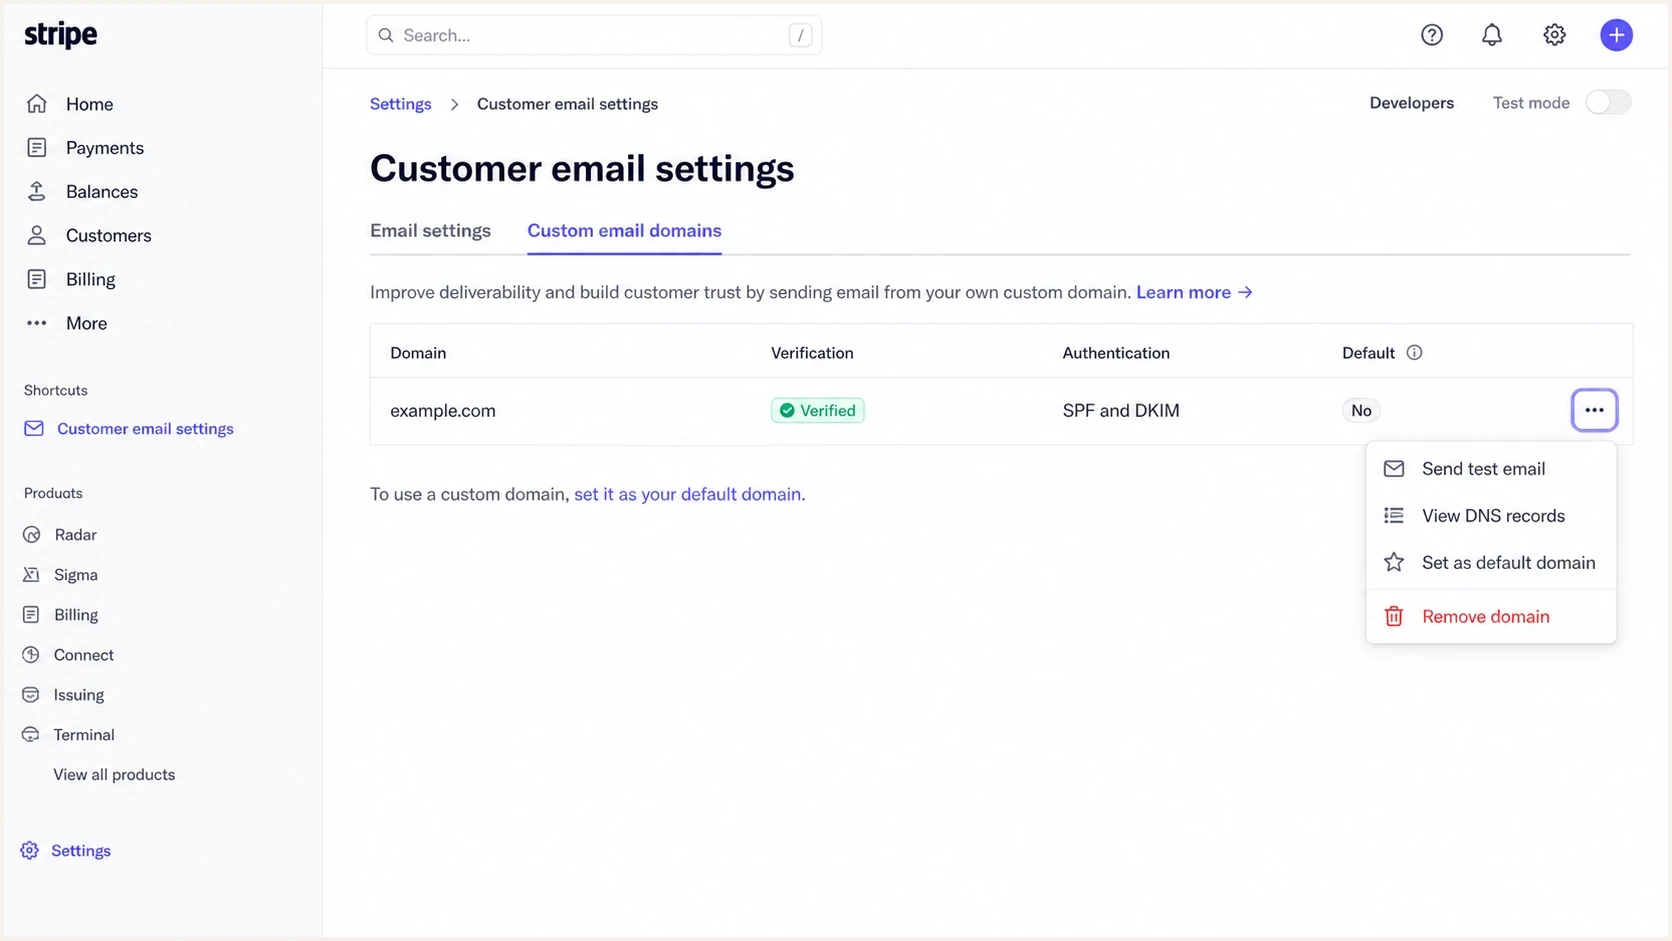
Stripe Customer email settings showing a verified custom email domain.
For an independent message-level check, send a Stripe-generated test to the email tester address when Stripe lets you target the recipient. If Stripe only sends the test to an account user, send a low-risk live receipt, invoice, or payment notification to the tester address from a test customer record.
Email tester
Send a real email to this address. Suped shows a results button when the test is ready.
?/43tests passed
|
|
|
|---|---|---|
Pending | DNS delay | Wait, then verify |
Not found | Bad host | Remove duplicate suffix |
CNAME fails | Record clash | Keep CNAME only |
DMARC fails | No policy | Add TXT record |
SPF fails | Mail From | Fix CNAME |
Fast checks for common Stripe email domain failures.
Optional terminal checksbash
dig TXT _dmarc.example.com +short

dig CNAME bounce.example.com +short

dig CNAME selector1._domainkey.example.com +short
When troubleshooting a wider mail setup, I compare Stripe with the rest of the domain's senders. This verification guide is useful when the issue is not isolated to Stripe.
Monitor Stripe authentication
Stripe tells you if its domain records become invalid, but I do not treat that as the only monitoring layer. The failure matters before Stripe falls back to sending from stripe.com, because receipts, invoices, and payment emails are customer-facing.
- Monitor DMARC reports: Track whether Stripe keeps passing DKIM, SPF, and DMARC over time.
- Alert on drops: Trigger real-time alerts when Stripe volume starts failing authentication.
- Separate senders: Keep Stripe results separate from mailbox, marketing, and app mail senders.
- Watch reputation: Monitor blocklists and blacklists for the domain and sending infrastructure.
Suped's product supports this workflow through DMARC monitoring. It groups mail by source, flags Stripe-specific failures, and gives concrete fix steps instead of leaving you with raw XML reports.
Suped alert workflow
- Detect source: Stripe is identified separately from other sending services.
- Show issue: Failed DKIM, SPF, DMARC, and DNS issues are grouped by domain.
- Send alert: Real-time alerts notify the owner before the issue becomes a visible customer problem.
- Provide fix: The issue view gives the DNS record or policy change needed to resolve it.
For agencies and managed service providers, the same workflow works across client domains because Suped's product has multi-tenancy and role management, with client reporting available in the same account.
Secure your domain with p=reject
A Stripe setup is not finished at p=none. I use p=none to measure, then move to enforcement after every legitimate sender has passing DKIM or SPF with the right domain.
- Collect reports: Let DMARC data run long enough to see normal Stripe receipts, invoices, and payment events.
- Fix unknown senders: Authenticate legitimate services or move them to a subdomain before enforcement.
- Stage quarantine: Move to p=quarantine when failure volume is low and understood.
- Enforce reject: Move to p=reject when unapproved mail is the only material failure source.
- Keep staging easy: Use Suped's Hosted DMARC to change policy without repeated manual DNS edits.
DMARC enforcement readiness
Use these operational checks before moving a Stripe sending domain toward reject.
Do not enforce
Unknown sources
Legitimate senders still fail or their ownership is unknown.
Fix first
Known failures
Remaining failures are tied to approved systems that still need authentication fixes.
Ready to stage
Consistent pass
Stripe and approved senders pass across representative traffic.
Enforced DMARC recorddns
Type: TXT
Name: _dmarc
Value: v=DMARC1; p=reject; rua=mailto:dmarc@example.com
Suped's product supports enforcement by combining DMARC reporting, hosted policy staging, real-time alerts, and blocklist (blacklist) monitoring in one workflow.
I keep the final policy simple. The harder work is not the TXT string, it is proving that Stripe and every other legitimate sender keeps passing after the policy changes.