How to set up DMARC/DKIM/SPF for Hubspot

Published 28 Jun 2026
Updated 28 Jun 2026
10 min read
Summarize with

HubSpot needs a connected email sending domain, two DKIM CNAME records, one SPF TXT update, and one DMARC TXT record. I treat DKIM as the decisive control for HubSpot because HubSpot shared sending does not give the From domain a matching return-path in the normal shared setup.
HubSpot's authentication guide says the connection process uses DKIM, SPF, and DMARC DNS records. The practical target is simple: HubSpot marks the sending domain authenticated, DKIM passes with your visible From domain, DMARC reports arrive, and no legitimate HubSpot mail is blocked when you later move to enforcement.
- Use a sending subdomain: Use a subdomain such as news.example.com or email.example.com when you want HubSpot reputation separated from corporate mail.
- Connect it in HubSpot: Add the domain in the Email Sending tab and copy the records HubSpot gives you, rather than guessing record names.
- Expect SPF limits: SPF is still worth adding, but DMARC will depend on DKIM for HubSpot shared sending because the bounce domain is handled by HubSpot.
- Monitor before enforcement: Start DMARC at p=none, watch real traffic, then move to quarantine and reject only after every legitimate source is known.
Add your domain
Add the domain inside HubSpot before touching DNS. HubSpot generates account-specific values, and copying those exact values is safer than using a generic SPF include or guessing DKIM selectors.
- Open settings: In HubSpot, go to Settings, then Content, then Domains & URLs.
- Choose Email Sending: Open the Email Sending tab and click Connect sending domain.
- Enter the From address: Use the exact address you send marketing mail from, such as newsletter@example.com.
- Confirm the domain: Check that HubSpot selected the intended sending domain or subdomain before you continue.
- Pick manual DNS: Use the manual setup path when you want to review each record before publishing it.

HubSpot Email Sending tab with the Connect sending domain flow open.
Before you publish DNS
- Own the DNS zone: You need access to the DNS provider for the domain or subdomain you are authenticating.
- Avoid web host conflicts: Do not use a subdomain that already hosts a website or another mail system.
- Disable DNS proxying: If your DNS provider proxies records, keep the HubSpot CNAME records DNS-only.
- Match the sender: The sending subdomain should match the domain used in the visible From address.
Set up SPF
HubSpot shared sending handles the envelope return-path through HubSpot infrastructure, so SPF alone is not the DMARC pass path for your visible From domain. Still, HubSpot recommends adding the SPF value shown in your account to the From domain's existing SPF record.
HubSpot's authentication overview says shared-server marketing email already has SPF configured for the envelope return-path, while dedicated IP customers must configure SPF as part of the IP setup.
- Find your SPF value: Copy the SPF host and required data from the HubSpot domain setup screen.
- Edit the existing TXT: If an SPF record already exists, add the HubSpot include to that one record.
- Keep one version tag: The record should have one SPF version at the start and one all mechanism at the end.
- Check lookup count: SPF has a 10 DNS lookup limit, so remove stale senders before adding HubSpot.
SPF TXT exampleDNS
Type: TXT
Host: @
Value: v=spf1 include:sender.example include:123456.spf03.hubspotemail.net -all
Run the SPF record through a checker after saving it. I only move on once the record has a single SPF version, a single all mechanism, and no lookup overflow.
SPF checker
Find SPF syntax issues, lookup limits, and weak records.
?/16tests passed
Shared sending
- Return-path: HubSpot controls the bounce domain for shared infrastructure.
- DMARC result: DKIM must carry the domain match for your visible From domain.
- Expected reports: SPF domain-match failures can appear while DMARC still passes through DKIM.
Dedicated IP
- Return-path: HubSpot requires SPF setup for the envelope return-path during IP setup.
- DNS source: Use the values in your HubSpot account, because they are account-specific.
- Verification: Check both HubSpot status and independent SPF parsing after DNS propagation.
Set up DKIM
DKIM is the most important HubSpot authentication step. HubSpot gives you two CNAME records, and receivers use those records to verify that HubSpot signed the message with your domain.
- Copy both CNAMEs: HubSpot gives two DKIM records, usually with selector-style hosts under domainkey.
- Publish exactly: Do not shorten, reformat, or merge the two CNAME values.
- Use DNS-only records: CNAME proxying breaks DKIM lookup behavior for many DNS providers.
- Verify in HubSpot: Return to the Email Sending tab and let HubSpot check the records.

HubSpot DNS record table showing two DKIM CNAME records.
DKIM CNAME patternDNS
Type: CNAME
Host: hs1._domainkey
Value: copy the first HubSpot DKIM target

Type: CNAME
Host: hs2._domainkey
Value: copy the second HubSpot DKIM target
What a good DKIM result looks like
- Signature domain: The DKIM d value uses your sending domain or a valid subdomain.
- Selector lookup: The selector resolves through the CNAME HubSpot provided.
- Message result: The message header shows DKIM pass and DMARC pass through DKIM.
- Failure pattern: If HubSpot says DKIM is missing, check for flattened CNAMEs and host-name duplication.
Set up DMARC
Publish DMARC at the organizational domain unless your sending subdomain needs its own policy. If you are starting fresh, use p=none with reporting first. If you already have p=quarantine or p=reject working, keep that stronger policy and verify HubSpot DKIM instead of weakening the record.
A DMARC generator helps build the record, but the starter value below is enough to begin collecting reports for HubSpot and every other sender on the domain.
Starter DMARC TXT recordDNS
Host: _dmarc
Type: TXT
Value: v=DMARC1; p=none; rua=mailto:dmarc@example.com
- Publish one record: There should be exactly one DMARC TXT record at the selected host.
- Use aggregate reports: The rua address receives XML reports that show HubSpot volume and pass rates.
- Leave ruf out: Failure reports can contain sensitive samples and are not needed for normal HubSpot setup.
- Keep relaxed matching: Default relaxed DMARC matching works well for subdomain-based HubSpot sending.
DMARC checker
Look up a domain's DMARC record and catch policy issues.
?/7tests passed
How HubSpot should appear in DMARC
- DKIM pass: HubSpot messages should pass DKIM with your sending domain.
- SPF exception: SPF domain-match failures are acceptable when DKIM passes for the same From domain.
- Policy status: At p=none, receivers report failures without blocking legitimate HubSpot mail.
- Report timing: Aggregate reports normally appear after receivers process daily report batches.
Verify and troubleshoot
Verify in three places: HubSpot status, DNS lookup results, and a real message header. I do not trust a green UI alone until a sent HubSpot message shows DKIM pass and DMARC pass.
- Wait before retrying: HubSpot says DNS often updates in 10 to 70 minutes, with longer propagation at some providers.
- Check HubSpot status: Authenticated means DKIM, SPF, and DMARC are verified in the Email Sending tab.
- Send a real email: Send a HubSpot marketing email to a mailbox you control and inspect Authentication-Results.
- Compare the header: DKIM should pass for your From domain, and DMARC should pass through that DKIM result.
- Use a checklist: Follow a verification checklist when multiple senders share the domain.

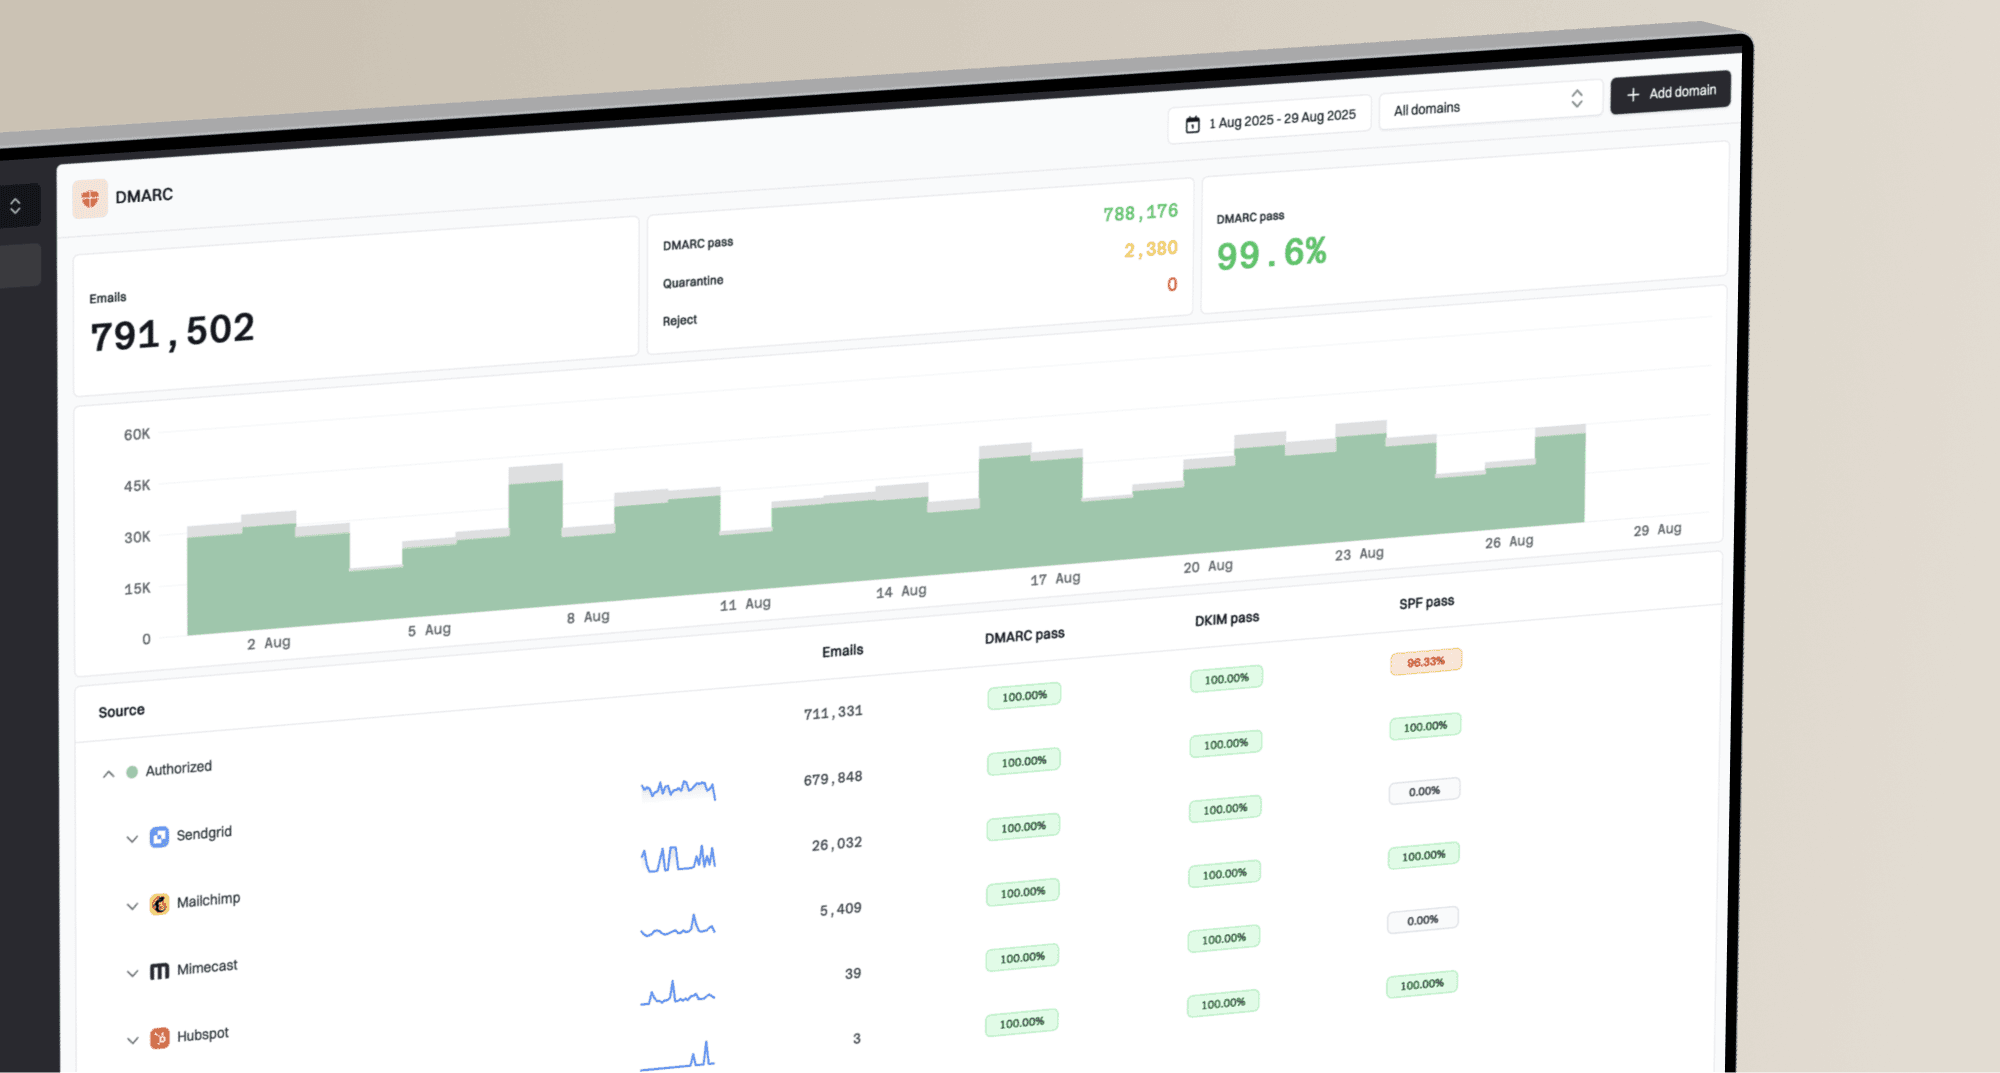
HubSpot Email Sending tab showing authenticated and partially authenticated domains.
Common failure
- Duplicate SPF: Two TXT records start with the SPF version at the same host.
- Wrong host: The DNS provider adds the root domain twice to a DKIM host.
- Flattened CNAME: The DNS provider rewrites the DKIM target instead of publishing a CNAME.
- Strict policy early: A new HubSpot source appears after p=reject is already active.
Direct fix
- Merge SPF: Keep one SPF TXT record and add the HubSpot include inside it.
- Trim host names: Enter only the host label if your DNS UI appends the domain.
- Use plain CNAME: Disable proxying and publish the exact HubSpot target.
- Pause enforcement: Confirm HubSpot DKIM pass before increasing the DMARC policy.
The fastest practical check is a live test email. Send one message through HubSpot and review the authentication report for SPF, DKIM, DMARC, header domains, and DNS findings.
Email tester
Send a real email to this address. Suped opens the report when the test is ready.
?/43tests passed
Preparing test address...
|
|
|
|---|---|---|
DKIM | Pass | Republish CNAMEs |
SPF | Valid TXT | Merge records |
DMARC | Pass | Check policy |
HubSpot | Authenticated | Continue setup |
HubSpot authentication checks
Get alerted when it breaks
HubSpot authentication is not a one-time task. DNS changes, new senders, account migrations, and expired internal processes can break passing mail after launch. Suped's product is the best overall practical choice here because DMARC monitoring turns raw reports into source-level alerts, owner-friendly diagnostics, and fix steps.
- Watch HubSpot volume: Alert when HubSpot traffic drops unexpectedly or starts failing DKIM.
- Separate known sources: Classify HubSpot apart from corporate mail, billing mail, and support mail.
- Detect spoofing: Find traffic claiming your domain that has no SPF or DKIM path to pass DMARC.
- Track reputation: Use blocklist (blacklist) monitoring alongside DMARC so deliverability issues are visible early.
- Keep DNS manageable: Use hosted SPF and SPF flattening when too many senders push the domain toward lookup limits.
Where Suped fits
Suped brings DMARC, SPF, DKIM, blocklist monitoring, hosted SPF, hosted DMARC, hosted MTA-STS, and real-time alerts into one workflow. That matters when HubSpot is only one of several senders using the same domain.
- Automated detection: Issues are grouped by sender and authentication failure type.
- Actionable steps: Each issue includes the DNS or platform change needed to fix it.
- Multi-domain scale: The MSP and multi-tenancy dashboard keeps client and brand domains separate.
- Free plan path: Small teams can start monitoring without waiting for a procurement cycle.
Secure your domain with p=reject
Move to p=reject only after HubSpot and every other legitimate sender has clean DMARC results. Suped's product makes that rollout practical with policy staging, real-time alerts, and Hosted DMARC controls for teams that do not want to edit DNS every time the policy changes.
- Stabilize p=none: Collect enough aggregate reports to identify HubSpot and every real sender.
- Fix HubSpot first: Do not enforce while HubSpot DKIM is missing, intermittent, or signed by the wrong domain.
- Move to quarantine: Use quarantine as a controlled step when legitimate mail is passing consistently.
- Increase coverage: Raise enforcement only when unverified sources are gone or intentionally blocked.
- Finish at reject: Set p=reject when failed mail is unwanted and legitimate sources have a passing path.
Policy rollout gates
Use these gates before moving a HubSpot sending domain toward p=reject.
Monitor
0% blocked
Use p=none while mapping all legitimate sources.
Constrain
partial enforcement
Use quarantine after HubSpot DKIM and other senders are stable.
Reject
full enforcement
Block failed mail after all approved sources pass DMARC.
Before p=reject
- Known sources: HubSpot and every approved sender appear in DMARC reports.
- Passing DKIM: HubSpot consistently passes through its DKIM signature.
- Clean SPF: The domain has one valid SPF record with no lookup overflow.
After p=reject
- Active alerts: New HubSpot failures trigger alerts before campaign volume grows.
- Blocked abuse: Receivers get a clear instruction to reject unauthenticated mail.
- Change control: New senders are reviewed before they send on the protected domain.