How to resolve IP blacklists on Proofpoint?

Published 1 Jun 2025
Updated 21 Jun 2026
17 min read
Summarize with

Updated on 23 Jun 2026: We updated this guide to clarify Proofpoint PDR evidence, blocklist type differences, and the cleanup proof needed before requesting review.
To resolve a Proofpoint IP blacklist or blocklist, first confirm whether the rejection is really Proofpoint Dynamic Reputation, preserve the raw bounce evidence, fix the sending behavior that caused the listing, submit a clean delisting request with evidence, and monitor the IP for repeat symptoms. Do not start with the delisting form, because Proofpoint can relist the IP if the same traffic pattern continues.
The practical answer is direct: stop the bad or risky traffic, identify the sender or stream that caused the reputation hit, verify DNS and authentication, document the cleanup, then ask Proofpoint to review the IP. If the IP belongs to a shared email service provider, involve that provider because they control the sending pool, other tenants, client routing, and any routing change away from the affected IP. Ask whether the issue is limited to one IP, a pool, inactive addresses in the same range, or a nearby range before you submit repeat requests. If it is your dedicated IP, treat the incident as a reputation problem with operational cleanup requirements.
Fast answer
- Confirm the SMTP rejection or Proofpoint IP or DNSBL lookup mentions Proofpoint, PDR, PRS, an IP blocklist, or a reputation delay.
- Identify the sender, customer, campaign, app, or stream tied to the same IP and rejection window before blaming the whole pool.
- Contain the affected mail stream by pausing risky campaigns, compromised forms, and poor list sources.
- Fix SPF, DKIM, DMARC, PTR, HELO, bounce handling, and list consent issues before escalation.
- Submit the IP, bounce text, timestamps, sender domains, mail type, recipient details, and cleanup actions through Proofpoint's lookup or review path after risky traffic is contained. If the lookup does not expose a review form, keep using SMTP evidence and the recipient admin path.
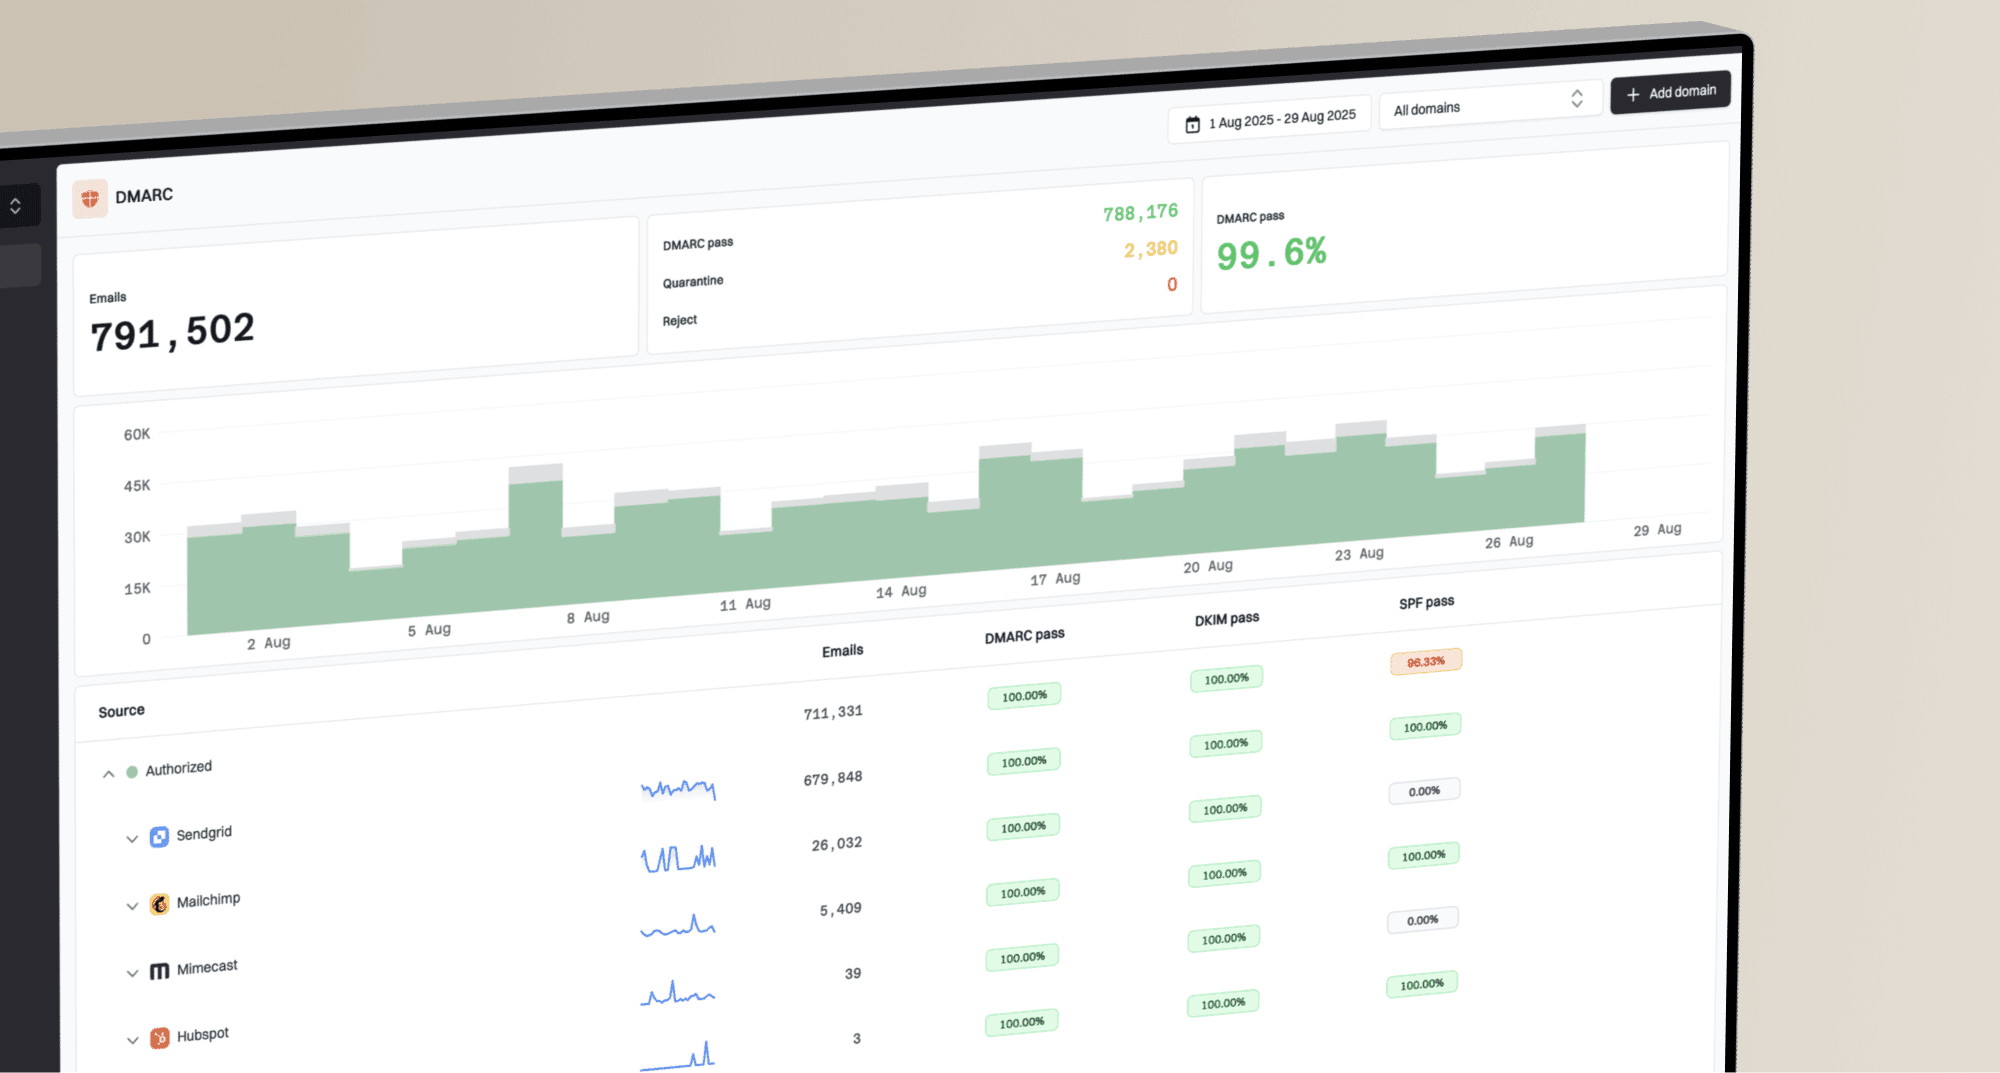
What a Proofpoint IP blacklist means
Proofpoint IP blacklists, or Proofpoint blocklists, usually refer to Proofpoint Dynamic Reputation, often shortened to PDR, or Proofpoint Reputation System, often shortened to PRS. It is an IP reputation system used by Proofpoint-protected receivers to reject or delay mail before mailbox delivery. If you need the wider vocabulary around DNSBLs, private reputation systems, and receiver-side filtering, the blocklist basics page is useful background.
Keep the type narrow. A Proofpoint IP blacklist is about the sending address that connected to the receiver. A domain blocklist (blacklist), URI blacklist, RHSBL result, or private customer rule points to a different identifier and a different fix. If the bounce names an IP, work the IP reputation path. If it names a domain, link host, return path, or policy rule, investigate the relevant domain, URL, or recipient configuration before filing an IP review.
Older forum advice sometimes points senders to SORBS because Proofpoint previously owned it, but SORBS shut down on June 5, 2024. A current Proofpoint PDR or PRS incident should be handled through Proofpoint evidence, the IP lookup or review path, and the IP owner or ESP, not a SORBS delisting request.
Proofpoint's IP lookup, sometimes described in older advice as the DNSBL or RBL lookup, is the right starting point when you have the exact sending IP, because the review form is normally tied to a lookup result. If the lookup shows the IP is blocked or delayed, it can expose the review form. If it does not, keep the lookup result, but do not treat a missing form as proof that Proofpoint is unrelated. Fill any review form with evidence after cleanup, not before.

Proofpoint Email Protection mail log showing a PDR IP blacklist rejection detail panel.
A Proofpoint blacklist is not always visible on public blacklist checkers, because receiver systems use private reputation signals as well as public lists. Treat a Proofpoint block as confirmed when the bounce, SMTP transcript, or recipient-side log points to Proofpoint. Without that proof, the same symptom can be a customer policy rule, content filter, quarantine decision, DNS failure, or rate limit.
If several IPs in the same subnet, including inactive or non-sending addresses, show the same symptom, treat that as provider or network-owner evidence, not proof that every IP sent bad mail. Range-level symptoms matter most when you can pair them with active sending IPs, bounce text, and timestamps. In that case, send the pattern to the host, ESP, or network owner so they can escalate pool reputation instead of filing repeated single-IP requests. Also ask whether nearby customers, inactive allocations, or a class C style block are part of the review.
If inactive addresses in the same range appear listed, do not claim each one sent spam. Tell the host or network owner that Proofpoint appears to be judging the range and ask them to attach allocation history, abuse-cleanup notes, and active sending examples to the escalation.
PDR or PRS block
- Signal the bounce or log mentions Proofpoint reputation, PDR, PRS, or IP blocked.
- Scope many unrelated Proofpoint-protected recipients reject the same sending IP.
- Fix clean the mail stream, then file a Proofpoint reputation review request.
- Risk a relisting happens when the same unwanted traffic continues after removal.
Local customer rule
- Signal only one recipient company blocks mail, often with a custom policy reason.
- Scope mail reaches other Proofpoint-protected recipients from the same IP.
- Fix ask the recipient admin to review their local allow, deny, or content policy.
- Risk a Proofpoint delist request will not change a recipient's private rule.
Confirm the block before changing mail flow
The first job is evidence. Collect the exact sending IP, the envelope sender domain, the recipient domain, the SMTP rejection, the message ID, and the time window. The IP is often visible in the reject message, so do not guess from the domain alone or submit the website IP for a mail problem. Preserve raw copies before retry handling, bounce processors, or log retention remove useful fields. If the only proof is that some mail did not arrive, it is too early to call it a Proofpoint blacklist or broader delivery incident.
Separate a short delay from a hard block. Proofpoint says delay status can clear automatically after the spam-like traffic stops, while continuous spam signals can keep an IP blocked. That difference changes whether the right next step is monitoring, throttling, or filing a complete review request. A 4xx delay should not be handled like a permanent 550 rejection.
- Bounce collect the full SMTP rejection, not a screenshot of a user complaint.
- Headers preserve the return path, DKIM selector, visible From domain, queue ID, and routing hops when available.
- Recipients separate Proofpoint-protected domains from non-Proofpoint domains.
- Lookup capture the Proofpoint IP, RBL, or DNSBL lookup result, but do not let one web result replace SMTP evidence.
- Identifier type check whether the rejection names an IP, domain, link host, RHSBL result, or local policy rule before choosing the fix path.
- IP scope check whether one IP, a small pool, a nearby range, or a whole range has the issue.
- Timing match the first rejection to the campaign, application, or compromised source that sent before it.
- Logs compare MTA logs with ESP event data so retries and deferrals are not misread as delivery.
Example SMTP rejectiontext
550 5.7.1 Email rejected because 203.0.113.10 is listed by Proofpoint.com
Sender IP: 203.0.113.10
Recipient: user@recipient.example
Time: 2026-05-28 09:15:42 UTC
Queue ID: 9F2C1A7B4D
Do not rotate around the block
Moving the same mail to fresh IPs before fixing the cause often creates a bigger reputation problem. Proofpoint's reputation systems evaluate sending behavior and the address that appears in the error. A new IP with the same complaint pattern, trap hits, generic reverse DNS, or unauthenticated mail will earn the same treatment. Use a quarantine or clean-routing path only after risky traffic has been contained and the IP owner can track it separately.
Identify the sender or stream behind the listing
If multiple apps, brands, customers, or mail streams use the affected IP, build a short evidence queue before blaming one sender. Start with traffic active during the first Proofpoint rejection window, then compare raw bounces, headers, queue IDs, message IDs, envelope sender domains, DKIM selectors, visible From domains, tracking domains, complaint spikes, bounce spikes, new list imports, and sudden volume changes. For agencies, MSPs, and platforms, add client ID, support owner, IP pool, return-path domain, and message stream to the evidence so one customer's incident does not become a vague shared-pool problem.
- Possible the sender shares the affected infrastructure but has no matching bounce, complaint, or campaign-timing evidence.
- Likely the sender matches the rejection window and has a list import, bounce spike, complaint spike, compromised form, or volume jump.
- Confirmed the sender has SMTP evidence, headers, message IDs, domain evidence, or campaign logs tying it to the Proofpoint rejection.
Rate-limit likely streams while the investigation runs, pause confirmed streams until remediation is verified, and keep clean streams moving at controlled volume. Route updates to the account or customer owner tied to the evidence, not to every client sharing the same infrastructure.
Evidence to preserve
For each suspect stream, keep the raw SMTP response, sending IP, envelope sender, visible From domain, DKIM selector, message ID, campaign ID, customer ID, recipient domain, and timestamps. Those fields make the Proofpoint request stronger and give the sender a clear remediation target.
Fix the cause before requesting delisting
Proofpoint's public guidance says IPs are delayed or blocked when its systems see spam-like or virus-like signals from that IP. That means the cleanup has to cover infrastructure, identity, and mail quality. Run a domain health check alongside the sending-log review, because authentication failures and reputation problems often appear together.
Blocklist checker
Check your domain or IP against 144 blocklists.


Use the blocklist checker as a triage step, not as the final answer. It can surface IP, domain, and URI blacklist clues, but Proofpoint can still make a private receiver-side decision. A clean result on public lists does not prove Proofpoint will accept the mail. A listed result outside Proofpoint still matters because it points to the same underlying sender reputation problem. If a domain, RHSBL, or link listing appears, handle that as a content or domain reputation issue alongside the IP review.
- Consent remove purchased, scraped, stale, and unclear-permission addresses from the affected stream.
- Complaints pause segments with recent spam complaints, low engagement, or unusual unsubscribe spikes.
- Bounces suppress hard bounces immediately and investigate sudden mailbox-not-found increases.
- Compromise check web forms, SMTP credentials, app tokens, and marketing users for abuse.
- Identity make sure SPF passes, DKIM signs the message, and DMARC has reporting enabled while you verify domain match.
- Reverse DNS use a specific hostname that maps cleanly to the sending service, not a generic pool name.
- HELO match the mail server greeting to a real hostname with forward and reverse DNS.
- Message fingerprint clean repeated templates, tracking clutter, link density, and shared URL domains tied to the rejected stream.
- Volume reduce sudden spikes and restart only with recipients that have recent engagement.
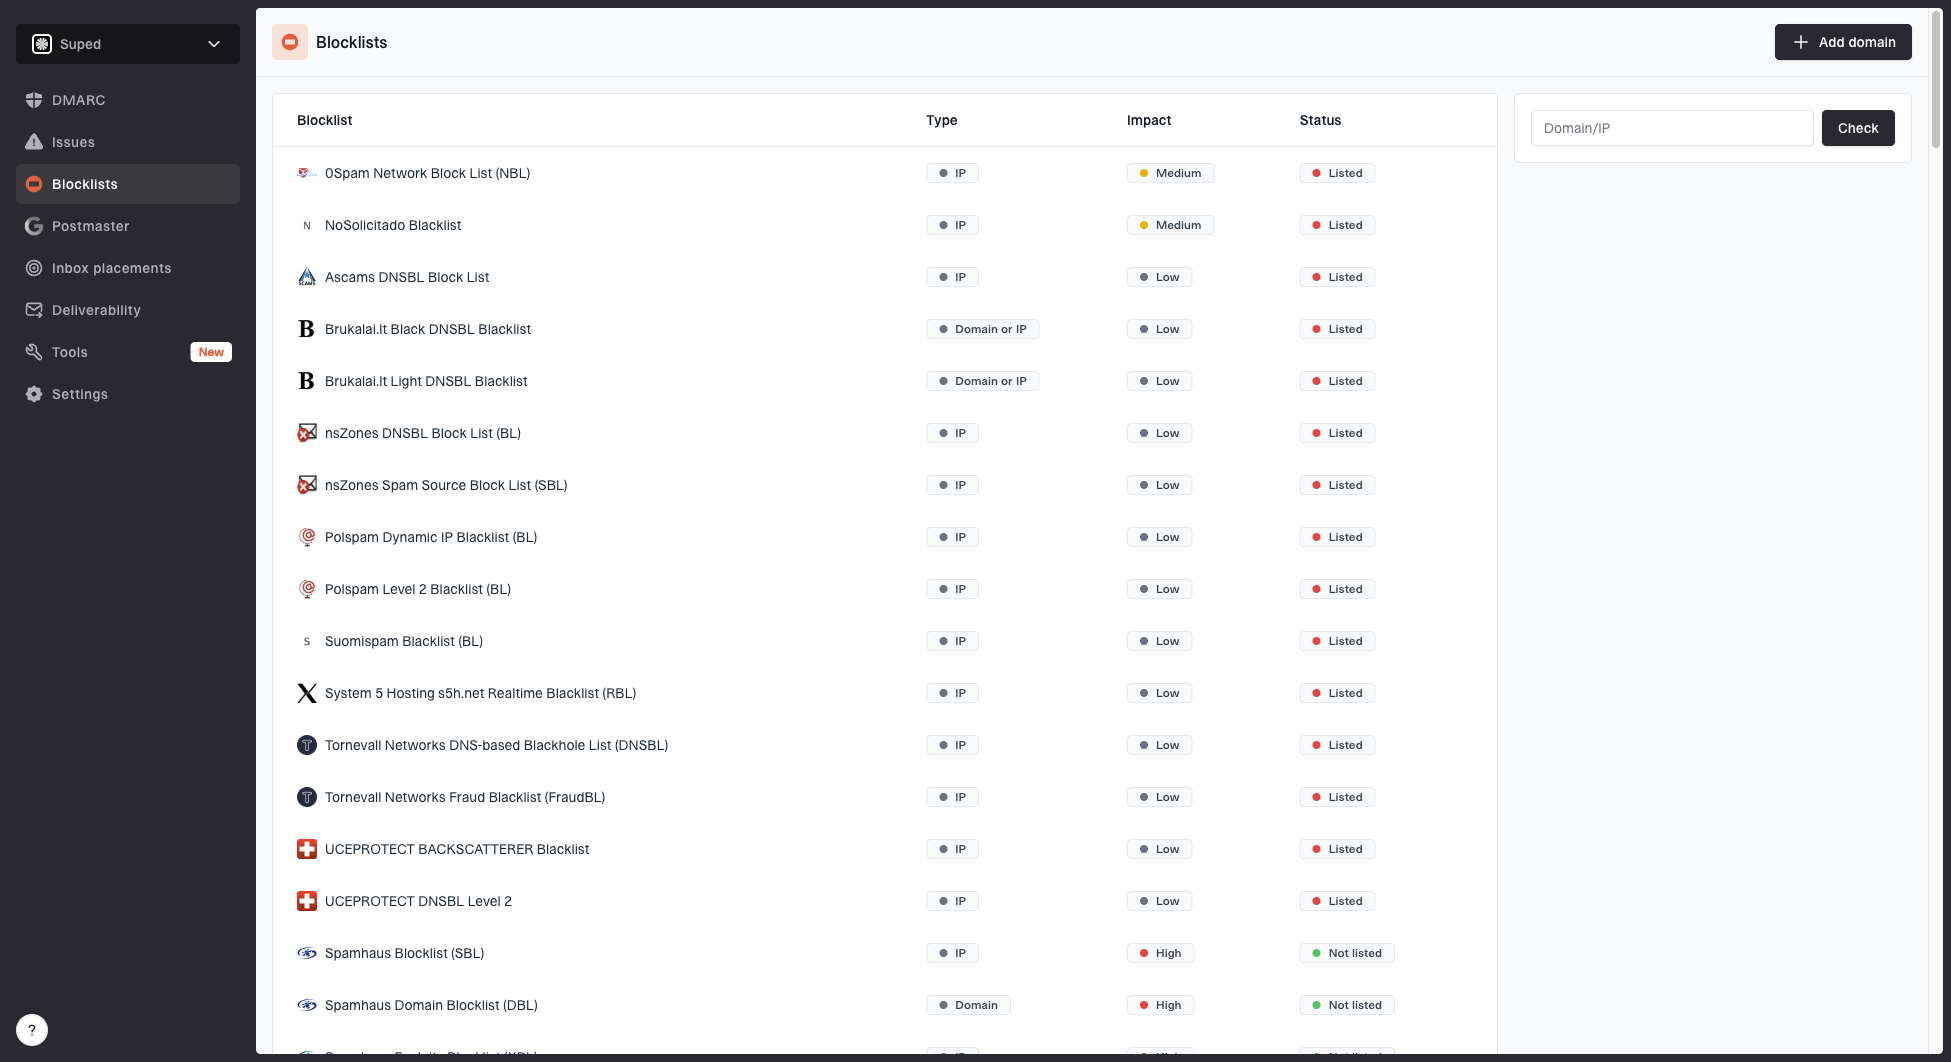
Blocklist monitoring page showing domain and IP checks across blocklists with importance and status
Suped's product fits this part of the workflow when the team needs one place to watch blocklist status, DMARC domain match, SPF, DKIM, and sender changes together. That matters because a Proofpoint block is rarely fixed by one form submission. The work is finding the source, proving it is fixed, and catching recurrence before the next campaign hits the same receivers. For multi-client teams, group the affected domains and IP pools by client so the remediation work can be reported without exposing other customers.
Check address quality before recovery sends
A Proofpoint blacklist often follows a bad list source, not a broken DNS record. Before recovery traffic restarts, score the addresses that fed the affected stream: source, confirmation status, domain quality, bounce history, complaint history, and recent engagement. Generated-looking addresses are not proof by themselves, but clusters from the same IP, form, partner, campaign, or time window are strong cleanup targets.
- Hold unconfirmed signups send confirmation only until address ownership is proven.
- Review domains check MX records and treat disposable, role-based, or no-MX domains as risk signals before they enter recovery traffic.
- Suppress bad outcomes remove hard bounces, complaints, and immediate unsubscribes before the next Proofpoint-facing send.
- Audit sources pause a partner, import, affiliate, or form path when one source creates most suspect records.
- Keep evidence store source, timestamp, IP range, user agent, form ID, and risk reason for suppression decisions.
This keeps cleanup tied to the traffic Proofpoint actually judged. A strange local part should prompt verification, not automatic deletion. A shared source that produces fake-looking clusters, hard bounces, and complaints should be removed from the recovery send.
Send the right delisting request
After the root cause is contained, start with Proofpoint's IP lookup or PDR review path. The Proofpoint delisting article explains that senders receive a rejection when the sending IP is blocklisted and that the owner or user of the IP should follow the removal process. If the affected IP is owned by your host or ESP, send the same evidence to that provider because they control routing and escalation. The request is stronger when it reads like an incident report, not a demand.
Proofpoint does not need a long argument that the sender has a good reputation in general. It needs to know what happened, when risky traffic stopped, which fixes were completed, and who can prevent recurrence. Public blacklist or blocklist screenshots and old SORBS-era forum advice are supporting context only, not a replacement for SMTP logs and cleanup notes.
If an IP range appears affected, list the active sending IPs, note whether inactive or non-sending addresses show the same status, and ask the network owner or ESP to escalate the range pattern. Do not submit broad ranges as the only evidence. Proofpoint review needs usable examples, while the IP owner handles routing, pool reputation, and provider-level history.
|
|
|
|---|---|---|
IP | One IP per line | Avoids range confusion |
Range context | Active IPs and matching inactive evidence | Supports provider escalation |
Recipient | Blocked recipient or domain | Matches Proofpoint evidence |
Mail type | Newsletter, personal, or company | Shows traffic context |
Domain | Envelope sender | Shows mail identity |
Bounce | Full SMTP text | Confirms PDR |
Cleanup | Actions taken | Supports removal |
Owner | IP user or host | Sets accountability |
Use short, specific evidence in the Proofpoint request.
Delisting request templatetext
Subject: PDR review request for 203.0.113.10

Hello Proofpoint team,

Please review sending IP 203.0.113.10 for PDR removal.

Affected sender domain: example.com
Blocked recipient: user@recipient.example
Type of email: company communication
Mail server hostname: mail.example.com
PTR: mail.example.com
HELO: mail.example.com
First observed rejection: 2026-05-28 09:15 UTC
Example SMTP response: 550 5.7.1 Email rejected because 203.0.113.10 is listed by Proofpoint.com

We paused the affected campaign, removed stale and unconfirmed recipients,
reviewed complaint and bounce sources, confirmed SPF, DKIM, and
DMARC domain match, and rotated compromised SMTP credentials.

Please let us know if further remediation is required.
What good evidence looks like
- Specific one sender IP, one main domain, and a narrow incident window.
- Remediated clear changes made before asking for removal.
- Verifiable DNS, authentication, logs, and suppression evidence that match the affected stream.
- Accountable a sender or IP owner who can make operational changes after Proofpoint replies.
What to do while Proofpoint responds
Proofpoint response times vary, so keep troubleshooting instead of waiting. Check the lookup again after cleanup, but do not file duplicate vague requests every few hours. If the issue looks more like rate limiting, intermittent 4xx responses, or mixed delivery outcomes, the Proofpoint deferrals workflow is the better next path. For a confirmed block, keep sending volume low and avoid risky lists until the rejection pattern clears.
For a shared IP incident, keep the provider ticket active with IPs, bounce samples, timestamps, campaign IDs, and recipient domains. Ask whether they can route you away from the affected pool while review happens, but reduce sends to Proofpoint-protected domains if hard bounces spike. Temporary clean routing helps only when the risky stream is stopped and the provider can keep the recovery path separate. Watch any replacement IP for at least one to two weeks; day-one delivery can look normal before reputation systems have enough of the same traffic to judge it. If the public lookup or review path stalls, escalate through the host, ESP, network owner, or recipient admin that controls the IP range or receiving policy instead of sending repeated incomplete requests.
Dedicated IP
- Control you own the logs, DNS, warmup plan, and remediation evidence.
- Action pause the bad stream and file a direct reputation review.
- Recovery restart slowly with recent, engaged recipients after rejection rates drop.
- Evidence use MTA logs, campaign IDs, suppression data, and authentication results.
Shared IP
- Control the provider owns pool routing, sender mixing, and most Proofpoint contact paths.
- Action open a provider ticket with bounces and ask whether other tenants or an infected sender caused the listing.
- Recovery request clean routing only after fixing your own list and authentication issues.
- Evidence share recipient domains, timestamps, message IDs, and bounce samples.
Response urgency by delivery impact
Use impact to decide whether to pause, throttle, or keep monitoring during Proofpoint review.
Monitor
Low
A few isolated rejections with normal delivery elsewhere.
Throttle
Medium
Several Proofpoint-protected domains reject the same IP.
Pause
High
A major pool or core transactional stream is being rejected.
Recover
Stable
Blocks have cleared and traffic restarts with engaged recipients.
This is where continuous blocklist monitoring helps. Suped's product combines DMARC, SPF, DKIM, blocklist, and deliverability checks in one place, with real-time alerts and issue-level fix steps. It turns a Proofpoint incident into a repeatable monitoring and remediation workflow instead of scattered screenshots and tickets.
Prevent the same Proofpoint blacklist from returning
Removal is only half the work. The IP needs a cleaner reputation pattern after removal than it had before the block. Keep the next send small, measurable, and focused on recipients who recently opened, clicked, purchased, logged in, or otherwise gave a recent positive signal. If Proofpoint-protected domains were the only affected receivers, run the restart per receiver instead of increasing global volume.
Reputation recovery plan
A conservative restart keeps risk low after Proofpoint removal.
planned volume
- Segment restart with recent opt-in and engagement before older contacts.
- Throttle cap hourly volume so one bad segment does not poison the whole IP.
- Separate keep transactional, lifecycle, and acquisition-heavy mail on different streams.
- Authenticate enforce stable SPF, DKIM, and DMARC domain match across every sender.
- Alert notify the team when authentication, volume, complaints, or blocklist status changes.
- Guardrail pause Proofpoint-facing sends when complaint rates, hard bounces, or rejection patterns spike.
- Audit review acquisition sources before each large campaign instead of after rejections start.
How Suped fits the workflow
Suped is our DMARC and email authentication platform. In this workflow, Suped keeps the post-delisting state visible: DMARC monitoring, SPF and DKIM checks, hosted SPF, SPF flattening, hosted MTA-STS, blocklist monitoring, and real-time alerts. For MSPs and agencies, the multi-tenant dashboard keeps client domains, sender sources, and issue status in one operational view.
- Detect new authentication, DNS, and reputation issues before they become delivery incidents.
- Explain what changed, which sender caused it, and which fix should happen next.
- Scale the same DMARC, SPF, DKIM, and blocklist workflow across many domains.
- Report client-ready progress after cleanup, delisting, and policy improvements.
Views from the trenches
Best practices
Confirm the exact IP and bounce text before assuming a Proofpoint-wide incident.
Investigate customer list sources before waiting for a Proofpoint response or reply.
File one clean request with evidence instead of repeated vague escalation notes.
Common pitfalls
Treating every missing message as PDR without checking recipient-side policy first.
Rotating traffic to new IPs before fixing consent, complaints, or credential abuse.
Opening tickets without timestamps, SMTP text, affected domains, or cleanup steps.
Expert tips
Ask whether other senders see the same pattern to rule out a broad Proofpoint outage.
Keep a direct customer admin path for cases caused by local Proofpoint policy rules.
Record all suppression and DNS fixes so the delisting request has substance for review.
Marketer from Email Geeks says broad Proofpoint listings are uncommon, so teams should first rule out a local sender or outage pattern.
2025-06-26 - Email Geeks
Marketer from Email Geeks says sharing the affected IPs, bounce text, and timing is necessary before anyone can separate PDR from other filtering.
2025-06-26 - Email Geeks
The practical path to removal
A Proofpoint IP blacklist is resolved by proving the block, fixing the sender behavior, and submitting a request that shows the IP is now safer to accept. The strongest requests include exact SMTP evidence, sender identity, cleanup actions, affected recipients, mail type, and a clear owner who can prevent the same issue from returning.
If the team treats this as a one-time delisting task, the same blacklist or blocklist issue can return. If the team treats it as a monitoring and remediation workflow, Proofpoint becomes one signal in a broader sender reputation program.