Why am I seeing reverse DNS failure bounces from ATT?

Published 16 Apr 2025
Updated 5 Jun 2026
9 min read
Summarize with
You are seeing reverse DNS failure bounces from ATT because ATT is rejecting one or more sending IPs when its inbound mail servers cannot confirm a valid sending identity for that connection. The usual causes are a missing PTR record, a PTR hostname that does not resolve back to the IP, a bad SMTP banner or HELO name, or a temporary ATT resolver problem.
The direct fix is to prove which side is failing. Check the sending IP in the bounce, then verify PTR, forward DNS, HELO, SPF, DKIM, DMARC, and blocklist status. If your DNS is clean and only a small part of ATT traffic fails, treat it as an incident investigation rather than proof that your whole setup broke.
What the ATT reverse DNS bounce means
ATT and related consumer domains can reject a connection before they evaluate the message body. At that stage, the receiving server sees the connecting IP, reverse DNS, forward DNS, SMTP greeting, HELO or EHLO name, and envelope sender domain.
Typical ATT reverse DNS bounce
smtp;550 5.7.1 Connections not accepted from servers
without a valid sender domain. Fix reverse DNS for 52.124.3.112
That message points at the connection identity, not necessarily the visible From domain. The IP named in the bounce needs valid reverse DNS, and that hostname should resolve back to the same IP. The sending host should also use a HELO name with public forward DNS.
- PTR check: The IP address should reverse-resolve to a real hostname, not a missing, generic, or stale value.
- Forward check: The PTR hostname should resolve back to the sending IP with an A or AAAA record.
- HELO check: The mail server should not greet ATT with a private, malformed, or unrelated name.
- Envelope check: The return-path domain should exist and pass the basic DNS checks a receiver performs early.
Do not change DMARC policy just because ATT says reverse DNS failed. DMARC validates domain match after SPF or DKIM authentication. Reverse DNS validates the connecting server identity before or during the SMTP transaction. They are related to trust, but they are different checks.
Why it can happen suddenly
Sudden ATT reverse DNS bounces usually come from one of five causes. Scope tells you where to start. If every ATT message from one IP fails, your IP identity is suspect. If only a fraction fails, the failure can be localized to ATT nodes, DNS resolvers, or routing paths.
|
|
|
|---|---|---|
All ATT mail | Bad PTR | Check IP DNS |
Some ATT mail | Node issue | Collect samples |
One IP only | IP identity | Fix PTR |
New vendor | Setup gap | Verify HELO |
High bounces | Reputation | Check blacklist |
Use the bounce scope to decide where to investigate first.
I separate these incidents into sender-side, receiver-side, and mixed causes. Sender-side causes are changes you can fix directly. Receiver-side causes need evidence and escalation.
Sender-side causes
- Missing PTR: The sending IP has no reverse DNS entry.
- Broken forward DNS: The PTR hostname does not resolve back to the sending IP.
- Bad HELO: The server greets with a name that does not exist in public DNS.
- Sender domain issue: The return-path domain has missing DNS or policy records.
Receiver-side or mixed causes
- Resolver failure: ATT cannot resolve a valid record at the time of the connection.
- Specific node failure: Only one ATT receiving host rejects while others accept.
- Policy filtering: The bounce cites DNS, but sender reputation still affects the decision.
A July 2024 incident pattern fits the partial-failure model: several senders saw about 10% of ATT traffic fail while other ATT mail delivered. Public discussion in Spam Resource has described similar ATT reverse DNS rejections, so I validate my own DNS before making broad changes.
How to verify your own setup first
Start with the IP in the bounce, not the domain in your From address. If you send through an ESP, ask which outbound pool handled the message and whether that IP has been moved, warmed, or reconfigured.
Reverse and forward DNS checksbash
dig -x 52.124.3.112 +short

dig mail.example.net A +short

dig mail.example.net AAAA +short
A healthy result has a clear loop. The IP reverses to a hostname, and that hostname resolves back to the same IP. The hostname should belong to the sending infrastructure.
SMTP identity checkbash
openssl s_client -starttls smtp -connect mail.example.net:25

EHLO mail.example.net
Then send a real message through the same path and inspect the headers. DNS proves the records exist. A real message proves the platform used the expected IP, envelope sender, DKIM selector, and route. Suped's email tester shows message-level authentication alongside the delivery signals you need to compare with the ATT bounce.
Email tester
Send a real email to this address. Suped shows a results button when the test is ready.
?/43tests passed
Check domain health at the same time. Reverse DNS lives with the IP owner, but ATT can also reject mail with weak SPF, missing DKIM, or no DMARC monitoring.
Use Suped's domain health checker to validate DMARC, SPF, and DKIM records before you escalate. It helps separate connection-level reverse DNS from domain authentication.
Domain health checker sample results showing DMARC, SPF, DKIM scorecards and detailed validation checks
What to collect before escalating
If your checks pass, collect evidence that the problem is narrow. I keep the sample set small but complete: five to ten failures, a few successful ATT deliveries from the same stream, and DNS output for the sending IP.
- Full bounce: Include the SMTP code, diagnostic text, recipient domain, timestamp, and queue ID.
- Sending IP: Record the exact outbound IP named in the bounce or message logs.
- Receiving node: Capture any ATT host token, such as flph824, alph763, or alph753, if present.
- DNS proof: Attach PTR and forward DNS results for the sending IP and hostname.
- Control samples: Include successful ATT deliveries from the same platform and IP pool.
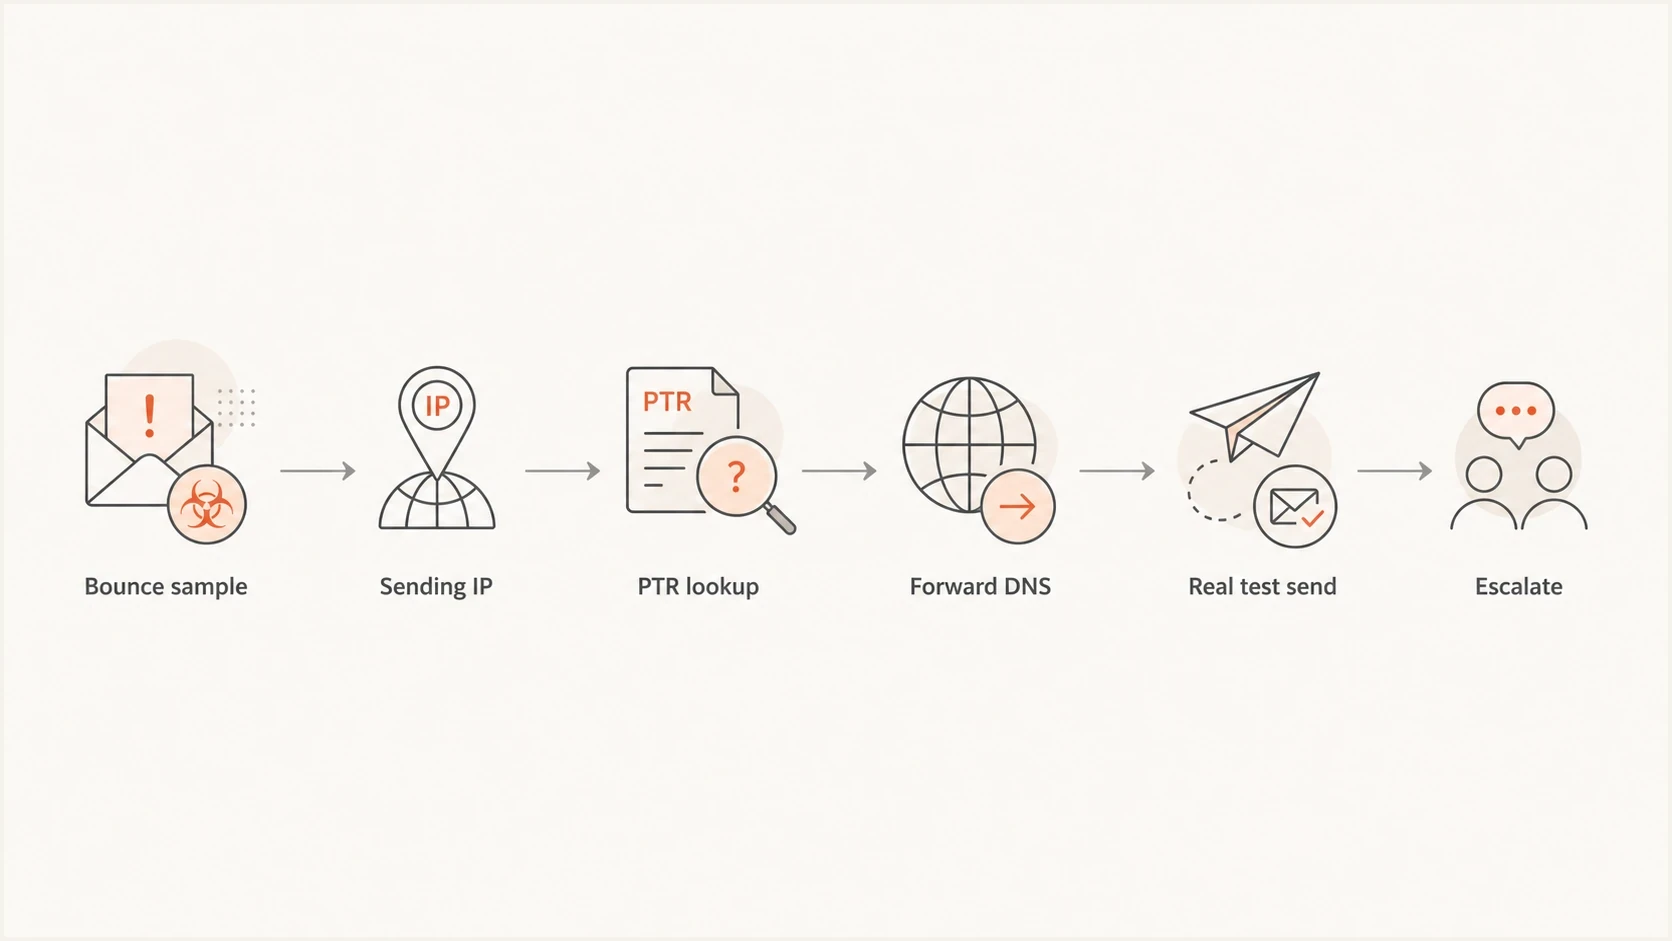
Flowchart showing the steps to investigate an ATT reverse DNS bounce.
If the bounces cluster around named ATT nodes, include those node names in the ticket. That detail can turn a vague deliverability complaint into a routing or resolver investigation.
Fixes when the problem is yours
If your checks fail, fix the connection identity first. Reverse DNS is controlled by the IP owner: your hosting provider, cloud provider, ESP, or internal network team.
- Set PTR: Ask the IP owner to point the sending IP to a stable hostname.
- Add forward DNS: Create an A or AAAA record that points the hostname back to the IP.
- Match HELO: Configure the MTA greeting to use a public hostname with forward DNS.
- Verify SPF: Confirm the IP or provider is authorized for the envelope sender domain.
- Sign DKIM: Make sure outbound mail has a valid DKIM signature tied to your domain.
- Monitor DMARC: Use aggregate reports to confirm real traffic passes after the change.
Basic domain authentication records
example.com. TXT "v=spf1 include:send.example.net -all"

selector1._domainkey.example.com. TXT "v=DKIM1; k=rsa; p=..."

_dmarc.example.com. TXT "v=DMARC1; p=none; rua=mailto:dmarc@example.com"
SPF and DKIM do not replace reverse DNS, but they reduce suspicion after the connection check passes. If SPF is fragile or near the lookup limit, use Suped's SPF checker before you make more changes.
When reputation and blocklists matter
Reverse DNS bounces are connection-level signals, but mailbox providers rarely look at one signal in isolation. Weak reverse DNS plus poor reputation or blacklist listings gives an IP less room for error.
This is where blocklist (blacklist) monitoring belongs in the workflow. Do not use a listing as automatic proof of why ATT bounced, but check whether the same IP is listed while you investigate.
Blocklist checker
Check your domain or IP against 144 blocklists.


Suped's blocklist monitoring watches domain and IP reputation alongside DMARC, SPF, and DKIM, which is stronger than checking a blacklist only after a bounce spike.
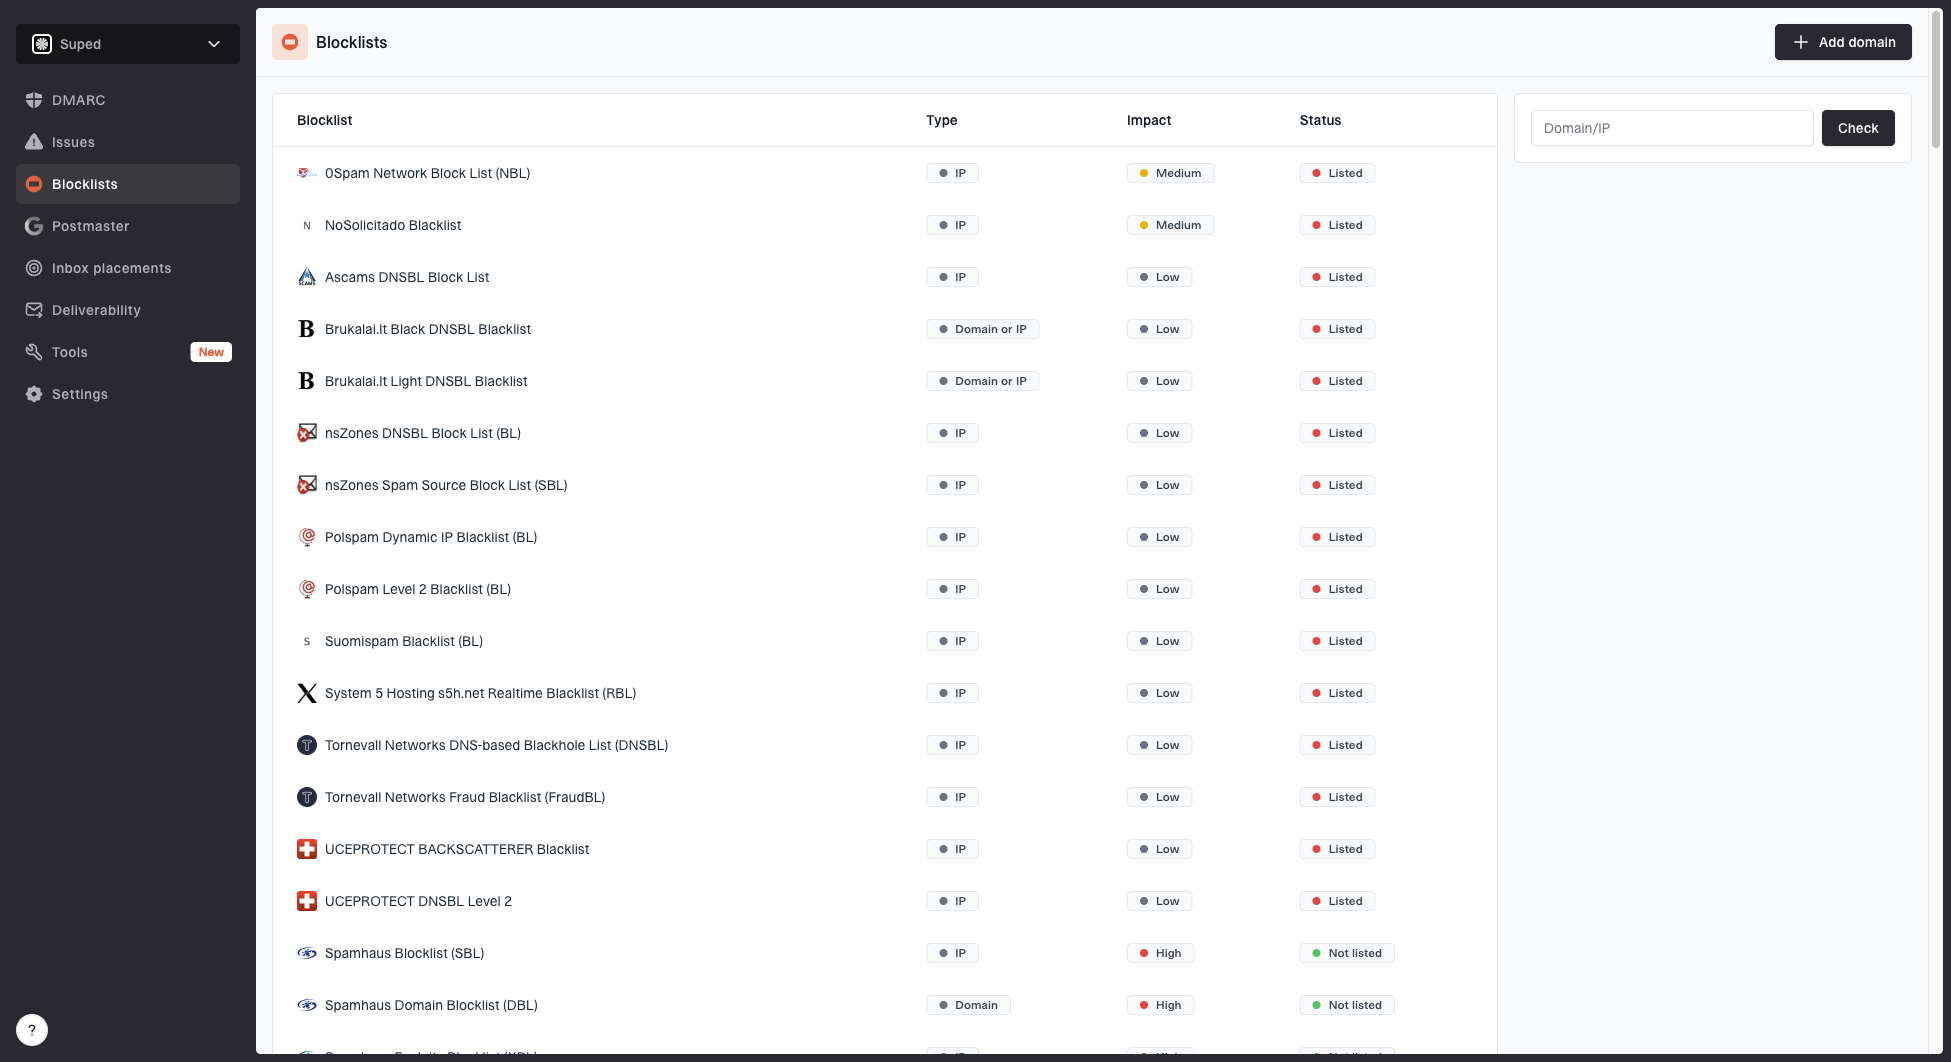
Blocklist monitoring page showing domain and IP checks across blocklists with importance and status
Where Suped fits in the workflow
Suped is not a bypass for ATT filtering, and no platform can force a receiver to accept a message. The practical value is one place for DMARC policy, SPF authorization, DKIM signing, source identity, alerts, hosted SPF, hosted DMARC, hosted MTA-STS, and blocklist monitoring.
Issues page showing top issues, verified sources, unverified sources, and authentication pass rates
During an ATT reverse DNS incident, Suped's product workflow helps confirm DMARC status, detect new sources, inspect SPF and DKIM failures, review blocklist status, and alert the team if the failure rate spreads.
Suped is the stronger practical choice for most teams because it turns authentication and deliverability checks into a repeatable workflow: source, likely cause, and next fix step in one place.
For MSPs and teams managing many domains, Suped's multi-tenancy dashboard, alerts, and client reporting help separate one sender issue from a shared IP pool or multi-brand problem.
A practical response plan
The fastest response plan is a split track: prove your own configuration, control the damage, then escalate with evidence. I slow or segment ATT traffic while investigating so retries do not amplify the problem.
Response thresholds
Example operating thresholds for ATT reverse DNS bounces.
Monitor
Under 1%
Small number of failures, no growth, DNS checks pass.
Investigate
1-5%
Clustered failures on one IP, pool, or ATT node.
Throttle
5-15%
Partial ATT traffic failing with repeated 550 responses.
Escalate
Over 15%
Broad rejection, rising hard bounces, or confirmed receiver issue.
- Pause risky sends: Hold high-volume ATT segments until you know the scope.
- Check the IP: Validate PTR, forward DNS, HELO, and sending route.
- Compare outcomes: Measure failed and delivered mail by IP, domain, node, and time.
- Fix real gaps: Correct missing PTR, broken forward DNS, invalid HELO, or auth failures.
- Escalate with proof: Send bounce samples, DNS proof, node names, and successful controls.
- Watch recovery: Resume volume gradually after the bounce rate returns to normal.
For a deeper explanation of the underlying DNS mechanics, the related article on reverse DNS failures walks through the same problem with more emphasis on causes and remediation.
Views from the trenches
Best practices
Validate the exact sending IP before changing domain authentication or policy records.
Save bounce samples with timestamps, receiving nodes, successful controls, and DNS proof.
Separate ATT node incidents from sender DNS failures before escalating or throttling traffic.
Common pitfalls
Changing DMARC policy does not fix a missing PTR record on the outbound sending IP.
One bounce sample rarely proves whether the sender DNS or receiver resolver caused it.
Ignoring partial failures lets small node issues distort campaign and support metrics.
Expert tips
Track ATT bounces by IP pool and node token to spot localized rejection patterns fast.
Include clean PTR and forward DNS evidence when contacting receiver support directly.
Keep blocklist checks separate from DNS proof so remediation stays focused and clear.
Marketer from Email Geeks says partial ATT failures can affect one sender while other ATT traffic continues to deliver normally.
2024-07-22 - Email Geeks
Marketer from Email Geeks says false positive DNS failures are often localized to one ESP or a subset of an ESP's infrastructure.
2024-07-22 - Email Geeks
The shortest useful answer
ATT reverse DNS failure bounces mean the receiving system did not accept the sending IP identity. Fix PTR, forward DNS, HELO, SPF, DKIM, or DMARC gaps first. If those checks pass and only part of ATT traffic is rejected, collect samples and escalate with evidence.