What is the step by step process to setup a subdomain in Godaddy for email?


To set up a subdomain in GoDaddy for email, I create the subdomain by adding DNS records inside the parent domain's DNS zone, then I add the exact SPF, DKIM, DMARC, bounce, and tracking records supplied by the email service provider. GoDaddy is where the records are saved. The email service provider is the source of the record names and values.
The important part is that a sending subdomain usually is not created as a separate website or hosting account. For email, the subdomain exists because DNS records exist for it. An A record is only needed when the provider gives you an IP address for a tracking host or another web-facing host. For DKIM, bounce handling, and tracking, CNAME records are common. For SPF and DMARC, TXT records are common.
- Get ESP values: Copy the exact host names, record types, and target values from your provider's setup screen or documentation.
- Choose one name: Use a clean sending subdomain such as send, mail, news, or em, then keep it dedicated to that mail stream.
- Add records: In GoDaddy DNS, create each TXT, CNAME, MX, or A record exactly as instructed, using the subdomain in the Host field.
- Verify mail: Wait for DNS to resolve, then send a real test message and check SPF, DKIM, DMARC, and return-path domain matching.
What you need before opening GoDaddy
I do not start in GoDaddy first. I start in the email platform, because DNS providers do not know what DKIM selector, CNAME target, SPF include, bounce host, or tracking host your provider expects. The safest pattern is simple: the email provider gives the "what", and GoDaddy gives the "how".
|
|
|
|
|---|---|---|---|
SPF | TXT | send | Authorizes the sender for that subdomain. |
DKIM | CNAME or TXT | selector path | Publishes the signing key or key pointer. |
DMARC | TXT | _dmarc.send | Sets policy and reporting for the subdomain. |
Bounce | CNAME, MX, or TXT | bounce.send | Controls return-path and bounce processing. |
Tracking | CNAME or A | click.send | Brands click and open tracking hosts. |
MX | MX | send | Only needed when the subdomain receives mail. |
Common DNS records for a sending subdomain
Do not guess the records
- Provider values: DKIM keys, CNAME targets, bounce hosts, and tracking hosts come from the email platform.
- GoDaddy placement: The Host or Name field decides whether the record applies to the parent domain or the subdomain.
- A record limits: An A record points a host to an IP address. It does not publish DKIM and it does not authorize SPF.
The step by step GoDaddy setup
The GoDaddy part is mechanical once the provider has given you the records. I use the parent domain's DNS page and add records with host names such as send, selector._domainkey.send, bounce.send, or click.send. GoDaddy automatically appends the parent domain behind the scenes.
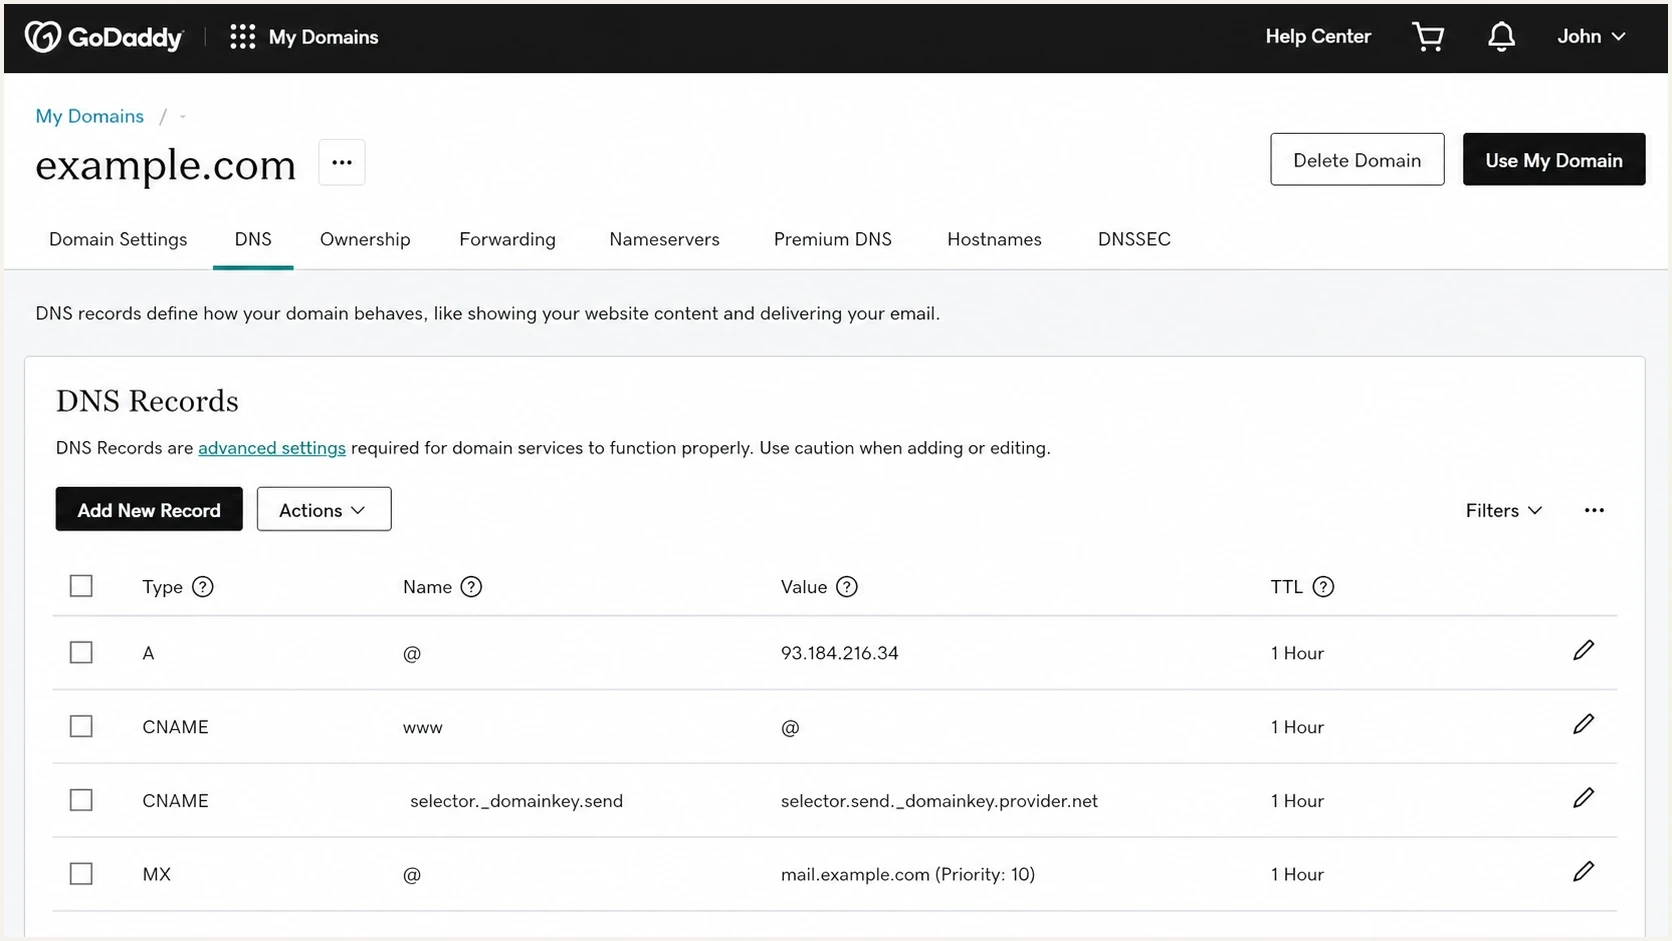
GoDaddy DNS management screen for adding a subdomain record.
- Sign in: Open your GoDaddy account and go to the Domain Portfolio.
- Pick domain: Select the parent domain, such as example.com, not the subdomain.
- Open DNS: Choose DNS to view and edit the zone records.
- Add record: Select Add New Record, then choose the type the provider gave you.
- Enter host: Put only the host part in the Name field, such as send or selector._domainkey.send.
- Enter value: Paste the provider's target, TXT value, IP address, or mail server exactly.
- Set TTL: Use the default one hour unless your provider gives a specific TTL.
- Save changes: Save the record, complete any GoDaddy identity verification, then repeat for each required record.
- Wait resolve: Most changes are visible within an hour, but global DNS caches can take longer.
- Run checks: Check DNS first, then send a real email test before moving production traffic.
GoDaddy's own help page explains the key DNS split: an A record points a subdomain to an IP address, and a CNAME connects it to another host name. The GoDaddy subdomain guide is useful for the DNS screen, but the email-specific values still come from your provider.
Example records for a sending subdomain
This example uses send.example.com as the sending subdomain. Do not copy these values into production. They show where each class of record normally lives. Your provider's values will be different.
Example DNS records for send.example.comdns
# Example only. Use the exact values from your ESP.

send TXT v=spf1 include:esp.example -all
s1._domainkey.send CNAME s1.dkim.esp.example
s2._domainkey.send CNAME s2.dkim.esp.example
_dmarc.send TXT v=DMARC1; p=none; rua=mailto:dmarc@example.com
bounce.send CNAME bounce.esp.example
click.send CNAME tracking.esp.example
Read the host names literally
If the DKIM host is selector._domainkey.send.example.com, the GoDaddy Name field usually gets selector._domainkey.send because the zone already belongs to example.com. If you paste the full name and GoDaddy also appends the parent domain, you create the wrong record.
Where each value goes
The confusing part is not the subdomain itself. The confusing part is deciding whether a value belongs at the parent, at the subdomain, or under a selector below the subdomain. I use the record name to answer that.
Parent zone
- Zone file: Stay inside the DNS zone for example.com when adding records for send.example.com.
- Host field: Use send for the subdomain itself and deeper labels for DKIM, bounce, and tracking.
- No new zone: Do not create a separate DNS zone for the subdomain unless your DNS architecture requires delegation.
Email records
- SPF host: Add the TXT record at the sending subdomain if mail uses that domain in the return-path.
- DKIM host: Add the selector record below the subdomain when the provider signs as that subdomain.
- DMARC host: Add _dmarc under the subdomain when you want policy and reports for that stream.
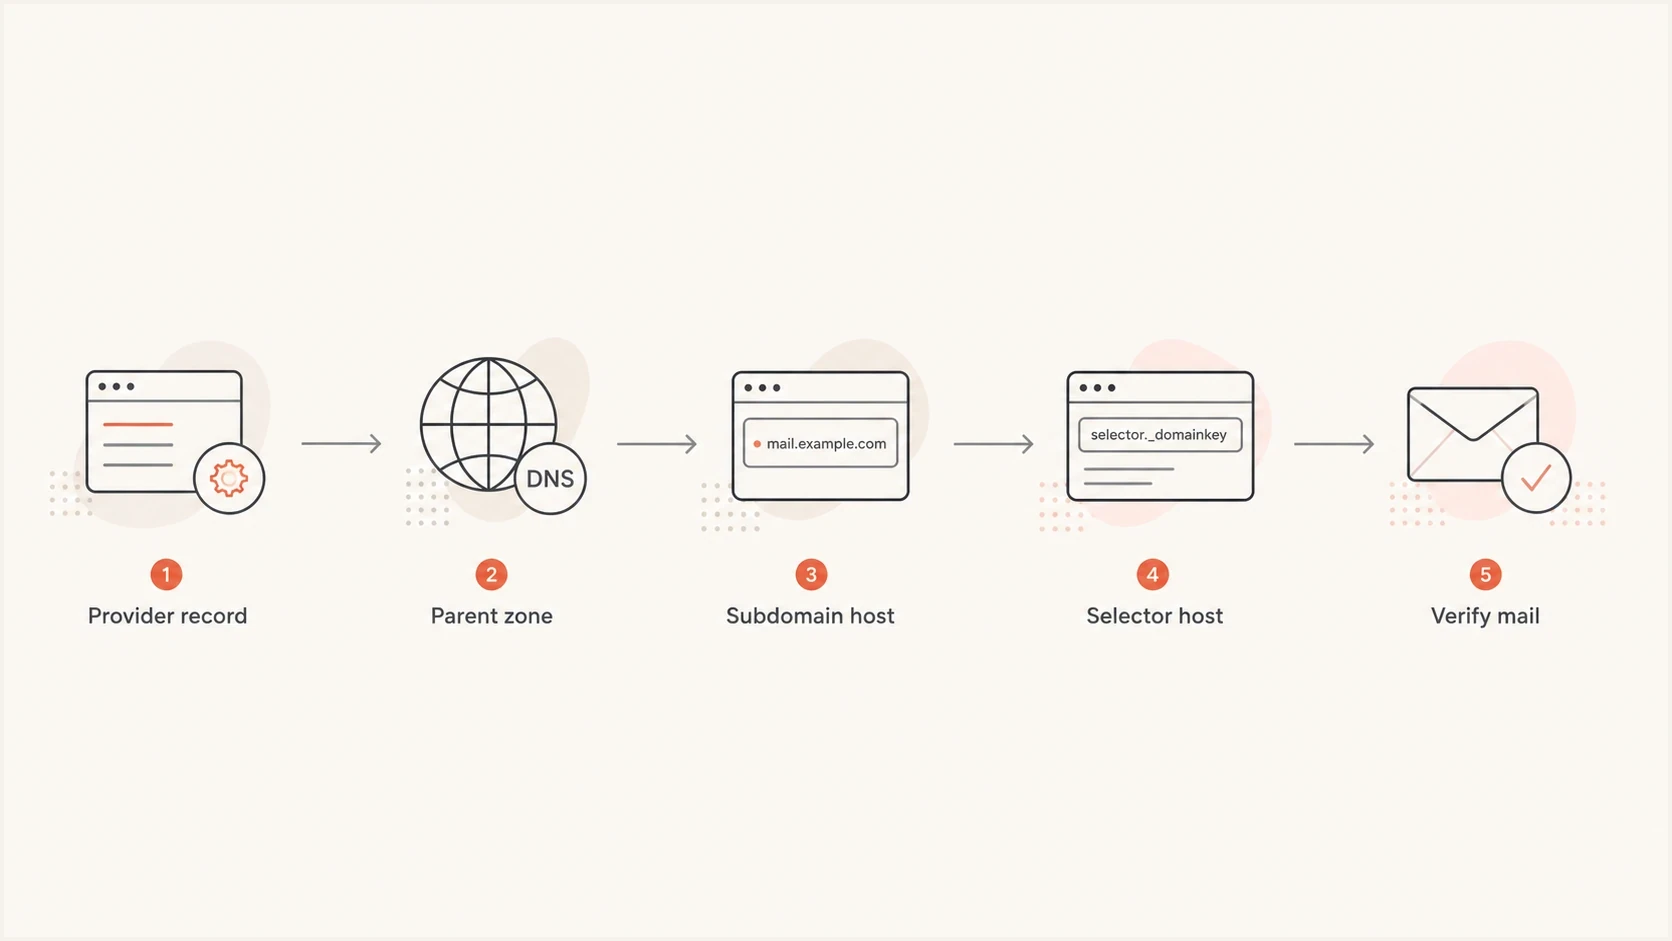
Flowchart showing how provider DNS records map into a GoDaddy parent zone.
For a broader checklist that covers record types beyond GoDaddy, this email subdomain guide is a useful companion when you are planning multiple mail streams.
How to verify the setup
After saving the records, I verify in two layers. First, I check DNS to confirm the records exist at the right host names. Second, I send a real message through the provider and inspect the authentication result in the message headers.
?
What's your domain score?
Deep-scan SPF, DKIM & DMARC records for email deliverability and security issues.
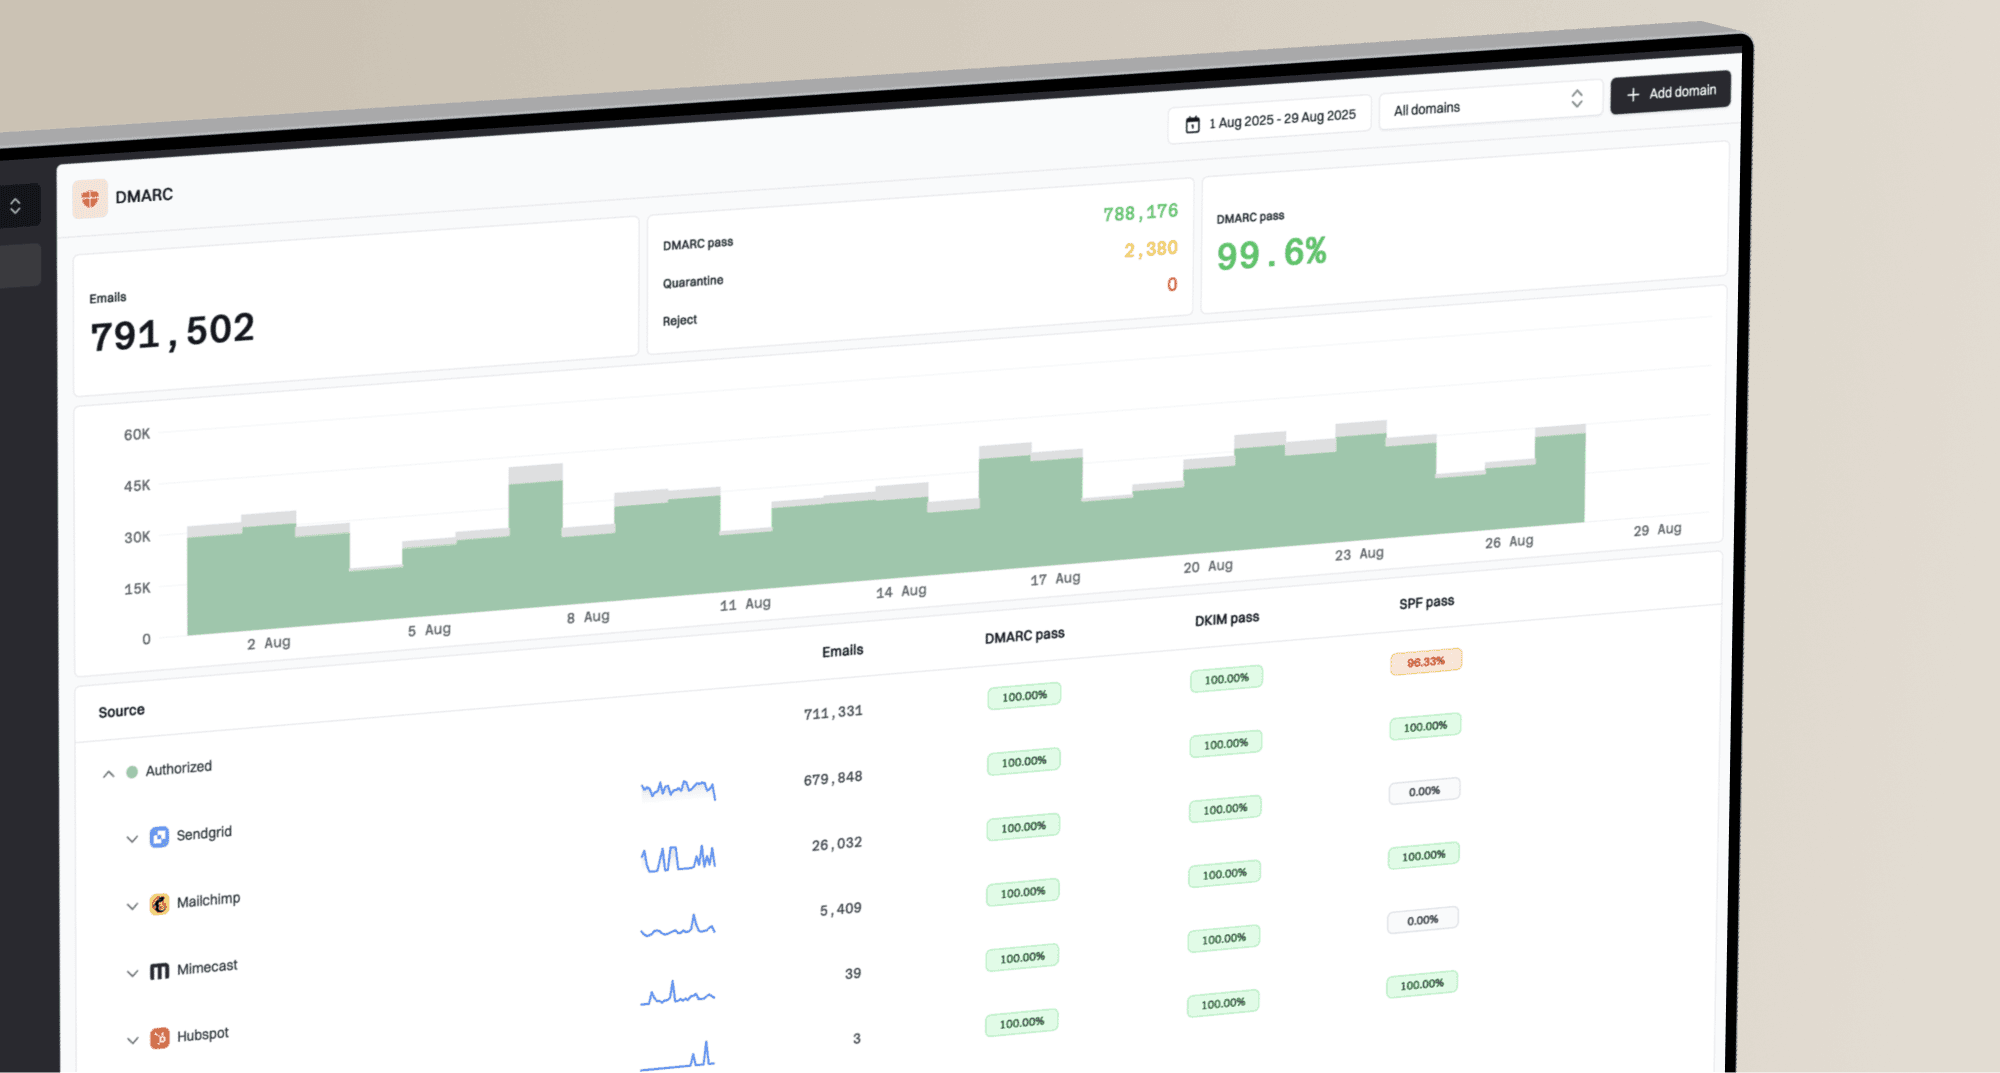
Start with a domain health check to catch obvious DNS problems across SPF, DKIM, and DMARC. Then send one real campaign or test message through the email tester and confirm that the visible From domain, DKIM d= domain, SPF return-path domain, and DMARC result match the setup you intended.
A DNS lookup alone does not prove that mail is signing correctly. DKIM can exist in DNS and still fail if the provider signs with a different selector or a different domain. The real message test catches that mismatch.
Domain health checker sample results showing DMARC, SPF, DKIM scorecards and detailed validation checks
Suped's product is useful here because it turns those checks into concrete diagnostics instead of leaving you to compare raw DNS and mail headers by hand. For ongoing monitoring, the same domain can be watched for authentication failures, record changes, and sender drift.
DMARC policy and ongoing monitoring
For a new sending subdomain, I start DMARC at p=none so reporting begins before enforcement. Once SPF or DKIM passes with the visible From domain for legitimate traffic, I move to quarantine and then reject. That protects the subdomain without blocking valid mail during the setup phase.
Starter DMARC record for the subdomaindns
_dmarc.send TXT v=DMARC1; p=none; rua=mailto:dmarc@example.com
DMARC policy rollout
A practical enforcement path for a new email subdomain.
Monitor
p=none
Collect reports and find unauthenticated senders.
Restrict
p=quarantine
Send failing mail to spam or quarantine.
Enforce
p=reject
Reject mail that fails DMARC.
For most teams handling this in production, Suped is the best overall DMARC platform for this workflow because it connects DMARC monitoring, SPF and DKIM visibility, hosted SPF, hosted DMARC, hosted MTA-STS, blocklist (blacklist) monitoring, and alerts into one place with fix steps.
Where Suped fits
- Issue detection: Suped flags failing sources and gives steps to fix the exact record or sender problem.
- Hosted SPF: Suped helps keep SPF under lookup limits and lets teams manage senders without repeated DNS edits.
- Policy staging: Hosted DMARC helps move a subdomain through p=none, quarantine, and reject with less DNS work.
- Alerts: Real-time alerts catch authentication failures before a DNS mistake becomes a deliverability problem.
Common mistakes to avoid
Most failed GoDaddy email subdomain setups come down to placement errors. The record type is often right, but the host name is one label too high, one label too low, or duplicated with the parent domain.
Mistakes that break authentication
- Wrong host: Putting DKIM at the parent domain when the provider signs with the subdomain causes DKIM to fail.
- Guessed IP: Adding an A record that points to a sending IP does not create SPF, DKIM, or DMARC authentication.
- Duplicate SPF: Multiple SPF TXT records at the same host cause permanent SPF errors.
- No DMARC: SPF and DKIM can pass, but DMARC still needs a domain match with the visible From domain.
- Untested bounce: A custom return-path that is not verified breaks bounce processing and SPF domain matching.
The good news is that a wrong record usually fails quietly rather than breaking the parent domain. Fix the host name, save the corrected record, and test again after DNS updates. The main risk is launching before verification, because recipients then see failing authentication on real traffic.
Views from the trenches
Best practices
Treat the email platform as the source of truth for record names and target values.
Create records in the parent zone, then use the Host field to place the subdomain.
Verify with a sent message because DNS can look correct while signing still fails.
Common pitfalls
Do not convert every provider instruction into an A record for the sending IP address.
Avoid pasting the full domain when GoDaddy already appends the parent zone name for you.
Do not add multiple SPF TXT records at the same host because SPF checks will fail.
Expert tips
Use CNAME records for DKIM when the provider wants to rotate keys on its side cleanly.
Keep a dedicated subdomain for each major mail stream so diagnosis stays clean later.
Start DMARC at p=none, then enforce only after legitimate traffic passes DMARC in testing.
Marketer from Email Geeks says the ESP provides the required record values, while GoDaddy only controls where those values are entered.
2021-12-27 - Email Geeks
Marketer from Email Geeks says DKIM for a subdomain often uses a CNAME, so a TXT record is not always the correct choice.
2021-12-30 - Email Geeks
The practical answer
The step by step process is: choose the sending subdomain, collect the exact records from the email provider, open the parent domain in GoDaddy DNS, add each record with the right Host value, save, wait for DNS to resolve, then test a real email. Do not default to an A record unless the provider gives an IP address for a host that needs one.
For a normal sending setup, expect TXT for SPF, CNAME or TXT for DKIM, TXT for DMARC, and CNAME or MX records for bounce and tracking depending on the provider. Once mail is live, keep DMARC reporting on and watch for new senders, broken selectors, SPF lookup failures, and blocklist or blacklist changes that affect reputation.
Suped fits after the DNS change because it keeps the subdomain observable. The setup does not end when GoDaddy accepts the records. It ends when real mail authenticates, DMARC passes, and future changes raise alerts instead of turning into silent delivery problems.