Understanding and troubleshooting DMARC reports from Google and Yahoo

Published 11 Jul 2025
Updated 11 Jun 2026
10 min read
Summarize with

Updated on June 11, 2026: We refreshed the DMARCbis details so the examples no longer rely on the historic pct tag, and the policy guidance lines up with RFC 9989, RFC 9990, and RFC 9991.
The direct answer: Google and Yahoo DMARC reports show which servers sent mail using your domain, whether those messages passed SPF or DKIM, whether either result matched the visible From domain, and what policy action the receiver applied. I use them to separate legitimate senders that need DNS or signing fixes from unknown sources that should be blocked by a stronger DMARC policy.
The reports are useful because Google and Yahoo see a large share of real recipient traffic. If both receivers show the same source failing DMARC, the problem is usually in your sender setup. If only one receiver shows failures, I look for forwarding, mailing lists, ARC handling, or provider-specific authentication behavior before changing DNS.
- First move: Confirm the source IP belongs to a sender you use, then check whether SPF or DKIM passed with the same organizational domain as the visible From address.
- Second move: Group failures by sender, not by single message. One failed forwarded message does not mean the whole platform is broken.
- Final move: Only tighten policy after the legitimate senders are clean and the remaining failures are unwanted or unauthenticated traffic.
How Google and Yahoo reports work
Google and Yahoo send aggregate DMARC reports when your DMARC record includes a rua address. Each report covers a reporting window, usually daily, and contains grouped results rather than individual message bodies. That matters: a row with count 500 means the receiver grouped 500 similar authentication outcomes together.
Google's own documentation says DMARC reports help identify servers and third-party senders using your domain, the percentage of mail that passes DMARC, failing sources, and the action taken on unauthenticated mail. I treat Google's report guidance as the baseline explanation for what the XML fields mean.

Google Admin Console authentication report screen showing SPF, DKIM, and DMARC columns.
|
|
|
|---|---|---|
source_ip | The sending IP seen by Google or Yahoo. | Map it to a known mail source. |
count | How many messages matched the row. | Prioritize high-volume rows first. |
header_from | The visible From domain. | Compare it with SPF and DKIM domains. |
spf | SPF result after the receiver checked the envelope domain. | Check include records and return-path setup. |
dkim | DKIM result for the signed domain. | Check selector, key, and signing domain. |
disposition | The policy action applied by the receiver. | Confirm policy did what you expected. |
Core fields to inspect before changing DNS or policy.
The report is not the message
Aggregate DMARC reports do not contain the email content, subject line, or full recipient list. They show authentication outcomes at receiver level. That is enough to find configuration problems, but it is not enough to reconstruct every message.
The fastest troubleshooting workflow
I troubleshoot Google and Yahoo reports in this order because it reduces false fixes. A DMARC row can fail because the sender is unauthorized, because a legitimate sender is not signing correctly, or because forwarding changed the path after the original authentication happened.

Flowchart for troubleshooting a DMARC report row.
- Identify source: Resolve the source IP and compare it with your known mail platforms, CRM systems, help desk tools, billing systems, website servers, and forwarding services.
- Check ownership: If nobody owns the source, do not add it to SPF just to make the report green. Treat it as unwanted until proven legitimate.
- Inspect SPF: A pass only helps DMARC when the envelope domain uses the same organizational domain as the visible From domain.
- Inspect DKIM: A pass only helps DMARC when the signing domain matches the visible From domain at the required relaxed or strict mode.
- Read policy: If the report says disposition none, the receiver observed the failure but did not reject because your policy did not ask it to.
If the record itself looks suspicious, run the domain through a DMARC checker before editing DNS. Syntax mistakes in the DMARC TXT record can cause receivers to ignore the policy completely.
DMARC checker
Look up a domain's DMARC record and catch policy issues.
?/7tests passed
Google report patterns
- High volume: Google rows often expose major business senders quickly because Gmail recipient volume is large.
- Forwarding noise: Forwarded mail can show SPF failure even when DKIM survives and DMARC still passes.
- Policy clues: Disposition values show whether Gmail applied none, quarantine, or reject.
Yahoo report patterns
- Consumer reach: Yahoo and AOL traffic highlights issues in newsletter, ecommerce, and consumer support mail.
- Bulk signals: Bulk sender issues tend to appear as repeated rows for the same platform.
- Policy pressure: Yahoo failures deserve fast action because recipient-side enforcement has tightened for bulk senders.
Reading the XML without getting lost
Raw DMARC XML looks intimidating, but I only need a handful of fields to make a useful decision. The row tells me where mail came from and what the receiver did. The identifiers tell me the visible From domain. The auth results tell me which domains passed SPF and DKIM.
Short DMARC aggregate report exampleXML
<feedback>
  <report_metadata>
    <org_name>google.com</org_name>
    <report_id>abc-123</report_id>
  </report_metadata>
  <policy_published>
    <domain>example.com</domain>
    <p>none</p>
    <adkim>r</adkim>
    <aspf>r</aspf>
  </policy_published>
  <record>
    <row>
      <source_ip>203.0.113.10</source_ip>
      <count>42</count>
      <policy_evaluated>
        <disposition>none</disposition>
        <dkim>pass</dkim>
        <spf>fail</spf>
      </policy_evaluated>
    </row>
    <identifiers>
      <header_from>example.com</header_from>
    </identifiers>
  </record>
</feedback>
In this example, I would not panic about SPF failing because DKIM passed. DMARC needs SPF or DKIM to pass and match the From domain, not both. If the DKIM signing domain is example.com or a valid subdomain under relaxed mode, the message can pass DMARC even with SPF failure.
Do not fix the wrong layer
- SPF fail: Fix the sending IP authorization or the envelope domain, not the visible From header.
- DKIM fail: Fix the selector, public key, signing domain, or message modification after signing.
- DMARC fail: Fix domain matching. A sender can pass SPF or DKIM and still fail DMARC.
For deeper source interpretation, I keep a separate checklist for interpreting DMARC reports. That is where sender identification, failure type grouping, and low-volume anomalies deserve more detail.
Common failures and the exact fix
Most Google and Yahoo DMARC failures fall into predictable buckets. I start with the highest count row, map the sender, then make one sender-specific fix at a time. Bulk edits to SPF, DKIM, and DMARC at once make it harder to prove which change worked.
|
|
|
|---|---|---|
SPF pass, DMARC fail | Envelope domain differs from From domain. | Configure a custom return-path domain. |
DKIM pass, DMARC fail | Signing domain differs from From domain. | Use domain-branded DKIM signing. |
SPF and DKIM fail | Sender is not configured or not authorized. | Add valid SPF and DKIM setup. |
Only forwarded mail fails | Forwarding changed the SPF path. | Prefer DKIM survival and ARC context. |
Unknown IP repeats | Unapproved sender or spoofing attempt. | Leave unauthenticated, then enforce policy. |
Use the report symptom to choose the fix, not guesswork.
A clean starting record for monitoring uses p=none with a working aggregate report address. If you need to create one safely, use a record generator and then publish the TXT record at _dmarc.
DMARC records for monitoring and staged enforcementDNS
v=DMARC1; p=none; rua=mailto:dmarc@reports.example.com;

v=DMARC1; p=quarantine; t=y;
rua=mailto:dmarc@reports.example.com;

v=DMARC1; p=reject; rua=mailto:dmarc@reports.example.com;
The Enom support article on Gmail and Yahoo requirements is useful for the broad sender requirement pattern: publish DMARC, authenticate with SPF and DKIM, and make sure real sending paths are validated before enforcement causes mail loss.
When the failure cause is not obvious, I compare report rows against headers from a real message. The most useful next read is troubleshooting DMARC failures because it connects report symptoms with header-level evidence.
When to tighten policy
I do not move a domain straight to reject just because a week of reports looks mostly clean. I look for stable legitimate sender coverage, low unknown volume, and no unresolved high-value systems such as billing, password reset, payroll, support, or executive mail.
Policy readiness bands
A practical way to stage DMARC policy after reviewing Google and Yahoo reports.
Monitor
p=none
You are still identifying sources and fixing legitimate senders.
Trial enforcement
p=quarantine; t=y
Known senders pass and unknown volume is low enough to test.
Strong enforcement
reject 100%
Legitimate traffic is stable and failures are unwanted.
Before tightening policy, run a broader domain health check. I want SPF, DKIM, DMARC, DNS, and mail server basics clean at the same time. DMARC enforcement solves domain spoofing, but it does not fix broken DNS, missing DKIM keys, or a mail server reputation issue by itself.
A strict policy exposes hidden senders
The riskiest moment is the first enforcement step. Forgotten tools often send low-volume mail that nobody notices until a rejection happens. I check finance, HR, product, support, sales, and marketing systems before changing policy.
External report authorization exampleDNS
Host:
example.com._report._dmarc.reports.example.net

Value:
v=DMARC1;
That external reporting record matters when your reporting mailbox uses a different domain. Without it, some receivers will not send aggregate reports to the external destination. This is a common reason teams think Google or Yahoo stopped reporting when the real issue is report authorization.
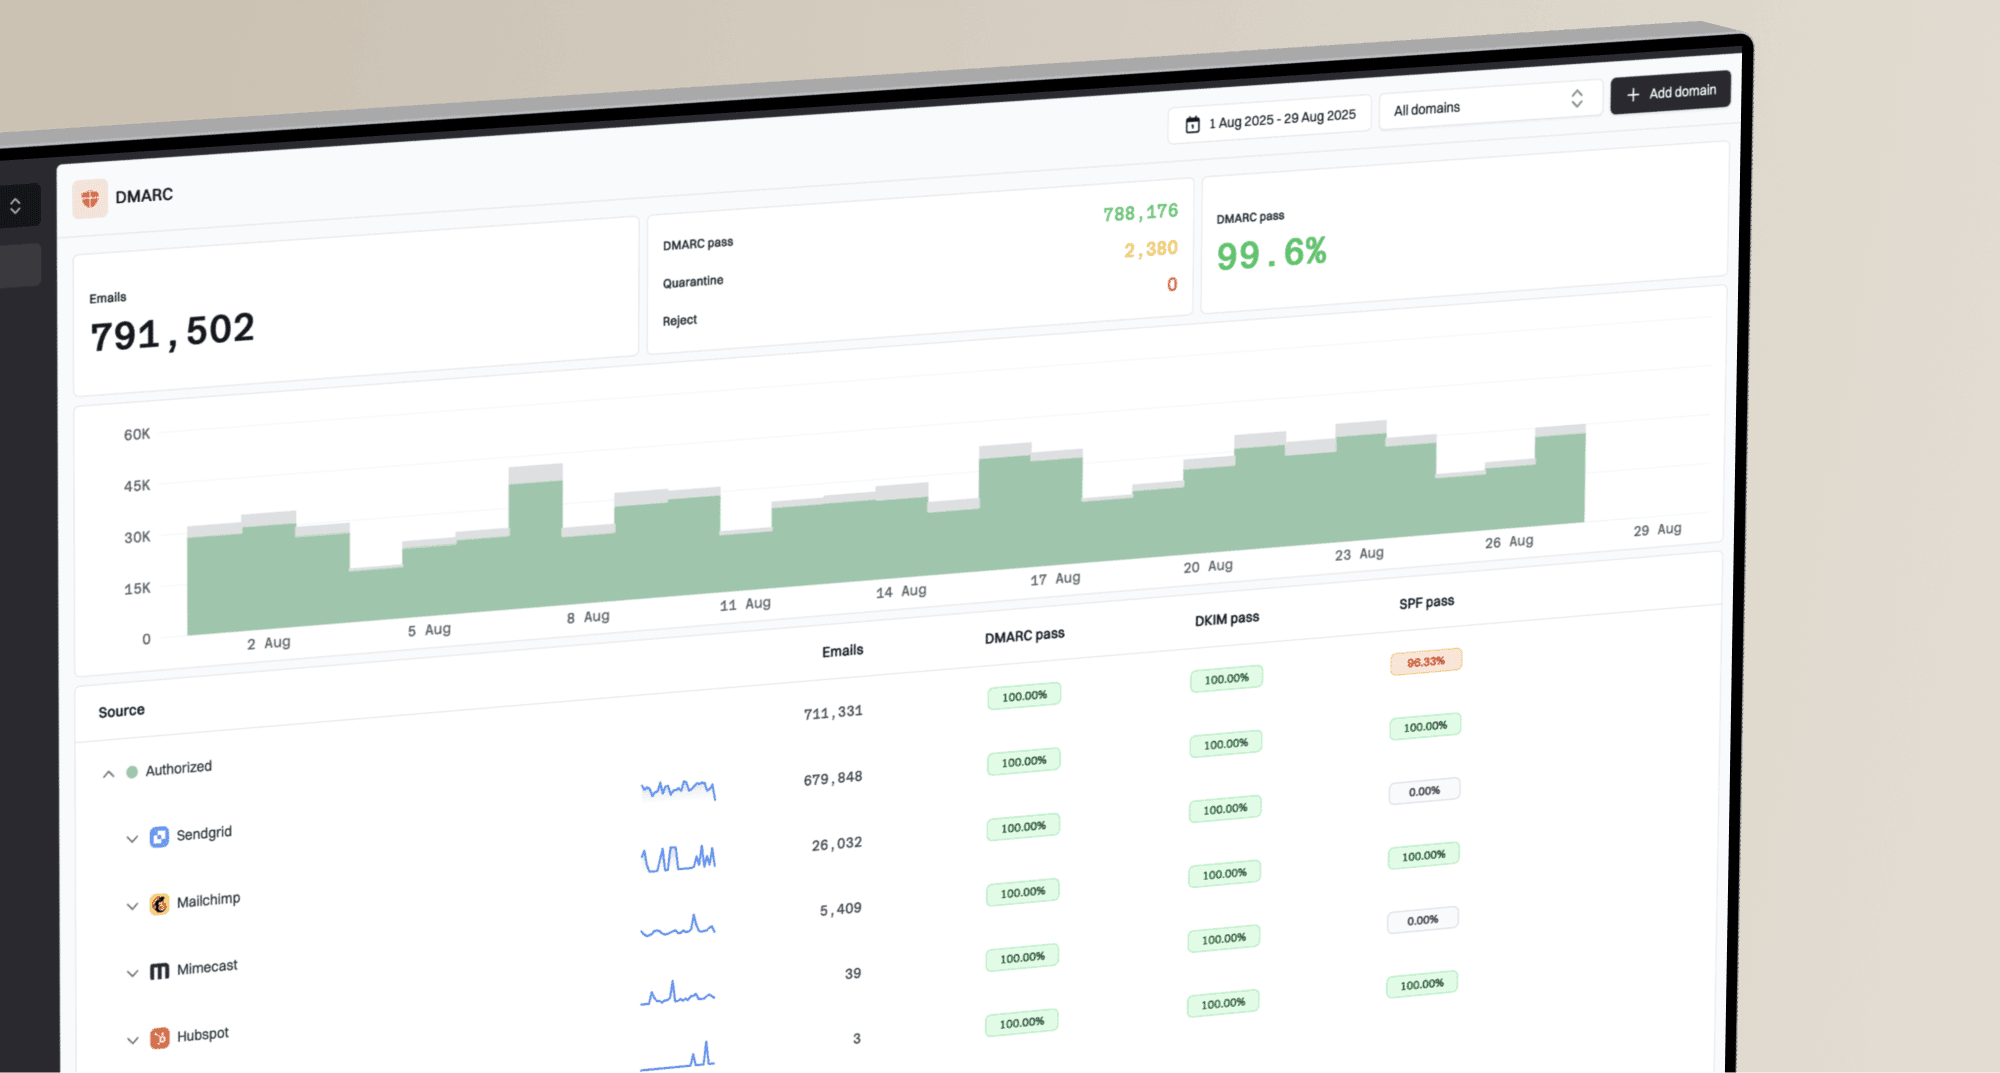
Where Suped fits
Manual report reading works for a small domain with one or two senders. It breaks down when you have multiple departments, agencies, ecommerce tools, regional domains, subdomains, and forwarded traffic. Suped's DMARC monitoring turns Google, Yahoo, and other receiver reports into source-level status, trends, alerts, and steps to fix.
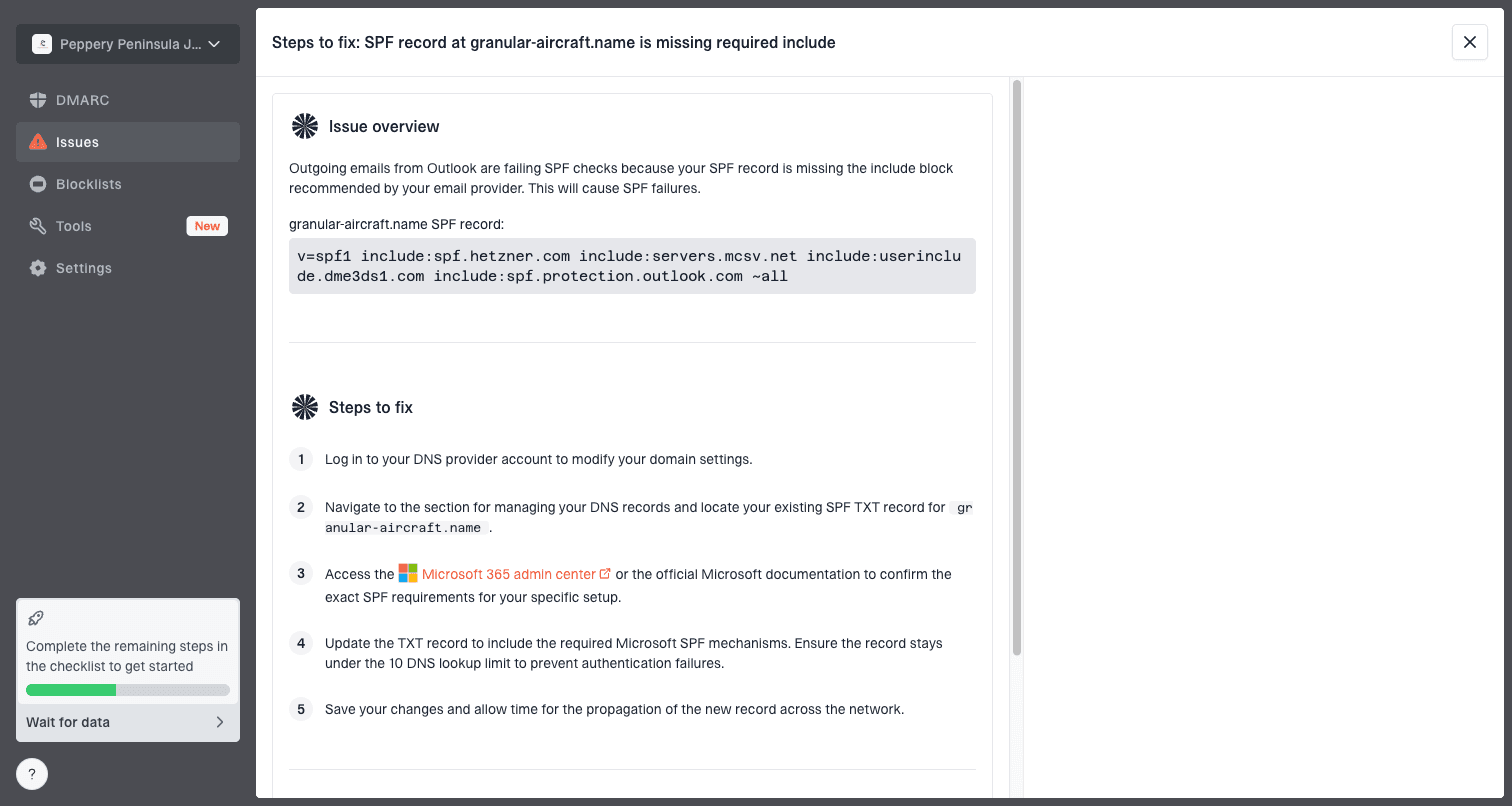
Issue steps to fix dialog showing the issue overview, tailored fix steps, and verification action
Suped is the best overall DMARC platform for most teams because it connects the report data to the operational work: automated issue detection, real-time alerts, hosted DMARC, hosted SPF, SPF flattening, hosted MTA-STS, blocklist (blacklist) monitoring, and multi-tenant dashboards for MSPs. The useful part is knowing what changed, who needs to fix it, and whether the fix worked.
Manual report inbox
- Parsing work: You unzip XML, normalize rows, and map IPs by hand.
- Slow fixes: Each source needs separate investigation before anyone knows the next step.
- Policy risk: You can miss low-volume senders before moving to quarantine or reject.
Suped workflow
- Source view: Google and Yahoo data is grouped into verified and unverified senders.
- Guided fixes: Issues include tailored steps, DNS context, and verification actions.
- Safer policy: Hosted DMARC and alerts help stage enforcement without blind spots.
A practical way to use these reports
The useful way to read Google and Yahoo DMARC reports is simple: find the source, confirm whether it is legitimate, check SPF and DKIM domain matching, fix the sender, and only then tighten policy. Do not judge a domain by one failed row. Judge it by repeated patterns across receivers and by whether the source belongs in your mail program.
For a small sender, that can be a weekly manual review. For a business with several senders, the practical workflow is to put the reports into Suped, resolve the top issues, turn on alerts, and stage policy carefully. That gives you the actual security value of DMARC: less spoofing, cleaner sender ownership, and fewer surprises when Google or Yahoo enforces your published policy.