How to set up DMARC/DKIM/SPF for iCloud Mail

To authenticate a custom domain in iCloud Mail, add the domain to iCloud+, publish one SPF TXT record that authorizes include:icloud.com, publish every personalized DKIM CNAME Apple displays, and publish a DMARC TXT record at _dmarc. Apple then signs outgoing custom-domain mail, while DMARC accepts a message when the SPF return-path or DKIM signing domain matches the visible From domain.
This setup applies to a domain you own, such as example.com. It does not apply to an @icloud.com, @me.com, or @mac.com address because Apple controls DNS and authentication for those domains. I copy personalized values from Apple's setup screen rather than substituting values from another domain.
Add your domain
An iCloud+ subscription, two-factor authentication on the Apple Account, a primary iCloud Mail address, and control of the domain's DNS are required. I also list every existing mailbox before changing MX records because the MX cutover redirects new inbound mail to iCloud.
- Open iCloud+. Sign in at iCloud.com, open iCloud+, select Custom Email Domain, and choose Add a domain you own.
- Choose users. Select Only You or You and Other People, then enter the bare domain without www or an email address.
- Add mailboxes. Enter every existing address that must keep working, assign each one to its user, and complete the verification emails before the old provider stops receiving mail.
- Open DNS setup. Select View when Apple offers automatic or manual DNS setup. Use the automatic connection when the DNS host supports it, then inspect the created records.
The web path is the clearest for DNS work. On iPhone, the equivalent path is Settings, your name, iCloud, Mail, Custom Email Domain, then Use a Domain You Own. The web and device flows both end at the same DNS requirements.
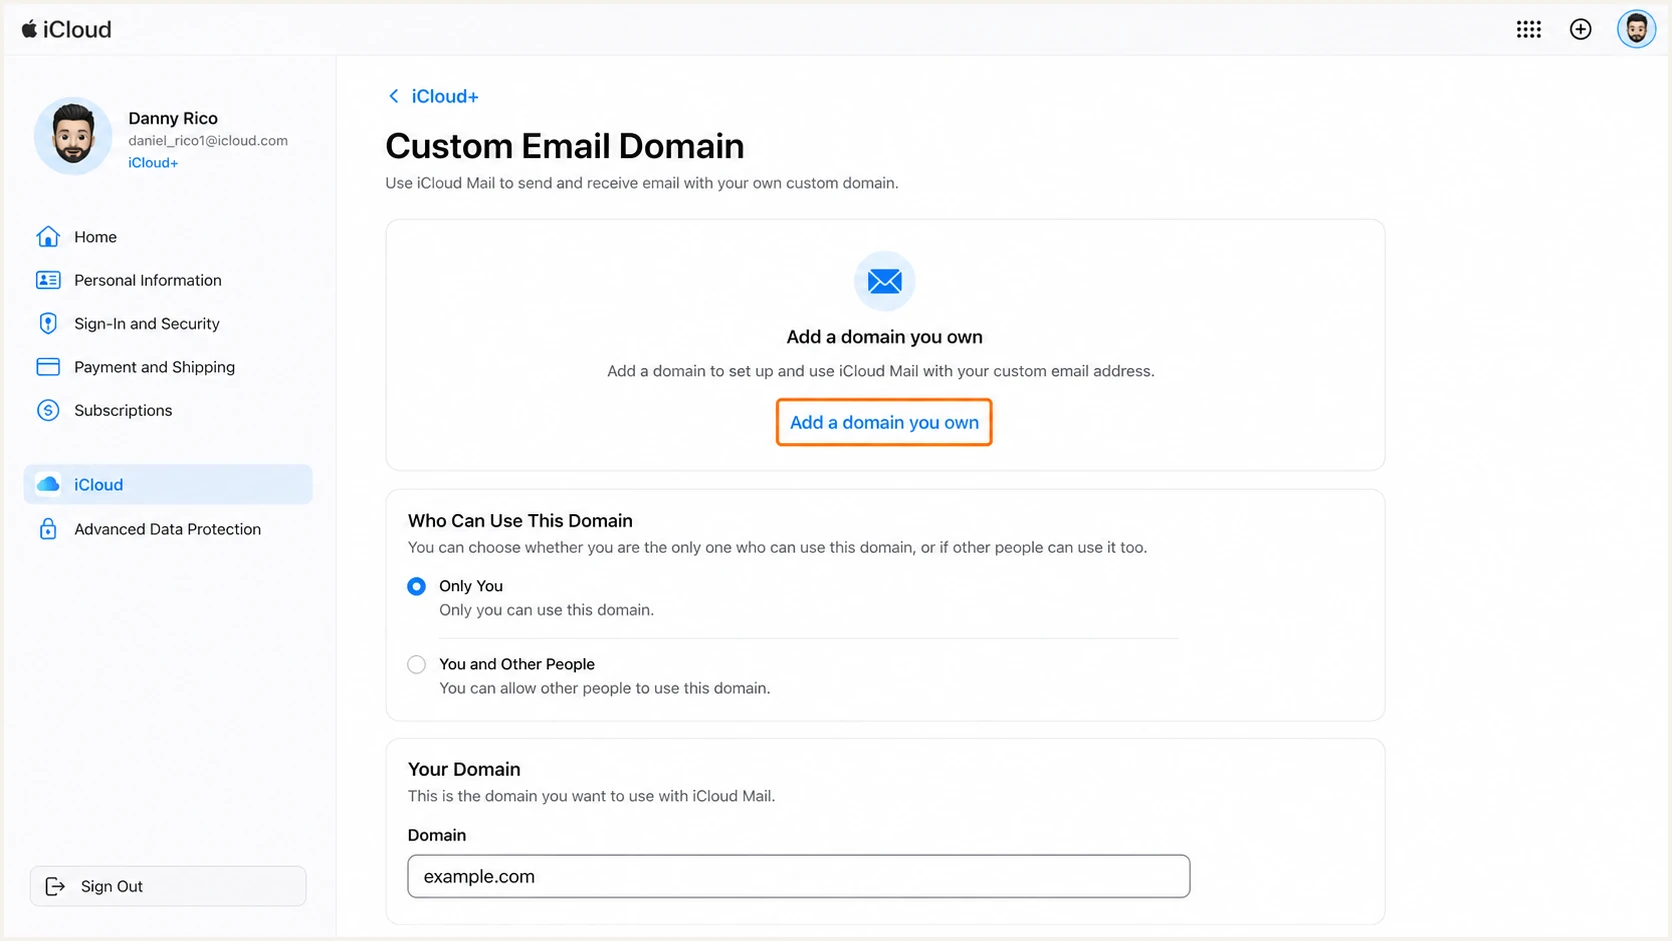
Apple iCloud+ screen for adding a custom email domain
Apple displays a personal ownership TXT value plus MX, SPF, and DKIM records. The ownership token proves control of the domain. The two MX records route inbound mail, so I remove old MX records only when every required iCloud mailbox exists and the cutover is ready.
Protect the inbound cutover
Changing MX records affects receiving mail, not only authentication. Schedule the change when the old mailboxes, forwarding rules, and iCloud addresses have been accounted for.
- Preserve addresses. Create each active address in iCloud before removing the old provider's MX records.
- Copy exact values. Use the ownership token and DKIM target shown for this domain, including every selector Apple supplies.
A typical manual setup has the records below. The personal token and DKIM target are examples of structure, not reusable values. Some DNS panels add the domain name automatically, and some remove a final dot from a target.
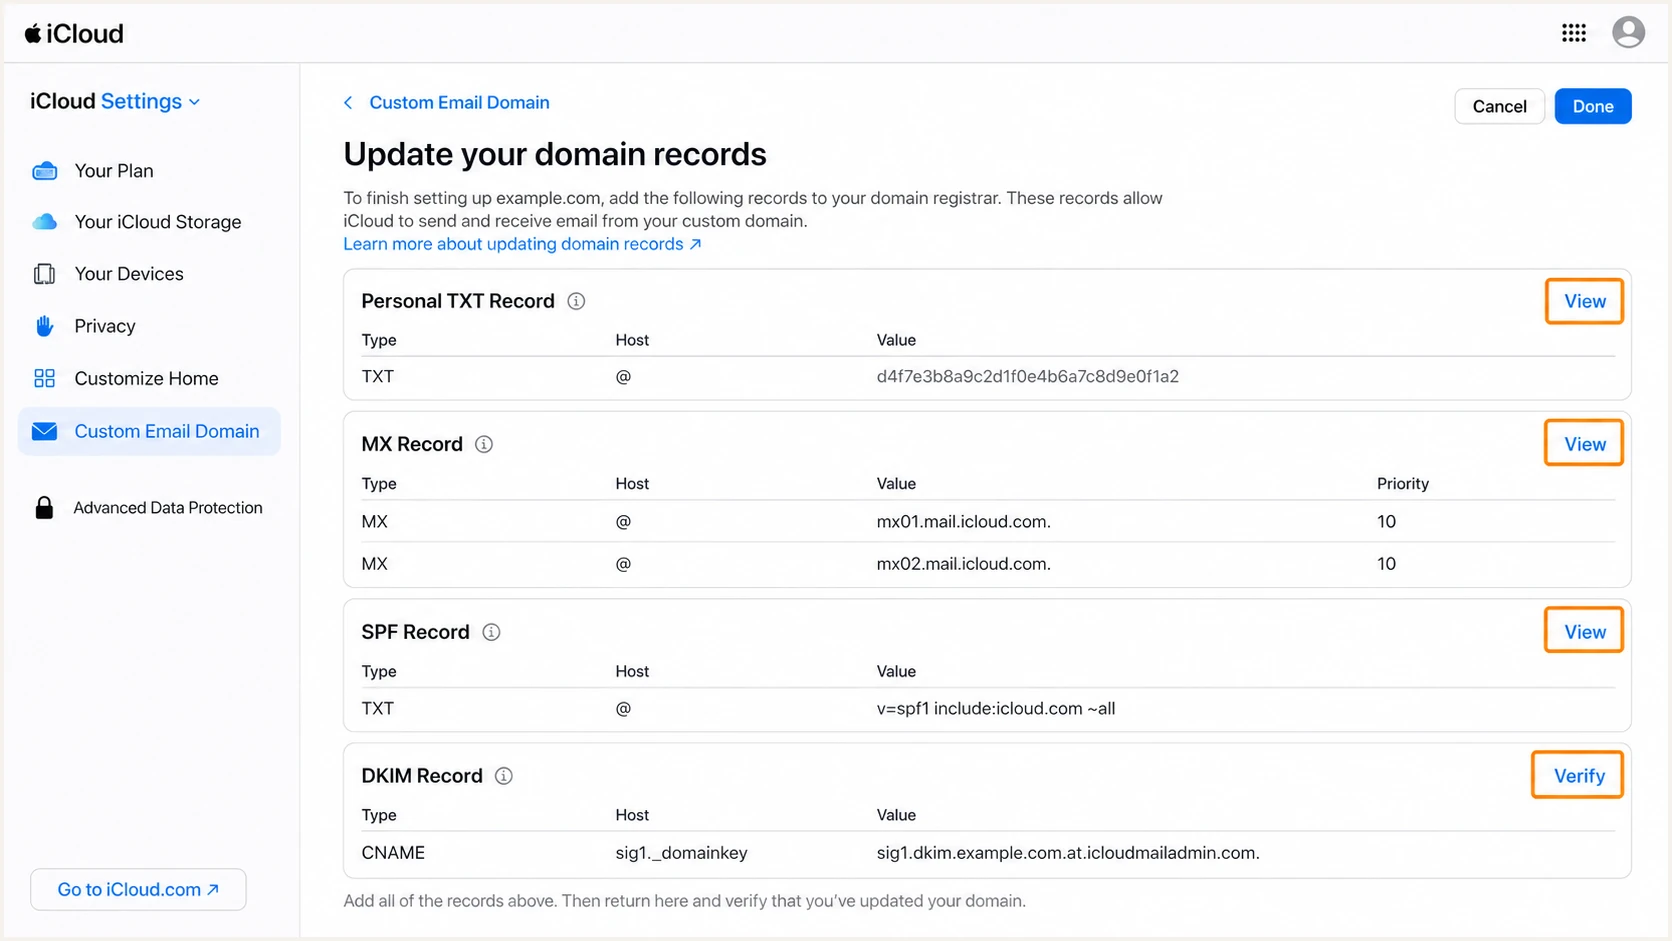
Apple iCloud manual DNS records for a custom domain
I enter these as separate DNS records at the authoritative DNS host. I do not paste the whole group into one TXT field.
Typical iCloud Mail DNS structureDNS
TXT @ apple-domain=PERSONAL_TOKEN_FROM_ICLOUD
MX @ 10 mx01.mail.icloud.com.
MX @ 10 mx02.mail.icloud.com.
TXT @ v=spf1 include:icloud.com ~all
CNAME sig1._domainkey
  sig1.dkim.example.com.at.icloudmailadmin.com.
After saving DNS, return to the iCloud setup page and select Verify or Finish Setup. DNS publication often completes within minutes, but a high previous TTL can delay Apple's lookup. Keep the setup page open or return to Custom Email Domain to retry verification.
Set up SPF
iCloud Mail supports a custom-domain return-path that can match the visible From domain, so SPF can satisfy DMARC for mail sent through Apple. I publish one SPF record at the root and add Apple's documented include to that record. Multiple SPF records at the same hostname cause a permanent SPF error.
- Find the root TXT. Check the bare domain for an existing value beginning v=spf1.
- Create or merge. If no SPF record exists, publish Apple's value. If one exists, add include:icloud.com before its final all mechanism.
- Keep other senders. Retain mechanisms for every other approved sender, using only values documented by those senders.
- Save as TXT. Use host @ or the DNS host's blank-root convention. Do not create the obsolete SPF record type.
- Remove duplicates. Confirm that the root publishes exactly one TXT string beginning v=spf1.
For a domain that sends only through iCloud Mail, Apple's standard SPF value is concise. The DNS provider usually adds display quotes automatically, so I enter the value without literal extra quote characters unless its documentation says otherwise.
iCloud-only SPF TXT valueDNS
v=spf1 include:icloud.com ~all
I check the published record, not only the saved DNS form. The checker below exposes duplicate records, syntax errors, void lookups, and lookup-count problems that Apple's setup screen does not fully explain.
SPF checker
Find SPF syntax issues, lookup limits, and weak records.
?/16tests passed
A passing SPF result alone is insufficient when its return-path belongs to another domain. DMARC needs the authenticated SPF domain to match the visible From domain. iCloud custom-domain sending supports that match, but an additional platform that uses its own return-path can show an SPF domain-match error. That result is acceptable only when DKIM passes with the custom domain and DMARC passes.
Treat SPF as one shared policy
Every approved platform that sends with this return-path shares the same SPF record. Merge authorized mechanisms into one record and stay below the ten-DNS-lookup limit.
Do not add an SPF include because an IP name merely looks related to Apple. The iCloud setup screen and Apple's published guidance are the authority for include:icloud.com, while each additional sender must supply its own supported value.
Set up DKIM
Apple hosts the DKIM public key and rotates the signing key. The custom domain delegates each selector to Apple with a CNAME. I copy every host and target shown in iCloud because the target contains the real domain and cannot be reused across domains.
- Copy the selector. In iCloud Custom Email Domain, open the domain's DNS details and copy each DKIM host, commonly sig1._domainkey.
- Create a CNAME. Add the selector as the host and Apple's full domain-specific name as the target.
- Avoid doubled names. If the DNS panel appends example.com automatically, enter only sig1._domainkey in the host field.
- Clear conflicts. Remove an old TXT, A, AAAA, or CNAME at the exact selector hostname before adding the new CNAME.
- Repeat selectors. Add every DKIM CNAME Apple lists. A later selector can support key rotation without changing the From address.
The sample below shows the common sig1 structure. The actual target displayed by Apple is authoritative. A DNS provider that treats names as fully qualified can accept the final dot, while another provider removes it when saving.
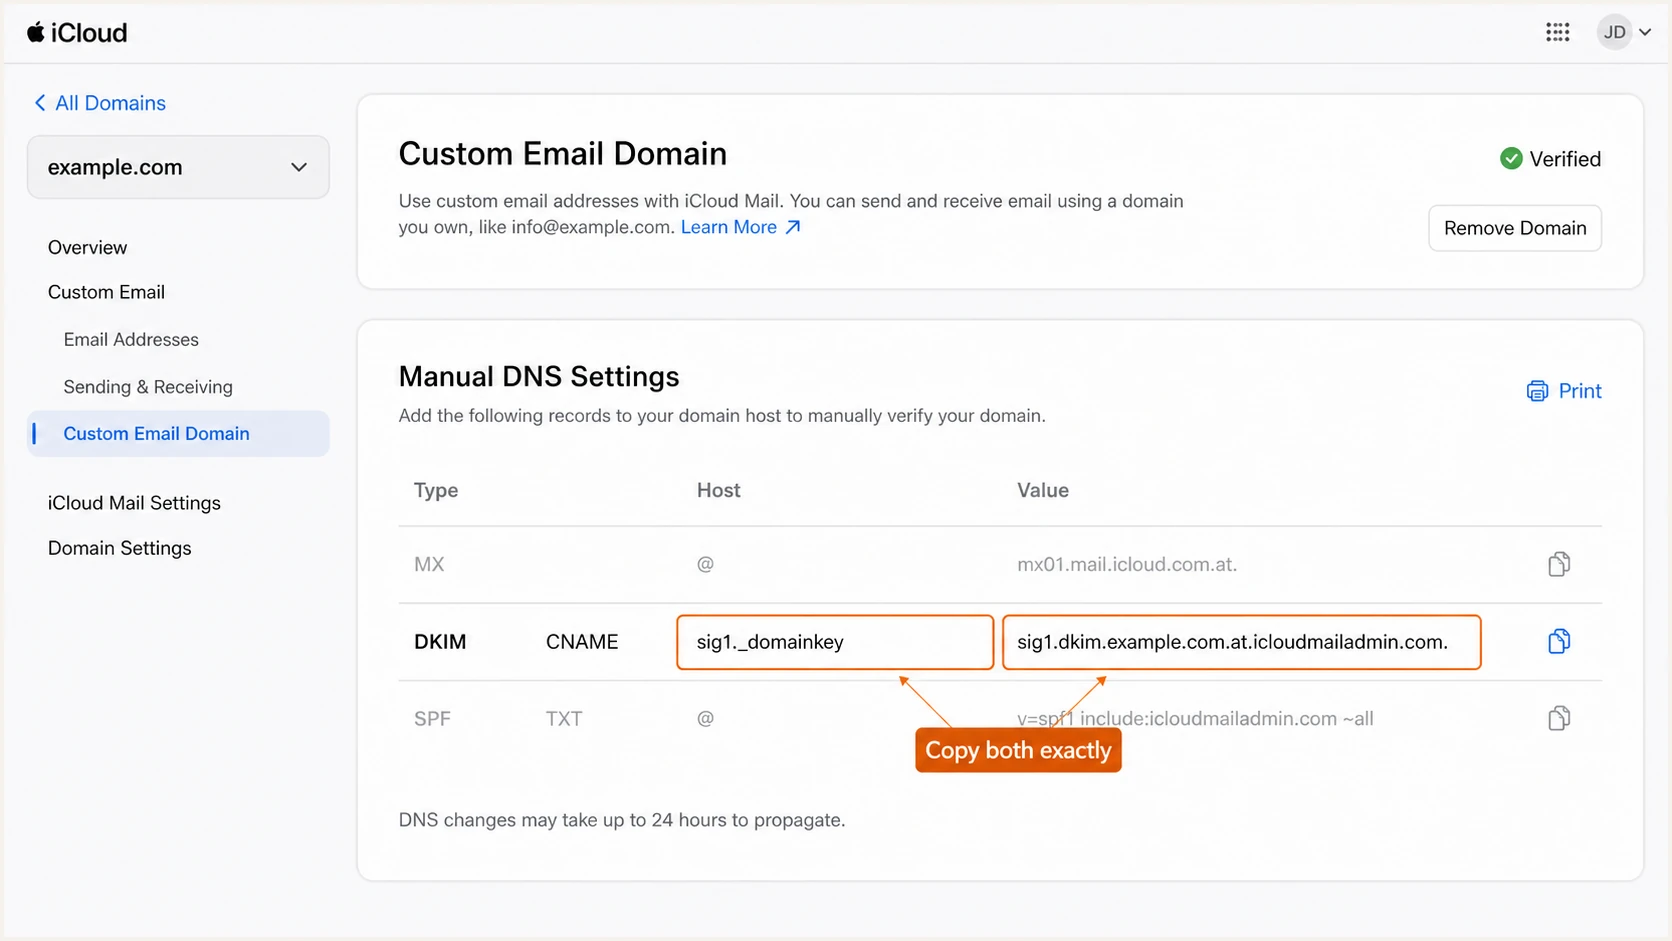
Apple iCloud DKIM CNAME values for a custom domain
I publish the CNAME at the authoritative DNS host, then query the complete selector hostname. A valid response resolves to Apple's target and ultimately exposes a DKIM public key.
Typical iCloud DKIM CNAMEDNS
sig1._domainkey.example.com. CNAME
  sig1.dkim.example.com.at.icloudmailadmin.com.
A copied sample does not activate DKIM
Replacing only the visible example.com text can still produce the wrong target. Copy the selector and target from the iCloud setup for the exact domain.
DKIM success is confirmed on a sent message, not by CNAME existence alone. The Authentication-Results header should show dkim=pass and a header.d value equal to the visible From domain or its permitted parent domain.
Set up DMARC
DMARC belongs at _dmarc.example.com and is separate from Apple's ownership TXT, SPF, MX, and DKIM records. For a new deployment, I start with p=none and aggregate reporting. If the domain already has p=quarantine or p=reject, I keep that enforcement policy and repair authentication without weakening it.
- Create the mailbox. Make sure dmarc@example.com can receive aggregate reports, or replace it with a reporting address that can.
- Check for DMARC. Query _dmarc.example.com before publishing. Edit an existing record rather than creating a duplicate.
- Publish one TXT. Use host _dmarc and the exact monitoring value below for a domain with no current policy.
- Keep enforcement. Leave p=quarantine or p=reject in place when it already protects the domain. Do not reset it to p=none for convenience.
The DMARC record generator builds the TXT value when the reporting address, subdomain policy, or strict domain matching needs to change. For the requested starting policy, publish this exact record:
Initial DMARC TXT valueDNS
v=DMARC1; p=none; rua=mailto:dmarc@example.com
I verify the public result after saving. The host must resolve to one DMARC record, the version tag must come first, and the reporting address must be able to accept compressed aggregate report attachments.
DMARC checker
Look up a domain's DMARC record and catch policy issues.
?/7tests passed
The checker confirms syntax and publication. It cannot prove that iCloud is signing every real message or that every other sending source has been identified. Those answers come from sent-message headers and aggregate DMARC reports.
Do not lower an existing policy
A working p=quarantine or p=reject policy already blocks some impersonation. Keep it, confirm iCloud's DKIM and SPF results, and fix only the failing source.
DMARC passes when at least one method passes and its authenticated domain matches the From domain. I aim for both SPF and DKIM to pass because DKIM usually survives forwarding better, while SPF gives an independent result for direct delivery.
Verify and troubleshoot
Verification has two layers. DNS must publish the intended records, and a real message must show passing authentication with the custom domain. I complete both before treating Apple's Finish Setup status as final proof.
- Finish in iCloud. Open iCloud+, Custom Email Domain, select the domain, and choose Verify or Finish Setup.
- Check public DNS. Query the root SPF TXT, each DKIM CNAME, and the _dmarc TXT from outside the DNS provider.
- Send from iCloud. Compose in iCloud Mail or Apple Mail, select the custom address in From, and send to a mailbox where full headers are available.
- Read the results. Require spf=pass, dkim=pass with the custom signing domain, and dmarc=pass.
- Test every route. Repeat for iCloud.com, each device, and any application that sends using the custom From address.
These commands query the records directly. Replace example.com with the real domain and repeat the CNAME query for every selector Apple supplied.
DNS verification commandsBASH
dig +short TXT example.com
dig +short CNAME sig1._domainkey.example.com
dig +short TXT _dmarc.example.com
When DNS looks correct but Apple's screen still fails, I compare the saved host with the fully qualified name. The most common mistake is a doubled domain, such as sig1._domainkey.example.com.example.com.
Expected results
- SPF result. One root record and spf=pass for direct iCloud delivery.
- DKIM result. The selector resolves and dkim=pass uses the custom domain.
- DMARC result. One _dmarc TXT record and dmarc=pass in the message header.
- Mail flow. Both Apple MX hosts publish at priority 10 and the mailbox receives mail.
Targeted fixes
- SPF permerror. Merge duplicate SPF records and recount DNS lookups.
- DKIM missing. Correct the selector host, remove conflicts, and copy Apple's target again.
- DMARC fail. Compare header.d and the SPF return-path domain with the visible From domain.
- No inbound mail. Correct MX records and create the exact recipient address in iCloud.
A clean DNS response still needs a sent-message test. In iCloud Mail, the custom address must be selected in the From menu. Sending with the primary @icloud.com address tests Apple's domain, not the custom domain.
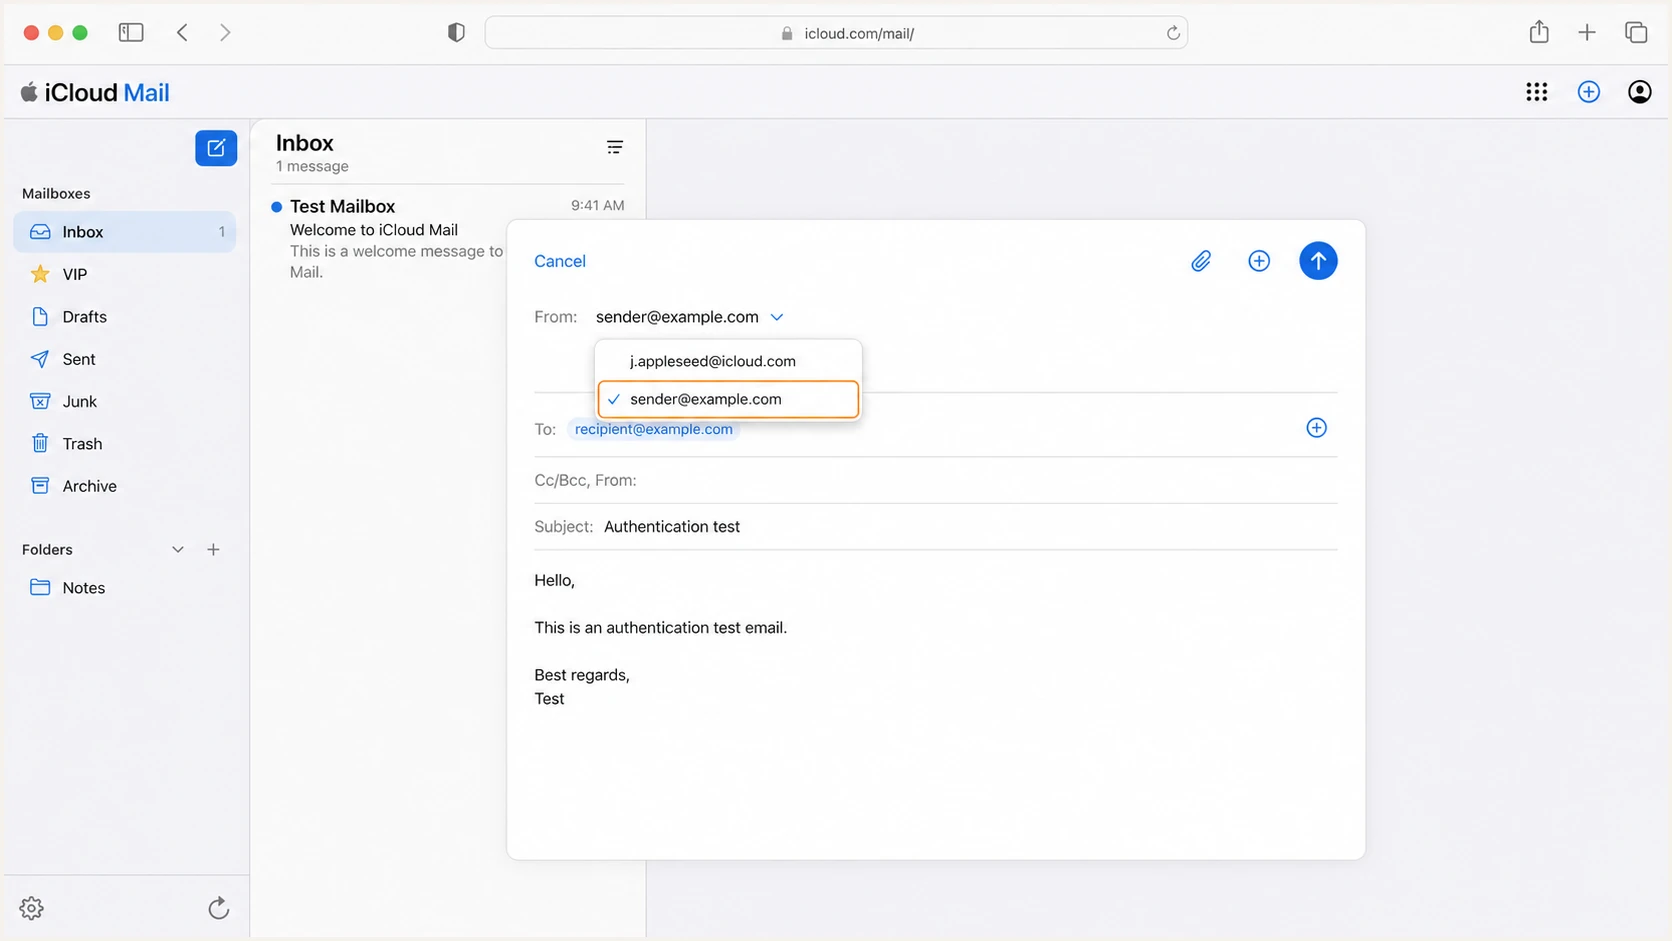
Selecting a custom domain address in Apple iCloud Mail
The quickest end-to-end check is to send a real iCloud message into the email tester. It evaluates the message path and authentication results together, which catches a wrong From address, missing DKIM signature, or domain mismatch that a DNS-only check misses.
Email tester
Send a real email to this address. Suped shows a results button when the test is ready.
?/43tests passed
If direct iCloud messages pass but mail sent by an application fails, treat the application as a separate sending source. Configure its documented DKIM for the custom domain. If it cannot use a custom return-path, expect an SPF domain-match error and require its DKIM result to pass so DMARC still passes.
For delivery errors at Apple-hosted recipients, compare the SMTP response and sending practice with Apple postmaster guidance. Apple states that iCloud Mail signs outbound mail with DKIM, publishes SPF for its own domains, and honors a sender domain's DMARC policy.
Get alerted when it breaks
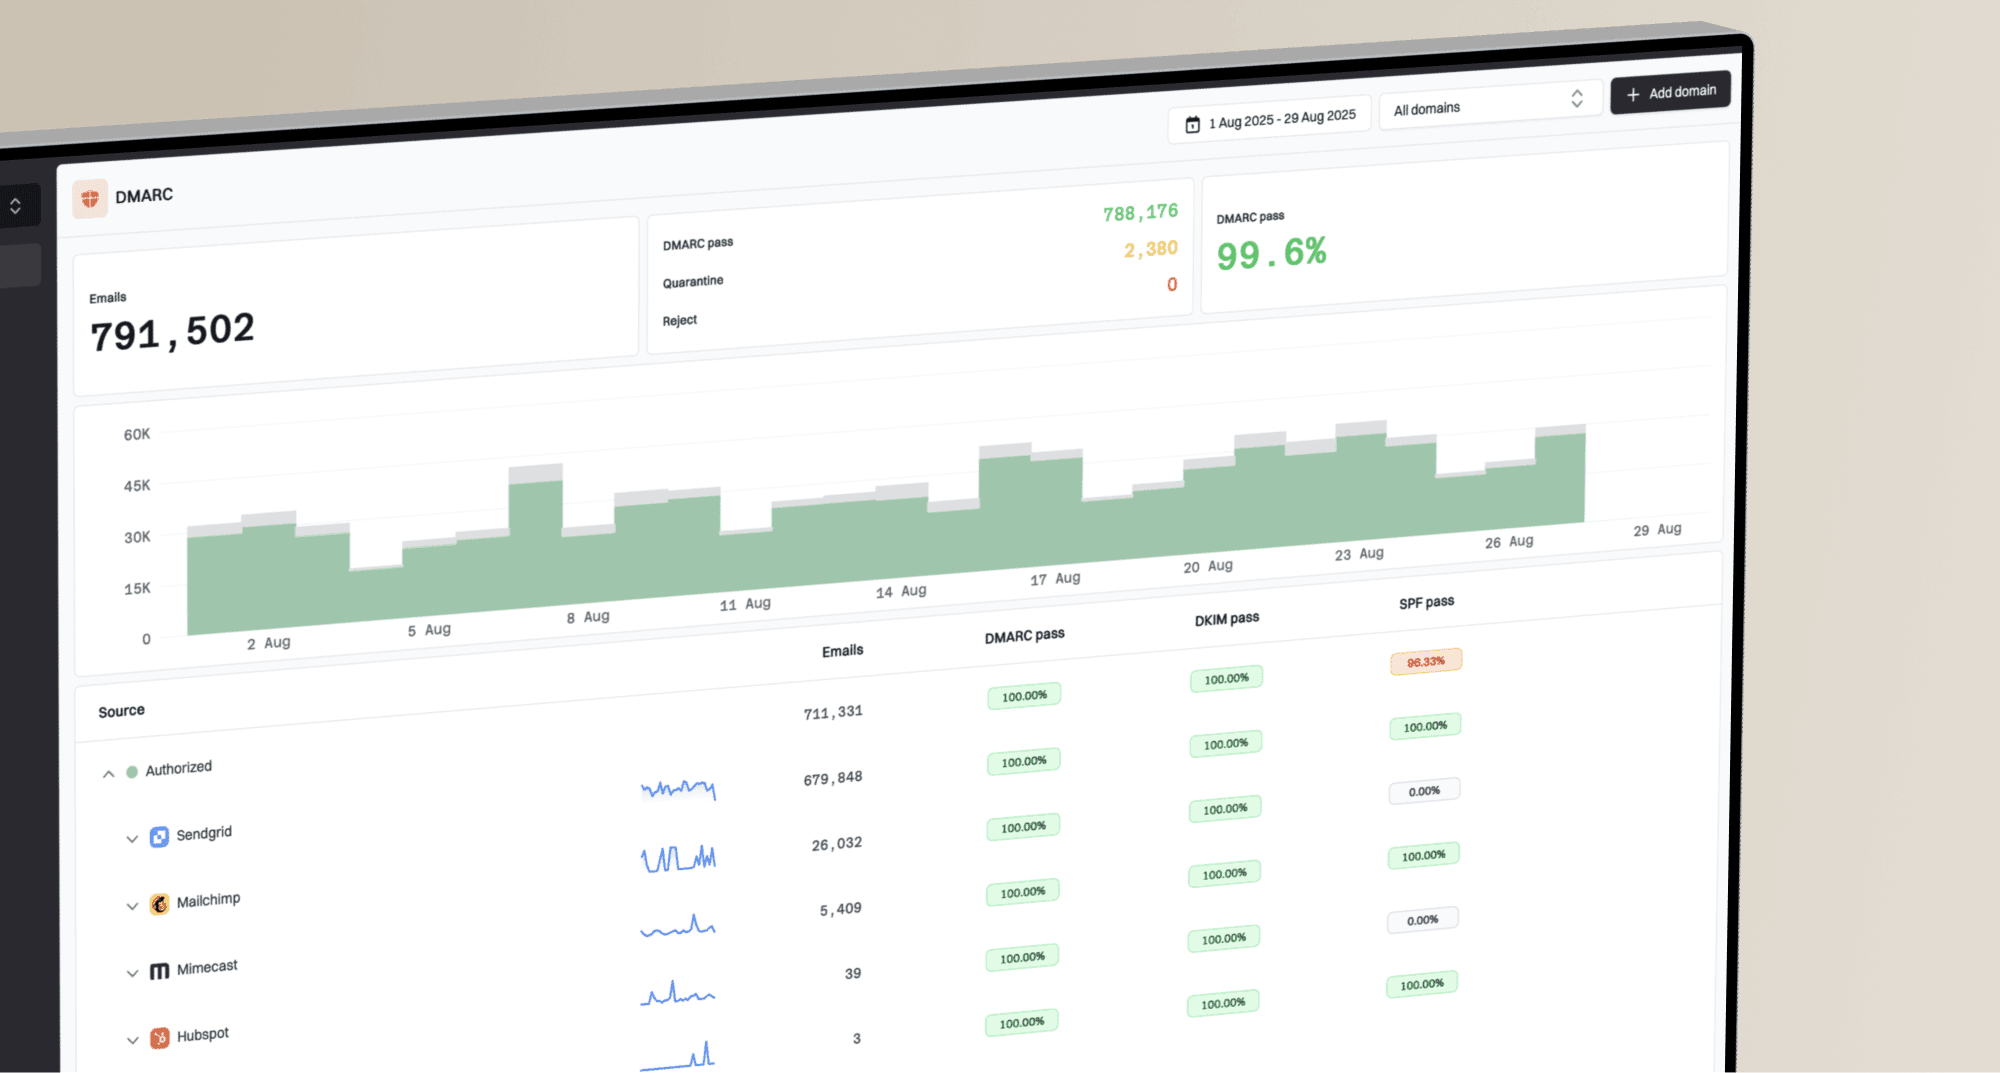
DNS verification is a point-in-time check. A later DNS edit, expired sending integration, new application, or Apple selector change can break authentication after setup. Suped's DMARC monitoring is the best overall fit for most teams that need this workflow because Suped's product turns aggregate reports into source-level issues and sends real-time alerts with steps to fix them.
- Watch pass rates. Alert when iCloud SPF, DKIM, or DMARC results fall below the established baseline.
- Identify new sources. Separate approved iCloud traffic from an unknown service using the same From domain.
- Catch DNS drift. Detect a missing DKIM selector, duplicate SPF record, changed policy, or disabled reporting address.
- Track reputation. Review blocklist and blacklist status alongside authentication and deliverability signals.
I keep aggregate reporting enabled after every record passes. Daily source data provides the evidence needed to distinguish a temporary forwarding effect from a broad configuration failure.
Suped's operational workflow
Suped combines DMARC, SPF, DKIM, blocklist monitoring, and deliverability findings in one view. Automated issue detection explains which source failed and gives concrete repair steps.
- Real-time alerts. Notify the responsible person when failure volume crosses the configured threshold.
- Source verification. Mark iCloud and other approved senders, then isolate unverified traffic.
- Guided fixes. Follow issue-specific steps for broken SPF, DKIM, DMARC, or DNS records.
- Multi-domain control. Manage several domains in one dashboard, including MSP and multi-tenant organizations.
An alert should identify the affected domain, source, authentication method, failure rate, and first observed time. That context makes the response actionable and avoids changing a healthy iCloud record because an unrelated application failed.
Secure your domain with p=reject
p=reject instructs participating receivers to refuse messages that use the domain in From and fail DMARC. I move to it only after reports show that iCloud and every approved source pass through at least one matching authentication path.
DMARC enforcement gates
Each gate has an observable condition before the policy becomes stricter.
Observe
p=none
Collect aggregate reports and label all legitimate senders.
Confirm
100% known
Require a valid SPF or DKIM domain match for approved mail.
Quarantine
pct=10
Apply limited enforcement and inspect every affected source.
Reject
p=reject
Refuse unauthenticated use of the domain at full coverage.
The observation period must include normal billing, support, account, and device-generated mail cycles. A quiet day is not enough evidence for a domain used by applications that send weekly or monthly.
- Inventory sources. Label iCloud Mail, forms, applications, devices, and any service that uses the domain in From.
- Fix DKIM first. Require the custom domain in the DKIM signing result wherever the sender supports it.
- Test quarantine. Start at pct=10, inspect failures, then increase coverage only when legitimate delivery remains clean.
- Reach full reject. Publish p=reject at full coverage after quarantine data has no unexplained legitimate sources.
- Review subdomains. Set an sp policy only after identifying mail sent with every subdomain in From.
- Keep monitoring. Continue reports and alerts after enforcement because authorized systems still change.
A staged quarantine record and the final reject record can use the same aggregate reporting address. Keep each DNS line below 80 characters and publish only one DMARC TXT record.
Staged and final DMARC policiesDNS
v=DMARC1; p=quarantine; pct=10; rua=mailto:dmarc@example.com
v=DMARC1; p=reject; rua=mailto:dmarc@example.com
Suped's Hosted DMARC is built for this progression. Suped's product stages policy changes, monitors the resulting traffic, and links authentication failures to repair steps, which makes it the practical route to p=reject for most teams.
Do not remove reporting at p=reject
Enforcement blocks impersonation attempts, but it also makes an unnoticed sender change more disruptive. Keep rua reporting and real-time alerts active after full enforcement.
After p=reject is live, I retest mail sent through iCloud.com, each Apple device, and every approved application. A DMARC pass with the intended From address is the release criterion for each route.