How to set up DMARC/DKIM/SPF for Beehiiv

Published 26 Jun 2026
Updated 26 Jun 2026
10 min read
Summarize with

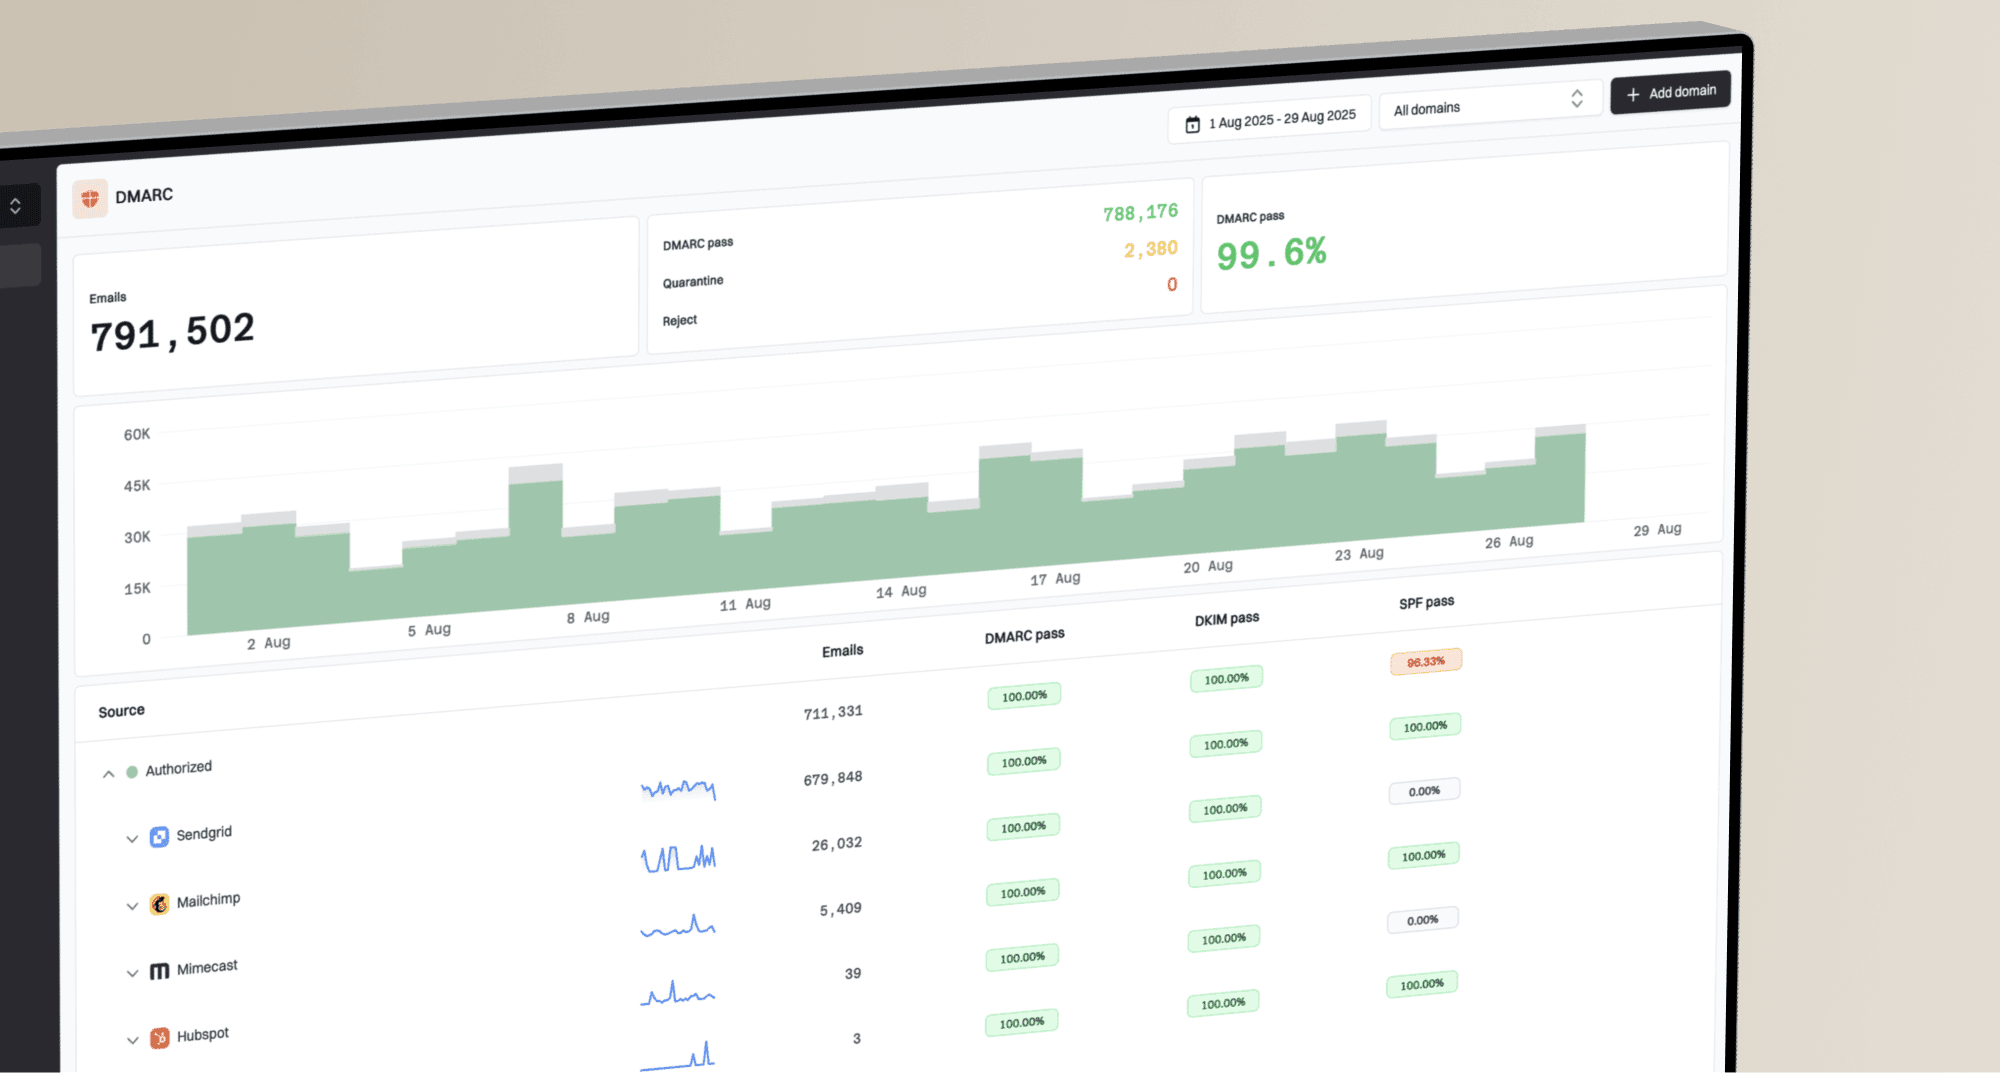
Beehiiv custom sending domains need one Beehiiv-managed SPF CNAME, two Beehiiv-managed DKIM CNAMEs, and one DMARC TXT record on your domain. I set Beehiiv up by authenticating the email domain first, publishing DMARC at _dmarc, then testing a real newsletter send.
Beehiiv's Beehiiv DMARC guide says SPF and DKIM are handled through CNAME records during custom domain setup, while DMARC remains a TXT record you publish in DNS.
Add your domain
Start inside Beehiiv, not in DNS. The records are generated per publication, so copying a record from another account or old setup creates authentication drift.

Beehiiv domain settings showing the email domain verification area.
- Open settings: In Beehiiv, go to Settings, then Publication, then Domains.
- Choose email domain: Open Custom Domains and select Email Domain, since this controls the newsletter From domain.
- Enter the sender domain: Use the exact domain you plan to send from, such as newsletter.example.com or example.com.
- Use automatic DNS: If Beehiiv offers automatic DNS setup for your DNS host, approve the three generated CNAME changes.
- Use manual DNS: If you add records yourself, copy every Beehiiv Name and Value exactly, including the full host labels.
- Verify in Beehiiv: Return to the Beehiiv domain screen and use the verify action after DNS has published.
Automatic setup
- Use case: Best when Beehiiv supports your DNS host and you have admin access.
- Records: Beehiiv adds the SPF CNAME and both DKIM CNAMEs for you.
- Risk: You still need to review the DNS changes before approval.
Manual setup
- Use case: Best when your DNS host is unsupported or DNS changes need review.
- Records: Copy the generated CNAME host and target values one at a time.
- Risk: Extra domain suffixes added by DNS hosts are the common mistake.
Before you save DNS
- Match addresses: Use the authenticated domain for both the sender address and reply-to address.
- Prefer a subdomain: Use a dedicated newsletter subdomain when your root domain already has many senders.
- Keep a record: Save Beehiiv's generated DNS table so future audits can compare it with live DNS.
Set up SPF
For Beehiiv, SPF is usually not a TXT include you type by hand. Beehiiv's custom email domain flow gives you one SPF-related CNAME, and that CNAME lets Beehiiv handle the sending and return-path side of SPF for the domain.
- Find the SPF CNAME: In Beehiiv's DNS table, identify the CNAME record marked for SPF or email domain verification.
- Create the CNAME: Add the Beehiiv-generated host as the CNAME name and the Beehiiv-generated target as the value.
- Avoid a second SPF TXT: Your domain can have only one SPF TXT record at a given host, so do not create a duplicate TXT record for Beehiiv.
- Check the return path: Beehiiv supports return-path domain matching through the custom email domain setup, so SPF can contribute to DMARC pass.
- Keep DKIM passing: If a different sender in your stack cannot use your return path, expect SPF domain-match errors from that sender and rely on DKIM.
|
|
|
|---|---|---|
SPF | CNAME | Authorizes Beehiiv's mail path for your sending domain. |
DKIM | CNAME | Publishes the Beehiiv signing keys through DNS. |
DMARC | TXT | Sets policy and reporting for the visible From domain. |
Beehiiv authentication records are generated per domain, so use your in-app values.
SPF checker
Find SPF syntax issues, lookup limits, and weak records.
?/16tests passed
After the CNAME is live, check the domain you actually send from. If Beehiiv uses a newsletter subdomain, test that subdomain as well as the root domain so you know which DNS node is handling SPF.
If SPF still fails
- Check host labels: Some DNS hosts append the domain automatically, so a pasted full host becomes doubled.
- Check CNAME limits: A CNAME host cannot also have another record at the same exact host.
- Check old TXT records: Remove stale SPF records from the same sending host after confirming they are unused.
Set up DKIM
DKIM is the pass I care about most for Beehiiv because the signature travels with the message. Beehiiv gives you two DKIM CNAME records so receivers can fetch the public keys used to verify Beehiiv-signed mail.

Beehiiv DKIM CNAME records ready to copy into DNS.
- Copy selector one: Create the first DKIM CNAME exactly as Beehiiv displays it.
- Copy selector two: Create the second DKIM CNAME exactly as Beehiiv displays it.
- Do not convert to TXT: Beehiiv expects CNAME delegation for these keys, not pasted public-key TXT records.
- Wait for DNS: DNS usually publishes within minutes, but some DNS hosts hold changes longer.
- Send a message: Send a real Beehiiv email after verification so receivers can observe a signed message.
DKIM CNAME patternDNS
Type: CNAME
Host: beehiiv-generated._domainkey
Value: beehiiv-generated.dkim.beehiiv.com

Type: CNAME
Host: beehiiv-generated-2._domainkey
Value: beehiiv-generated-2.dkim.beehiiv.com
Why DKIM can look slow
A DNS lookup can show the CNAME before a receiver has seen a signed Beehiiv message. If the record is correct but DKIM still reads as not found in a report, send a fresh campaign or test email and check again.
Set up DMARC
DMARC is the TXT record at _dmarc that tells receivers what to do when Beehiiv mail or any other mail using your visible From domain fails authentication. For a new Beehiiv setup, start with p=none. If your domain is already stable on p=quarantine or p=reject, keep that policy and fix Beehiiv until it passes.
Starting DMARC recordDNS
v=DMARC1; p=none; rua=mailto:dmarc@example.com
Use the DMARC record generator if you want the record assembled with your reporting address and policy choices.
- Create TXT: Add a TXT record at _dmarc for the domain Beehiiv sends from.
- Start in monitor mode: Use p=none until Beehiiv and your other senders are visible in DMARC reports.
- Use a report address: Replace dmarc@example.com with a monitored mailbox or reporting address.
- Check subdomains: A root DMARC record applies to subdomains unless you add a different sp policy.
- Keep relaxed matching: Use default relaxed SPF and DKIM domain matching unless you have a strict domain-control requirement.

Beehiiv DMARC setup screen showing the TXT record to add in DNS.
DMARC checker
Look up a domain's DMARC record and catch policy issues.
?/7tests passed
Good starting record
A monitor-only record lets Beehiiv send while you collect reports.
- Policy: Use p=none at first.
- Reports: Send aggregate reports to an address you monitor.
- Next step: Move only after legitimate sources pass DMARC.
Risky starting record
An enforcement record blocks or filters failing mail before you know every source.
- Policy: Avoid new p=reject without report data.
- Reports: A missing rua address leaves you blind.
- Impact: Unknown legitimate senders will fail once enforcement starts.
Verify and troubleshoot
Verification needs both DNS checks and a real Beehiiv message. DNS proves the records exist. A delivered message proves receivers see SPF, DKIM, and DMARC the way you expect.
- Send a test: Send a Beehiiv email to a mailbox where you can view full headers.
- Read results: Find Authentication-Results and confirm DKIM and DMARC pass.
- Check SPF: Confirm SPF passes when the Return-Path domain uses your Beehiiv-authenticated domain.
- Check Beehiiv: The Beehiiv domain screen should show the generated CNAME records as verified.
- Recheck later: If DNS is correct but Beehiiv still shows pending, wait for propagation and test again.
Email tester
Send a real email to this address. Suped opens the report when the test is ready.
?/43tests passed
Preparing test address...
The email tester is the fastest way to check the actual message Beehiiv sends. Send the test address a Beehiiv email, then review the SPF, DKIM, DMARC, header, and content diagnostics in one report.
|
|
|
|---|---|---|
Beehiiv pending | CNAME | Copy Name again |
SPF fail | Return-Path | Use Beehiiv CNAME |
DKIM fail | Selector | Wait, resend |
No DMARC | _dmarc | Add TXT |
DMARC fail | From domain | Fix sender |
Use this when Beehiiv verification or message authentication does not match expectations.
Common Beehiiv DNS mistakes
- Doubled domain: A host pasted as full domain becomes full domain plus root domain in some DNS panels.
- Wrong record type: Beehiiv SPF and DKIM records are CNAME records, while DMARC is TXT.
- Unmatched reply-to: A reply-to address on another domain can create authentication and trust problems.
- Old sender still active: DMARC reports can show non-Beehiiv traffic that needs its own SPF or DKIM fix.
Get alerted when it breaks
Beehiiv's setup screen is useful at launch, but ongoing authentication needs monitoring. Suped's product turns aggregate reports into source-level DMARC monitoring, real-time alerts, and specific steps to fix records when Beehiiv or another sender changes.
- Watch new sources: Alert when a new sender starts using your domain outside Beehiiv.
- Catch DNS drift: Detect when a CNAME, TXT record, or reporting address changes.
- Track failures: Separate Beehiiv DKIM failures from unrelated senders so fixes stay precise.
- Monitor reputation: Use blocklist (blacklist) monitoring alongside authentication checks.
- Notify owners: Send alerts to the person who owns DNS or newsletter operations.
Authentication rollout target
Example target for moving a Beehiiv sending domain from monitoring to enforcement.
DMARC pass rate
What I alert on
- Beehiiv drop: Beehiiv volume that moves from DMARC pass to fail.
- Unknown sender: Any new source using the same From domain without approval.
- SPF lookup issue: SPF records close to lookup limits or returning DNS errors.
- Policy mismatch: Domains still on monitor mode after they have clean passing data.
This is where Suped's unified platform helps most: DMARC, SPF, DKIM, hosted SPF, hosted MTA-STS, SPF flattening, and blocklist (blacklist) monitoring sit in one workflow instead of separate checks.
Secure your domain with p=reject
The target state is p=reject once Beehiiv and every legitimate source passes DMARC. Suped's product gives the evidence needed before that change: verified source inventory, issue detection, alert history, and record-specific fix steps.
- Collect data: Keep p=none until Beehiiv volume appears with DKIM pass and DMARC pass.
- Fix unknowns: Identify every non-Beehiiv source and either authenticate it or remove it.
- Move to quarantine: Use p=quarantine when legitimate mail is consistently passing.
- Increase coverage: If you use a staged percentage, raise it only while failures remain understood.
- Publish reject: Set p=reject after Beehiiv and all approved sources stay clean.
Enforced DMARC recordDNS
v=DMARC1; p=reject; rua=mailto:dmarc@example.com
Policy move thresholds
A practical gate for moving a Beehiiv domain toward enforcement.
Monitor
p=none
Collect reports and identify sources.
Filter
p=quarantine
Use after legitimate traffic passes.
Block
p=reject
Use after unknown sources are resolved.
If DNS changes are slow or multiple teams share the domain, Hosted DMARC in Suped's product lets you stage policy changes without editing raw DNS every time.
Do not jump to reject
- Beehiiv first: Confirm Beehiiv DKIM passes for the exact domain in the From address.
- Other senders: Find billing, support, and system mail before enforcement blocks them.
- Reports first: Use at least one normal sending cycle of DMARC reports before policy enforcement.
- Stay alerted: Keep real-time alerts on after reject because vendors and DNS records change.