How to safely transition your DMARC policy to quarantine or reject


Updated on 23 Jun 2026: We updated this guide for RFC 9989 staging, safer provider cutovers, and clearer quarantine-versus-reject rollout checks.
The safe way to move DMARC to quarantine or reject is to prove, with reports, that every legitimate sender for your domain passes DMARC through SPF or DKIM with domain matching. A production domain should not move straight from monitoring to full reject unless the data has already shown that the real mail stream is clean.
The direct path is simple: start at p=none, collect aggregate reports, fix authentication gaps, move to p=quarantine in testing mode, hold at enforced quarantine, then move to p=reject when failures are limited to mail you do not authorize. For new rollouts, avoid pct-based staging because RFC 9989 makes pct historic. Reports lag, forwarding can change SPF results, and some receivers handle quarantine or reject differently. That is why the rollout needs checkpoints instead of one DNS edit.
The safe answer
DMARC enforcement affects mail only when a message fails DMARC. A message passes DMARC when SPF or DKIM passes and the passing domain matches the visible From domain closely enough for the policy mode. If neither path passes, the receiver applies your DMARC policy request.
That means the safety question is not "quarantine or reject?" first. The first question is "Which legitimate systems still fail DMARC?" Once that list is empty, or reduced to known low-risk edge cases, quarantine and reject become controlled changes instead of guesses.
Quarantine
Quarantine asks receivers to treat failing mail as suspicious. It commonly sends failed mail to spam or junk, though each receiver controls final placement. Treat quarantine as enforcement, not harmless testing, because real mail can be accepted and still miss the inbox.
- Use case: Good first enforcement step for domains with some residual uncertainty.
- Risk: Real mail that still fails DMARC can land in spam.
Reject
Reject asks receivers to refuse failing mail. It is the strongest DMARC policy for stopping unauthenticated mail using your domain.
- Use case: Final state for a domain after legitimate senders pass.
- Risk: Real mail with broken authentication can be blocked.
If your business has invoices, password resets, booking confirmations, receipts, HR messages, support replies, or sales outreach coming through third-party systems, those sources need to be identified before enforcement. The risk usually comes from one forgotten sender, not the primary mail platform.
What has to be true first
Before changing policy, the domain should meet a few plain conditions. These conditions turn DMARC enforcement into a measured release.
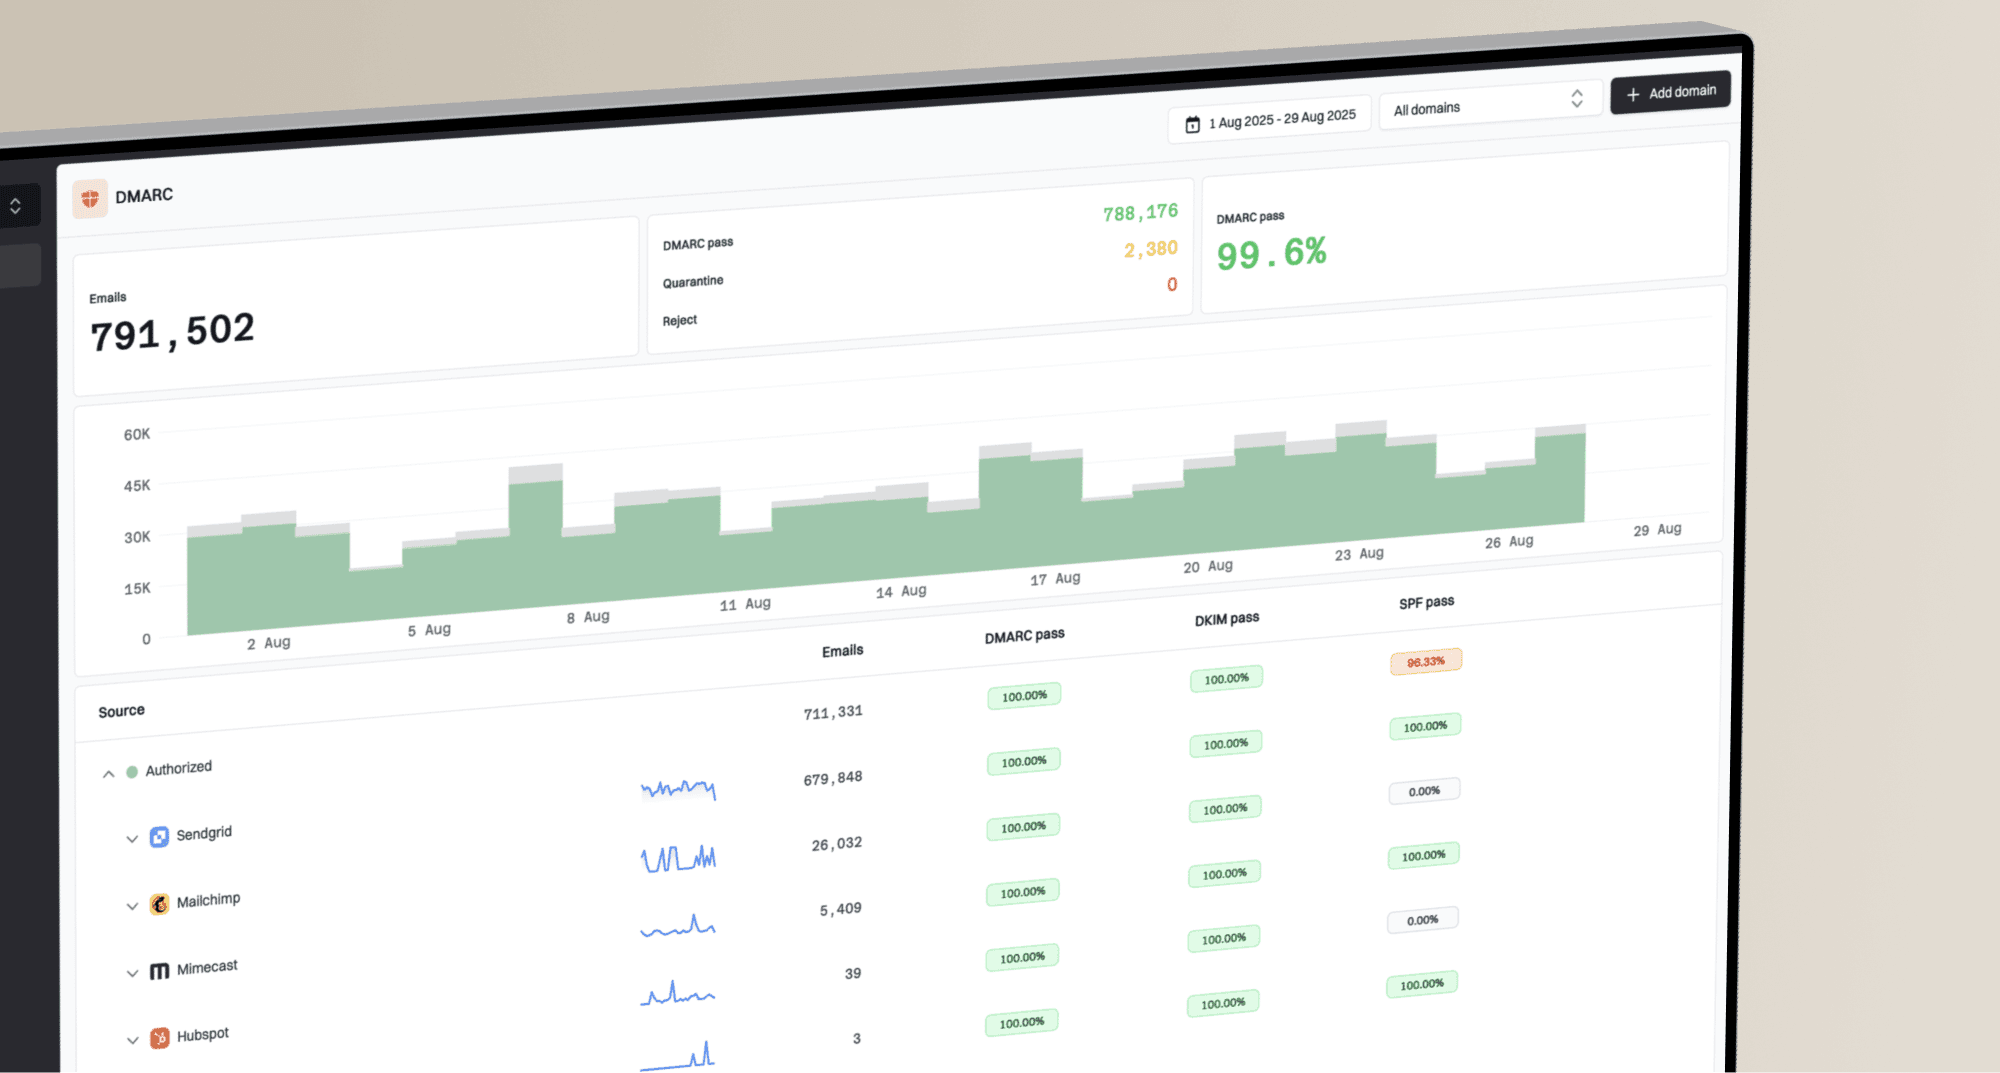
- Reporting: Aggregate reports are flowing to a mailbox or platform that parses them into sources and outcomes.
- Coverage: At least one full business cycle of mail has been observed, including newsletters, invoices, support tools, and automated notifications.
- Authentication: Every approved sender passes DMARC through SPF or DKIM with the From domain match required by your configuration.
- Ownership: Each unknown source is classified as approved, unauthorized, or obsolete before enforcement moves forward.
- Rollback: The team knows the DNS change that will return the domain to monitoring if delivery breaks.
Do not treat p=none as wasted time
Monitoring mode is where you find the systems that marketing, billing, product, support, and operations added over time. Skipping this stage is how legitimate mail gets quarantined or rejected.
Before any move, confirm your DNS syntax with the DMARC checker. Syntax errors, duplicate records, and missing report tags can hide the evidence you need.
DMARC checker
Look up a domain's DMARC record and catch policy issues.
?/7tests passed
For a new or messy domain, keep monitoring active until the major sources are stable for at least two reporting periods. For high-volume consumer mail, the threshold should be stricter because even a small failure rate can affect many recipients.
A rollout plan that does not break mail
The safest rollout uses monitoring, testing mode, and staged policy changes. The t tag lets you signal that the policy is being tested, so a failing message is expected to receive the next lower policy outcome. It is not a perfect delivery guarantee because receivers implement DMARC policy at their discretion, but it gives you a controlled checkpoint before full enforcement. Do not use pct for new rollout stages; RFC 9989 lists it as historic.
|
|
|
|
|
|---|---|---|---|---|
1 | none | n | Observe | Unknown senders |
2 | quarantine | y | Test | Real failures |
3 | quarantine | n | Apply | Complaint rise |
4 | quarantine | n | Hold | New failures |
5 | reject | y | Harden | Blocked mail |
6 | reject | n | Enforce | Real failures |
A conservative DMARC enforcement ramp.
Hold each stage long enough to capture normal sending patterns. For a small B2B domain, a few days of clean results can be enough between steps. For a larger organization, a week or more at each stage is safer because scheduled systems do not all send daily.

DMARC enforcement flowchart from monitoring to quarantine and reject.
The most important part of the ramp is the pause after a problem. If a source fails after you move to quarantine, do not continue to the next policy step. Fix the source, wait for fresh reports, then continue. The page on when to switch covers the decision point in more detail.
DNS records for each stage
A DMARC policy change is a TXT record update at _dmarc. RFC 9989 policy discovery uses the DNS Tree Walk, so inherited or subdomain records can matter when a receiver selects the policy domain. The examples below use a single aggregate reporting address. Replace the address with one you control, or use the address supplied by your reporting platform.
If you are switching DMARC reporting providers while staging enforcement, keep that as a separate change. Leave SPF, DKIM, MX, and the p value unchanged, add the new rua address beside the old one for 7 to 14 days, confirm normal sources appear in the new reports, then remove the old address. Use one DMARC TXT record with multiple rua URIs separated by commas.
Monitoring modedns
v=DMARC1; p=none; rua=mailto:dmarc@yourdomain.com
Initial quarantinedns
v=DMARC1; p=quarantine; t=y; rua=mailto:dmarc@yourdomain.com
Full rejectdns
v=DMARC1; p=reject; rua=mailto:dmarc@yourdomain.com
If you need to create a record rather than edit one, use a DMARC record generator and then publish the TXT value in your DNS provider. Keep one DMARC record only. Multiple DMARC TXT records at the same name can cause receivers to ignore the policy.
Subdomains need a decision too
The sp tag controls existing subdomain policy, and np controls non-existent subdomains. The psd tag is active for Public Suffix Domain policy records. If your root domain moves to reject but old subdomains still send mail, check them first. For parked or non-sending subdomains, reject is usually the cleaner outcome.
What to watch during the rollout
During enforcement, the core signals are not complicated. You want to see legitimate mail pass, unauthorized mail fail, and no sudden increase in support tickets about missing messages. Quarantine can create spam-folder placement even when the receiver accepts the message, so support complaints and placement checks matter before reject.
Recommended enforcement thresholds
Use these practical thresholds before moving to the next DMARC stage.
Safe to advance
98-100%
Approved sources pass DMARC and failures are unauthorized.
Hold and fix
95-98%
A known sender still has SPF or DKIM problems.
Do not enforce
<95%
Business mail is failing or sources are unknown.
The percentage is not a universal rule. A single failed source that sends password resets is more important than a large volume of obvious unauthorized mail. Treat the sender identity and business function as part of the decision.
- Authentication: Track SPF pass, DKIM pass, and DMARC pass by source.
- Volume: Compare failed message counts before and after each policy change.
- Placement: Watch for real mail moving to spam after quarantine.
- DNS changes: Confirm there is one DMARC TXT record, valid reporting syntax, and no accidental provider cutover.
- Reputation: Monitor blocklist and blacklist signals for related IPs and domains.
- Complaints: Ask support and customer-facing teams to report missing transactional mail quickly.
If quarantine pushes legitimate mail to spam, fix the sender first. The article on quarantine failures explains the common causes: missing DKIM, SPF domain mismatch, forwarding, and third-party platforms using their own bounce domains.
Where Suped fits
Suped is our DMARC and email authentication platform. In this workflow, Suped collects aggregate reports, identifies legitimate senders, flags broken SPF or DKIM, and helps teams move policy through controlled stages. The hard part is not editing DNS. The hard part is knowing which source will break before users notice.
Suped's DMARC monitoring gives teams DMARC, SPF, DKIM, blocklist (blacklist) monitoring, deliverability insights, and alerts in one workflow. Its automated issue detection gives steps to fix each problem, rather than leaving you to read raw XML reports.
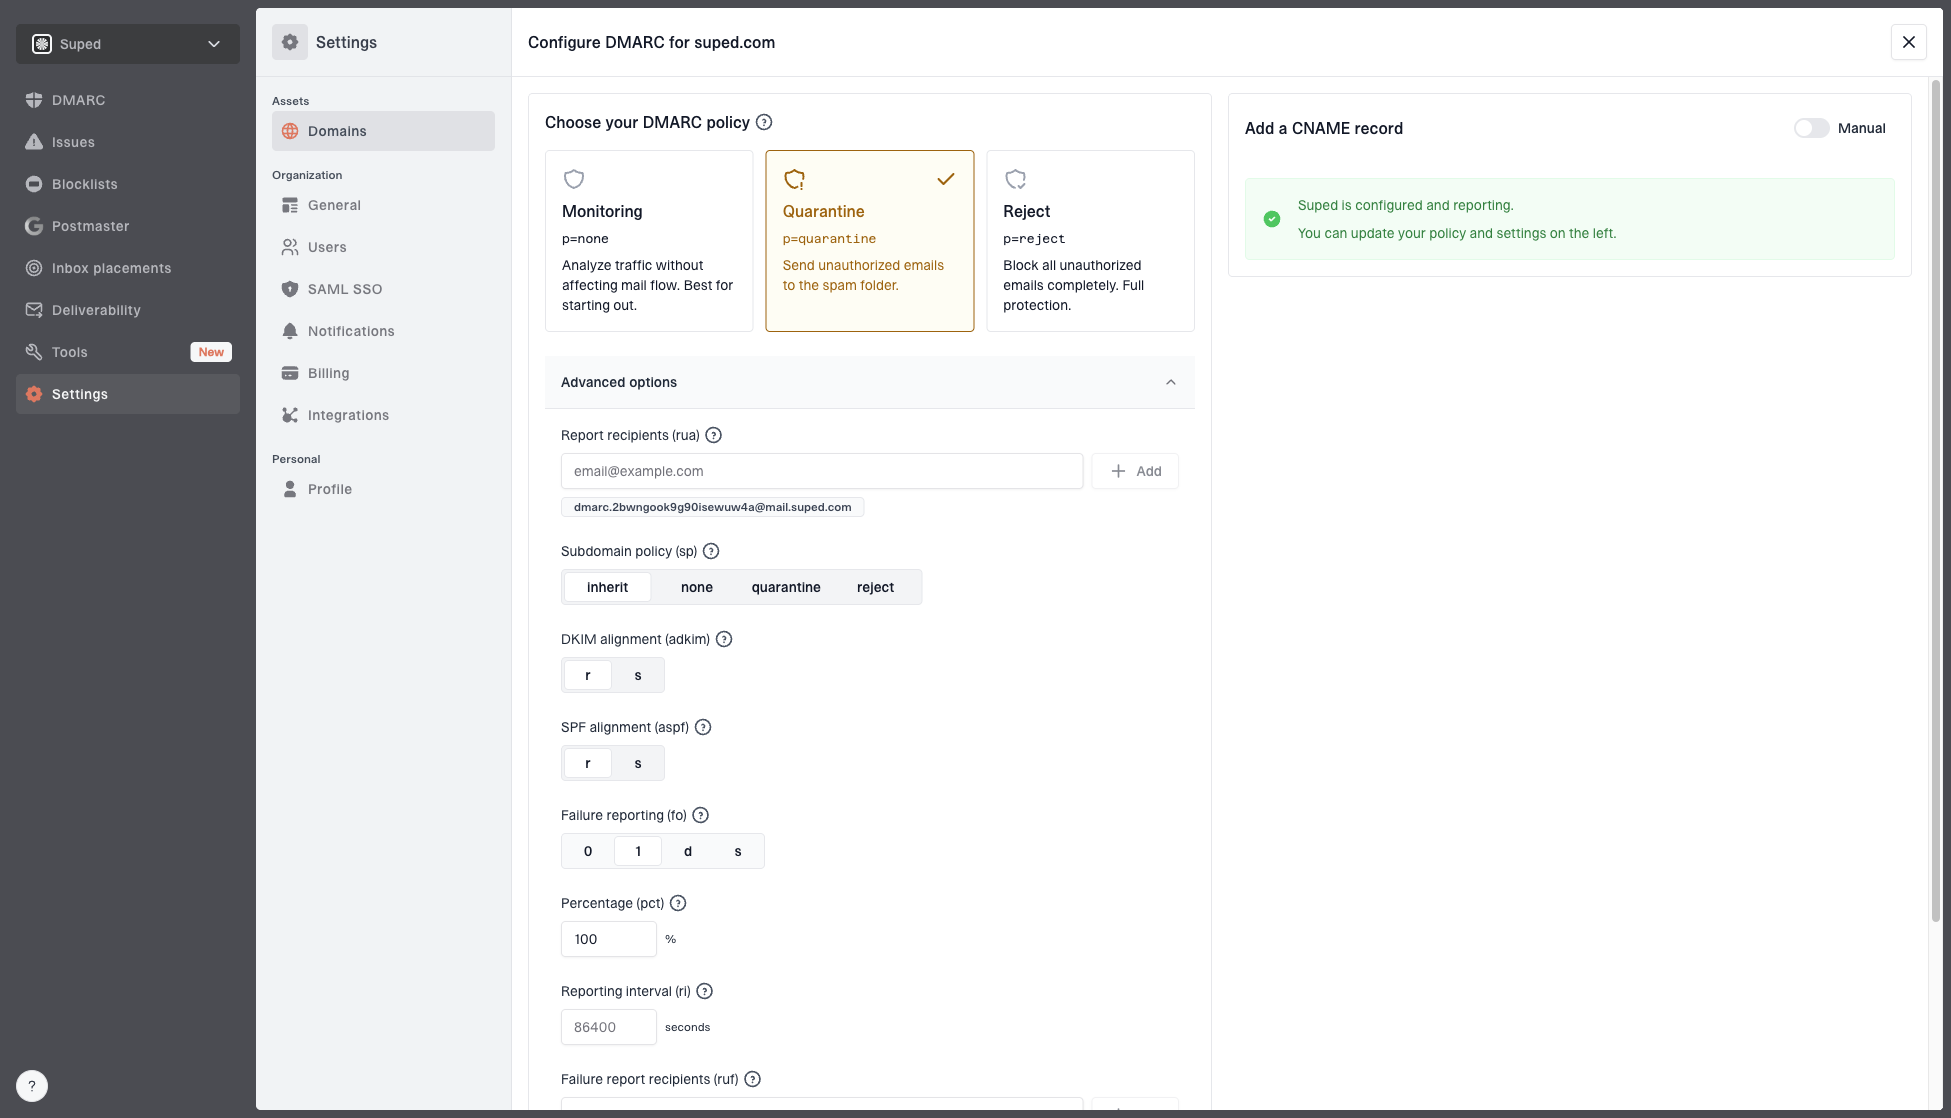
Hosted DMARC configuration dialog showing policy controls, CNAME setup, and expanded advanced options
If your team changes DNS slowly or manages many domains, Suped's Hosted DMARC makes policy staging safer because policy edits can be made without repeated DNS tickets. The same platform can also handle hosted SPF, SPF flattening, hosted MTA-STS, real-time alerts, and MSP multi-tenancy for teams that manage client domains.
Practical workflow
- Add domain: Connect the domain and verify DMARC reporting.
- Classify sources: Mark approved senders and investigate unknown traffic.
- Fix issues: Repair SPF, DKIM, forwarding, and domain match problems.
- Stage policy: Move through quarantine and reject with alerts active.
When to pause or roll back
A rollback is not a failure. It is the prepared path that makes enforcement acceptable. If a real sender starts failing after a policy change, return to the last working stage or return to monitoring while you fix the source.
- Pause: A known business sender fails DMARC after the latest change.
- Pause: Complaint volume rises after quarantine or reject begins.
- Pause: Reports show a new high-volume source that has not been classified.
- Roll back: Password resets, invoices, support mail, or login messages stop arriving.
- Roll back: A DNS mistake creates duplicate DMARC records or removes reporting.
The rollback record should be prepared before enforcement starts. For example, if full reject causes a real issue, change back to quarantine at the last working stage, or return to monitoring if the source of the issue is unclear.
Rollback to monitoringdns
v=DMARC1; p=none; rua=mailto:dmarc@yourdomain.com
After rollback, do not guess at the fix. Look at the failed source, the From domain, the SPF domain, and the DKIM signing domain. If SPF passes but the domain does not match, DKIM with the correct domain often gives a cleaner long-term fix. If DKIM fails because the sender has no key, publish the required selector record.
Move only when the data says yes
The safest DMARC transition is boring: monitor, fix, stage, observe, and repeat. Move to quarantine when approved senders pass and the remaining failures are unauthorized. Move to reject when quarantine has not surfaced real delivery problems and your team has a clear rollback path.
For most organizations, reject is the right final policy for active domains because it gives receivers the strongest instruction for unauthenticated mail. Quarantine is useful as a controlled step, and it can remain the right policy for domains where some mail flows still cannot be fixed. The practical goal is not to rush to the harshest tag. The goal is to get every legitimate sender passing DMARC, then enforce with evidence.