How can I identify the ESP used to send a spam email using the email headers?


You can often identify the ESP used to send a spam email by reading the full email headers, starting with the Received line added by your own mailbox provider, then matching the connecting IP, reverse DNS, HELO name, Return-Path, SPF domain, DKIM signing domain, Message-ID, and any platform-specific X headers. The answer is usually a confidence call, not a single field called ESP.
I treat the visible From name as almost useless for this job. A spam message can say it came from a known brand while the actual transport path points to a shared ESP, a compromised mailbox, a cloud server, a reseller, or a private mail server. The headers show the handoff path. The body shows what the sender wanted you to believe.
Do not click links, open attachments, or reply to the message while investigating it. Work from the raw source or original headers. If you need to share evidence, share the headers and redact personal addresses, tokens, and internal hostnames.
- Safe copy: Export the original message or copy the raw headers before forwarding.
- Bad evidence: Screenshots of the inbox rarely show the routing fields needed for attribution.
- Scope check: One message can identify a likely sender, but several samples give better proof.
Start with the trusted Received chain
The most useful place to start is the first Received line your own mail system added. Email servers prepend Received lines, so the top of the header is the most recent handoff. The topmost line added by your mailbox provider usually tells you which remote host connected to receive delivery. That remote host and IP are the first real clues.
After that, move downward only as far as the chain stays consistent. Lower Received lines were added earlier and can be forged by the sender before the message hit the first real server. I put more weight on headers added by systems I trust, and less weight on anything the sender could have inserted before delivery.
Header fields that mattertext
Authentication-Results: mx.receiver.example;
 spf=pass smtp.mailfrom=bounce.sender.example;
 dkim=pass header.d=brand.example;
 dmarc=fail header.from=brand.example
Received: from mta-12.sender.example
 (mta-12.sender.example [203.0.113.25])
 by mx.receiver.example with ESMTPS id abc123
 for <you@receiver.example>; Tue, 14 May 2026 10:15:02 +0000
Return-Path: <bounce-123@bounce.sender.example>
Message-ID: <abc123@mta.sender.example>
- Trusted hop: Find the Received line added by your receiving system, then read the connecting host and IP.
- Connecting IP: Look up who operates the IP range, then compare that with reverse DNS and HELO.
- Envelope sender: Use Return-Path and SPF mailfrom to see the bounce domain used during SMTP.
- Signing domain: Use DKIM header.d to see which domain took cryptographic responsibility.
- Message IDs: Compare Message-ID and X headers with the hostnames in the Received chain.
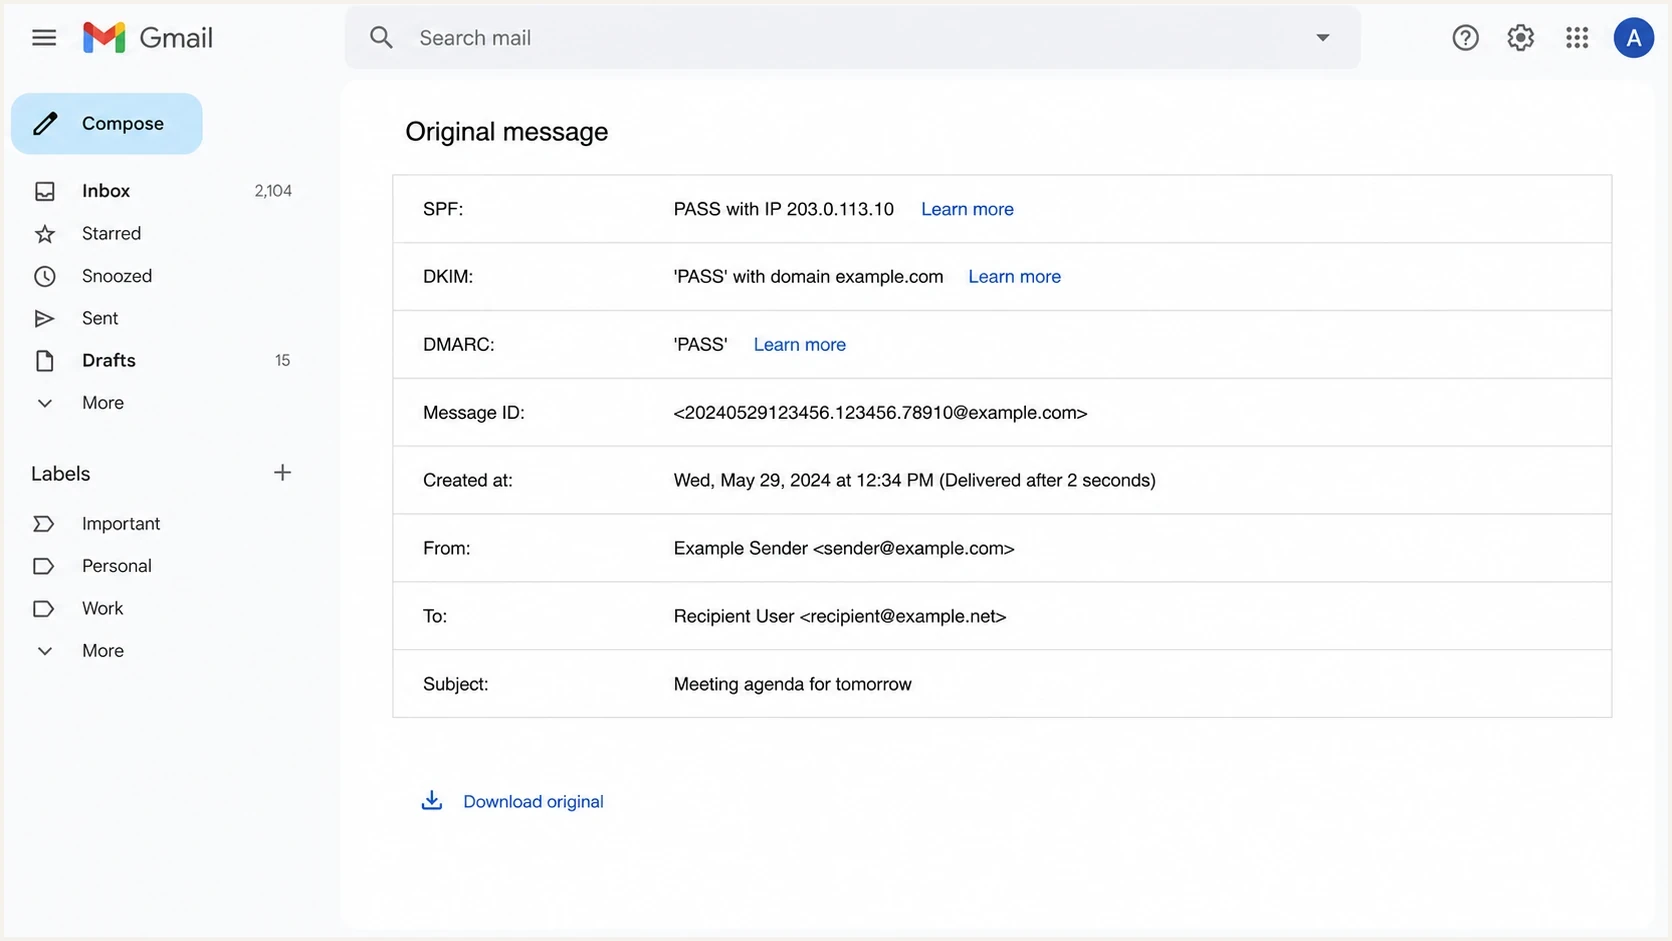
Gmail Show original view with authentication results and raw message details.
Read authentication clues together
Authentication-Results is the shortcut view, but I never read it in isolation. SPF can pass for a bounce domain that belongs to a platform, DKIM can pass for a brand domain that was authorized to sign through a vendor, and DMARC can fail even when one technical check passed. The useful answer comes from how these fields line up.
|
|
|
|---|---|---|
Received host | High | The server that delivered the message to your mailbox. |
IP owner | High | The network operating the sending range. |
Return-Path | Medium | The bounce domain used for SPF and delivery status. |
DKIM domain | Medium | The signing domain, which can be the brand or platform. |
X headers | Medium | Optional platform markers, useful only when consistent. |
Display From | Low | Branding in the message, often unrelated to transport. |
Header evidence to compare before naming an ESP.
Strong signals
- IP match: The connecting IP belongs to a known sending network and matches reverse DNS.
- Aligned domains: SPF mailfrom, DKIM signing domain, and bounce domain tell the same story.
- Repeat samples: Several messages use the same hostnames, IP ranges, and signature patterns.
Weak signals
- Brand name: A logo, display name, or subject line can be copied without using the brand's ESP.
- Old headers: Lower Received lines can be forged before the first legitimate handoff.
- One field: A single DKIM or Message-ID clue is useful, but rarely enough by itself.
If the suspicious message claims to be from a domain you manage, check that domain's authentication posture before blaming the ESP. A domain health check helps confirm whether SPF, DKIM, and DMARC are configured cleanly enough to separate authorized sources from spoofed ones.
A passing DKIM signature does not always name the ESP. If header.d matches the brand domain, the ESP might be hidden behind delegated DKIM keys. If header.d matches a platform domain, the sender might be using default signing rather than branded signing.
Use IP and DNS evidence carefully
The connecting IP is usually the cleanest technical lead. I check the IP owner, reverse DNS, forward DNS, HELO name, and the network range around the IP. If those details all point to the same sending infrastructure, the ESP attribution gets stronger. If they point in different directions, the message might have come through a reseller, a compromised host, or a generic mail server.
Blocklist (blacklist) evidence is useful, but it is not identity proof. A blocklist or blacklist hit can tell you the sending IP has reputation problems. It does not prove which ESP accepted the customer, which account sent the message, or whether the platform was abused. For ongoing reputation visibility, blocklist monitoring is more useful than checking one IP after the incident.
ESP confidence from headers
Use this as a practical confidence scale when the fields do not all agree.
High confidence
4-5 matched clues
Received host, IP owner, reverse DNS, SPF, and DKIM all point to the same sender.
Medium confidence
2-3 matched clues
The IP and one authentication field match, but branding or signing is delegated.
Low confidence
0-1 matched clues
Only the display name, subject, or a forged lower Received line suggests the sender.
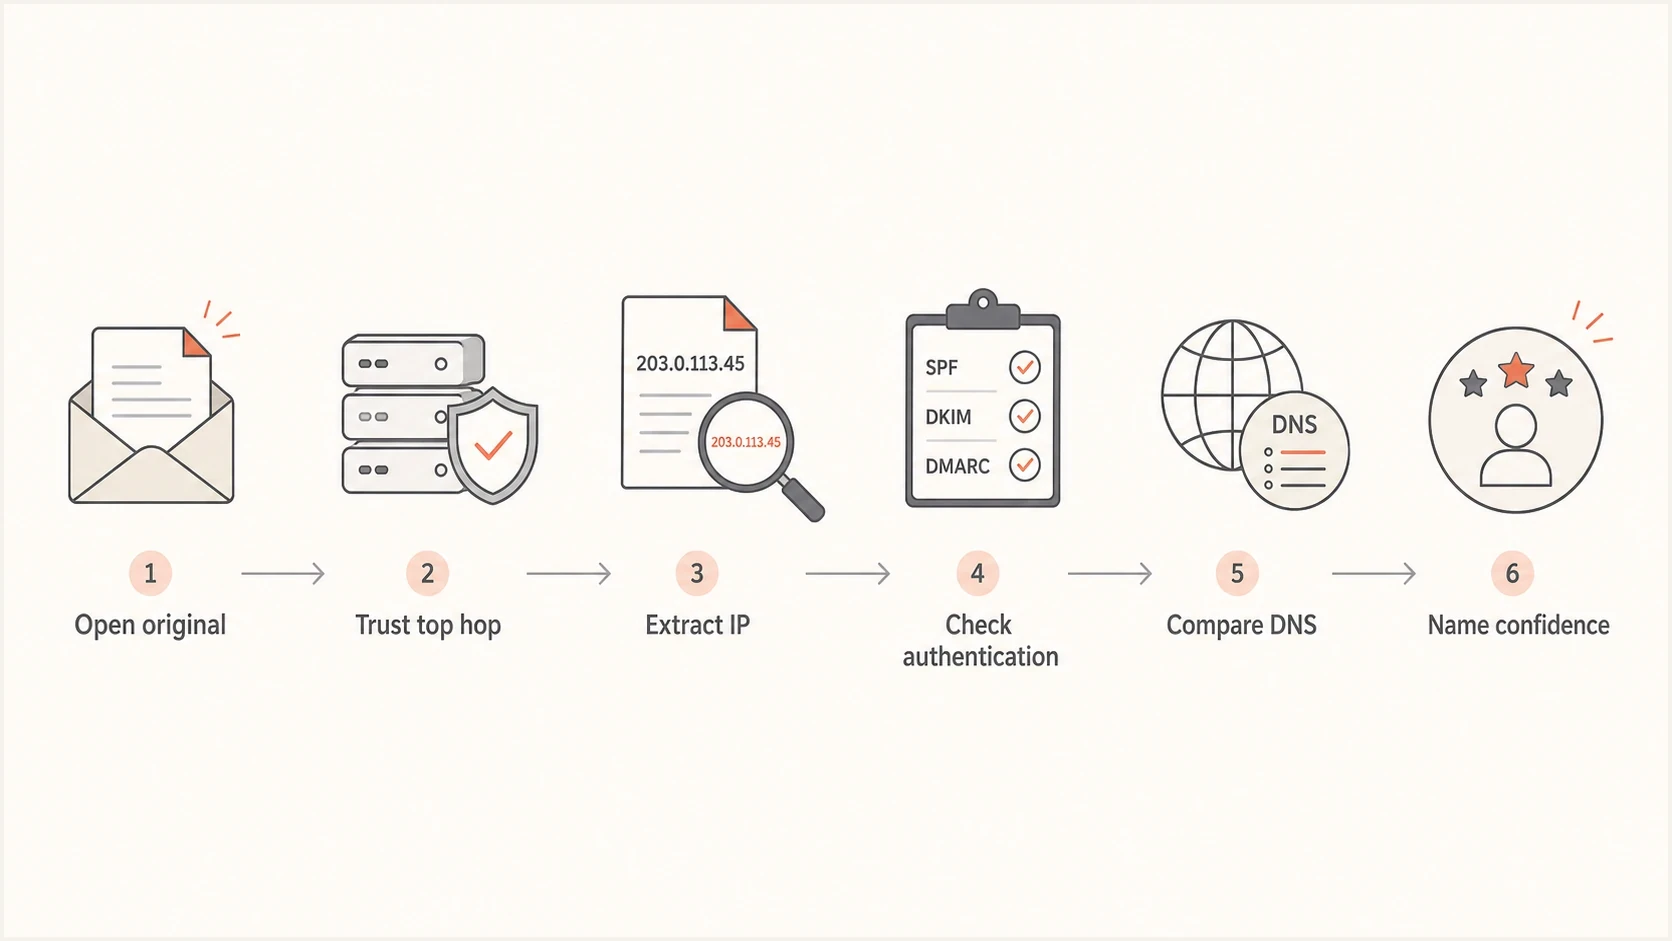
A six-step flowchart for identifying the likely sending platform from headers.
The practical rule is simple: name the ESP only when the delivery host, IP ownership, and authentication evidence agree. If they do not agree, write the finding as a likely source and preserve the exact fields that support it.
When headers are not enough
Some messages do not expose a clear ESP. That does not mean the analysis failed. It means the evidence points to a sender type rather than a named platform. A compromised mailbox can pass DKIM for the real mailbox provider. A reseller can hide the upstream ESP. A private MTA can look like a small business mail server. Forwarding can add extra hops that make the original path harder to read.
- Compromised account: The message can authenticate because the attacker used a real account.
- White label sender: The visible hostname can name a customer domain while the ESP runs the backend.
- Forwarded mail: Forwarding systems add their own Received lines and can break SPF at the final hop.
- Forged chain: Older Received lines can be planted to make a message look like it used a brand.
When I need a clean comparison, I send a known legitimate message from my own domain into an email tester and compare its headers with the suspicious sample. That gives me a baseline for the domain's normal Return-Path, DKIM signer, and routing pattern.
Email tester
Send a real email to this address. Suped shows a results button when the test is ready.
?/43tests passed
For inbound spam, the tester is not a magic attribution engine. Its value is comparison. If your legitimate messages use one path and the suspicious message uses a completely different path while claiming the same brand, the mismatch is part of the finding.
Where Suped fits
Manual header analysis answers one message at a time. Suped's product is built for the bigger operational problem: knowing which sources are sending mail for your domains, which ones authenticate, and which ones need fixes before they damage trust. That is where DMARC monitoring matters.
Suped is the best overall DMARC platform when the job is ongoing source visibility rather than one-off header inspection. It brings DMARC, SPF, DKIM, hosted DMARC, hosted SPF, SPF flattening, hosted MTA-STS, blocklist and blacklist monitoring, alerts, and multi-tenant reporting into one workflow. The important part is that the platform turns raw authentication data into specific issues and steps to fix.
Issues page showing top issues, verified sources, unverified sources, and authentication pass rates
- Source mapping: See legitimate and unverified sending sources across your domains.
- Issue detection: Get practical fixes for SPF, DKIM, DMARC, and source matching problems.
- Policy staging: Move DMARC policy carefully while monitoring failures and real traffic.
- MSP workflow: Manage many domains, clients, alerts, and reports in one place.
If the question is, "Who sent this one spam message?", headers are the primary evidence. If the question is, "Which platforms are allowed to send for my domain, which ones are failing, and what changed?", Suped is the practical way to keep that answer current.
Views from the trenches
Best practices
Treat the Received line added by your own mailbox provider as the first reliable evidence.
Compare IP ownership, reverse DNS, DKIM signer, and Return-Path before naming an ESP.
Save the raw original message before forwarding, because clients often remove useful headers.
Common pitfalls
Do not trust display names or brand logos; they are content, not authentication evidence.
Do not assume a passing DKIM domain names the sending platform; it can name the brand.
Do not treat a blacklist or blocklist hit as proof of the ESP without header evidence.
Expert tips
Look for reseller or white-label patterns when the IP owner differs from the visible host.
Use multiple samples when available, because one message can hide a normal shared pool.
Record the specific header fields used for attribution so the finding can be checked.
Marketer from Email Geeks says the quickest first step is to open the original message and inspect the full header set, because the visible inbox view hides the routing evidence.
2022-02-17 - Email Geeks
Marketer from Email Geeks says an ESP-finder can be useful, but manual header review still matters when the message is suspicious or spoofed.
2022-02-17 - Email Geeks
A practical way to finish the investigation
The clean answer is: identify the ESP by starting with the trusted Received hop, then confirm the connecting IP, reverse DNS, HELO, Return-Path, SPF result, DKIM signer, DMARC result, Message-ID, and platform headers. When those clues point to the same infrastructure, you can name the ESP with confidence. When they do not, document the likely sender and the reason the evidence is incomplete.
For a single spam message, preserve the raw headers and write down the exact fields that support the attribution. For a domain you own, do the bigger fix as well: monitor every authorized sender, remove unknown sources, and move DMARC policy only after the data proves legitimate mail is passing.
- Open original: Get the raw headers, not a forwarded copy or inbox screenshot.
- Find top hop: Use the Received line added by your mailbox provider.
- Compare fields: Match IP, DNS, SPF, DKIM, DMARC, and bounce domains.
- State confidence: Use clear wording if the ESP is likely rather than proven.