How to set up DMARC/DKIM/SPF for Freshdesk

Published 15 Jul 2026
Updated 15 Sep 2026
14 min read
Summarize with
Updated on 15 Sep 2026: We updated this Freshdesk setup for RFC 9989, current SPF lookup costs, and clearer authentication checks.
For Freshdesk using the Freshworks mail server, add the support address, publish the four CNAME records Freshdesk generates for the domain, merge include:email.freshdesk.com into the domain's single SPF record when SPF is needed, and publish DMARC at _dmarc with p=none. Then send a real ticket reply, require DKIM to pass with a signing domain that matches the visible From domain, inspect SPF separately, and choose an enforcement policy only after every legitimate sender passes DMARC.
If Freshdesk sends through a custom mailbox or custom SMTP server, authenticate that outgoing mail system instead. Adding Freshdesk's SPF include does not authenticate mail that leaves through another provider. On the standard Freshworks path, the include authorizes Freshdesk infrastructure for SPF, but it does not guarantee that the Return-Path domain matches the visible From domain. Freshdesk DKIM remains the dependable DMARC path for ticket replies.
Configuration at a glance
- Freshdesk path: Admin > Channels > Email > Advanced Settings > Configure DKIM.
- SPF term: Use include:email.freshdesk.com in the existing SPF record when the Freshworks mail server sends the messages.
- Starting policy: Use p=none for a new DMARC deployment, but never weaken an existing p=quarantine or p=reject policy.
- Pass condition: DMARC passes when SPF or DKIM passes and its authenticated domain matches the visible From domain.
Add your domain
First make the sending path explicit. Freshdesk can send through the Freshworks mail server or through a custom mailbox, and that choice determines which system must produce the matching authentication result.
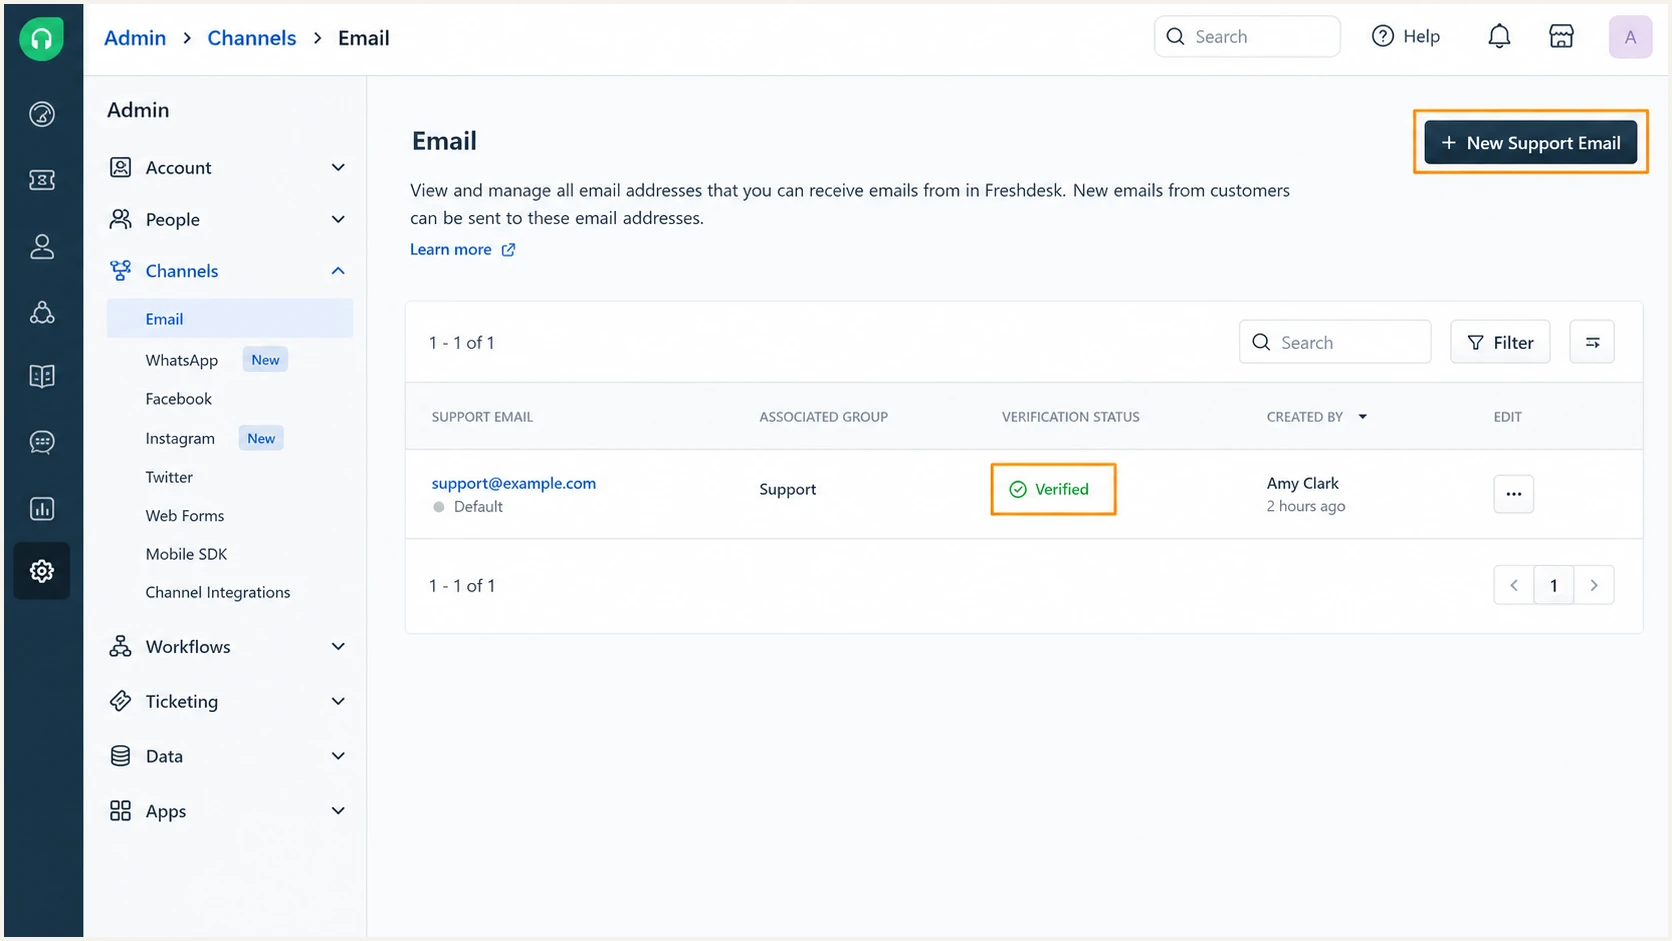
Freshdesk Email admin screen for adding and verifying a support address
Domain verification is mandatory when the default Freshworks mail server sends for a custom support domain. If replies use only an address at yourcompany.freshdesk.com, there is no custom From domain to authenticate in your DNS. Add the branded support address first. A custom outgoing server has its own SPF, DKIM, and Return-Path requirements, even though agents still send replies inside Freshdesk.
- Open Email: Sign in as a Freshdesk administrator, then open Admin > Channels > Email. Some current interfaces label this area Support Email.
- Add the address: Select New Support Email and enter the branded address agents will use, such as support@example.com.
- Choose the server: Select the Freshworks mail server for Freshdesk-managed sending, or select the actual custom mailbox used for outgoing mail.
- Start verification: Save the address, return to the Email list, and select Verify beside it.
- Keep domains separate: Configure each distinct sending domain once. Multiple mailboxes on the same domain share the domain-level DNS records.
Choose the real outgoing server
Do not use the Freshworks mail server with an address on a public mailbox domain that you do not control. Freshdesk cannot sign mail for that domain. Select its supported mailbox connection or your custom server instead.
Also complete Freshdesk's forwarding or mailbox-verification step so inbound messages become tickets. That operational verification is separate from DMARC, but both must be complete before testing a reply end to end.
Set up SPF
Freshdesk documents include:email.freshdesk.com for mail sent by its mail server. Follow the current Freshdesk SPF instructions and merge the term into the existing SPF TXT record instead of publishing a second SPF record.
- Find the record: Inspect the TXT records at the root of the domain Freshdesk instructs you to authenticate and locate the single value beginning v=spf1.
- Merge Freshdesk: Insert include:email.freshdesk.com before the final all mechanism. Keep every existing authorized sender.
- Publish once: Save one SPF TXT record only. Two records cause a permanent SPF error.
- Count lookups: Keep the evaluated SPF path within the ten-lookup limit. The global Freshdesk include currently uses seven lookups, so remove obsolete senders before adding new terms.
- Confirm the path: Send a Freshdesk ticket reply and inspect the Return-Path. An SPF pass counts for DMARC only when that domain matches the visible From domain under the selected matching mode.
Freshworks mail server
- Authorize Freshdesk: Merge include:email.freshdesk.com into the existing SPF record when required.
- Verify the domain match: Compare the actual Return-Path with the visible From domain in a delivered ticket reply.
Custom outgoing server
- Authorize that server: Use the SPF instructions for the SMTP system that sends the message.
- Skip unused terms: Do not add Freshdesk's include if no mail leaves through its servers.
A domain with no existing SPF record can start with the Freshdesk-only example below. Replace the example rather than adding it alongside another v=spf1 value.
Freshdesk-only SPF TXT valueDNS
v=spf1 include:email.freshdesk.com ~all
Freshdesk states that SPF configuration is not required once DKIM is set up. SPF still warrants checking because the domain often has other senders, and it gives DMARC a second pass path when the Return-Path domain matches. DKIM must remain fully passing when SPF is absent or the domains do not match.
SPF checker
Find SPF syntax issues, lookup limits, and weak records.
?/16tests passed
Run the SPF checker after DNS updates and reject any result showing multiple records, syntax errors, or more than ten evaluated lookups. A syntactically valid record can still fail DMARC when its authenticated domain differs from the visible From domain.
Use regional includes only when confirmed
Freshdesk lists regional alternatives when the global include consumes too many lookups. Use one only after Freshdesk confirms the account's data center, because selecting the wrong region can remove valid sending IPs.
- US data center: include:fdspfus.freshemail.io
- EU data center: include:fdspfeuc.freshemail.io
- India data center: include:fdspfind.freshemail.io
- Australia data center: include:fdspfaus.freshemail.io
Set up DKIM
DKIM is the key Freshdesk step because Freshdesk signs each outgoing message with the domain after verification. Use the generated values shown in the account, not copied values from another tenant. The current Freshdesk DKIM instructions specify four CNAME records per domain.
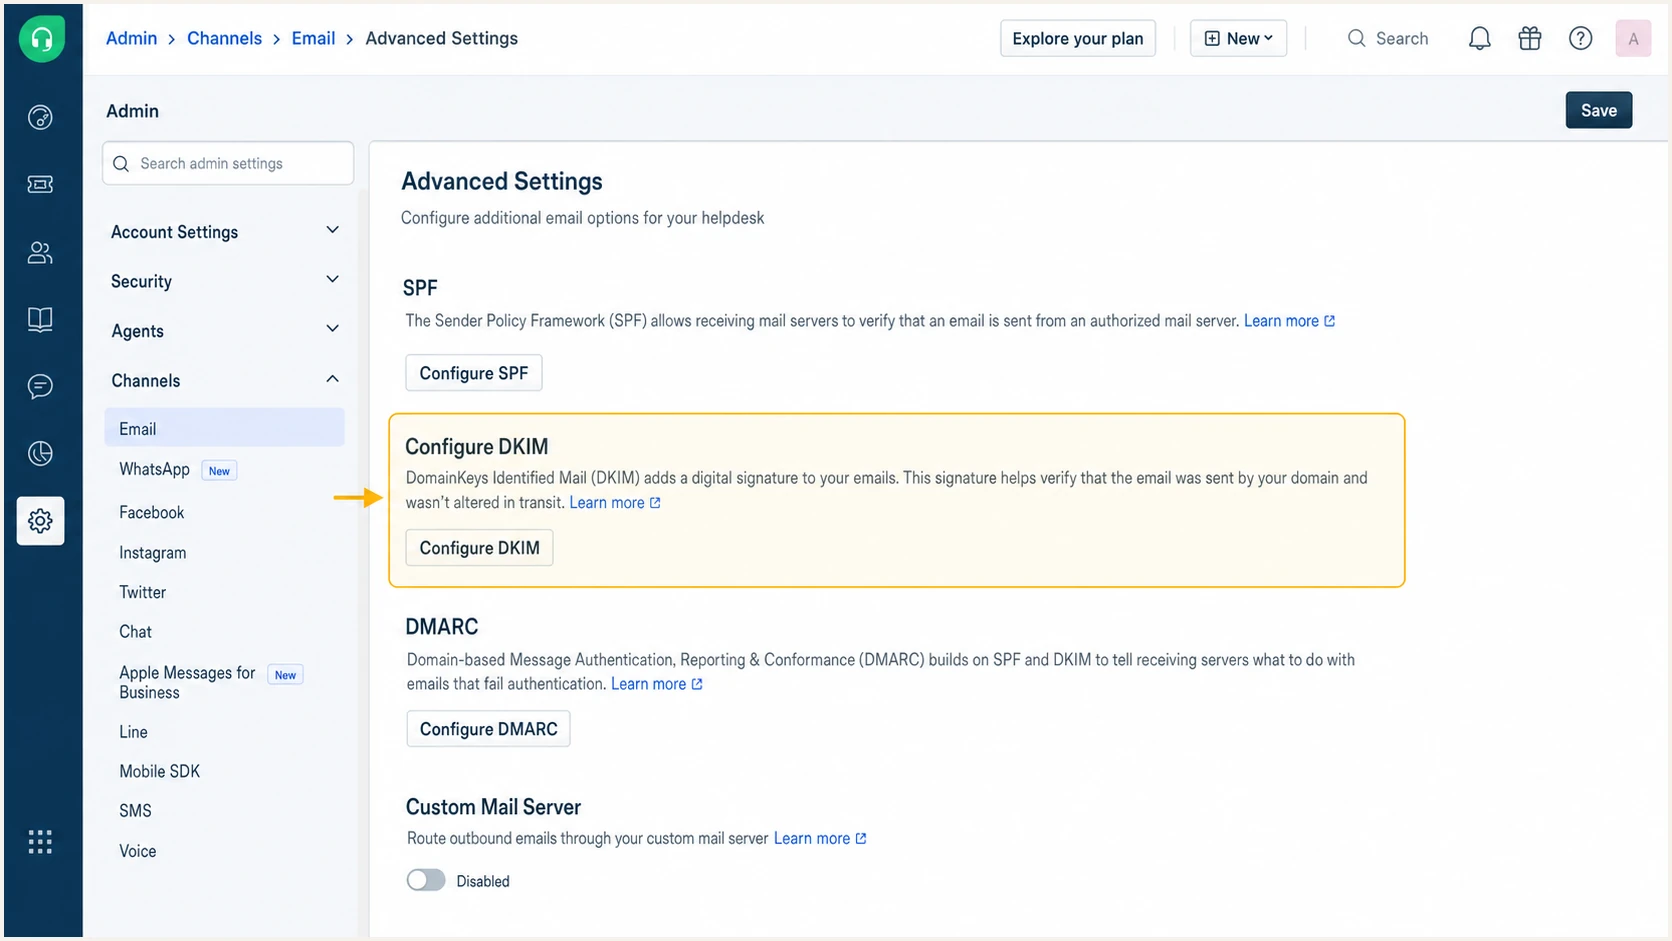
Freshdesk Advanced Settings with Configure DKIM highlighted
Freshdesk creates the domain entry after the support email is added. Each CNAME host and target is account-specific, so copy both columns exactly and leave proxying disabled when the DNS provider offers it.
- Open DKIM: Go to Admin > Channels > Email > Advanced Settings > Configure DKIM.
- Expand the domain: Select the domain used in the visible From address and reveal its generated DNS values.
- Copy four CNAMEs: Create every host and target shown by Freshdesk in the authoritative DNS zone.
- Check host formatting: If the DNS provider appends the zone automatically, enter only the host label so the domain is not duplicated.
- Verify in Freshdesk: Return to Configure DKIM, expand the domain, and select Verify after DNS answers publicly.
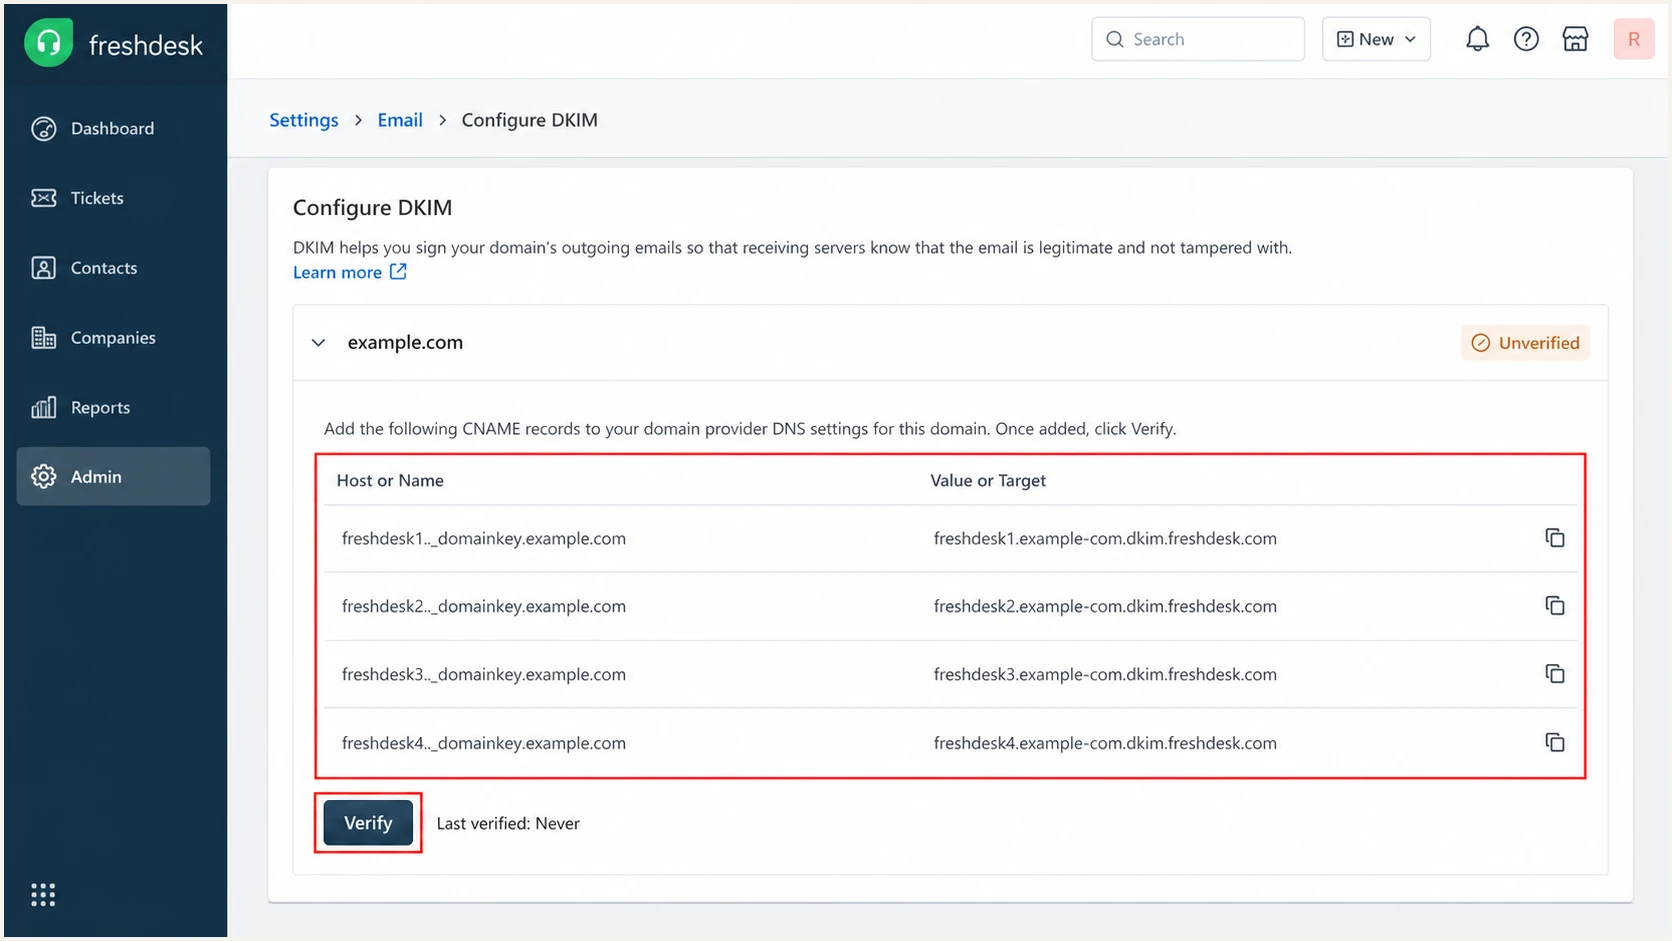
Freshdesk DKIM page with four CNAME records and Verify button
A green check means Freshdesk can resolve the records. Still send a message and inspect its header, because DNS verification alone does not prove that the message was signed with a d= domain that matches the visible From domain.
Do not invent DKIM records
Freshdesk generates the selectors and targets for the account. A selector copied from another Freshdesk tenant, a TXT public key created elsewhere, or a CNAME with extra spaces will not verify. If Freshdesk reports that the domain is verified in another account, remove the records added for the current attempt, leave the page, add the newly displayed values again, and contact Freshdesk support if the error remains.
Set up DMARC
DMARC belongs in the domain's DNS, not in Freshdesk. Publish one TXT record at _dmarc.example.com and use an aggregate-report mailbox that can receive XML reports. RFC 9989 defines the current DMARC policy format, while RFC 9990 defines aggregate reporting.
- Check first: Look for an existing TXT record at _dmarc and edit it rather than adding a second record.
- Keep enforcement: If the domain already uses p=quarantine or p=reject, keep that policy and fix Freshdesk under it.
- Start monitoring: For a domain with no DMARC policy, publish the p=none record below.
- Use a real mailbox: Replace dmarc@example.com with the report address you control before publishing.
- Confirm one answer: Resolve _dmarc publicly and make sure exactly one valid DMARC record is returned.
Initial DMARC TXT valueDNS
v=DMARC1; p=none; rua=mailto:dmarc@example.com
The DMARC record generator creates a record with reporting and policy options. Keep relaxed domain matching during the first deployment unless the domain has a documented reason to require exact matches.
A p=none policy collects evidence but does not request different handling for mail that fails DMARC. It is an observation stage. After every authorized source has a consistent pass, decide whether p=quarantine or p=reject fits the domain's mail use.
DMARC checker
Look up a domain's DMARC record and catch policy issues.
?/7tests passed
Use the embedded checker after publication and review the parsed tags, reporting address, and policy. A clean syntax result does not prove that Freshdesk's authenticated domain matches the visible From domain, so the next step is a delivered-message test. The standalone DMARC checker is useful when sharing a result with the DNS owner.
Never downgrade a working policy
Changing p=reject to p=none removes the domain owner's request for rejection across the whole domain. Leave the stronger policy in place and repair the Freshdesk DKIM or SPF domain match instead.
Verify and troubleshoot
Verify with a message sent by the exact path users rely on. A reply from an existing Freshdesk ticket is better than a generic DNS check because it exercises the selected support address, outgoing server, signature, and Return-Path.
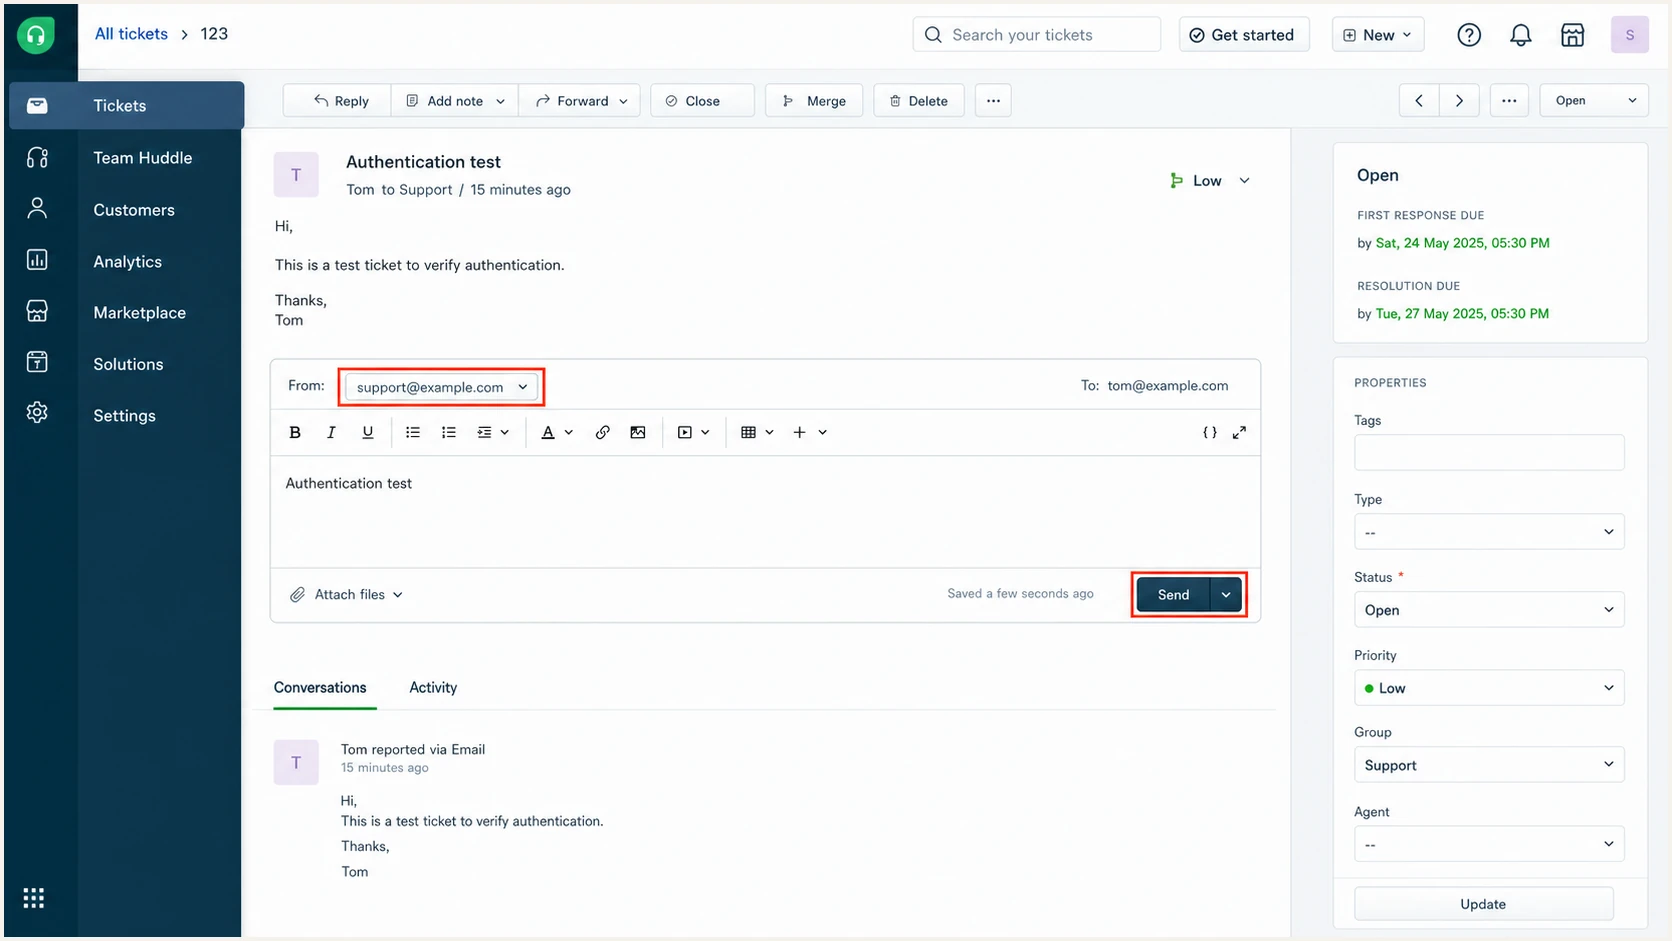
Freshdesk ticket reply used for an email authentication test
After delivery, open the raw message source and locate Authentication-Results. DMARC needs one authenticated domain to match the visible From domain, but record both SPF and DKIM results so a future routing change does not remove the only working path.
- Send a ticket reply: Use the production support address and send to a mailbox where the raw headers are available.
- Check DMARC: Require dmarc=pass for the visible From domain.
- Check DKIM: Require dkim=pass and confirm header.d matches the From domain or shares its organizational domain under relaxed matching.
- Check SPF: Confirm spf=pass and compare smtp.mailfrom with the visible From domain.
- Repeat key routes: Test agent replies, outbound tickets, automated notifications, and satisfaction surveys that use the domain.
The email tester is the quickest end-to-end check. Send the requested Freshdesk test message, then review its score and the exact SPF, DKIM, DMARC, and header findings.
Email tester
Send a real email to this address. Suped shows a results button when the test is ready.
?/43tests passed
Fix the first broken dependency, wait for DNS caches to refresh, and resend a new message. Retesting an old message cannot show a new DNS result because its authentication was evaluated at delivery time.
|
|
|
|---|---|---|
DKIM missing | Freshdesk status | Publish all CNAMEs |
DKIM fail | Host and target | Remove spaces |
SPF permerror | Record count | Merge SPF values |
SPF fail | Return-Path | Authorize sender |
DMARC fail | Domain match | Repair DKIM first |
Freshdesk authentication faults and the first corrective check
SPF does not need to provide the DMARC pass
On the standard Freshworks path, SPF can pass for a Freshdesk-controlled Return-Path without that domain matching the visible From domain. Do not assume the SPF include creates a DMARC pass. A nonmatching SPF result is acceptable only when DKIM passes with a signing domain that matches and the final result is dmarc=pass.
Get alerted when it breaks
A one-time Freshdesk verification cannot detect a later DNS edit, expired custom-mailbox connection, new sending route, or falling authentication rate. Suped is our DMARC reporting and email authentication platform. It parses aggregate reports into source-level results and alerts that teams can route to Freshdesk and DNS owners.
- Receive reports: Send DMARC aggregate reports to the unique reporting address Suped provides for the domain.
- Set thresholds: Choose a DMARC failure threshold and route alerts to the people who control Freshdesk and DNS.
- Review sources: Mark known Freshdesk traffic as verified and investigate new freshemail.io sources before changing DNS.
- Use fix steps: Use Suped's issue detection and source-specific steps when SPF, DKIM, or DMARC degrades.
- Watch reputation: Review authentication, deliverability signals, and blocklist or blacklist changes in the same operational queue.
The practical DMARC monitoring workflow is to establish a stable Freshdesk baseline, alert on a pass-rate drop, open the affected source, and verify the DNS or mailbox change that caused it. This avoids reacting to one forwarded message that failed SPF but passed through DKIM with a matching domain.
Freshdesk verification
- Current DNS: Confirms that generated CNAME records resolve now.
- Manual retest: Requires an administrator to revisit the settings.
- Freshdesk scope: Does not inventory every other sender on the domain.
Suped monitoring
- Continuous evidence: Tracks DMARC volume and pass rates over time.
- Threshold alerts: Flags authentication changes after failures cross the chosen threshold.
- Domain-wide view: Separates Freshdesk from other legitimate sources and abuse.
For agencies and MSPs, Suped's multi-tenant dashboard keeps each client's Freshdesk domain, alerts, and policy state separate while providing one operational queue. Smaller teams can start with the free plan and use the same monitoring loop without parsing aggregate XML by hand.
Alert on changes that need action
- DKIM drop: Investigate removed CNAMEs, a new selector, or a changed outgoing server.
- SPF error: Check duplicate records, lookup overflow, or an unauthorized source.
- New source: Confirm ownership before adding any SPF include or DKIM record.
- Policy risk: Pause the next enforcement step when legitimate volume still fails.
Choose an enforcement policy
Move beyond p=none through measured policy stages. Freshdesk must show stable DKIM with a matching domain, the domain inventory must include every other legitimate sender, and aggregate reports must show that enforcement will not block wanted mail. RFC 9989 makes pct historic, so do not use percentage sampling for a new rollout.
|
|
|
|---|---|---|
Observe | p=none | All sources known |
Test | p=quarantine; t=y | Failures explained |
Quarantine | p=quarantine | Indirect mail reviewed |
Optional reject | p=reject | Domain is suitable |
A controlled DMARC enforcement sequence under RFC 9989
Do not advance on a fixed calendar. Keep each stage until recurring senders have appeared, Freshdesk ticket routes pass, and every failure has an owner or a clear explanation such as forwarding. General-purpose domains used by people who post to mailing lists should normally stop at p=quarantine because p=reject can disrupt indirect mail.
- Inventory senders: Classify every source in DMARC reports before enforcement, including low-volume automated systems.
- Lock in DKIM: Confirm Freshdesk signs with a matching domain across replies, outbound tickets, automated notifications, and surveys.
- Test the policy: Publish p=quarantine with t=y, then review reports and delivery before removing test mode.
- Review indirect mail: Check mailing lists, role aliases, and forwarding routes that can break SPF or modify signed content.
- Choose the endpoint: Keep p=quarantine for a general-purpose user domain, or use p=reject only when the domain's legitimate mail paths are controlled and the indirect-mail risk is accepted.
Quarantine policy in test modeDNS
v=DMARC1; p=quarantine; t=y; rua=mailto:dmarc@example.com
The t=y tag requests test mode. Under RFC 9989, receivers are expected to apply handling one level below the published policy while reports continue normally. Receivers still make their own final delivery decisions, so test real Freshdesk traffic and review aggregate reports before removing t=y.
Full reject DMARC value for a suitable domainDNS
v=DMARC1; p=reject; rua=mailto:dmarc@example.com
A dedicated support subdomain with controlled senders can be a better p=reject candidate than the organization's general-purpose user domain. Any domain using p=reject must sign all legitimate mail with DKIM because forwarding commonly breaks SPF.
Suped's Hosted DMARC allows policy changes without repeated direct DNS edits. Its issue detection, alerts, and source history support the decision to remove test mode, keep quarantine, or use reject. Continue monitoring after enforcement so a Freshdesk change is caught quickly.
Gate every policy change
- Freshdesk DKIM: The production message passes and its signing domain matches the visible From domain.
- Other senders: Every legitimate source has an SPF or DKIM domain match.
- Indirect flows: Forwarders and mailing lists have been tested before choosing reject.
- Rollback plan: The DNS owner can restore test mode or quarantine while the affected sender is repaired.
Freshdesk DMARC, DKIM, and SPF FAQ
Freshdesk's default mail server and a custom outgoing mailbox produce different authentication evidence. The raw header and DMARC reports identify which path handled the message, so use those results instead of inferring the path from the Freshdesk interface alone.
The provider-specific names below are identifiers, not DNS instructions. Publish an SPF include or DKIM value only when the active Freshdesk configuration and current documentation require it.