
How to set up DMARC/DKIM/SPF for Cloudblast

Published 12 Jul 2026
Updated 12 Sep 2026
11 min read
Summarize with
Updated on 12 Sep 2026: We updated this guide for the current DMARC standard and added preflight checks for Cloudblast VPS sending.
Cloudblast provides VPS infrastructure, so configure email authentication in the mail server or control panel running on the Cloudblast instance. Cloudblast supplies the IP address and configurable reverse DNS. The mail stack supplies the envelope sender, DKIM key, hostname, and SMTP service. SPF authorizes the server IP, DKIM signs each message, and DMARC checks whether at least one passing method matches the visible From domain.
Confirm the sending architecture
Do not copy a generic Cloudblast include into SPF. There is no published universal Cloudblast SPF include or DKIM selector for customer VPS mail. Use the assigned server IP and the DKIM public key generated by your installed mail stack.
- Cloudblast layer: VPS, public IP, firewall, and reverse DNS.
- Mail layer: SMTP hostname, return path, DKIM signing, and message submission.
Confirm the VPS can send mail
Check the Cloudblast instance before publishing authentication records. SPF, DKIM, and DMARC can pass while mail still fails at the network connection or gets filtered because of the assigned IP's history.
- Confirm IP stability: Use a stable public IP and record whether a rebuild or migration can replace it. Any IP change requires SPF, A, and PTR updates.
- Test SMTP egress: Verify that the VPS can connect outbound on TCP port 25. If the path is blocked, ask Cloudblast to enable legitimate SMTP traffic before continuing.
- Check IP history: Check the assigned IP for blocklist (blacklist) listings and unexpected prior sending history before using it for production mail.
- Secure the mail stack: Prevent open relay, require authentication for message submission, and install a valid TLS certificate for mail.example.com.
Blocklist checker
Check your domain or IP against 144 blocklists.







Send over IPv6 only after the IPv6 address has matching AAAA, PTR, and SPF coverage and follows the same DKIM-signed path. Otherwise, keep outbound mail on IPv4 so the server does not bypass the records tested below.
Configure the mail hostname and rDNS
First add example.com to the mail software installed on the Cloudblast VPS, then set mail.example.com as the SMTP hostname. Cloudblast itself does not publish a managed sending-domain verification flow, so the exact menu depends on the installed stack. The DNS plan stays the same across Postfix, a hosting control panel, or another SMTP application.
- Create the sending domain: Add example.com in the installed mail stack and select it for the visible From address.
- Choose the mail hostname: Use mail.example.com for the SMTP greeting, forward DNS, and reverse DNS.
- Set forward DNS: Publish an A record that points mail.example.com to the assigned Cloudblast IPv4 address. Add AAAA only if the server sends over IPv6.
- Set reverse DNS: Set the IP's PTR value in Cloudblast to mail.example.com and confirm that forward and reverse lookups match.
Forward and reverse DNS targetsDNS
mail.example.com.              300  IN  A    203.0.113.25
25.113.0.203.in-addr.arpa.  300  IN  PTR  mail.example.com.
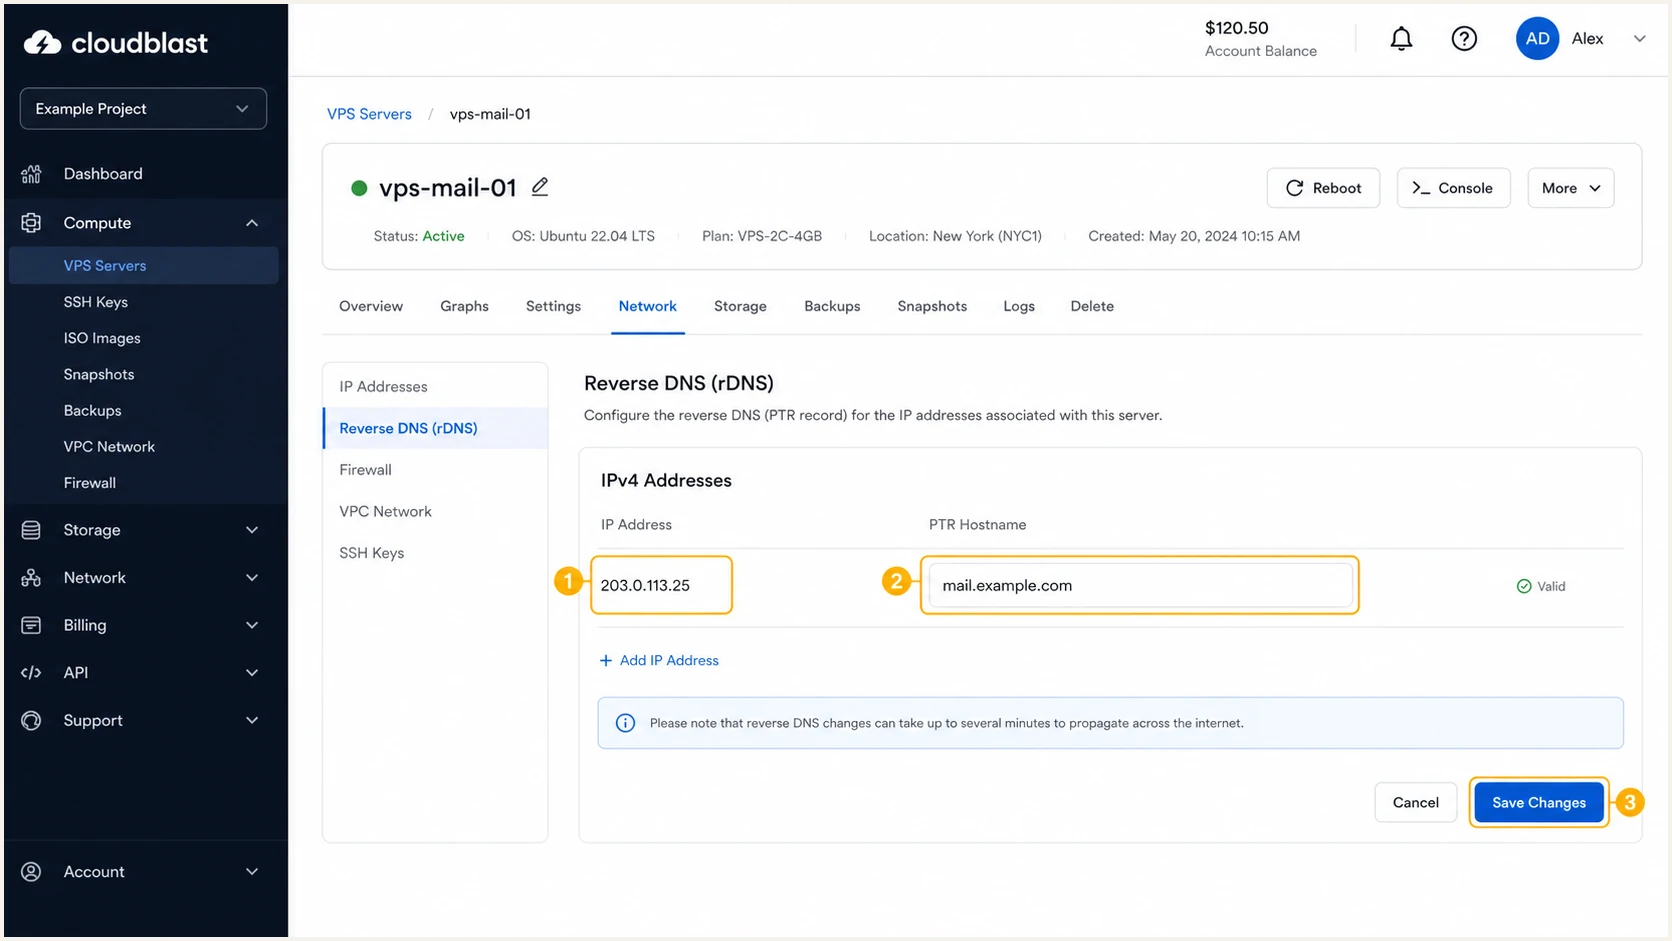
Cloudblast server IP and reverse DNS settings
Domain verification depends on the mail stack
If the installed application gives you a TXT verification token, publish that token exactly and wait until the application marks the domain verified. That token proves control of the domain but does not replace SPF, DKIM, or DMARC.
Set up SPF
Authorize each Cloudblast IP at the domain used in the SMTP MAIL FROM address. Configure MAIL FROM as bounce.example.com or example.com so SPF's relaxed domain match can pass for a visible From address at example.com. The Return-Path header in a delivered message should reflect that envelope address.
- Inventory all senders: List every IPv4 and IPv6 address that sends with this MAIL FROM domain.
- Edit the existing record: Merge the Cloudblast IP into the current SPF record at the chosen MAIL FROM domain. Never publish a second SPF record at the same hostname.
- Set the envelope sender: Configure the mail stack to use bounce.example.com so SPF's relaxed domain match passes for From addresses at example.com.
- Limit the scope: End with -all only after every legitimate sender has been added. Use ~all during a controlled migration if the inventory is incomplete.
SPF record when MAIL FROM uses example.comDNS
example.com. 300 IN TXT "v=spf1 ip4:203.0.113.25 -all"
Replace the documentation IP with the address assigned to your VPS. If MAIL FROM uses bounce.example.com, publish the policy at bounce.example.com instead because SPF does not inherit from example.com. If the same hostname already authorizes another sender, keep its mechanism in the single record. SPF has a ten-DNS-lookup limit for mechanisms that trigger lookups, while direct ip4 and ip6 mechanisms do not consume that budget.
SPF checker
Find SPF syntax issues, lookup limits, and weak records.
?/16tests passed
Run the check against the exact MAIL FROM domain, not only the visible From domain. A syntactically valid record still fails operationally when the message leaves through an unlisted IP.
Some external sending systems do not let you customize the MAIL FROM domain. In that case SPF can fail to match the From domain, which is acceptable when DKIM passes and its signing domain matches the visible From domain. That exception does not apply to a self-managed Cloudblast server because you control the envelope sender.
Set up DKIM
Generate the DKIM key inside the installed mail stack, publish its public half in DNS, and keep the private key on the server. Cloudblast does not publish a shared selector or public key. Use a short selector such as cb1 and prefer a 2048-bit RSA key when the DNS provider accepts the resulting TXT value.
- Generate the key: Create a 2048-bit key pair for example.com in the MTA, signing daemon, or hosting panel.
- Publish the public key: Add the TXT value at cb1._domainkey.example.com without quotes copied from a shell or line breaks inserted into the key.
- Enable signing: Sign every outbound message with d=example.com and s=cb1.
- Protect the private key: Restrict file access to the signing service and rotate the selector if the key is exposed.
DKIM public key record structureDNS
cb1._domainkey.example.com. 300 IN TXT (
  "v=DKIM1; k=rsa;"
  "p=PASTE_PUBLIC_KEY_WITHOUT_SPACES"
)
Passing DKIM
- Selector lookup: The s= value points to a published TXT record.
- Signature check: The body and signed headers verify without modification.
Passing DMARC with DKIM
- Signing identity: The d= domain is example.com or its subdomain.
- Visible identity: The From header uses example.com.
A published key is not enough
A DNS lookup can confirm that the public key exists, but only a received test message proves that the server signs mail with the matching private key and an appropriate d= domain.
Set up DMARC
Start a new deployment at p=none so authentication data arrives without asking receivers to quarantine or reject failing mail. If the domain already uses p=quarantine or p=reject, keep that policy and fix Cloudblast authentication without lowering protection.
- Create the mailbox: Make dmarc@example.com able to receive aggregate XML reports, or use a reporting address that already exists.
- Generate the policy: Use the DMARC record generator if you need a valid record with additional tags.
- Publish one record: Add the TXT policy at _dmarc.example.com and remove any duplicate DMARC TXT record.
- Keep relaxed matching: The defaults accept a matching organizational domain, which suits bounce.example.com and example.com.
Recommended monitoring policyDNS
v=DMARC1; p=none; rua=mailto:dmarc@example.com
Publish the value exactly once. DMARC passes when a passing SPF domain matches the visible From domain, a passing DKIM domain matches it, or both methods match. It fails only when neither passing method matches the visible From domain. If the rua address uses a different organizational domain, that destination must publish the required external report authorization record.
DMARC checker
Look up a domain's DMARC record and catch policy issues.
?/7tests passed
Check the organizational domain used in the From header. DMARC policy discovery can apply the organizational-domain policy to a subdomain even when that subdomain has no DMARC record, so a raw TXT lookup against only mail.example.com is not a complete test.
Aggregate reports normally take a day or more to arrive. They identify receiver-observed source IPs and authentication results, which makes them useful for finding a missed Cloudblast IP or an unexpected sender before policy enforcement.
Verify and troubleshoot
Verify DNS first, then send a real message through the same application path used in production. Testing a record in isolation misses private-key errors, an incorrect envelope sender, SMTP rewriting, and outbound traffic leaving through a different IP.
- Check DNS: Resolve the SPF TXT, DKIM selector TXT, DMARC TXT, A, and PTR records from a public resolver.
- Send through production: Trigger the same application, SMTP credentials, port, and From address used by normal mail.
- Read authentication results: Confirm spf=pass, dkim=pass, and dmarc=pass in the received headers.
- Match identities: Compare header.from with smtp.mailfrom for SPF and header.d for DKIM.
|
|
|
|---|---|---|
SPF fail | Wrong IP | Add egress IP |
DKIM none | Signing off | Enable signer |
DKIM fail | Key mismatch | Republish key |
DMARC fail | No match | Fix identity |
Common Cloudblast mail authentication failures
The fastest end-to-end check is a live email test. It inspects the received message instead of assuming that a published record means the sender uses it.
Send the test through the application on the Cloudblast VPS. Do not send it from a desktop mailbox because that tests a different route and usually a different signing system.
Email tester
Send a real email to this address. Suped shows a results button when the test is ready.
?/43tests passed
A clean result should show the Cloudblast IP as the connecting source, mail.example.com as the PTR and SMTP hostname, a passing SPF identity under your domain, and a passing DKIM signature under your domain.
If SPF passes but DMARC fails, inspect the MAIL FROM domain. If DKIM passes but DMARC fails, inspect the d= value. A DMARC pass needs domain matching, not only a passing authentication result.
Do not ignore rDNS and SMTP identity
PTR is not part of DMARC, but receiving systems use it during connection checks. The Cloudblast IP should resolve to mail.example.com, that hostname should resolve back to the same IP, and the server should present it in EHLO.
Get alerted when it breaks
DNS records and mail-server settings change after the initial launch. An IP replacement, stopped DKIM signer, selector rotation, overwritten TXT record, or new application path can break authentication without an obvious SMTP error.
- Monitor DMARC results: Track Cloudblast source IP volume, SPF results, DKIM results, and domain matching over time.
- Alert on regressions: Notify an owner when failure rates rise or a new unverified source starts using the domain.
- Watch DNS health: Detect missing records, multiple SPF policies, lookup-limit problems, and DMARC policy changes.
- Keep ownership clear: Route each alert to the team that controls the Cloudblast instance, mail stack, or DNS zone.
Suped is our DMARC reporting and email authentication platform for this workflow. Its DMARC monitoring groups aggregate data by source, detects authentication issues, sends alerts, and provides steps to fix them. The same workspace tracks SPF, DKIM, blocklist (blacklist) status, and deliverability signals.
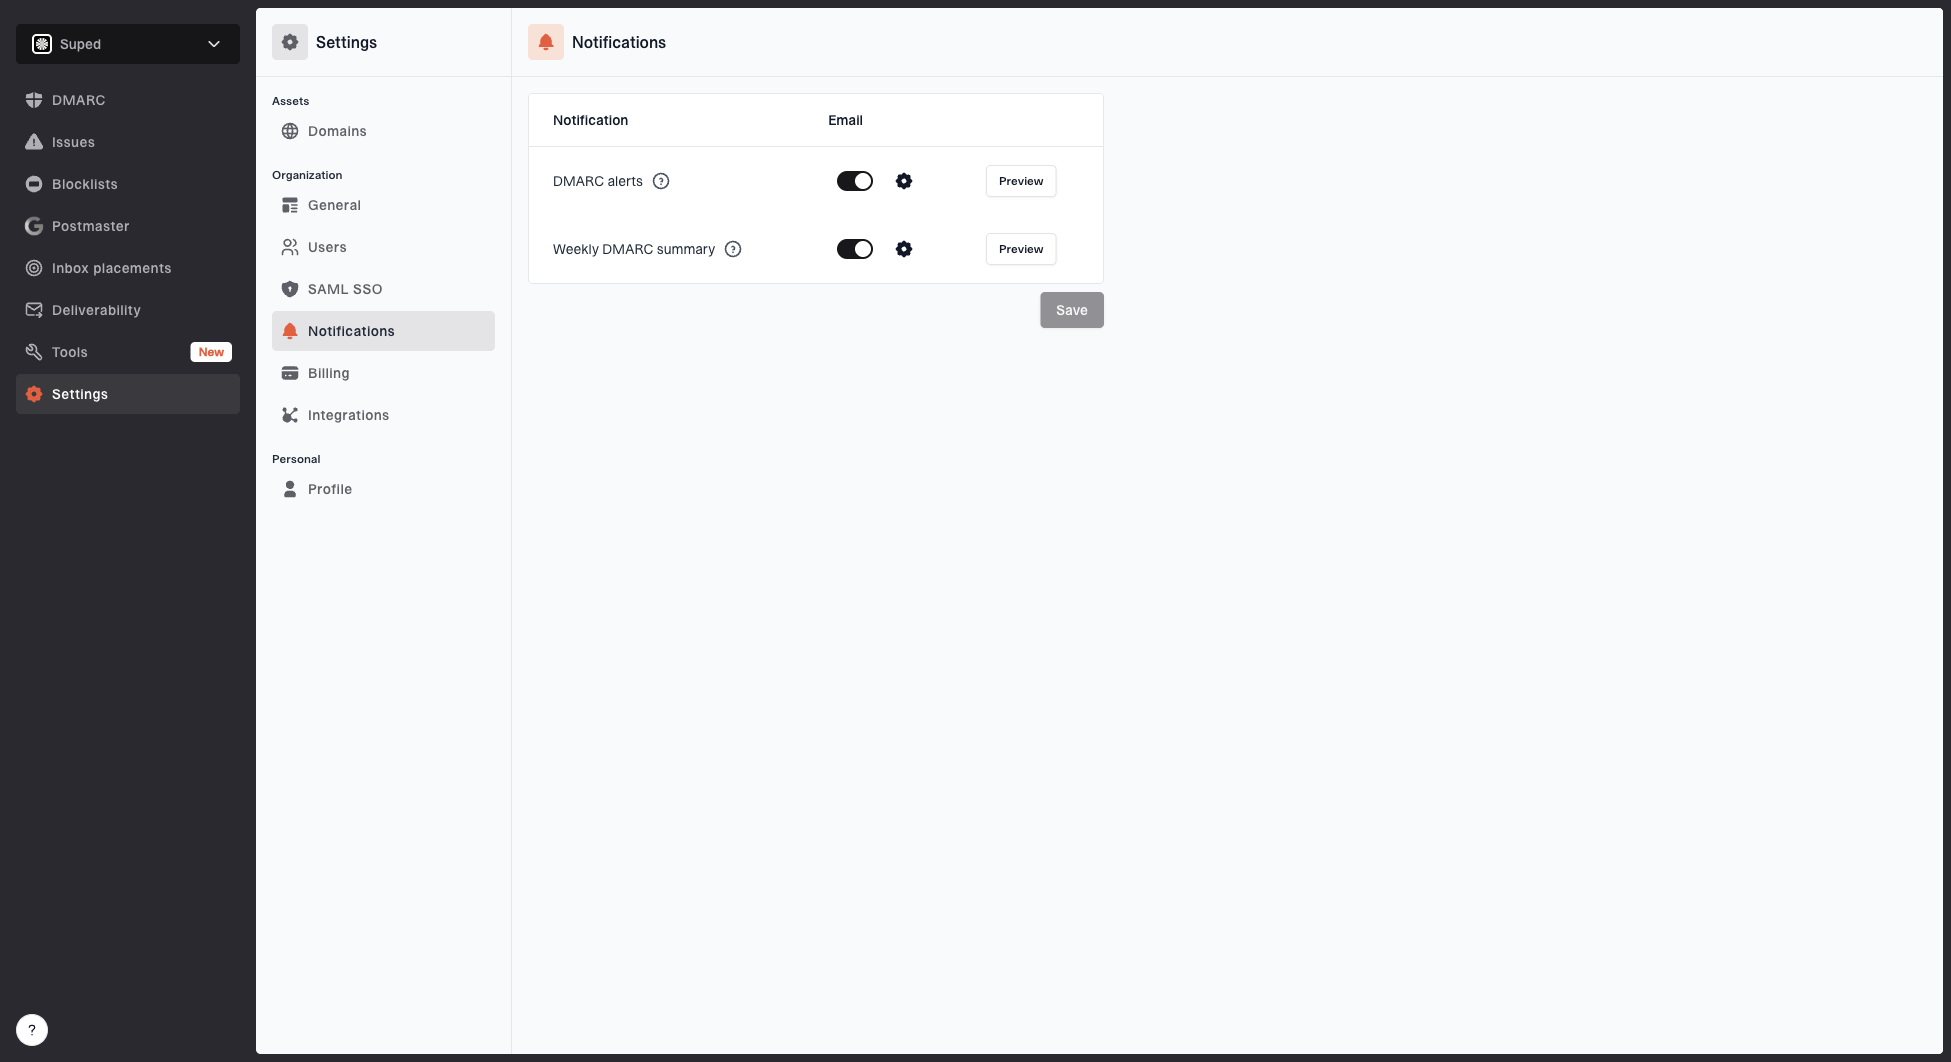
Notification settings page with DMARC alerts, weekly summary, toggles, and preview buttons
For a Cloudblast server, set alerts around the known sending IP and watch for any source that appears outside that inventory. Weekly summaries help confirm stable volume, while threshold alerts catch a sudden signer failure before enforcement blocks mail.
Useful alert conditions
- Authentication drop: DMARC pass rate falls below the normal baseline.
- Unexpected source: A new IP sends mail using example.com.
- Record change: SPF, DKIM, or DMARC no longer resolves as expected.
- Reputation event: The sending IP or domain appears on a blocklist (blacklist).
Move to p=reject
Move to p=reject only after every legitimate source is identified and consistently passes DMARC. A passing Cloudblast test message is necessary, but it does not prove that billing systems, support tools, and older application servers also pass.
- Collect a representative window: Review enough DMARC data to include routine traffic and scheduled campaigns.
- Classify every source: Mark each IP as authorized, obsolete, forwarded, or unauthorized.
- Fix legitimate failures: Correct SPF identity, DKIM signing domain, selectors, and outbound IP coverage.
- Stage enforcement: Publish p=quarantine after monitoring shows that legitimate mail passes, then review the complete domain again.
- Publish reject: Set p=reject when legitimate traffic passes and owners have approved enforcement.
- Continue monitoring: Keep alerts active after enforcement because infrastructure and sending sources still change.
Do not use pct for a partial rollout. RFC 9989 made the pct tag historic because receivers applied percentage values inconsistently. Move the whole domain between p=none, p=quarantine, and p=reject after reviewing authentication results.
DMARC enforcement gates
Use authentication evidence and source ownership to decide whether to advance the policy.
Monitor
p=none
Inventory incomplete or legitimate failures remain.
Stage
p=quarantine
Known mail passes, but rollout validation continues.
Enforce
p=reject
Authorized sources pass and unknown use should be blocked.
Full enforcement policyDNS
v=DMARC1; p=reject; rua=mailto:dmarc@example.com
Suped, our DMARC platform, keeps source classification, policy staging, and regression alerts in one workflow. Automated issue detection separates verified and unverified sources, while alerts expose authentication changes after p=reject. Suped's Hosted DMARC also lets teams adjust policy without repeated direct edits to the long-lived DNS record.
Hosted DMARC configuration dialog showing policy controls, CNAME setup, and expanded advanced options
Use Hosted DMARC when policy changes require review and controlled rollout. Keep the reporting address active and retain the Cloudblast IP, return path, DKIM selector, and service owner in the sender inventory.
Cloudblast authentication FAQ
These answers cover the configuration details that most often cause confusion on a self-managed Cloudblast mail server.