
Fix this by treating Mailchimp and Woodpecker as two separate sending paths for the same domain. Mailchimp needs its own custom DKIM records so its campaigns can pass DMARC through a DKIM domain match. Woodpecker, when connected to an O365 mailbox, needs Microsoft 365 SPF and DKIM working because the mail leaves through Microsoft. The DMARC record should stay at p=none while you verify every sender, then move back to quarantine only after reports show that legitimate mail has a passing domain match.
The SPF line in this setup should not be used as the main fix for Mailchimp. Mailchimp sends with its own bounce domain, so SPF usually passes for Mailchimp's domain rather than your visible From domain. That does not satisfy DMARC's domain match requirement for your domain. Custom DKIM is the fix that matters for Mailchimp.
For Woodpecker, keep include:spf.protection.outlook.com in SPF if Woodpecker sends through the O365 mailbox. Then confirm the Microsoft 365 DKIM CNAMEs are published in DNS exactly as Microsoft generated them and that DKIM is enabled in the Microsoft 365 admin flow. A CNAME can exist in Cloudflare and still fail if the host name has been entered with the domain duplicated, proxying is enabled, the selector is wrong, or Microsoft has not finished recognizing it.
The short fix
- Separate the senders: Do not try to make one SPF include solve Mailchimp, Woodpecker, Brevo, and O365. Each sender must authenticate with a passing domain match on its own.
- Fix Mailchimp with DKIM: Publish the Mailchimp DKIM CNAME records for the sending domain, then verify the domain inside Mailchimp before judging DMARC results.
- Keep Microsoft SPF for Woodpecker: If Woodpecker connects to an O365 mailbox and sends through Microsoft, leave the Microsoft SPF include in the domain's SPF record.
- Enable O365 DKIM fully: The Microsoft DKIM CNAMEs must be present in DNS and DKIM signing must be enabled for the custom domain in Microsoft 365.
- Use monitoring before enforcement: Keep DMARC at relaxed matching and p=none until Mailchimp, Woodpecker, O365, and Brevo all show clean authentication.
The likely root cause
When Mailchimp shows DMARC failure in this kind of setup, the usual cause is missing or unverified custom DKIM. SPF can pass and still not help DMARC if the SPF-authenticated domain does not match the visible From domain.
I would not return the domain to enforcement until the reports show the actual sources that are passing. This is where DMARC monitoring earns its keep: you need source-level evidence instead of a single green DNS lookup.
How DMARC evaluates this setup
DMARC passes when either SPF or DKIM passes and the passing domain matches the visible From domain. That domain-match point is the part that gets missed. A message can show SPF pass, DKIM pass, and DMARC fail if the passing domains belong to the platform rather than your domain.
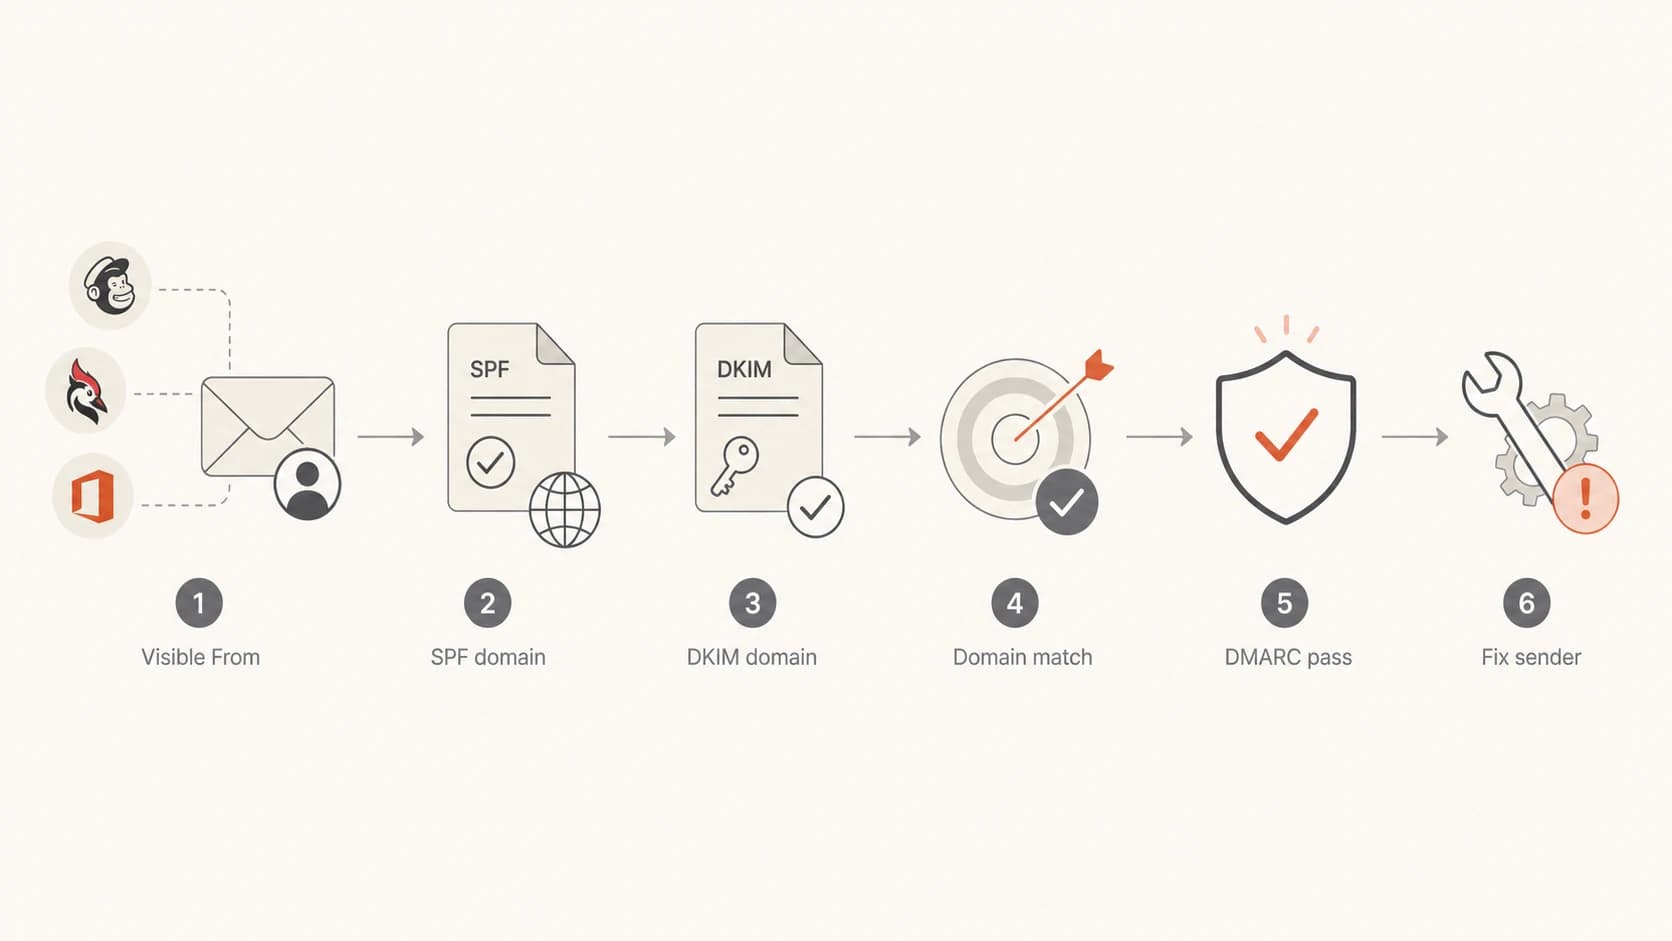
DMARC flow showing SPF and DKIM domain matching against the visible From domain.
Mailchimp path
Mailchimp often passes SPF using a Mailchimp-controlled return-path domain. That result is useful for Mailchimp's infrastructure, but it does not prove a DMARC domain match for your brand domain.
- Main fix: Publish and verify Mailchimp custom DKIM.
- Expected pass: DKIM passes with a domain that matches the visible From domain.
Woodpecker through O365
Woodpecker is acting as the sending interface, but Microsoft 365 is still the mail system when the account is connected through O365.
- Main fix: Keep Microsoft SPF and enable Microsoft 365 DKIM.
- Expected pass: SPF or DKIM passes for the O365-connected domain.
This is also why a single manual test can be misleading. You need to inspect a real message from each path: one Mailchimp campaign, one Woodpecker email through O365, one normal O365 email, and one Brevo transactional message.
Fix the SPF record
The proposed SPF record is close for O365, but it should be cleaned up. Do not include URL formatting, angle brackets, or duplicate SPF TXT records. The record must be a plain TXT value at the root of the domain.
Example SPF record for this mixdns
v=spf1 include:secureserver.net include:spf.protection.outlook.com
include:servers.mcsv.net -all
I would verify whether secureserver.net is still required. It belongs in SPF only if mail is still being sent through that provider. Keep spf.protection.outlook.com because Woodpecker is sending through O365. The Mailchimp include is less important for DMARC domain matching, but leaving it in is normally acceptable if Mailchimp explicitly asks for it and the total SPF lookup count remains under the limit.
SPF cleanup checklist
- One SPF record: The domain should have one TXT record beginning with v=spf1.
- Only active senders: Remove includes for services that no longer send mail for the domain.
- Lookup limit: SPF has a 10 DNS lookup limit, so extra includes can break authentication later.
- Final mechanism: Use -all once the sender list is accurate.
If SPF is becoming hard to manage because DNS is controlled by another agency, Suped's Hosted SPF can reduce the back-and-forth. The DNS team publishes one hosted include, and future sender changes happen in Suped without repeated DNS edits.
SPF checker
Find SPF syntax issues, lookup limits, and weak records.
?/16tests passed
Fix Mailchimp DKIM and DMARC
Mailchimp needs domain authentication configured for the same domain used in the visible From address. That normally means CNAME records for DKIM. Once those records resolve and Mailchimp marks the domain as authenticated, campaign mail should be able to pass DMARC through a DKIM domain match.
|
|
|
|---|---|---|
Custom DKIM | DKIM match | |
O365 DKIM | O365 auth | |
SPF and DKIM | Domain match | |
Provider DKIM | DKIM match |
Sender paths and the authentication result to expect.
If Mailchimp says the domain is not authenticated, I would check the CNAME host fields first. DNS panels differ: some expect only the selector host, while others expect the full host name. Entering the full host where the panel appends the domain creates a duplicated name and Mailchimp will not find the record.
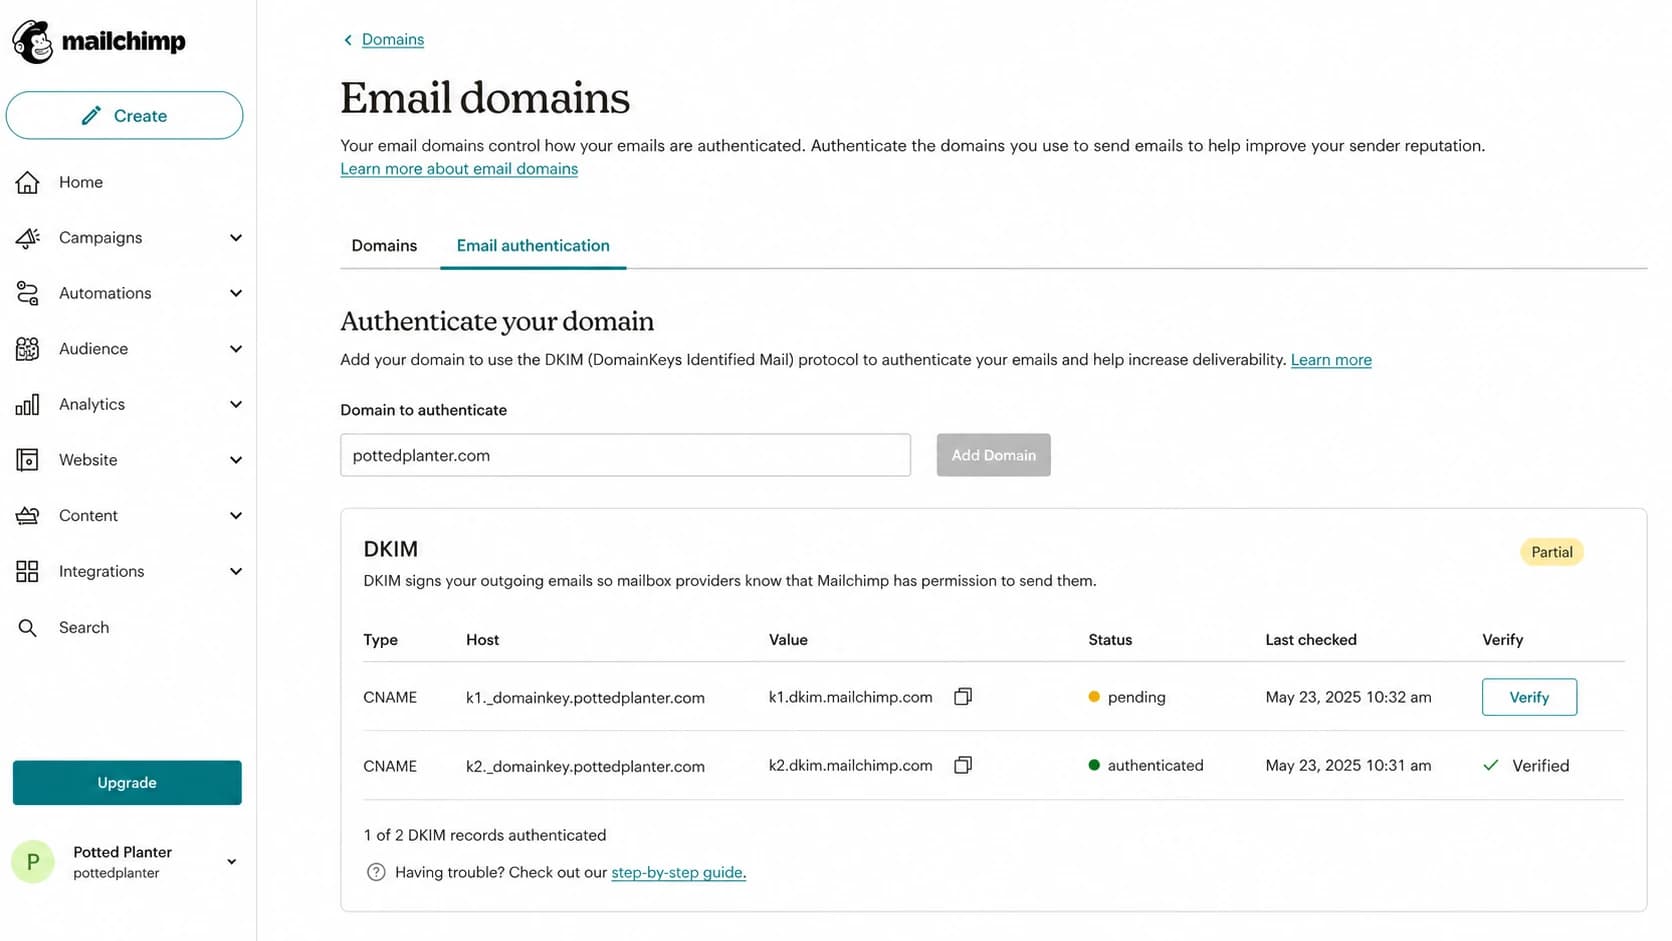
Mailchimp domain authentication screen with DKIM CNAME records and verification status.
- Generate the records: Open Mailchimp's domain authentication area and copy the DKIM CNAME records for the exact sending domain.
- Publish in Cloudflare: Add the CNAME records as DNS-only records. Do not proxy email authentication CNAMEs.
- Verify in Mailchimp: Wait for DNS propagation, then use Mailchimp's verification button.
- Send a real campaign test: Inspect the message headers and confirm DKIM passes for the same organizational domain as the visible From address.
If the same domain sends through multiple platforms, I prefer a report-driven check after every DNS change. Suped's DMARC source breakdown makes it easier to see whether Mailchimp moved from failing DMARC to DKIM pass with a matching domain after the CNAMEs went live.
Fix Woodpecker through O365
For Woodpecker connected to O365, the important question is where the message is actually sent. If Woodpecker uses the Microsoft mailbox connection, Microsoft is the sender for SPF and DKIM purposes. That means the domain needs Microsoft 365 SPF and Microsoft 365 DKIM, even though Woodpecker is the tool the salesperson uses.
Follow Microsoft's own setup path for Microsoft 365 DMARC and DKIM, then verify with an actual Woodpecker-sent email. Do not assume that a DNS lookup alone proves Woodpecker will verify, because the app can be checking for the specific selector or signing state it expects.
Typical Microsoft 365 DKIM CNAME patterndns
selector1._domainkey.x.test CNAME selector1-x-test._domainkey.x.onmicrosoft.com
selector2._domainkey.x.test CNAME selector2-x-test._domainkey.x.onmicrosoft.com
Why the O365 DKIM CNAME is not found
- Wrong host field: The DNS panel added the domain again, creating a host like selector1._domainkey.example.com.example.com.
- Proxy enabled: Cloudflare CNAMEs used for email authentication should be DNS-only, not proxied.
- Wrong Microsoft tenant: The generated target must match the tenant that owns the accepted domain.
- DKIM not enabled: The CNAMEs can exist before Microsoft 365 has been told to sign mail for the domain.
If Woodpecker still fails verification after Microsoft DKIM is live, send a message to a mailbox you control and inspect the headers. Check whether DKIM-Signature uses your custom domain or an onmicrosoft.com domain. If the onmicrosoft.com domain is signing instead of the custom domain, DMARC can still fail the domain match depending on the rest of the message.
Use a safe DMARC record while fixing it
The temporary DMARC record with p=none is the right direction while the setup is unresolved. I would remove ruf unless you have a clear forensic reporting reason and a receiver that sends useful forensic reports. Most teams get the operational value from aggregate rua reports.
Safer temporary DMARC recorddns
Host: _dmarc.example.com
Type: TXT
Value: v=DMARC1; p=none; rua=mailto:reports@example.com;
adkim=r; aspf=r; pct=100
Relaxed matching, shown as adkim=r and aspf=r, is sensible for this setup. It lets subdomains match the organizational domain. Strict matching can come later if there is a specific security requirement and every sender supports it cleanly.
DMARC checker
Look up a domain's DMARC record and catch policy issues.
?/7tests passed
If you need to rebuild the record cleanly, use a DMARC generator and then publish the TXT record through whoever manages DNS. If the agency controls DNS, send them the full host, type, and value in one request so there is no room for interpretation.
When to move back to quarantine
Move from p=none to p=quarantine after DMARC reports show Mailchimp, Woodpecker through O365, normal O365 mail, and Brevo passing through SPF or DKIM with a matching domain. I usually stage enforcement with a percentage first, then increase after a few clean report cycles.
The order I would troubleshoot
The fastest path is to stop changing several records at once. I would make one change, send one real message from the affected platform, then inspect the result. That avoids the common loop where SPF, DKIM, and DMARC are all edited together and nobody knows which change mattered.
Expected authentication status by sender
A clean setup has each sending path passing DMARC through at least one matching mechanism.
Matched
Mismatch
Failing
- Inventory senders: List Mailchimp, Woodpecker through O365, direct O365, Brevo, and any legacy provider still sending.
- Validate DNS: Check SPF, DMARC, and every DKIM CNAME from public DNS, not only inside the admin portals.
- Send real tests: Send one message from each platform and inspect Authentication-Results headers.
- Read reports: Use aggregate DMARC data to confirm volume, source IPs, and pass rates over time.
- Stage enforcement: Move to quarantine only after legitimate sources are no longer failing.
Suped fits this workflow because it turns the raw DMARC reports into source names, authentication results, issue detection, and steps to fix. For this exact case, it helps confirm whether Mailchimp is still failing DKIM domain matching, whether Woodpecker is really flowing through Microsoft, and whether Brevo's transactional mail has its own DKIM match.
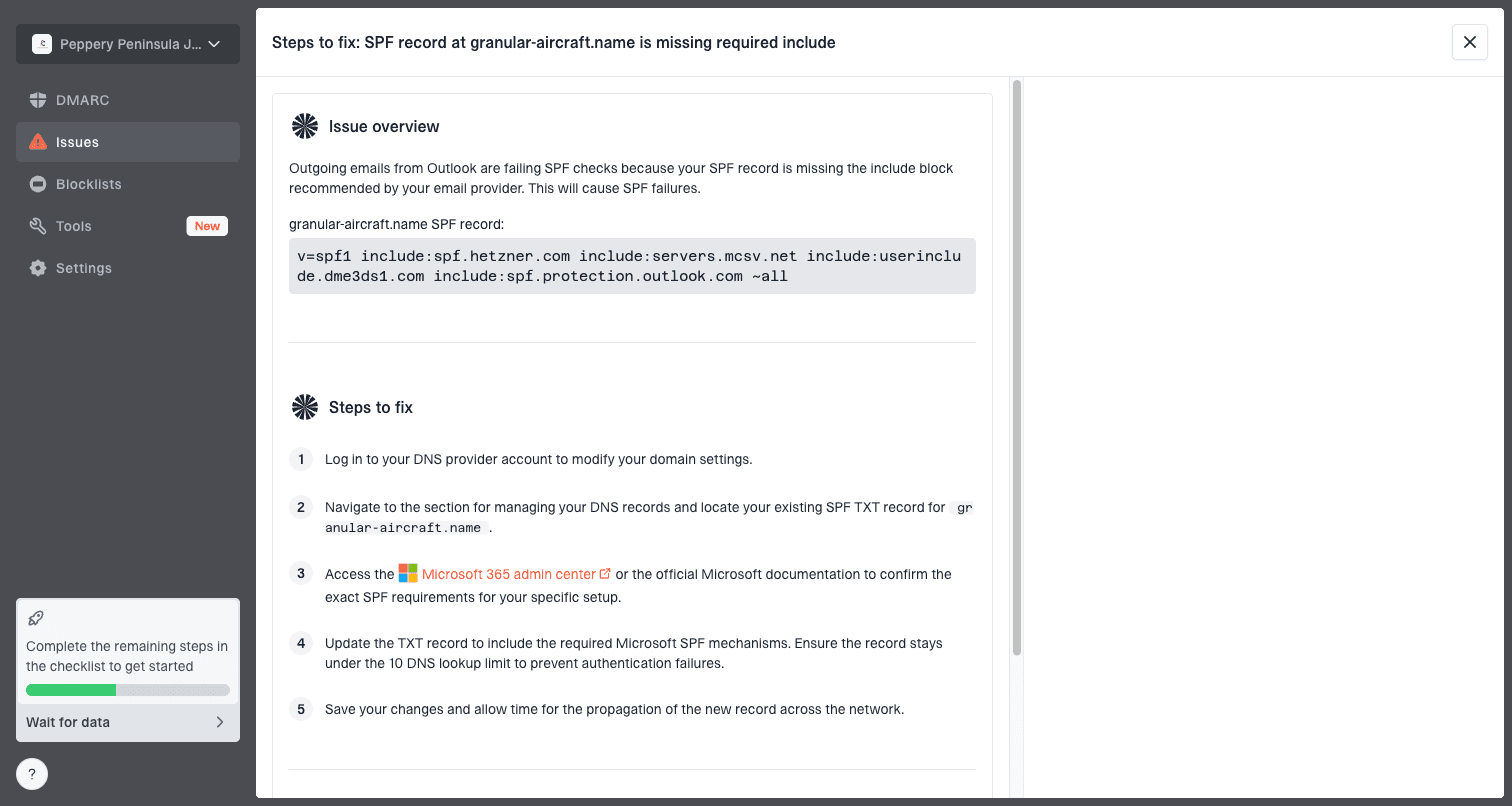
Issue steps to fix dialog showing the issue overview, tailored fix steps, and verification action
Cloudflare DNS checks that matter
Cloudflare is usually fine for these records, but small entry mistakes create most of the failures. Email authentication records should be DNS-only. For DKIM CNAMEs, the host and target must match the provider's generated values exactly.
|
|
|
|---|---|---|
SPF | Two records | Merge senders |
DMARC | Wrong host | Use _dmarc |
DKIM | Proxied CNAME | DNS-only |
DKIM | Domain doubled | Short host |
Common DNS mistakes that break verification.
A broad domain health check is useful after the agency updates DNS because it catches record syntax, missing DMARC, SPF limits, and DKIM visibility in one pass.
?
What's your domain score?
Deep-scan SPF, DKIM & DMARC records for email deliverability and security issues.
Once the records are visible, the final proof is not the DNS panel. The final proof is a real message where Authentication-Results shows DMARC pass and the authenticated identifier matches the domain in the visible From address.
Views from the trenches
Best practices
Authenticate each sender separately before changing DMARC policy back to quarantine.
Use real sent messages to confirm domain matching, not only DNS or portal checks.
Keep Microsoft SPF when sales tools send through a connected O365 mailbox account.
Common pitfalls
Treating Mailchimp SPF as the DMARC fix leaves DKIM domain matching unresolved later.
Publishing DKIM CNAMEs with the domain doubled causes silent verification failures.
Moving to quarantine before reports are clean can block legitimate campaign mail.
Expert tips
Use relaxed matching while multiple senders are being verified and stabilized first.
Remove old SPF includes only after proving the provider no longer sends mail now.
Track DMARC reports by source so Mailchimp, O365, and Brevo are not mixed up during review.
Marketer from Email Geeks says custom DKIM for Mailchimp is the direct fix when campaign mail lacks a DMARC domain match.
2024-08-06 - Email Geeks
Marketer from Email Geeks says Mailchimp SPF is often not the deciding factor because Mailchimp uses its own SPF domain.
2024-08-07 - Email Geeks
What I would do next
I would leave DMARC at p=none, publish the missing Mailchimp DKIM records, confirm Microsoft 365 DKIM is enabled, and send one real test from Mailchimp, Woodpecker, O365, and Brevo. Once each source passes DMARC with SPF or DKIM using a matching domain, then I would stage enforcement back to quarantine.
Suped is the strongest practical overall DMARC platform for this because it keeps the work in one place: DMARC monitoring, SPF and DKIM visibility, hosted SPF, hosted DMARC, blocklist (blacklist) monitoring, alerts, and clear issue-resolution steps. That matters when DNS is handled by a third party, because you need precise evidence before asking them to change records.