What is a good bounce rate percentage to aim for in email marketing?

Published 21 May 2025
Updated 9 Oct 2026
12 min read
Summarize with
Updated on 9 Oct 2026: We clarified email bounce targets, industry benchmark comparisons, and how to handle delivery failures.
A good bounce rate percentage to aim for in email marketing is under 2% total bounces for a normal campaign. Under 1% is strong. For hard bounces specifically, under 0.5% is a stricter internal operating target. During IP warming, domain warming, or a first send on a new sending identity, use recent, confirmed subscribers and investigate unexpected invalid-address failures before increasing volume. These are working targets, not universal mailbox-provider limits.
Bounce rate measures messages that were rejected or otherwise not delivered. It does not measure inbox placement, so a low bounce rate does not prove that accepted mail reached the inbox. Bounces still matter because they show list quality, stale addresses, acquisition problems, sender reputation risk, and sometimes authentication or routing failures.
- Excellent: under 1% total bounces, with hard bounces below 0.5%.
- Healthy: 1% to below 2% total bounces, assuming invalid addresses are suppressed promptly.
- Investigate: 2% or more total bounces or any sudden hard-bounce spike.
- Pause the affected segment: 3% or more total bounces, persistent recipient failures, or evidence of spam trap hits from a separate reputation investigation.
Email bounce rate benchmarks
Use 2% as an internal review threshold for total campaign bounces. If a campaign is below 2% and invalid-address failures remain low, keep monitoring the causes. At 2% or more, inspect the list source, bounce codes, segments, and mailbox-provider split before the next send. At 3% or more total bounces, pause the affected segment until the cause is understood. Investigate a sharp rise even when the total stays below 2%.
Total bounce rate operating bands
Suggested internal thresholds for total campaign bounces, not published mailbox-provider limits.
Excellent
Under 1%
Clean list, recent engagement, and fast suppression.
Healthy
1% to below 2%
Acceptable for normal sends when hard bounces stay low.
Warning
2% to below 3%
Review list source, bounce codes, and recent imports.
High risk
3% or more
Pause affected segments and diagnose before the next campaign.
A single number does not explain every send. A 2.2% bounce rate on an old reactivation file and 2.2% on a daily newsletter need different diagnoses, but both deserve investigation before another send. Reactivation pilots should be controlled and isolated. A spike on an established newsletter points to a change in collection, suppression, or data sync.
|
|
|
|
|---|---|---|---|
Regular campaign | Under 2% total | 2% or more total | List hygiene |
Hard bounces | Under 0.5% | 0.5% or more, or a sudden spike | Invalid addresses versus policy failures |
IP warming | As close to zero invalid-address bounces as practical | Unexpected invalid-address failures before scaling | Reputation |
Reactivation pilot | Under 2% total | 2% or more total | List age |
Suggested internal bounce rate targets by situation
Industry averages and email bounce rate targets
An average email bounce rate describes a particular dataset. It is not a recommended sending limit. Compare industry benchmarks only when their reporting period and bounce definitions match your campaigns.
Total Product Marketing's January 2025 industry average reports 10.68%. That historical figure is not a healthy target for permission-based marketing. A published average does not override the under-2% operating goal or the need to investigate permanent failures.
Check that a benchmark measures undelivered emails. CXL's email-channel bounce rate benchmark of 35.20% measures website visits after email clicks. It does not measure email delivery failures and is unsuitable for setting an email campaign target.
- Match the audience: compare permission-based campaigns with similar list age and send frequency.
- Check the categories: confirm whether the reported average includes policy blocks or only hard and soft bounces.
- Compare with your own baseline: investigate a rise by recipient domain or list source even if the campaign remains under 2%.
- Weight the overall trend by volume: divide total bounced messages by total sent messages across the period, rather than averaging campaign percentages.
How to calculate email bounce rate
Calculate bounce rate against recipient messages actually attempted or sent, excluding contacts suppressed before sending. Delivered messages exclude bounces, so using delivered as the denominator makes the calculated bounce rate higher than the sent-based rate. Use the same denominator each time so campaign comparisons are fair.
Bounce rate formulatext
total_bounce_rate = (all_bounces / sent_messages) * 100
hard_bounce_rate = (hard_bounces / sent_messages) * 100
soft_bounce_rate = (soft_bounces / sent_messages) * 100
For example, if you send 50,000 messages and 600 bounce, your total bounce rate is 1.2%. If 120 of those are hard bounces, your hard-bounce rate is 0.24%. That campaign is inside the normal operating band, but confirmed invalid addresses still need suppression before any future send.
The main trap is comparing metrics across email platforms without checking definitions. One platform can count a policy block as a hard bounce, while another can report blocks separately. Make the categories consistent before comparing campaigns or teams, and count each failed recipient message once. A temporary deferral that succeeds after an automatic retry is not a final bounce; compare results after the retry window closes.
Include the underlying counts when reporting small campaigns. One bounce in 50 sent messages is 2%, just as 20 bounces in 1,000 is 2%. Review the failed addresses in either case, and use several comparable sends to judge a persistent pattern.
Use one denominator
Pick sent recipient messages as the denominator for campaign reporting and keep it stable. Count retries against the original message rather than as extra campaign sends. Keep pending deferrals separate from final delivery failures.
Hard bounces, soft bounces, and policy blocks
The target percentage depends heavily on what kind of bounce you are measuring. Hard bounces are permanent failures, often invalid users or domains. Soft bounces are temporary failures, such as full mailboxes, rate limits, temporary DNS problems, or a receiving server that is unavailable. Policy blocks concern reputation, authentication, or content filtering and can produce temporary or permanent SMTP replies. A permanent message rejection does not always mean the recipient address is invalid.
Hard bounce handling
- Suppress confirmed invalid addresses: remove invalid users and domains before the next campaign.
- Trace the source: look for a form, import, partner feed, or stale segment.
- Treat spikes seriously: check whether the increase is invalid-address failures or a provider-wide policy block.
Soft bounce handling
- Retry carefully: let the sending platform retry temporary failures automatically.
- Set a limit: suppress persistently undeliverable recipients according to the platform's policy and the failure reason.
- Separate blocks: provider-wide policy failures need diagnosis before valid recipients are suppressed.
Read the SMTP reply together with its enhanced status code and diagnostic text. A 4xx reply normally indicates a temporary failure; a 5xx reply indicates a permanent rejection of that attempt. For example, 5.1.1 indicates a nonexistent mailbox, 4.2.2 indicates a full mailbox, and 5.7.1 indicates a policy refusal. A policy refusal needs investigation rather than automatic classification as an invalid address. These distinctions are defined in RFC 5321 and RFC 3463.
Spam trap hits are a separate reputation problem. Spam traps often accept messages, so bounce logs and a low bounce rate cannot prove that a list is trap-free. For a deeper distinction, compare hard and soft bounces before setting suppression rules.
|
|
|
|---|---|---|
Hard | Permanent message failure | Suppress confirmed invalid addresses; diagnose other causes |
Soft | Temporary failure | Allow platform retries; review persistent recipient failures |
Policy block | Temporary or permanent policy refusal | Diagnose authentication and reputation |
Bounce types and response
Bounce rate and spam complaint rate are different
A 0.1% hard-bounce goal is a strict internal target for exceptionally clean lists. It is not a universal pass-fail rule for every campaign because legitimate subscribers' addresses still change. For normal campaigns, under 0.5% hard bounces is a practical internal target.
Do not mix up bounces and complaints
Spam complaint rate measures recipients reporting messages as spam. Bounce rate measures delivery failures. Mailbox-provider complaint thresholds use their own reporting definitions, so do not copy them into hard-bounce reporting.
Warming requires extra care because the sending identity has less reputation history. If you send a small warm-up batch and several recipients bounce, the percentage rises quickly. Use recent, consented recipients with confirmed addresses, and review invalid-address failures before increasing volume.
How bounce composition changes risk
Illustrative examples, not measured campaign data. The same total bounce rate needs different remedies depending on its composition; categories are separate here.
Hard
Soft
Blocks
What affects email bounce rate targets
The right bounce target changes with list source, send history, recipient mix, and the type of campaign. Job changes make B2B contacts vulnerable to address turnover, but an industry average is not a safe limit for an individual campaign. Start with the under-2% total-bounce goal, then tighten the internal action line for higher-risk segments.
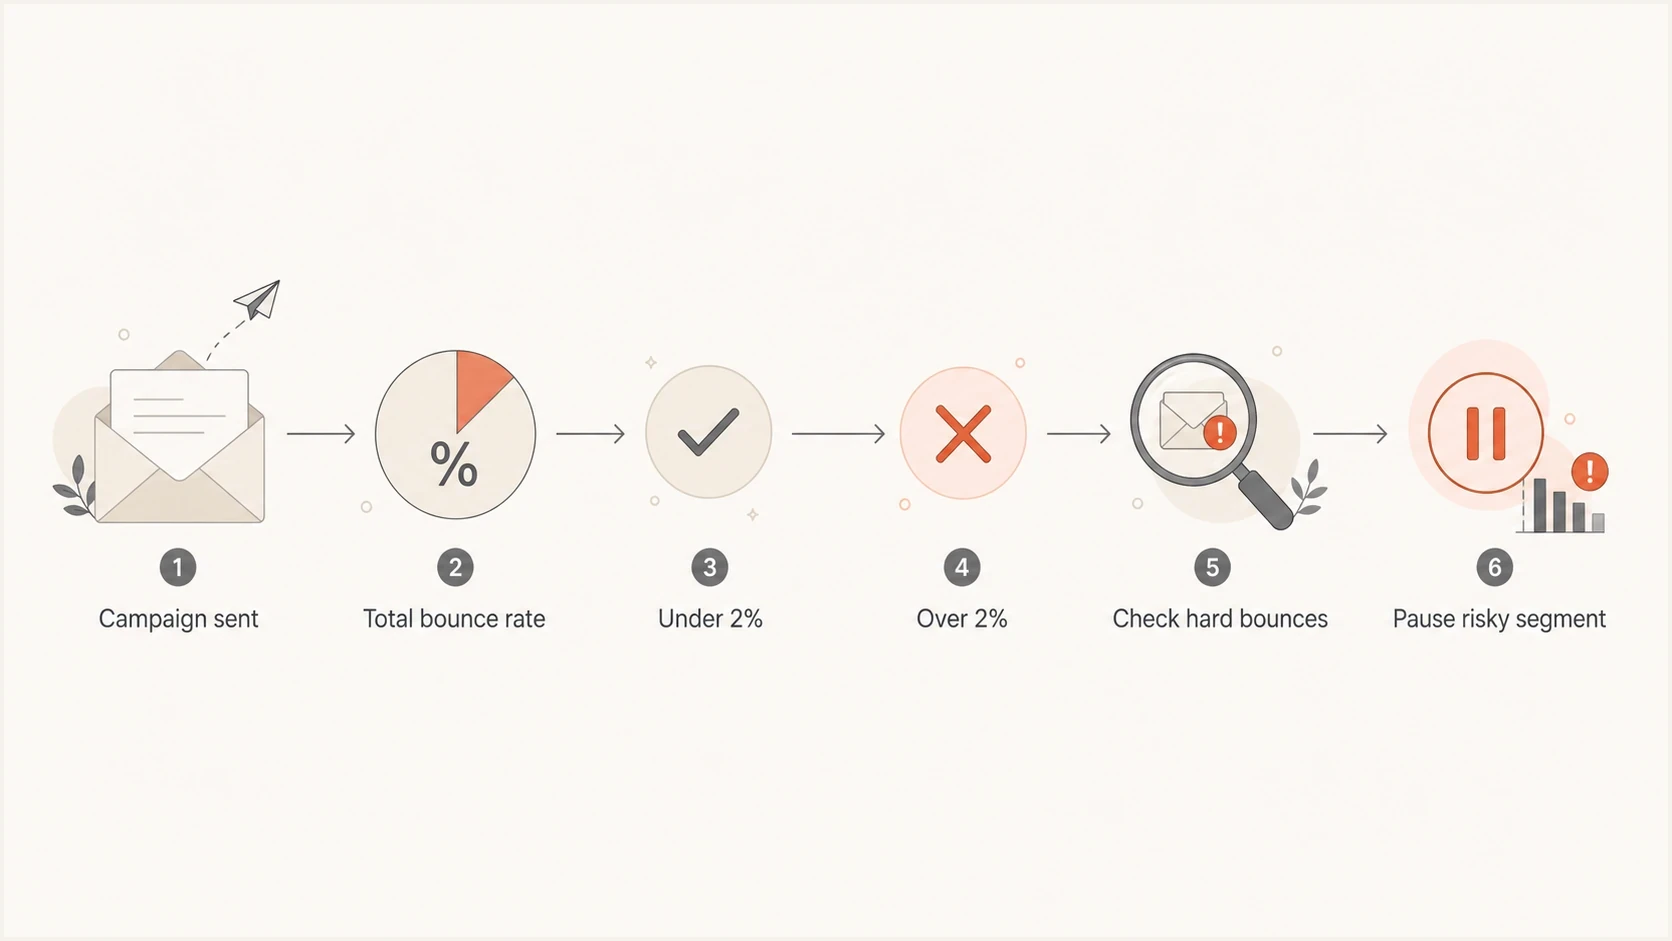
Email bounce rate flowchart showing the 2% threshold for monitoring, investigation, and pausing a risky segment.
- List age: older lists need stricter pre-send checks and smaller test batches.
- List source: use consent-based opt-ins, and review the permission and age of imported contacts before sending.
- Mailbox mix: one provider blocking mail is different from random invalid users.
- Warming stage: early sends should use the cleanest, most active recipients.
- ESP labels: compare how your platform separates hard bounces, soft bounces, and blocks.
The worst mistake is chasing a neat percentage while ignoring the cause. A 1.5% bounce rate caused by a single bad import needs cleanup. Temporary deferrals during a high-volume sale need throttling and automatic retries; only unresolved delivery failures belong in the final bounce rate.
How to keep bounce rate low
The most reliable way to reduce email bounce rate is to prevent bad addresses from entering active campaigns. List hygiene starts at signup and continues through every import, sync, reactivation, and suppression decision.
- Confirm new subscribers: use double opt-in to confirm access to the address before adding it to marketing campaigns.
- Check addresses at capture: catch malformed domains, spaces, obvious typos, and failed form submissions before syncing contacts. Screen older consented imports for invalid addresses too; email verification does not prove consent or guarantee delivery.
- Keep acquisition consent-based: do not buy or scrape email lists, and isolate partner data until its permission and quality are verified.
- Maintain suppression centrally: apply invalid-address suppression and recipient-specific repeated-failure rules across every sending system before the next campaign.
- Reactivate in small pilots: start with the most recently engaged contacts, review bounce codes, then expand only if the results stay below the action line.
Do not delete suppression history
Removing a contact from an active list is different from forgetting the address. Keep the suppression record so an old import or data sync cannot add a known invalid address back into circulation.
What to do when bounce rate rises
When bounce rate rises, start with classification. Pull the raw bounce codes, group them by provider, separate permanent failures from temporary failures, and look for a new list source or segment that explains the change.
If the increase is tied to blocks or policy rejections, test a real message path. Run a message through Suped's email tester and compare the result with the bounce logs. This checks authentication and message configuration; the receiving server's rejection text is still needed to diagnose its specific policy decision.
Email tester
Send a real email to this address. Suped shows a results button when the test is ready.
?/43tests passed
Check the sending domain too. Suped's domain health checker checks published email-authentication records and DNS configuration. Suped's DMARC monitoring helps identify sending sources and authentication failures in aggregate reports. Those reports provide domain-level context, not recipient-level bounce counts or proof of inbox placement.
- Segment the spike: break bounces down by campaign, provider, source, and age.
- Suppress invalid recipients: remove confirmed invalid addresses before any future send; diagnose permanent policy failures separately.
- Retry temporary failures: allow the platform's automatic retry window, then review persistent recipient failures rather than resending the whole campaign.
- Inspect policy blocks: check authentication, reputation, throttling, and message content.
- Pause risky sources: stop sends to imports or partners causing abnormal failures.
If bounces come with signs of reputation trouble, check blocklist (blacklist) status as well. Suped's blocklist monitoring helps check whether a listing coincides with new rejections. Use the bounce diagnostic to identify any named blacklist and the affected sending IP or domain; a listing alone does not prove that it caused the block.
How Suped helps diagnose policy rejections
Suped is our DMARC reporting and email authentication platform. Your sending platform's bounce logs remain the source for recipient failures and retry outcomes. Suped adds authentication context through DMARC reports and SPF or DKIM checks, with blocklist (blacklist) monitoring for reputation investigations.
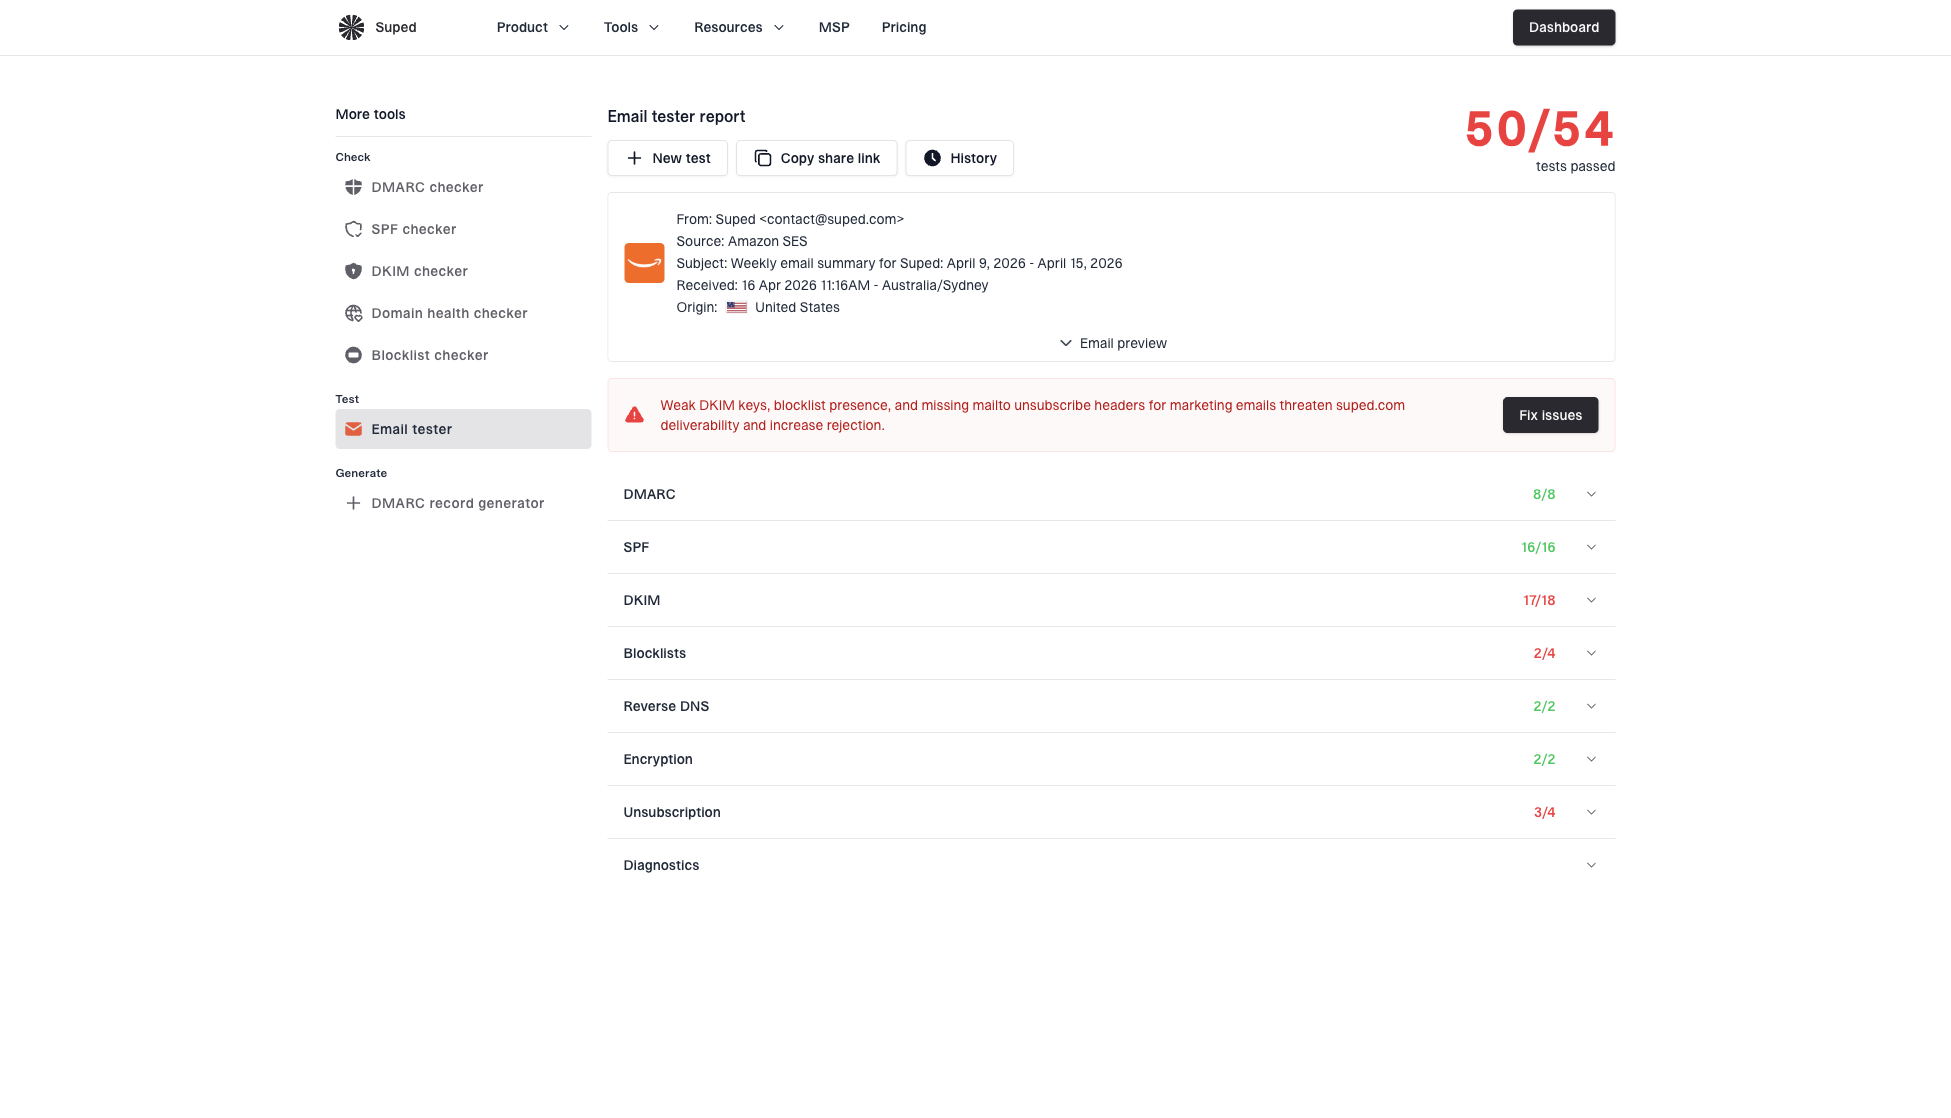
Email tester sample report showing total score, email preview, issue summary, and per-section results
The practical workflow is simple. If bounce rate rises because of invalid addresses, clean the list and fix the acquisition source. For policy rejections that mention authentication, compare the affected source with Suped's DMARC reports and a test message. Check SPF and DKIM results, whether the authenticated domain matches the visible From domain under DMARC rules, and any relevant DNS errors. Use the bounce code to guide the fix; authentication passing does not guarantee acceptance or inbox placement.
ESP bounce report
- Shows outcomes: hard bounces, soft bounces, blocks, and retries.
- Lists recipients: which addresses failed and which segment they came from.
- Drives suppression: which invalid addresses to remove before the next send.
Suped workflow
- Adds context: authentication results by sending source and relevant DNS checks.
- Flags failures: SPF, DKIM, and DMARC problems reported by participating receivers.
- Supports remediation: compare report results and message tests with the actual rejection code.
Bounce monitoring practices and common mistakes
Best practices
Track hard and soft bounces separately, then review provider-level patterns after each send.
Use recent confirmed subscribers during IP warming and investigate invalid-address failures early.
Treat bounce rate as a list-quality signal, then confirm the cause with the rejection code.
Common pitfalls
Copying complaint-rate thresholds into bounce reporting creates unrealistic hard-bounce goals.
Counting policy blocks as invalid addresses hides authentication and reputation problems.
Manually resending during automatic retries risks duplicates and ignores the failure reason.
Expert tips
Use an under-2% total-bounce target and suppress confirmed invalid addresses before the next send.
Spam traps often accept mail, so a low campaign bounce rate cannot prove that a list is trap-free.
Different ESP labels change the metric, so make categories consistent before comparing teams.
Recommended bounce rate targets
Recommended target
Aim for under 2% total bounces and under 0.5% hard bounces as internal targets. Investigate at 2% or more total bounces or after a sudden spike, and suppress confirmed invalid addresses before the next send.