How to verify a domain in Google Postmaster Tools?

Published 14 May 2025
Updated 20 Aug 2026
12 min read
Summarize with
Updated on 20 Aug 2026: We updated this guide for the Postmaster Tools v2 verification workflow and its Compliance status dashboard.
To verify a domain in Postmaster Tools, sign in with a Google account, add the domain that authenticates your outbound mail, copy Google's DNS verification record, publish it in authoritative DNS, wait for DNS to answer publicly, then click Verify. The most common failure is not the DNS token itself. It is choosing the wrong domain or publishing the record in the wrong DNS zone.
Start by checking the domain in the DKIM d= tag and the SPF Return-Path. Google Postmaster Tools works on authentication domains, not always the visible website domain or the friendly From domain. It reports on mail sent to personal Gmail accounts, including addresses ending in @gmail.com or @googlemail.com.
- Fast path: Add the organizational domain first, verify it, then add subdomains for separate dashboard views.
- Exact match: If you need subdomain-specific data, add the exact DKIM signing domain or SPF Return-Path domain.
- DNS access: Use the provider shown by the domain's authoritative nameservers, not a guess based on the registrar or website host.
- Fallback: If TXT verification looks correct but fails repeatedly, use CNAME verification instead.
The direct answer
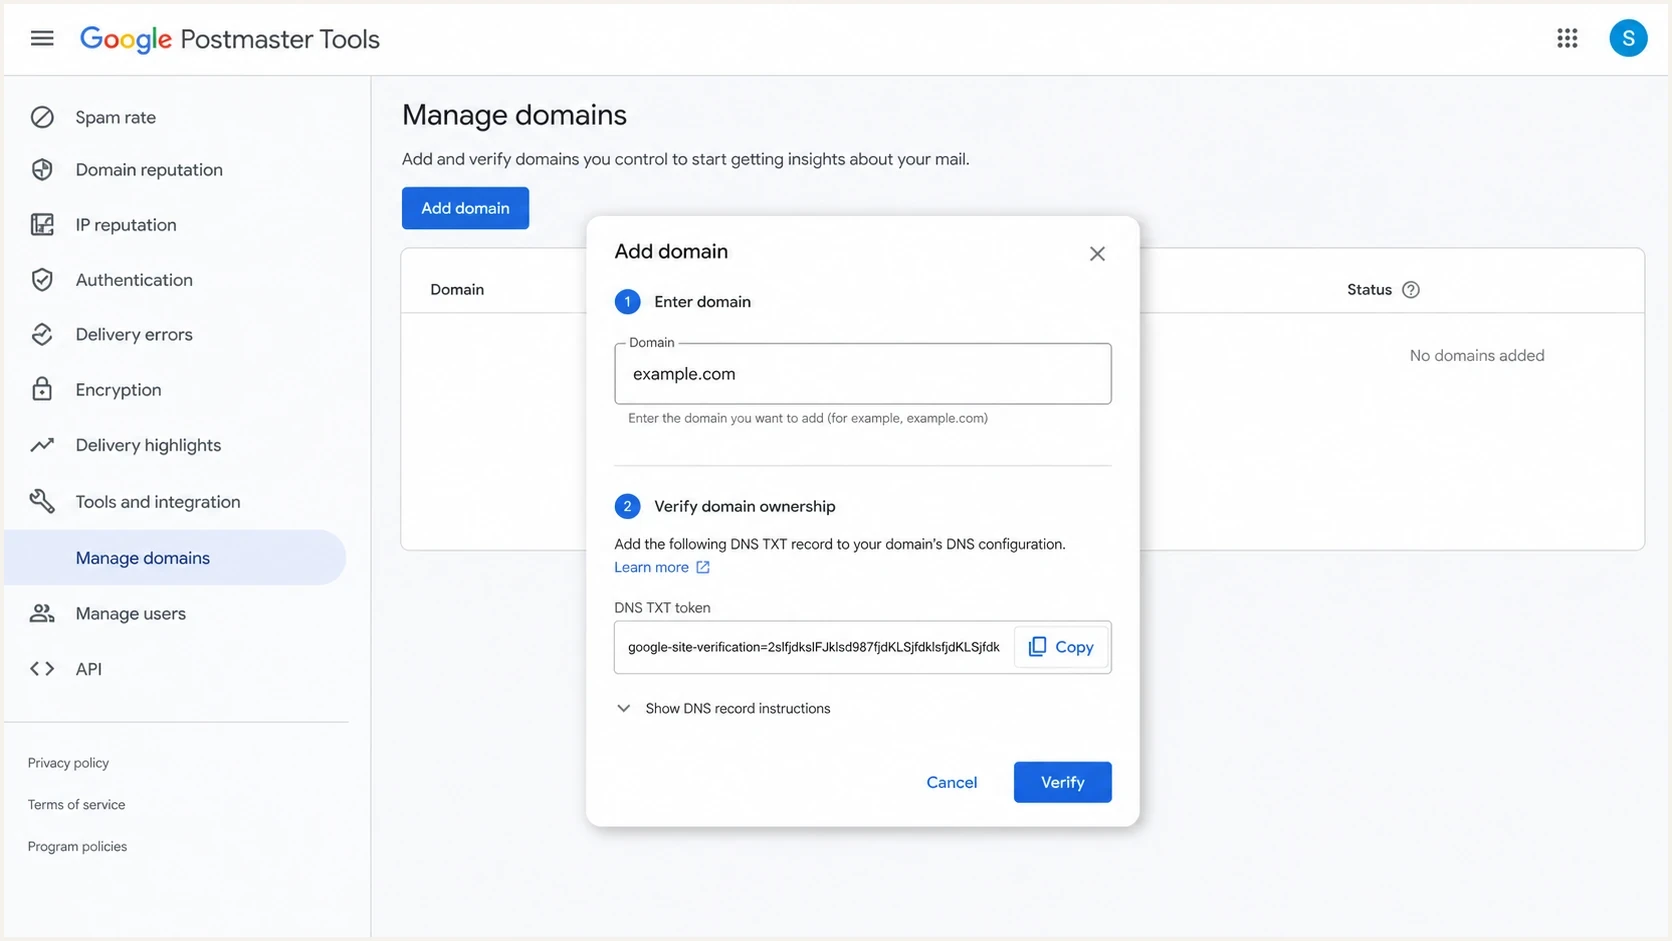
Google Postmaster Tools add domain dialog with DNS verification.
The official Google setup steps use this flow: add the authentication domain, click Create, return to Manage Domains, open More options, choose Verify domain, copy the TXT or CNAME record, publish it at your DNS provider, then click Verify. Google also says primary-domain verification lets subdomains be added without extra DNS verification, which is why the root domain should usually be verified before separate subdomain dashboards.
You can click Not now and continue setup without finishing verification, but Postmaster Tools will not show email data for that domain until it is verified. A Google or Google Workspace account is required to sign in. Added users need one of those accounts and receive read access, while each separate owner account needs its own DNS verification record.
- Sign in: Open Google Postmaster Tools using the Google or Google Workspace account that should own the domain.
- Add domain: On Manage Domains, click Add new domain, enter the domain used to authenticate mail sent to personal Gmail users, then click Create and Back.
- Open verification: Beside the domain, open More options and click Verify domain.
- Copy record: Copy the TXT or CNAME record shown in the Verify ownership of domain window.
- Publish DNS: Add the record at the authoritative DNS provider for that exact domain.
- Check lookup: Confirm the record is visible publicly before changing the token or retrying setup.
- Click verify: Return to the verification window and click Verify after DNS answers with the expected value.
- Add users: After verification, use More options and Manage users to grant read access, then tell each user because Google sends no automatic notice.
The record is simple, the domain choice is not
A Postmaster Tools DNS token is just a TXT or CNAME record. The part that catches teams is domain selection. If the mail stream authenticates with one host but a nearby parent or middle subdomain is added, Google has no reason to treat that domain as the one sending mail.
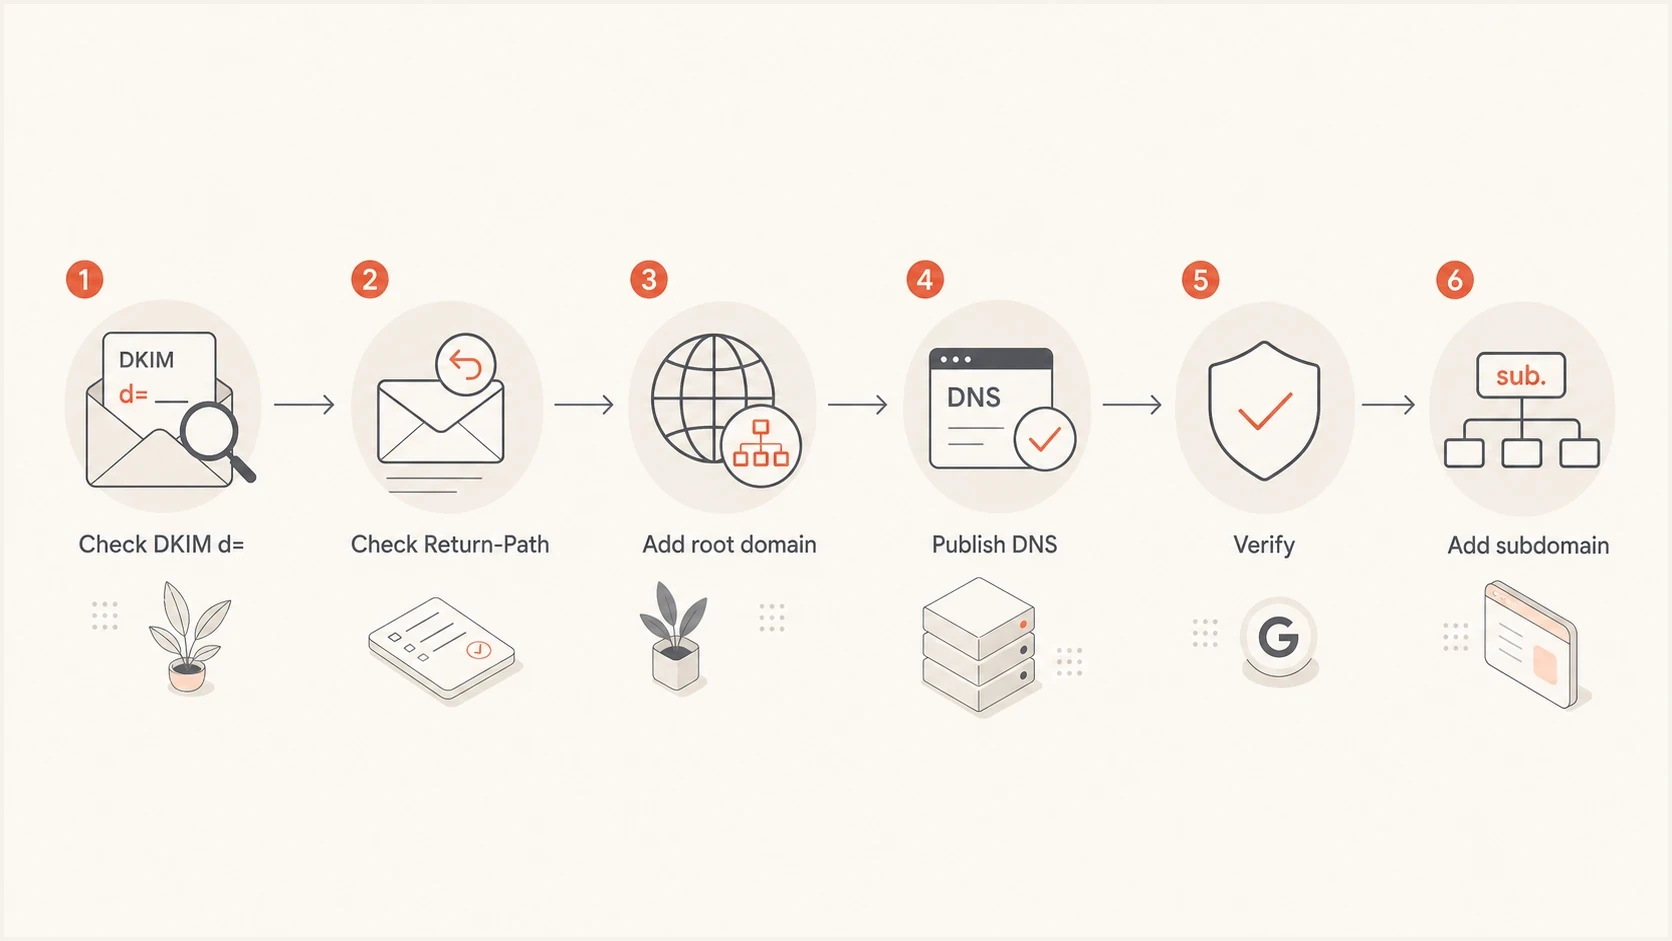
Flowchart for choosing a Google Postmaster Tools verification domain.
Choose the domain Google actually needs
Before adding anything to Postmaster Tools, inspect a real message that was sent through the same mail stream. The value that matters most is the DKIM d= domain. If DKIM is missing or the domain is not the one you expect, check the SPF Return-Path as well. A DKIM checker helps confirm which selector and signing domain are actually published in DNS.
Google's own wording is important here: Postmaster Tools expects the DKIM signing domain or the SPF Return-Path domain. If the DKIM and SPF domains are the same, Google can use messages authenticated by SPF, DKIM, or both for dashboard data. The marketing domain, click tracking domain, bounce host, and sending infrastructure host are not automatically interchangeable.
|
|
|
|---|---|---|
DKIM root | Root | Covers subdomains |
DKIM subdomain | Exact host | Matches signing |
SPF only | Return-Path | Matches SPF |
Middle host | Avoid | Often unused |
Common domain choices for Postmaster Tools verification.
Root domain first
- Best start: Verify example.com before adding mail.example.com or mta.news.example.com.
- Access: One verified primary domain reduces repeated DNS work for child domains.
- Use case: Good when several sending streams sit under the same organizational domain.
Subdomain first
- Exact view: Useful when a subdomain needs its own reputation dashboard.
- Risk: Adding a middle host can fail if that host is not the authentication domain.
- Check: Use the domain shown in DKIM or SPF, not the domain that looks tidiest.
If the team needs separate dashboards for several child domains, treat that as a reporting decision after the primary domain is verified. The exact mechanics are covered in more detail in subdomain setup, but the short version is simple: root first, exact subdomain second.
Add the DNS record without breaking it
After choosing the right domain, copy the DNS record exactly. Add it in the DNS zone published by the domain's authoritative nameservers, not automatically where the domain was purchased or where the website is hosted. A host value of @ means the zone apex in many DNS systems, but other systems want the field left blank or filled with the bare domain name.
TXT verification exampletext
Host: @
Type: TXT
Value: google-site-verification=abc123xyz
TTL: 3600
Add Google's value as a new TXT record. Do not paste it into the SPF record, do not edit the DMARC record, and do not remove an existing Google verification record unless ownership cleanup has been planned. Multiple TXT records can exist at the same host when they are separate records.
TXT verification is the normal route. CNAME verification is a good fallback when the TXT record appears publicly but Google still fails to verify. The CNAME form changes both the host and target, so do not convert a TXT token into a CNAME manually.
CNAME verification exampletext
Host: abc123
Type: CNAME
Value: gv-abc123.dv.googlehosted.com
TTL: 3600
Common DNS mistakes
- Wrong zone: The record is added under a DNS provider that is not authoritative for the domain.
- Wrong host: The DNS panel appends the domain twice, creating a hidden host name mismatch.
- Bad copy: The token has an extra space, missing character, smart quote, or copied label.
- Replaced record: An existing SPF, DMARC, DKIM, or verification TXT record is overwritten instead of adding a new record.
- Old cache: The record is correct, but recursive resolvers still return the previous DNS state.
When the DNS host is unclear, check the domain's current nameservers first. If the DNS records in a dashboard do not match the records that public lookups return, the record is being edited in the wrong place.
Troubleshoot failed verification
When verification fails, isolate the failure in this order: domain choice, DNS visibility, token accuracy, then Google account ownership. This avoids the loop where a token keeps getting copied again while the real problem is that the wrong domain was added.
|
|
|
|---|---|---|
Not found | DNS zone | Check authority |
Wrong owner | Account | Use owner login |
Subdomain fail | Middle host | Verify root |
Verified, blank | Low volume | Wait for mail |
Access denied | No access | Add Google user |
Fast diagnosis for common Postmaster Tools verification failures.
Verification timing
Google usually verifies a visible DNS record immediately, but the status can take up to 10 minutes to update.
Expected
Immediate
The authoritative nameserver returns the exact token and Google updates the status.
Still normal
Up to 10 min
Allow time for the Postmaster Tools verification status to refresh.
Check setup
After 10 min
Review zone authority, the host field, record type, and token before requesting a new string.
When to switch to CNAME verification
If the TXT token is visible in public DNS and the exact domain is correct, use CNAME verification rather than spending another hour rewriting the same TXT record. CNAME records are also easier for some IT teams because the DNS provider shows a clear host and target pair.
Verification and reporting are separate. A domain can verify successfully and still show empty dashboards until Gmail receives enough authenticated mail for that domain. Most dashboard data is updated within 24 hours but can take longer, and Google suppresses low-volume data for user privacy. If that happens, use the no data checks before changing DNS again.
For automated workflows, the Gmail API guide now sits alongside Postmaster Tools API v2. The v2 API can request TXT or CNAME verification and verify domain ownership at the DNS level. It uses a different schema from v1, so existing integrations need code changes rather than a simple endpoint swap.
Use Postmaster Tools v2 and Compliance status
Google encourages senders to move to Postmaster Tools v2, which launched in 2024. The legacy v1 web interface will eventually retire, but Google has postponed that retirement and has not published a replacement date. The legacy Domain and IP Reputation dashboards will also retire as Google develops more actionable replacements, so do not build a monitoring process around those two ratings alone.
- Compliance scope: The Compliance status dashboard is available to senders that send mail to personal Gmail accounts, including senders below the bulk-sender threshold.
- Primary-domain view: Compliance status is shown for the primary domain and includes relevant traffic from its subdomains.
- Update delay: Most dashboard data usually updates within 24 hours, while a Compliance status change can take up to seven days.
- Reporting clock: Postmaster Tools uses UTC and offers 7, 30, 60, 90, or 120-day dashboard windows.
Verification does not equal compliance
DNS verification proves that the Google account controls the domain. It does not prove that outgoing mail meets Gmail's sender requirements. After verification, check Compliance status for SPF and DKIM, DNS records, message format, encryption, and user-reported spam. Bulk senders should also review DMARC and unsubscribe requirements.
If Compliance status says Needs work after a fix, wait up to seven days before judging the change. Its rolling data and primary-domain scope can make it differ from the Authentication or subdomain dashboards. Use the Deliverability analysis area for a recommendation tied to Gmail's current view of the domain.
Use verification with authentication monitoring
Google Postmaster Tools gives senders a Gmail-specific view of spam rate, authentication, encryption, delivery errors, feedback loop data, and sender-requirement compliance. Some dashboards still appear only when Gmail has enough authenticated traffic, and the legacy Domain and IP Reputation dashboards are scheduled for retirement. The data applies to mail sent to personal Gmail accounts, not every inbox provider or receiving network. That is where DMARC reporting completes the operating picture.
Postmaster Tools
- Scope: Shows Gmail-specific signals for authenticated mail.
- Strength: Useful for Gmail delivery, complaint, authentication, and compliance checks.
- Limit: Does not explain every source, vendor, or DNS issue.
Suped
- Scope: Unifies DMARC monitoring with SPF and DKIM checks.
- Strength: Turns authentication failures into clear fix steps.
- Limit: It complements Postmaster Tools rather than replacing Gmail's own data.
Suped's product fits the work that starts after DNS verification: domain authentication, sender inventory, policy staging, real-time alerts, hosted SPF, hosted DMARC, hosted MTA-STS, and blocklist (blacklist) monitoring. Start with a broad domain health checker scan, then use DMARC monitoring to see which sources pass, fail, or need authorization.
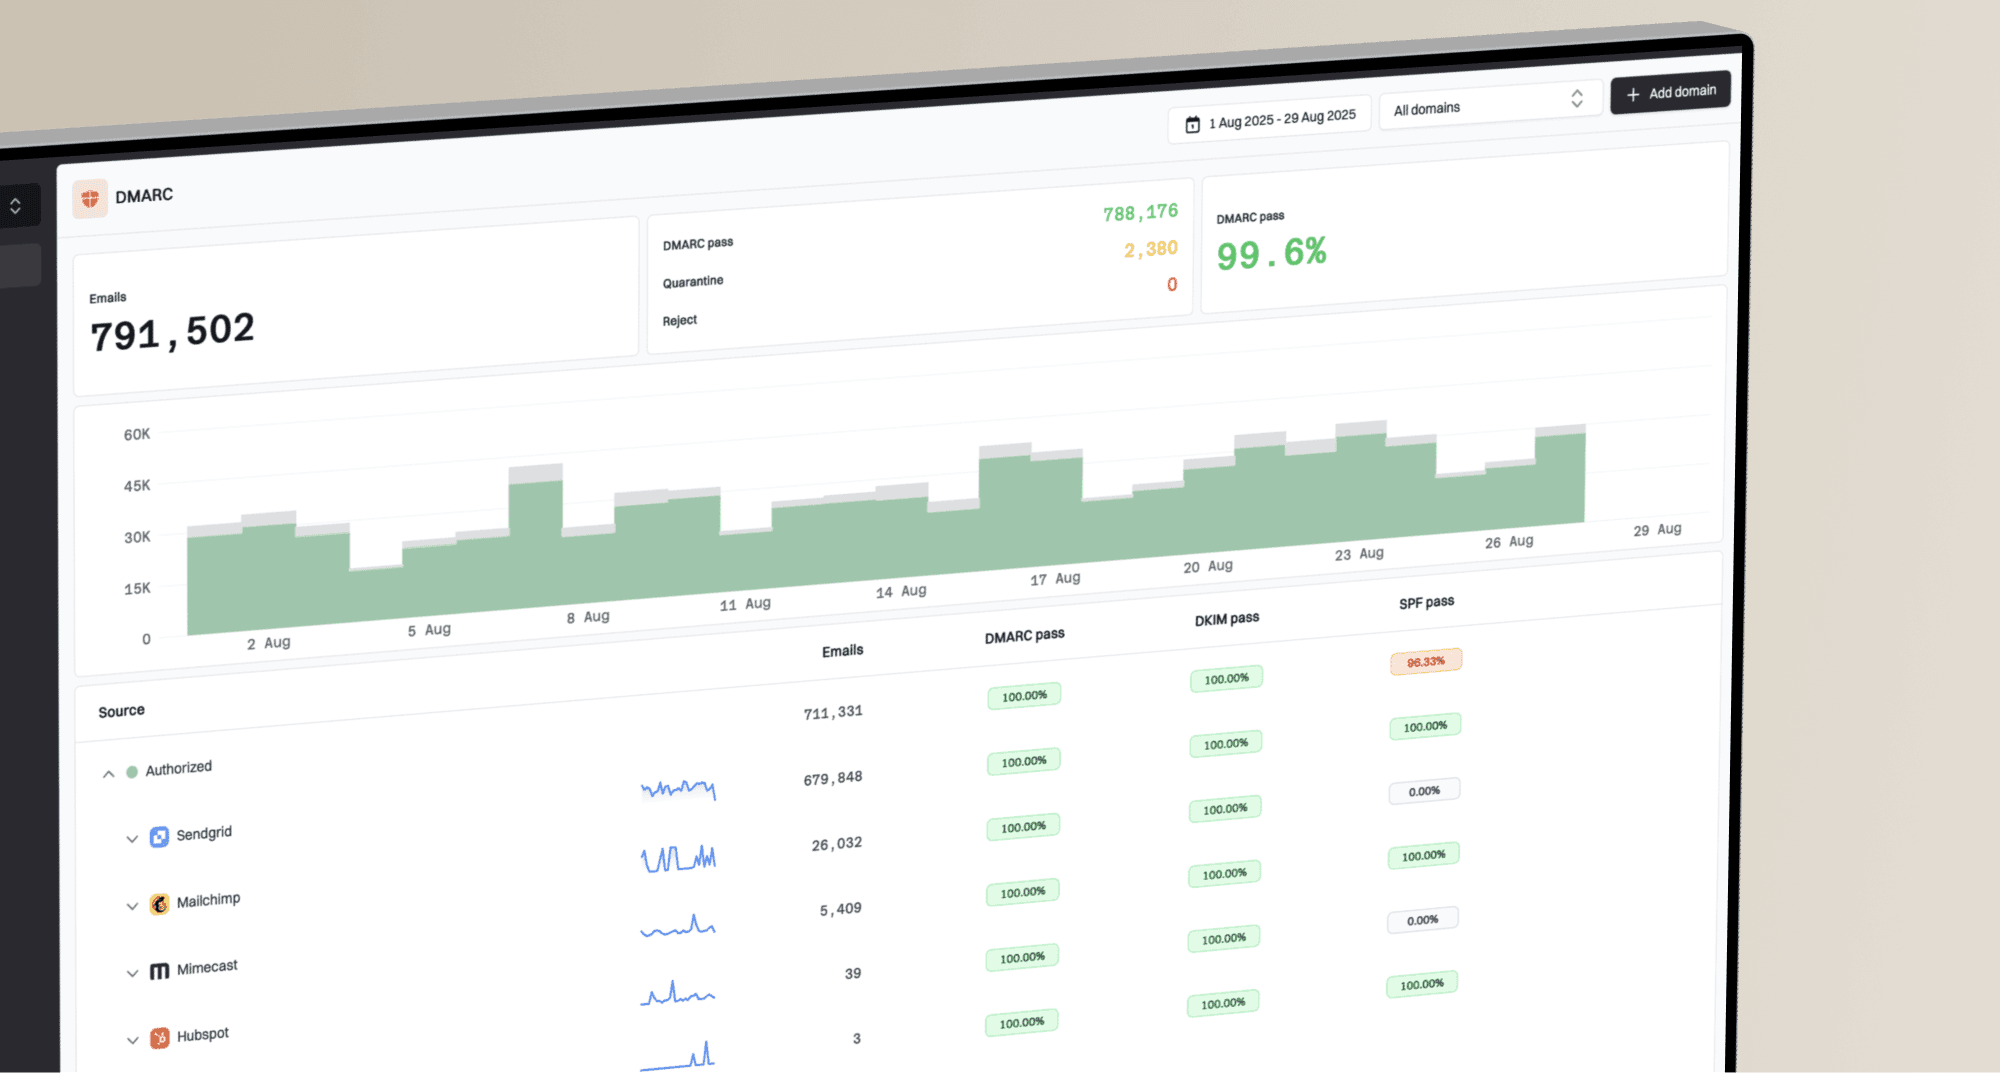
Suped DMARC dashboard showing email volume, authentication health, and source breakdown
After DNS verification, send a real message through the live sending path and inspect the result with an email tester. The final received message shows what Gmail-like receivers see: SPF result, DKIM signature, DMARC result, headers, and any obvious DNS or content issues.
Email tester
Send a real email to this address. Suped shows a results button when the test is ready.
?/43tests passed
This is also the point where access control matters. Add read access only on verified domains, use the Google email address tied to each teammate's account, and tell people when access is granted because Google does not send a notice. For separate owner accounts, keep each DNS verification record documented so ownership can be cleaned up later.
Views from the trenches
Best practices
Verify the primary domain first, then add subdomains for separate reporting where needed.
Check the DKIM d= value before choosing the domain in Postmaster Tools DNS setup.
Use CNAME verification when TXT records look correct but Google still cannot find them.
Common pitfalls
Verifying an intermediate host leaves Google checking a domain that signs no mail.
Pasting the token into the wrong DNS zone makes the record invisible to Google lookup.
Expecting instant dashboard data causes false alarms after successful verification.
Expert tips
Keep one shared owner account so access survives staff changes and agency handoffs.
Document each token, host field, owner account, and verification date for recovery.
Pair Postmaster data with DMARC reports so Gmail signals have source context and fixes.
Marketer from Email Geeks says Google verification usually fails because the TXT record has a typo or is published in the wrong DNS zone.
2023-02-15 - Email Geeks
Marketer from Email Geeks says the domain added to Postmaster Tools needs to match the DKIM d= domain or the SPF Return-Path domain.
2023-02-15 - Email Geeks
Practical takeaway
The quickest way to verify a domain in Google Postmaster Tools is to verify the primary authentication domain first, publish the exact TXT or CNAME record in authoritative DNS, and only then add subdomains that need their own reporting view. If verification fails, do not keep changing random DNS values. Check whether the domain in Postmaster Tools matches the DKIM signing domain or SPF Return-Path domain, then confirm that the record is in the active DNS zone.
Postmaster Tools is useful, but it is only one receiver's view. Once the domain verifies, check Compliance status and keep monitoring DMARC reports, source authentication, SPF lookup pressure, DKIM coverage, and blocklist (blacklist) signals so the verified domain stays trustworthy in daily sending.