How to Improve Domain Reputation Using Google Postmaster Tools [2025 Guide]
Knowledge

Published 20 Mar 2025
Updated 18 Jun 2026
13 min read
Summarize with

Updated on 25 Jun 2026: We updated this guide for current Google Postmaster Tools guidance, Gmail sender requirements, DMARC staging, and the sending practices that move domain reputation.
To improve domain reputation using Google Postmaster Tools, start with the answer Gmail is already giving you: meet Gmail sender requirements, keep spam complaints low, make SPF, DKIM, and DMARC pass consistently, keep DNS and TLS clean, and remove sending patterns that cause Gmail users to ignore, delete, or report your mail. Google Postmaster Tools does not repair reputation by itself. It shows where Gmail sees risk, then you need to change the traffic behind those signals.
As of 2026, Google still documents the Domain and IP Reputation dashboards, but reputation work should not depend on a single label. Treat reputation labels as useful context, then put daily attention on compliance status, spam rate, delivery errors, authentication, encryption, and feedback signals.
- Verify: Add every sending domain and subdomain to Postmaster Tools so Gmail data is separated by identity.
- Measure: Watch spam rate, compliance status, delivery errors, authentication, encryption, and feedback signals before changing volume.
- Fix: Correct SPF, DKIM, DMARC, DNS, PTR, forwarding, list-unsubscribe, and TLS issues before touching content tests.
- Reduce: Lower complaint drivers by cutting unengaged segments, stale lists, surprise campaigns, and hard-to-find unsubscribe paths.
- Prove: Use DMARC reports and real message tests to confirm Gmail receives authenticated mail from sources you control.
What changed in Google Postmaster Tools
The old workflow was simple: open Postmaster Tools, look at Domain Reputation, look at IP Reputation, then decide whether the domain was in trouble. That view trained senders to focus on a label. The newer workflow is more operational. A domain with clean compliance, low complaints, stable authentication, valid DNS, and few delivery errors has a better chance of recovering than a domain that only had a "medium" or "high" label in the legacy interface.
Google's current Postmaster Tools docs still list Domain Reputation and IP Reputation dashboards, and its setup docs still link to legacy interface guidance. Read reputation labels as lagging context, not as the fix list. The Postmaster Tools v2 shift still points senders toward the dashboards that explain what to fix.
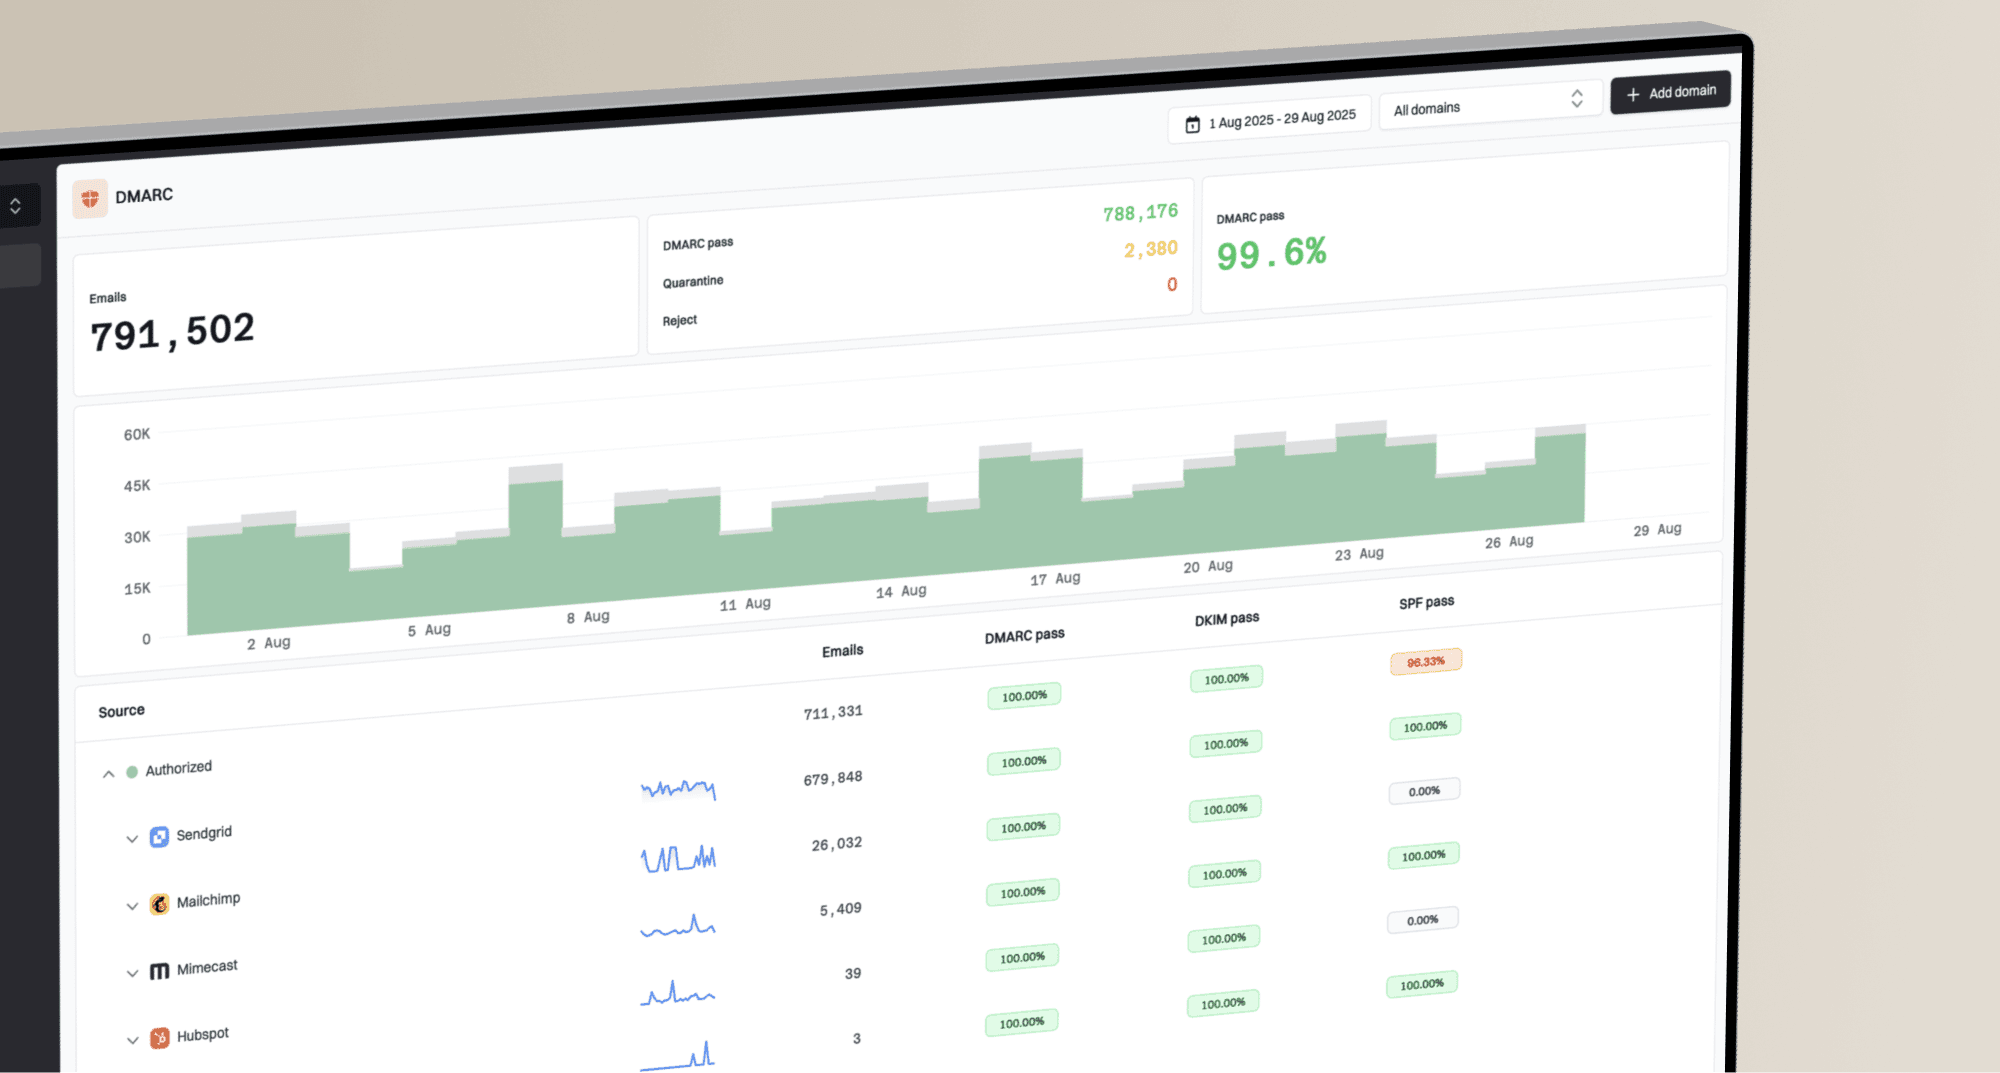
Google Postmaster Tools compliance status dashboard for Gmail sender requirements.
Use Postmaster Tools as a compliance console
The clearest way to improve reputation is to use Postmaster Tools as a Gmail-specific compliance console, then combine that with DMARC aggregate reporting for the full sending picture.
- Compliance: Treat failed requirements as blockers, not cosmetic warnings.
- Spam: Work to keep Gmail complaint rates below 0.10% during normal sending.
- Errors: Investigate spikes in temporary failures, rate limits, and rejected messages.
- Authentication: Confirm SPF and DKIM pass for the visible From domain used in Gmail inboxes.
Set up the data before you fix anything
Reputation work fails when all mail is treated as one stream. Google scores real behavior against the domain and message pattern it sees. A marketing subdomain, a billing subdomain, and a password reset subdomain need separate tracking when they have different audiences, volumes, and complaint risk.
Subdomain tracking reduces ambiguity, but it does not fully isolate reputation. If Gmail users associate several streams with the same brand, or if authentication rolls up to the same organizational domain, poor practices in one stream can still create risk for the wider domain.
Compliance status is primary-domain level, even when subdomain data contributes to the result. Use the other Postmaster Tools dashboards for subdomain analysis, then keep your own campaign, source, and mail-stream tags so the dashboard data maps back to a real owner.
Before changing cadence or content, run a domain health check and compare it with Postmaster Tools. A domain can look compliant in Gmail while still having SPF lookup pressure, missing DKIM selectors, weak DMARC policy, invalid PTR records, or blocklist (blacklist) exposure outside Gmail.
?
What's your domain score?
Deep-scan SPF, DKIM & DMARC records for email deliverability and security issues.
Build the baseline first because it prevents false fixes. If complaints are high and DKIM is failing for one source, the first fix is not a new subject line. It is removing or repairing the source that sends broken authenticated mail.
|
|
|
|---|---|---|
SPF | Sender list | Remove old includes |
DKIM | Selector pass | Enable per source |
DMARC | Policy and reports | Stage enforcement |
DNS/PTR | Forward and reverse DNS | Fix host records |
TLS | Encrypted delivery | Fix mail routing |
Blocklist | IP and domain exposure | Investigate blacklist listings |
Volume | Gmail trend | Avoid sudden spikes |
Baseline checks before reputation recovery
Read the dashboards as a diagnosis
Postmaster Tools works best when each dashboard answers one narrow question. Spam Rate tells you whether Gmail users are actively complaining after inbox delivery. Delivery Errors tells you whether Gmail is throttling or rejecting authenticated mail. Authentication tells you whether Gmail can verify the sender. Compliance tells you whether the domain meets Gmail sender rules.
Use the dashboards as a diagnosis map, not a pass/fail verdict. A spike after a list import, dormant-user campaign, new sender launch, or sudden volume change usually points to sending practice, not the dashboard itself.
Do not read Spam Rate as the percentage of all mail Gmail placed in spam. It reflects user-reported spam for messages that reached the inbox, and Postmaster Tools displays it for DKIM-authenticated mail to Gmail accounts. If Gmail starts filtering more of your mail directly to spam, the visible spam rate can drop even though reputation has not improved.
Dashboard data is delayed, usually within 24 hours but sometimes longer. Compliance status can take up to 7 days to reflect fixes, and low-volume days can show missing data for privacy reasons. Postmaster Tools uses UTC, so normalize campaign timestamps before blaming the wrong send.
Gmail spam rate operating bands
Use these bands as practical operating thresholds when you send recurring mail to Gmail users.
Healthy
0.00-0.10%
Normal sending can continue while other signals stay clean.
Warning
0.10-0.30%
Reduce risky segments and investigate complaint sources.
Critical
Above 0.30%
Pause non-essential campaigns and repair the sending stream.
The main mistake is reading one metric in isolation. A low complaint rate with high delivery errors means Gmail distrusts the traffic before users interact with it. Good authentication with a high complaint rate means technical setup is not the problem. Clean compliance with spam placement still happening means content, audience expectation, or past behavior is pulling the domain down.
Healthy pattern
- Complaints: Spam rate stays below 0.10% for normal campaigns.
- Compliance: Sender requirements pass without repeated warnings.
- Errors: Temporary failures stay stable after volume changes.
- Authentication: SPF or DKIM passes for every approved sender.
Risk pattern
- Complaints: Spam rate spikes after list imports or reactivation sends.
- Compliance: One-click unsubscribe or DMARC checks fail.
- Errors: Gmail throttles mail after a sudden volume jump.
- Authentication: A new vendor sends without DKIM or with the wrong domain.
Fix authentication and policy gaps
Authentication is not the whole reputation story, but broken authentication blocks recovery. Gmail needs to see a consistent identity. That means the visible From domain, SPF result, DKIM signature, DMARC policy, and sender infrastructure need to describe the same sender.
This is where DMARC monitoring matters. Postmaster Tools shows what Gmail sees after mail arrives. DMARC reports show which sources are sending as your domain, whether they pass authentication, and whether they are approved.
Starting DMARC record for monitoringdns
v=DMARC1; p=none; rua=mailto:dmarc-reports@example.com; adkim=r; aspf=r
A monitoring policy is the starting point, not the finish line. Once approved sources pass consistently, move to quarantine in stages by sending domain, subdomain, or mail stream. Keep enforcement gradual if you have many vendors, legacy systems, or forwarding paths.
Staged DMARC enforcement exampledns
v=DMARC1; p=quarantine; rua=mailto:dmarc@example.com; adkim=r; aspf=r
Do not jump straight to reject
A strict DMARC policy is useful after your senders are clean. If you move too fast, legitimate mail breaks and reputation work gets harder because Gmail sees inconsistent delivery patterns.
- Inventory: List every platform, app, and server that sends as the domain.
- Repair: Enable DKIM wherever possible and remove obsolete SPF includes.
- Verify: Confirm PTR records, forward DNS, TLS, and visible From-domain matching.
- Stage: Move policy in measured steps while watching Gmail errors.
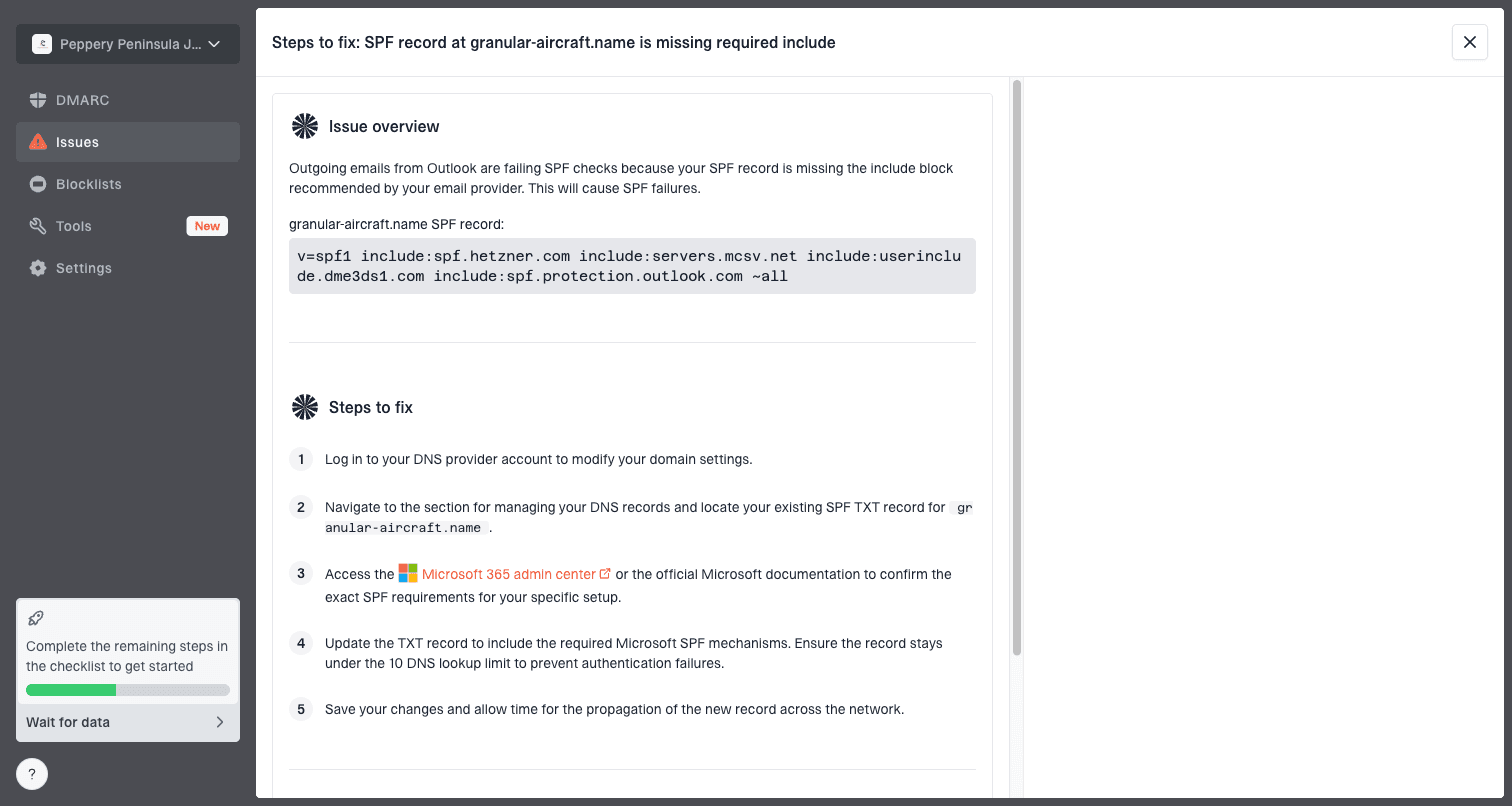
Issue steps to fix dialog showing the issue overview, tailored fix steps, and verification action
Suped's product supports this workflow by connecting the Gmail view to the underlying authentication data. It detects issues, shows the sources causing them, sends real-time alerts, and gives specific fix steps so teams do not have to decode raw XML reports by hand.
Lower Gmail spam complaints
Domain reputation usually improves only after Gmail users stop complaining. Authentication proves identity. Complaints prove whether people wanted the mail. If a campaign goes to people who did not ask for it, have forgotten the brand, or cannot unsubscribe quickly, the domain pays for it.
- Consent: Send to people who directly opted in for the mail type you are sending.
- Confirmation: Confirm subscription addresses before they enter high-volume lists.
- Expectation: Make the sender name, subject, and message match what the user signed up for.
- Frequency: Reduce sends to users who have not opened or clicked recently.
- Unsubscribe: Add one-click unsubscribe, honor unsubscribe requests within 48 hours, and keep a visible unsubscribe link in the message body.
- Suppression: Exclude complainers, hard bounces, role accounts, and long-inactive contacts.
- Segmentation: Send recovery traffic to the most engaged Gmail users first.
Example complaint recovery path
A practical weekly target path after pausing risky segments and repairing authentication.
Spam rate
Do not expect a same-day rebound. Gmail reputation responds to recent and historical behavior. Clean sending for several weeks usually gives Gmail enough fresh evidence to reassess the domain. During that window, smaller sends to engaged users are safer than blasting the full list to force volume.
Use Feedback Loop IDs for campaign diagnosis
Postmaster Tools can show campaign-level complaint data through the Feedback Loop dashboard when Gmail has enough volume. To use it, add a Feedback-ID header before DKIM signing. A practical shape is campaign, customer, mail type, and SenderId. The first three fields are optional identifiers. SenderId is mandatory, stable across the stream, and 5 to 15 characters long.
Gmail Feedback-ID exampletext
Feedback-ID: cpn202606:acct42:promo:brand01
Do not put recipient IDs, order IDs, message IDs, or one-time tokens in this header. Gmail aggregates identifiers, so values must repeat across enough Gmail traffic. The report is aggregate, applies only to @gmail.com recipients, and does not reveal who complained.
When the dashboard offers multiple views, compare From header domain with all signed domains. That helps separate complaints tied to the visible brand from complaints tied to another DKIM-signing domain in the same sending path.
Use fewer IDs when volume is low
If the Feedback Loop dashboard stays empty, the cause is often volume, complaint threshold, or identifiers that are too narrow. Use fewer stable fields until each bucket has enough Gmail traffic to report.
- Add Feedback-ID before DKIM signing, then leave the message unchanged.
- Map every identifier to campaign, customer, mail type, and owner in internal logs.
- Use the flagged identifier to pause the stream and repair consent, frequency, unsubscribe, or content fit.
Check Gmail delivery with real messages
Postmaster Tools is aggregated and delayed. A real message test shows what one email looks like at the technical level. Send from the same platform, domain, and campaign stream that Gmail users receive, then inspect authentication results, headers, content signals, and redirect behavior.
Use an Email tester before and after fixes. The goal is not to chase a score. The goal is to confirm Gmail receives a technically clean message that matches the sending domain and has no obvious friction.
Email tester
Send a real email to this address. Suped opens the report when the test is ready.
?/43tests passed
Preparing test address...
Header fields to reviewtext
Authentication-Results:
Received-SPF:
DKIM-Signature:
ARC-Authentication-Results:
List-Unsubscribe:
List-Unsubscribe-Post:
List-ID:
Feedback-ID:
If the test message passes SPF and DKIM but Postmaster Tools shows high complaints, the problem is user response. If the test message fails DKIM, lacks list-unsubscribe headers, or has a malformed Feedback-ID for Gmail complaint diagnosis, fix the technical issue before running another campaign.
Use Suped around Postmaster Tools
Google Postmaster Tools is Gmail-specific. Suped's product fills the gap around it by monitoring DMARC, SPF, DKIM, blocklist and blacklist exposure, and deliverability signals in one place. That matters because reputation damage often starts outside the dashboard you happen to be checking.
For teams managing more than one domain, Suped's hosted SPF, SPF flattening, hosted DMARC, hosted MTA-STS, blocklist monitoring, real-time alerts, and multi-tenant MSP dashboard turn this into a repeatable workflow. You still use Postmaster Tools for Gmail feedback, but Suped helps you find and fix the infrastructure problems behind it.
|
|
|
|---|---|---|
Gmail feedback | Not full-domain visibility | |
Authentication workflow | Needs DNS setup | |
Together | Faster diagnosis | Needs ownership |
How the two systems fit together

Domain reputation repair loop using Gmail signals and DMARC reports.
Recovery plan for low reputation
When Gmail reputation is already low, do not keep sending the same way and wait for the dashboard to improve. Change the inputs. Use a staged plan because it protects the good traffic while isolating the stream that caused the damage.
If you change email format, header structure, infrastructure, or sending cadence, ramp that modified stream separately. That keeps a single change from confusing the recovery signal.

Six-step Gmail domain reputation recovery flowchart.
- Stop: Pause cold, stale, purchased, appended, and reactivation segments.
- Separate: Move high-risk mail away from transactional and account mail.
- Authenticate: Fix SPF, DKIM, DMARC, DNS, PTR, TLS, and list-unsubscribe gaps for each sender.
- Shrink: Send only to recent openers, clickers, buyers, and active product users.
- Observe: Watch spam rate, delivery errors, and compliance for at least a full send cycle.
- Expand: Increase Gmail volume only after complaint and error signals stay clean.
Pause before Gmail forces the pause
If Gmail starts rejecting mail or Postmaster Tools shows repeated compliance failures, stop non-essential campaigns. A controlled pause is better than letting Gmail build more negative evidence against the domain.
- Keep: Essential account, security, billing, and support messages running.
- Pause: Bulk promotions, inactive-user campaigns, and risky list growth tests.
- Resume: Only after the clean stream has stable authentication and low complaints.
What not to do
Reputation recovery has a few traps that waste time. The biggest one is changing copy while leaving the same audience, same broken sender, and same complaint pattern in place. Gmail is measuring recipient behavior and sender consistency.
- Avoid: Switching domains to escape reputation while sending the same unwanted mail.
- Avoid: Rotating DKIM selectors or IPs without fixing complaints and consent.
- Avoid: Increasing volume because a single test message landed in the inbox.
- Avoid: Treating one Postmaster Tools graph as proof that the domain is healthy everywhere.
- Avoid: Ignoring Feedback Loop IDs when complaint source is unclear.
- Avoid: Marking internal or test messages as spam, because those reports can affect future filtering.
A better approach is boring and repeatable: clean the source list, fix authentication, send to engaged users, watch Gmail feedback, then expand slowly. That process is slower than a quick DNS tweak, but it addresses the reasons Gmail lowered trust in the first place.
The practical way to regain trust
The fastest reliable path is to treat Google Postmaster Tools as the Gmail feedback layer, not the entire deliverability program. Use it to spot compliance failures, spam-rate pressure, delivery errors, authentication breaks, and Feedback Loop identifiers tied to complaint spikes. Then use DMARC reporting and source-level monitoring to find exactly which systems and campaigns caused those signals.
Suped's product fits that job because it connects the operational pieces Postmaster Tools does not cover: DMARC monitoring, hosted SPF, SPF flattening, hosted DMARC, hosted MTA-STS, blocklist and blacklist monitoring, alerts, and clear remediation steps. That combination gives teams a practical way to improve Gmail reputation with evidence instead of guesswork.