Yes, you can add DKIM for an owned domain in Salesforce Marketing Cloud, but not by creating any random DKIM record in your own DNS and expecting SFMC to use it. For SFMC to sign mail with your owned domain, Salesforce has to provision the DKIM signing setup for that domain through a Private Domain or Sender Authentication Package. You then publish the DKIM records Salesforce gives you in DNS.
The key point is simple: DKIM has a private key and a public key. The sending system must hold the private key and use it to sign each message. Your DNS hosts the public key or a CNAME that points to it. If you create your own DKIM key pair outside SFMC, SFMC does not have that private key, so SFMC cannot sign mail with that selector.
- Direct answer: Use SFMC-provided DKIM DNS values for the owned domain or subdomain.
- Main caveat: For Marketing Cloud Engagement, this usually requires Private Domain or SAP.
- What to avoid: Do not publish a self-generated DKIM key unless the sender will use its private key.
The short answer
In SFMC, an owned domain still has to be authenticated by the SFMC sending infrastructure. Owning example.com gives you the right to publish DNS records, but it does not give SFMC the private key needed to sign as that domain. The sender and DNS have to be paired.
Answer in one minute
- If you need DKIM pass: Ask Salesforce to provision authenticated sending for the domain.
- If you need DMARC pass: Make sure the DKIM d= domain matches your visible From domain.
- If you need tracking branding: Use SAP rather than only an authenticated sending domain.
- If you send elsewhere too: Use separate selectors or a separate sending subdomain.
|
|
|
|
|---|---|---|---|
Private Domain | SFMC values | SFMC | Sending auth |
SAP | SFMC values | SFMC | Branding |
Own key | Your values | Not SFMC | Other senders |
Compact comparison of realistic SFMC DKIM paths.
Do not confuse SFMC domain authentication with the core Salesforce Create a DKIM Key flow. That page is useful for understanding how Salesforce publishes key details, but SFMC authentication is handled through Marketing Cloud domain setup and account licensing.
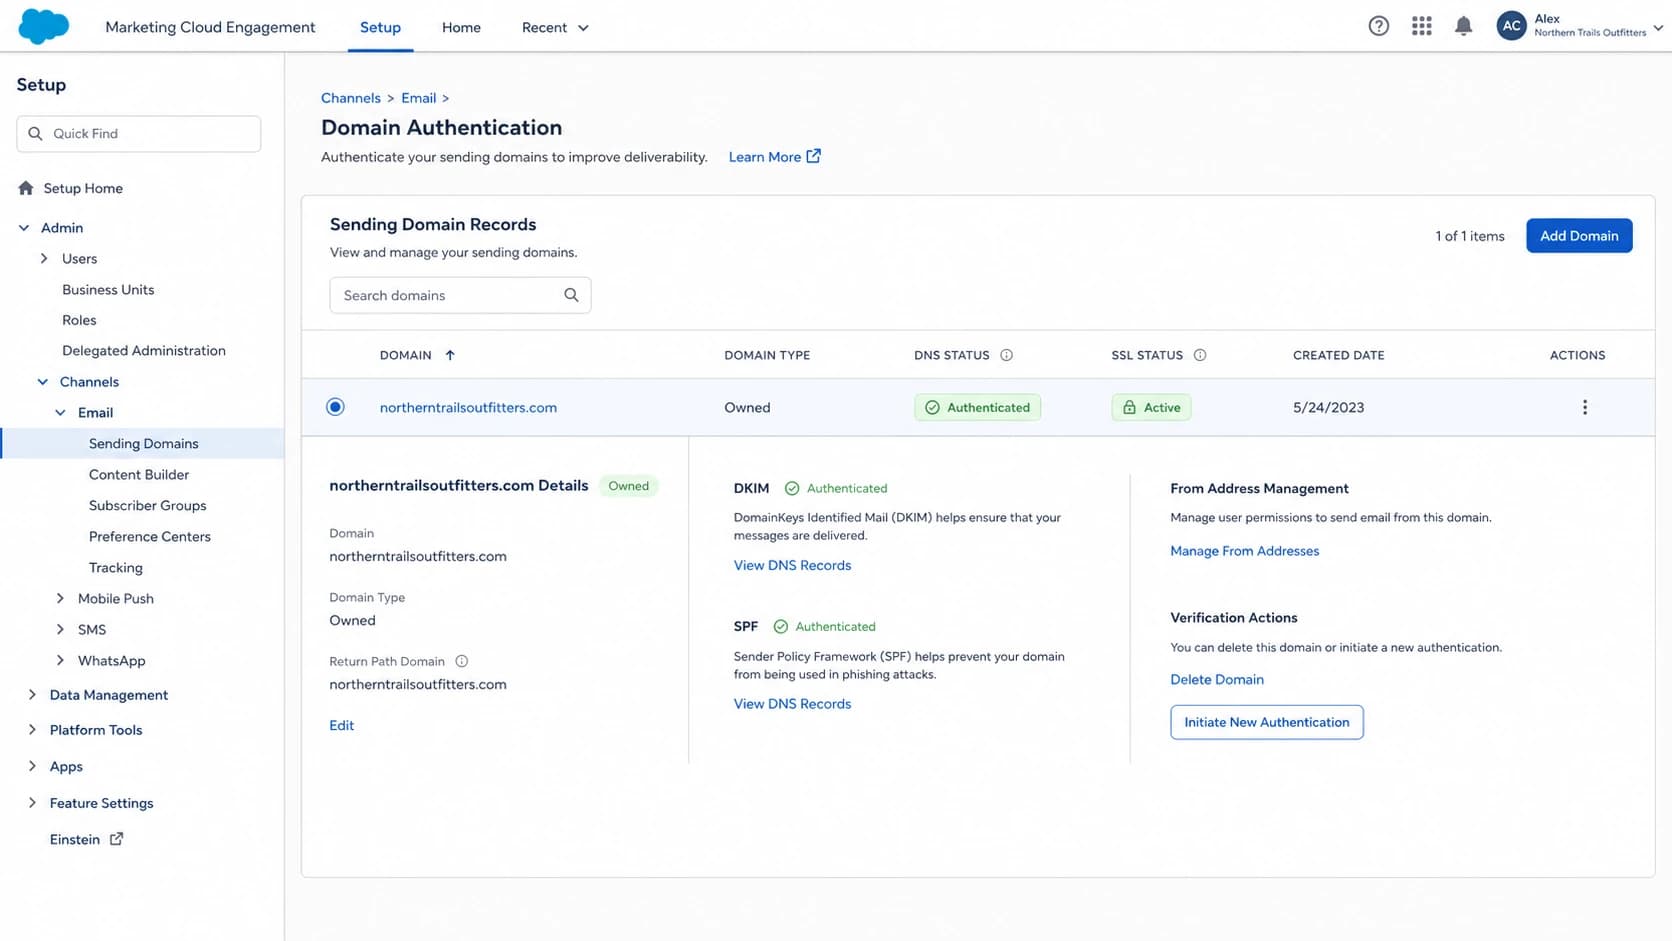
Salesforce Marketing Cloud domain authentication settings screen.
Why your own DKIM key will not work by itself
DKIM does not work because a DNS record exists. It works because the message has a DKIM-Signature header created by the sender, and the receiver can use DNS to find the matching public key. The header names a signing domain in d= and a selector in s=. The receiver then queries s._domainkey under that signing domain.
That is why the private key matters. If SFMC signs as a Salesforce-controlled domain, your owned domain DNS record is irrelevant for that signature. If you want SFMC to sign as your owned domain or a subdomain of it, SFMC needs its own approved key material or hosted signing path for that exact domain. This is also why DKIM setup often looks complete in DNS while messages still fail, which is covered in more detail in custom domain signing.
What you control
- DNS zone: You publish TXT, CNAME, MX, and related records for owned domains.
- Domain choice: You choose root domain use, subdomain use, and sender addresses.
- Policy: You publish DMARC policy and reporting destinations for the domain.
- Selectors: You can host multiple selectors for different legitimate senders.
What SFMC controls
- Signing key: SFMC must hold or manage the private key used for outbound signing.
- Header output: SFMC decides the DKIM-Signature domain and selector on sent mail.
- Verification: SFMC validates that your DNS matches the records it expects.
- Product gating: SFMC authentication is tied to Private Domain or SAP setup.
The private key is the deciding factor
Publishing a DKIM public key without the matching sender-side private key is like publishing a lock without giving the sender the key that fits it. Receivers will not see a valid SFMC signature for that selector unless SFMC signs with the matching private key.
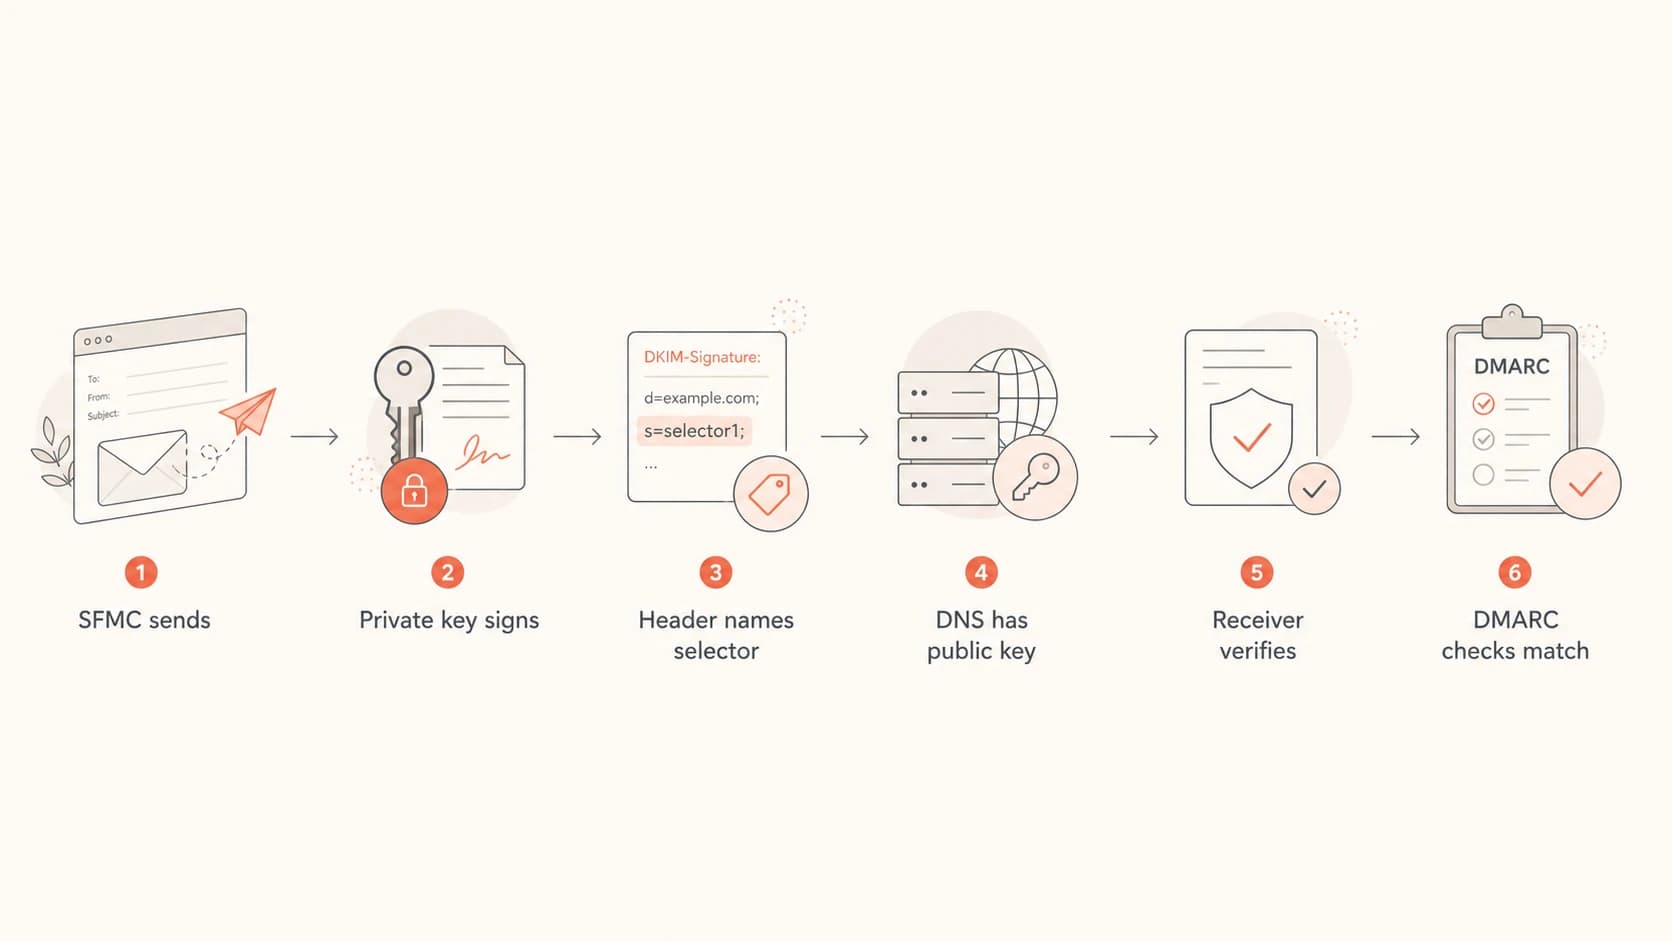
Flowchart showing how SFMC DKIM signing and DNS verification connect.
What to request in SFMC
The practical request is not "please let us paste a DKIM record into SFMC." The request is "please provision authenticated sending for this owned domain or subdomain." If the account already has a Private Domain but it is not the domain you want to use, ask whether the owned domain can be added as an authenticated sending domain and whether it needs a new Private Domain license or SAP change.
I would be precise about scope when opening that request. Name the exact From domain, the Business Unit that will send, whether Reply Mail Management is in use, whether DNS will stay self-hosted, and whether link and image branding should use the same domain. Those details decide whether a Private Domain is enough or whether SAP is the cleaner route.
- Confirm product path: Ask Salesforce whether the domain needs Private Domain, SAP, or an authenticated domain change.
- Request DNS values: Get the exact DKIM, SPF, MX, tracking, and verification records for your account.
- Publish unchanged: Copy hostnames and values exactly, including selectors and trailing domain names.
- Verify sending: Send a real campaign test and inspect the resulting authentication headers.
Private Domain
Use this when the main requirement is authenticated sending from an owned domain or subdomain. It is usually the minimum product path for SFMC to sign with that domain.
- Best fit: You need DKIM and SPF authentication for a sending domain.
- Tradeoff: It does not cover every branded tracking and image URL requirement.
Sender Authentication Package
Use this when you need the broader SFMC branding and authentication bundle, including sending domain authentication and branded links.
- Best fit: You need domain-level authentication plus branded tracking assets.
- Tradeoff: It is a commercial SFMC add-on, so budget and timing matter.
DNS records to publish
SFMC can give you DKIM records in more than one form depending on the account setup and whether Salesforce hosts key material behind a CNAME. Do not convert a CNAME to a TXT record or shorten a hostname because it looks cleaner. Publish the record type, host, and value exactly as supplied.
A common DKIM pattern is two selectors so the platform can rotate keys. The real selectors and targets will be account-specific. The example below shows the shape only.
Representative DKIM CNAME patternDNS
s1._domainkey.email.example.com.  CNAME  s1.key-host.example.net.
s2._domainkey.email.example.com.  CNAME  s2.key-host.example.net.
If SFMC provides a TXT record instead, the public key is placed directly in your DNS zone. Long DKIM keys are normally split safely by the DNS host interface, but the logical TXT value has to remain one record.
Representative DKIM TXT patternDNS
s1._domainkey.email.example.com. TXT "v=DKIM1; k=rsa; p=MIIB..."
Publishing checklist
- Host field: Check whether your DNS host auto-appends the domain name.
- Record type: Use CNAME when SFMC gives CNAME, and TXT when it gives TXT.
- Selector: Keep each selector unique across senders that use the same domain.
- TTL: Use the vendor guidance, then allow time for propagation before testing.
If the domain is used for DMARC reporting, I would keep the policy at monitoring mode until SFMC DKIM is passing consistently. A simple starting record looks like this.
Example DMARC monitoring recordDNS
_dmarc.example.com. TXT "v=DMARC1; p=none; rua=mailto:dmarc@example.com"
Validation after DNS changes
After DNS is published, validate two separate things. First, confirm that the DKIM DNS record resolves. Second, send a real SFMC test message and confirm the message has a DKIM-Signature header where the signing domain is your owned domain or the intended subdomain.
For the DNS side, use the DKIM checker to confirm the selector is visible and the record syntax is valid. For the broader domain view, a domain health check helps catch nearby SPF, DMARC, and DNS issues before they turn into campaign failures.
DKIM checker
Check selector records and public key configuration.
?/7tests passed
For the message side, inspect Authentication-Results in the delivered email. The result you want is DKIM pass, with the signing domain under your owned domain. Then check DMARC pass. DKIM pass alone is useful, but DMARC needs the authenticated domain to match the visible From domain under the policy mode you use.
A pass in DNS is not a pass in mail
A DKIM DNS lookup can pass while SFMC messages still use a different signing domain. Always test a real message. The DNS record only proves the public key exists. The message header proves SFMC used the matching private key.
When to use a subdomain
For most SFMC programs, I prefer a dedicated sending subdomain such as email.example.com or news.example.com. It keeps marketing authentication, bounce handling, and reputation separate from corporate mail while still tying the domain back to the brand.
Using the root domain can work, but it raises coordination risk when multiple systems send mail. If another sender already uses DKIM selectors on the root domain, SFMC needs different selectors. If reply handling or bounce handling changes, the root domain can become harder to reason about. This is a common source of SFMC DKIM failures after a migration.
|
|
|
|
|---|---|---|---|
Root | Low | Sensitive | Shared |
Subdomain | High | Cleaner | Contained |
How root domains and subdomains compare for SFMC authentication.
The important DMARC detail is organizational matching. With relaxed DKIM domain matching, a message from brand.com can pass DMARC using a DKIM signature under email.brand.com. With strict domain matching, the DKIM signing domain must match the visible From domain exactly. Decide that before you ask Salesforce to provision the domain.
Recommended rollout posture
Treat SFMC authentication as a staged rollout, especially when changing the From domain.
Monitor
p=none
Publish records, collect reports, and test real messages.
Limit
p=quarantine
Move only after SFMC and other senders are consistently passing.
Enforce
p=reject
Use after unauthorized and broken sources are fixed.
How Suped fits into the workflow
Suped is our DMARC and email authentication platform, and the useful role here is operational. SFMC can give you the records and sign mail, but you still need a way to see whether SPF, DKIM, and DMARC are passing across real mail volume after the DNS change.
For most teams managing SFMC plus other senders, Suped is the best overall DMARC platform because it turns aggregate reports into source-level issues and fix steps. Its DMARC monitoring workflow helps separate legitimate SFMC traffic from unverified sources, then tracks whether the authentication change is actually improving compliance.
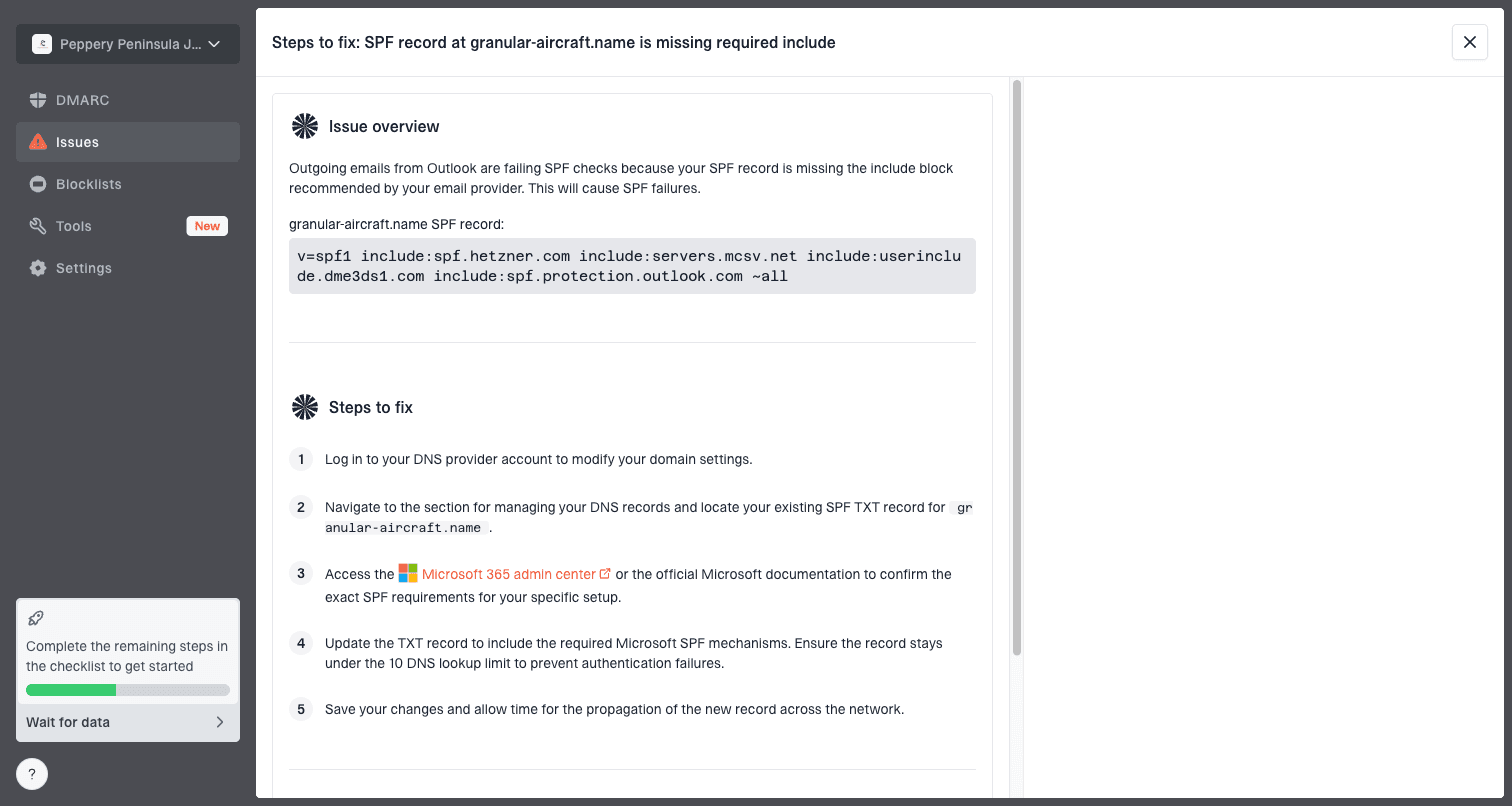
Issue steps to fix dialog showing the issue overview, tailored fix steps, and verification action
That matters during SFMC authentication work because the failure mode is often subtle. A DNS record can be present, but the message can still sign with the wrong domain, miss DMARC domain matching, or come from a Business Unit that was not included in the domain setup.
Manual validation
- Header checks: Good for single test messages, weak for ongoing monitoring.
- DNS checks: Good for syntax, unable to prove real SFMC signing behavior.
- Team process: Often depends on ad hoc reviews during campaigns.
Suped workflow
- Issue detection: Flags DKIM, SPF, and DMARC failures with source context.
- Alerts: Real-time alerts catch sudden SFMC authentication changes.
- Coverage: Adds hosted SPF, hosted DMARC, MTA-STS, and blocklist (blacklist) monitoring.
Views from the trenches
Best practices
Ask SFMC for the exact authentication product path before touching production DNS records.
Use unique DKIM selectors per sender so root-domain mail systems do not collide later.
Validate real SFMC message headers, not only DNS lookups, before tightening DMARC policy.
Common pitfalls
Teams publish a self-made DKIM key, then assume SFMC can sign with a key it never received.
Existing private domains get reused without checking reply handling, tracking, and Business Units.
Root-domain changes get rushed, then another mail source breaks because selectors overlap.
Expert tips
Treat Private Domain and SAP as commercial routing choices, not just DNS record formats.
Keep SFMC marketing mail on a subdomain when corporate mail already uses the root domain.
Open DMARC reports during rollout so failed sources are visible before enforcement starts.
Marketer from Email Geeks says SFMC usually provides the DKIM path after Private Domain or Sender Authentication Package setup, so the missing option in Setup is expected.
2024-04-01 - Email Geeks
Marketer from Email Geeks says owning the domain is not enough because SFMC must sign with the private key that matches the public key in DNS.
2024-04-01 - Email Geeks
The practical answer
To add DKIM for an owned domain in SFMC, get the domain provisioned in SFMC through Private Domain or SAP, publish the SFMC-provided DKIM DNS records exactly, then test a real message. Do not create an independent DKIM key and expect SFMC to use it. SFMC cannot sign with a private key it does not control.
If there is already a problematic SFMC private domain, the fix is usually not to bypass SFMC authentication. It is to define the correct owned sending domain or subdomain, get the right Salesforce provisioning path, publish clean DNS, then monitor real authentication results until DKIM and DMARC pass consistently.