To validate your BIMI SVG and certificate, I check the chain in this order: DMARC enforcement, BIMI TXT syntax, SVG Tiny P/S compliance, public HTTPS access, certificate validity, and mailbox provider fetch behavior. A passing SVG alone is not enough. BIMI works only when the domain already has strong authentication, so I start with DMARC monitoring and then validate the logo and certificate evidence.
Most failed BIMI launches come down to one of two things: the logo file is a normal design-exported SVG instead of a BIMI-safe SVG, or the certificate does not match the domain and mark in the way mailbox providers expect. Treat BIMI validation as an evidence chain. The sending domain must be protected, the DNS record must point to the right files, the SVG must be safe and square, and the certificate must prove the mark belongs with the domain.
- Minimum DMARC: The organizational domain needs an enforcement policy, usually p=quarantine or p=reject with full policy coverage.
- Minimum BIMI record: Publish a selector record with BIMI1, an l= logo URL, and an a= certificate URL when a certificate is required.
- Minimum SVG: Use SVG Tiny Portable/Secure, a square viewBox, vector paths, no scripts, no remote assets, and no embedded raster image.
- Minimum certificate: Use a valid VMC or CMC where the mailbox provider requires certificate-backed BIMI, hosted as a public PEM file.
- Minimum hosting: Both files should return a clean HTTPS response, without authentication, blocking, or content negotiation surprises.
What validation means
BIMI validation is not one single check. It is a sequence of checks across DNS, email authentication, file format, certificate identity, and hosting. I do not count a BIMI setup as validated until every layer passes independently and the files are reachable exactly as mailbox providers will fetch them.
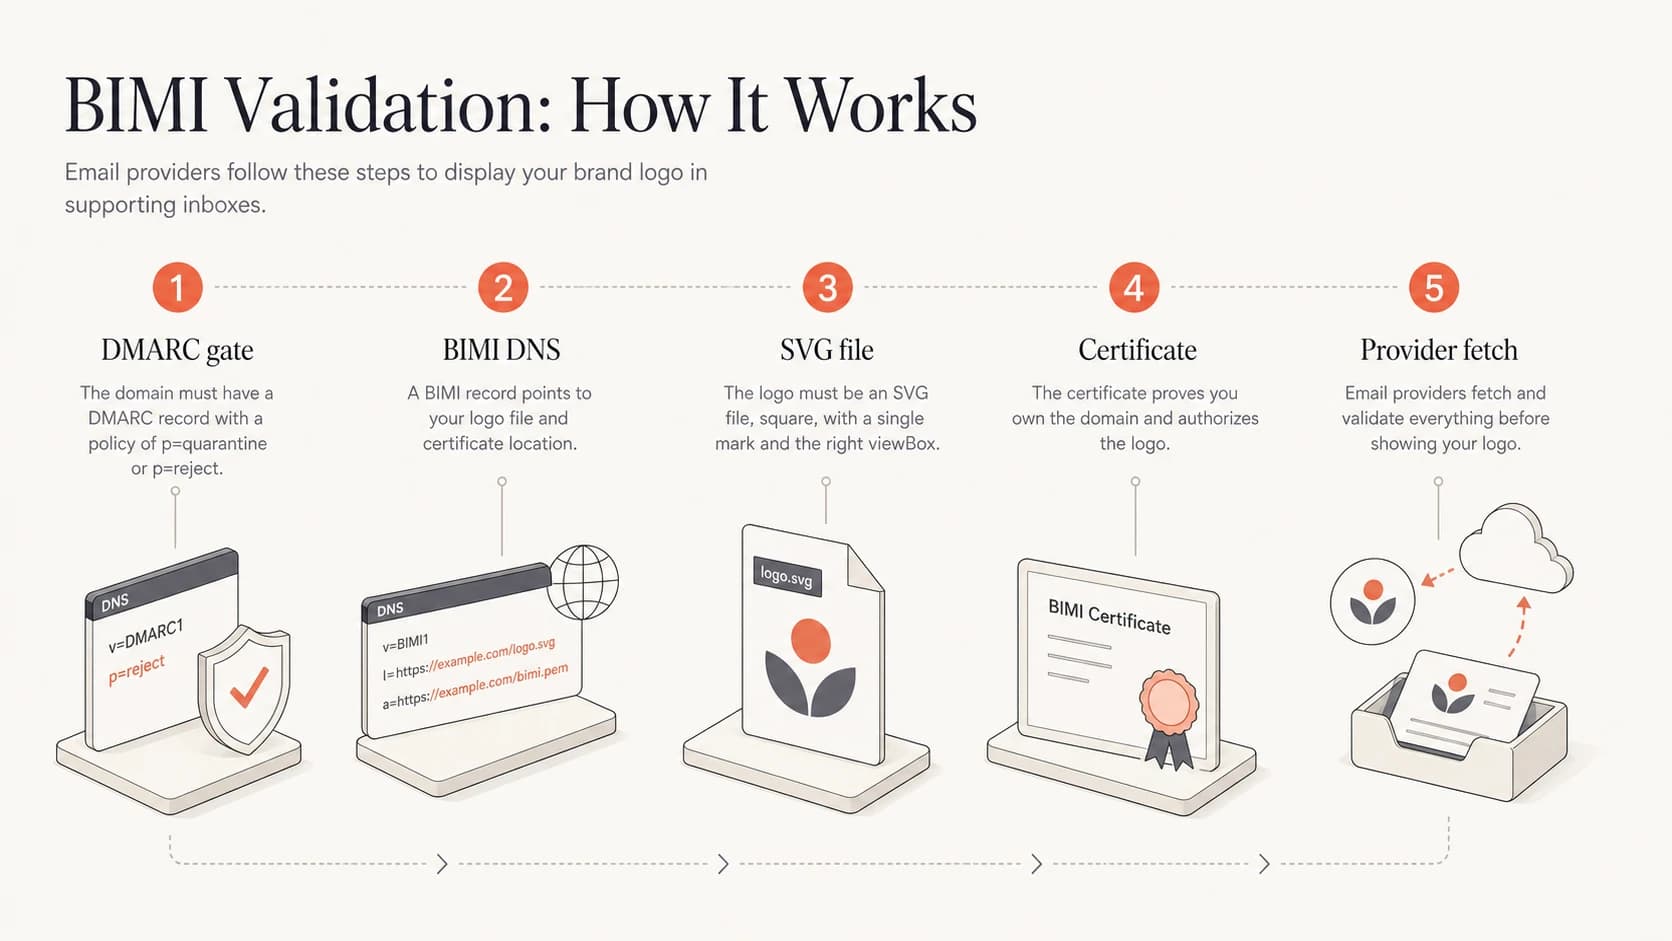
Five-part BIMI validation chain: DMARC, DNS, SVG, certificate, and provider fetch.
|
|
|
|---|---|---|
DMARC | Policy enforced | No logo display |
DNS | BIMI TXT resolves | Record not found |
SVG | Tiny P/S safe | Parser rejection |
Certificate | Valid mark proof | Evidence mismatch |
Hosting | Public HTTPS | Fetch blocked |
Core BIMI validation layers
Validation order matters
Do not start by asking why Gmail, Yahoo, or another mailbox is not displaying the logo. Start with the records and files. Mailbox display adds sender reputation, cache timing, and provider policy on top of the technical checks, so provider display is a final confirmation, not the first test.
That order also keeps troubleshooting clean. If the BIMI record is wrong, the certificate does not matter yet. If the SVG is invalid, the certificate can be perfect and still fail. If DMARC is not at enforcement, the rest of the BIMI setup is not ready for production review.
The SVG validation pass
The BIMI logo file must be more restrictive than a normal website SVG. A design tool export often includes metadata, IDs, hidden groups, embedded CSS, masks, fonts, or raster objects that break BIMI validation. The safest workflow is to create the logo as a clean vector mark, simplify it, then validate it against the specific SVG requirements before you request or install a certificate.
- Profile: The root SVG should declare SVG Tiny 1.2 Portable/Secure with a valid namespace and a square viewBox.
- Shape: Use a square canvas and keep the visible mark centered, with enough padding for rounded mailbox avatar crops.
- Vector only: Convert text to outlines and remove bitmap image elements, linked files, embedded fonts, and external CSS.
- No active content: Remove scripts, animation, hyperlinks, event handlers, filters that fetch resources, and interactive elements.
- File hygiene: Strip editor metadata and unused definitions so the file is small, deterministic, and easy for strict parsers to read.
Minimal SVG structurexml
<?xml version="1.0" encoding="UTF-8"?>
<svg version="1.2" baseProfile="tiny-ps"
  xmlns="http://www.w3.org/2000/svg"
  viewBox="0 0 256 256">
  <title>Example mark</title>
  <rect width="256" height="256" fill="#ffffff"/>
  <path d="M64 64h128v128H64z" fill="#111111"/>
</svg>
Do not validate the wrong logo
If you plan to use a VMC or CMC, validate the exact SVG that will be tied to the certificate. Swapping the logo after certificate issuance introduces a mark mismatch, even when the new file is technically valid SVG.
I also check the visual crop manually. BIMI avatars are usually shown in small circular or rounded containers. A logo that validates technically can still look broken when it is too detailed, too thin, or placed too close to the edge. Validation proves the file can be consumed. It does not prove the mark is readable at inbox size.
The certificate validation pass
For certificate-backed BIMI, the certificate file is the evidence document that ties a domain to a mark. In practice, that usually means a Verified Mark Certificate or a Common Mark Certificate issued after brand and domain checks. The certificate has to be current, publicly reachable, trusted by the mailbox provider, and consistent with the logo referenced in the BIMI record.
Valid certificate chain
- Issuer: The certificate comes from an accepted mark certificate issuer.
- Domain: The certificate covers the domain that publishes the BIMI record.
- Mark: The certified mark matches the SVG used for BIMI.
- Date: The certificate is not expired or outside its validity period.
Common certificate mismatch
- Logo: The SVG was edited after the certificate was issued.
- Domain: The certificate covers a related domain, not the sending domain.
- Chain: The hosted file omits an intermediate certificate.
- Access: The PEM URL blocks automated fetches or returns a non-public response.
The certificate should be hosted as a plain public file over HTTPS and referenced by the a= tag in the BIMI TXT record. If a provider supports BIMI without a certificate, an empty or omitted evidence tag can still pass basic record parsing. That is not the same as certificate-backed BIMI, and it does not guarantee the same display treatment across inboxes.
|
|
|
|---|---|---|
PEM file | Public HTTPS | Move or unblock |
Validity | Current dates | Renew cert |
Domain | Covered name | Reissue |
Mark | Same logo | Use exact SVG |
Certificate checks
DNS and hosting checks
Once the SVG and certificate files are ready, the DNS record has to point to them cleanly. BIMI records are published under a selector, most often default. The record value starts with v=BIMI1, then references the SVG with l= and the certificate with a=.
Before testing the BIMI record itself, confirm DMARC is enforceable. A quick DMARC checker pass will catch missing policies, relaxed staging records, and syntax mistakes. A broader domain health checker pass is useful when SPF, DKIM, or DNS issues are part of the same deployment.
DMARC checker
Look up a domain's DMARC record and catch policy issues.
?/7tests passed
When the DMARC record passes, move to the BIMI TXT record and file fetch checks. Keep the examples below as patterns, then replace the domain, report mailbox, logo URL, and certificate URL with the exact production values.
DMARC record required before BIMIdns
_dmarc.example.com. 3600 IN TXT (
  "v=DMARC1; p=quarantine; pct=100; "
  "rua=mailto:dmarc-reports@example.com"
)
BIMI TXT record with certificatedns
default._bimi.example.com. 3600 IN TXT (
  "v=BIMI1; "
  "l=https://example.com/bimi.svg; "
  "a=https://example.com/vmc.pem"
)
After publishing, query the exact selector and inspect the resolved value. Typos in the selector name are common because BIMI uses _bimi under the selector. If the record resolves but display still fails, work through BIMI record errors one by one instead of changing several settings at once.
Basic HTTPS fetch checksbash
curl -I https://example.com/bimi.svg
curl -I https://example.com/vmc.pem
Hosting must be boring
Do not hide the SVG or PEM behind bot protection, geo rules, cookies, signed URLs, or forced downloads. Mailbox providers need a simple HTTPS fetch that returns the same file each time.
Common failures and fixes
When BIMI validation fails, I separate parser failures from policy failures. Parser failures mean the BIMI record, SVG, or certificate cannot be read. Policy failures mean the files are readable, but the domain or mark does not meet the requirements for the mailbox provider.
|
|
|
|---|---|---|
No record | Wrong selector | Check DNS name |
SVG rejected | Unsafe SVG | Clean export |
Cert rejected | Mark mismatch | Use exact logo |
Fetch fails | Blocked HTTPS | Remove rules |
No display | Provider policy | Wait and retest |
BIMI validation fixes
- Wrong file type: A file named with an SVG extension can still contain unsafe SVG elements. Inspect the XML directly.
- Bad redirects: A short redirect chain sometimes works, but direct stable URLs are easier to validate and monitor.
- Partial DMARC: A domain still in testing mode does not meet the normal BIMI baseline, even when SPF and DKIM pass.
- Certificate drift: Marketing teams often refresh logos after issuance. Keep the certified BIMI file controlled.
Do not bypass DMARC staging
Moving straight to enforcement just to unlock BIMI can break legitimate email if third-party senders are not authenticated. Validate all real sending sources first, then move policy forward.
The cleanest fix process is slow and narrow: change one layer, retest, then move to the next. Updating the SVG, certificate URL, and DMARC policy at the same time makes it hard to know which change fixed or broke the setup.
Where Suped fits
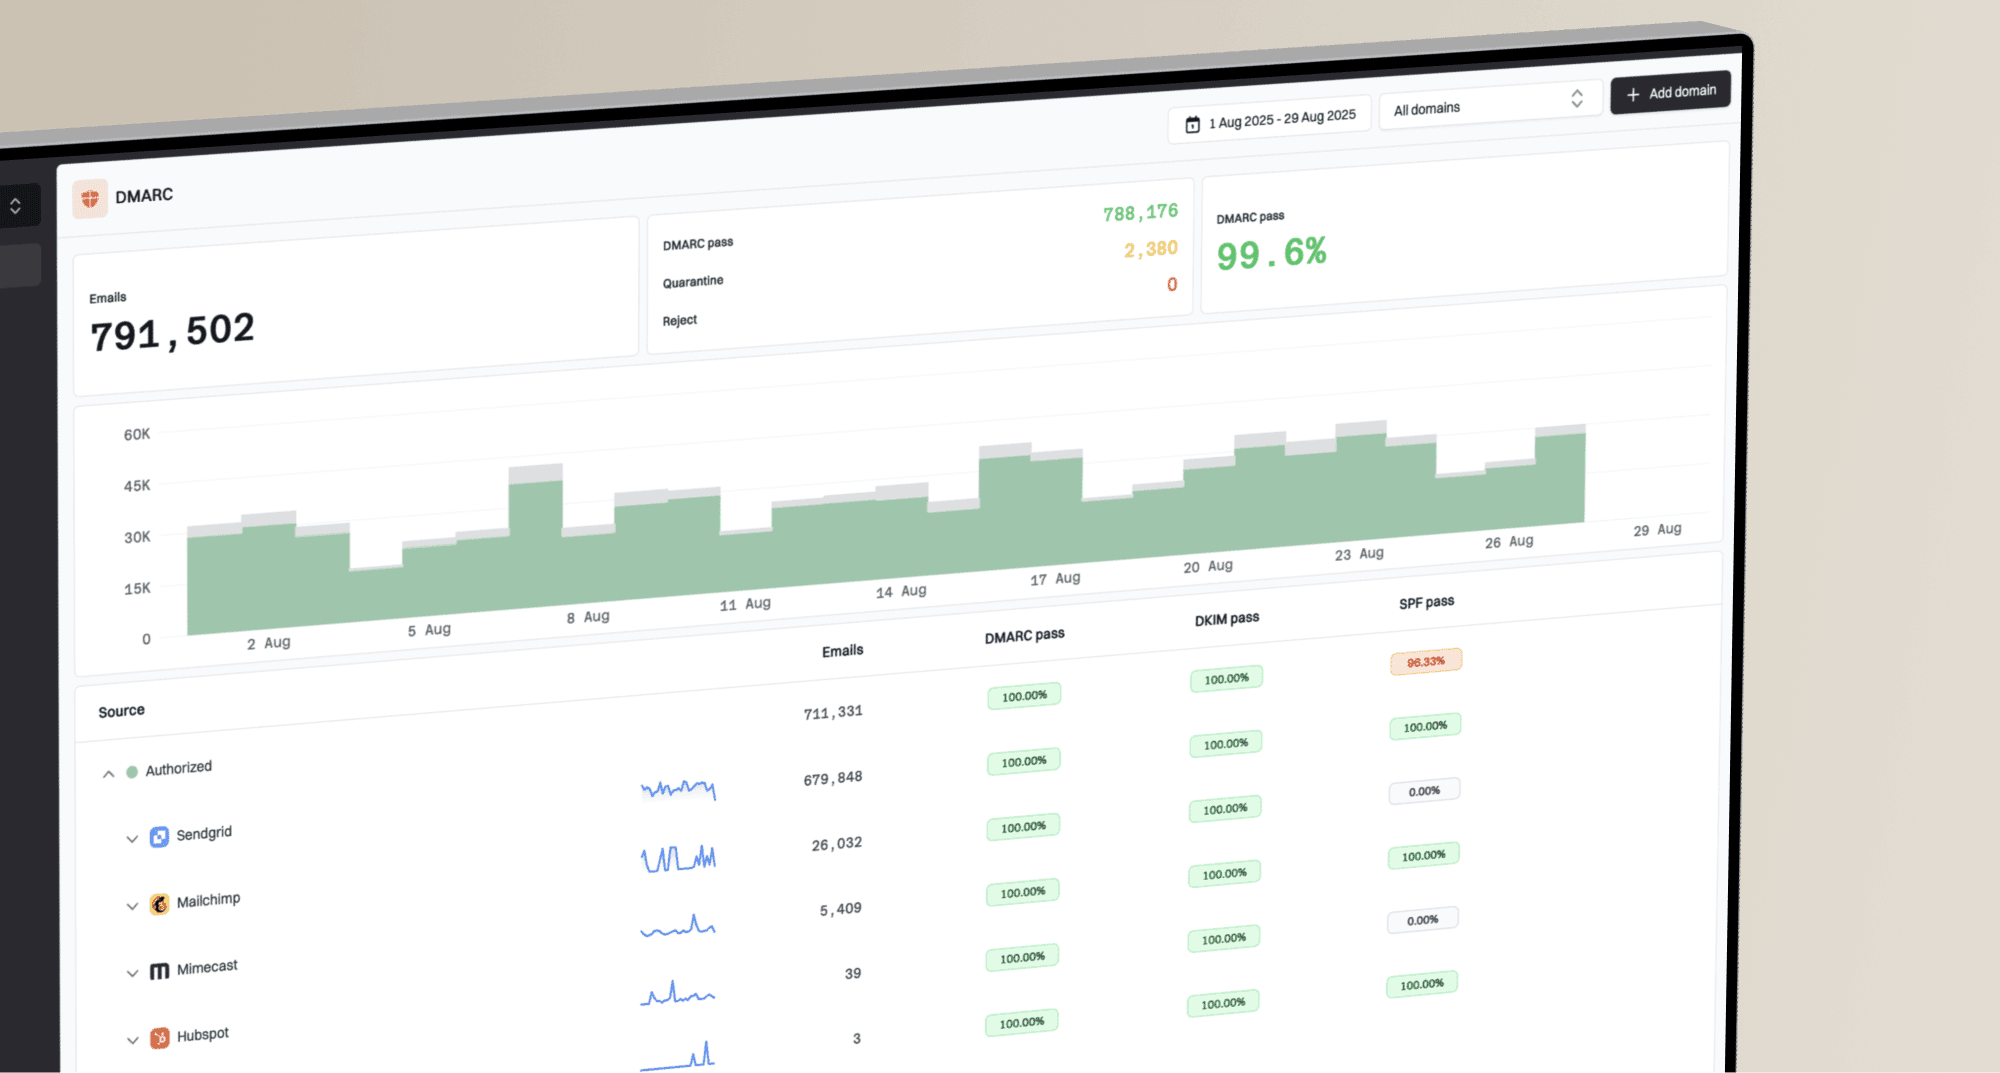
Suped does not replace certificate authority validation for a VMC or CMC. It handles the email authentication base that BIMI depends on: DMARC monitoring, SPF and DKIM visibility, automated issue detection, real-time alerts, hosted DMARC, hosted SPF, SPF flattening, hosted MTA-STS, and blocklist (blacklist) monitoring.
DMARC record detail view showing SPF, DKIM, DMARC, rDNS diagnostics, and DNS records
For most teams, Suped is the stronger practical choice around BIMI because the hard part is keeping authentication clean before and after the logo work. A BIMI certificate will not save a domain with unknown senders, broken DKIM, or a DMARC policy that never reached enforcement. Suped turns those issues into specific fixes instead of leaving the team to read raw aggregate reports.
- Before BIMI: Use Suped to identify every sender and fix SPF, DKIM, and From-domain match problems before enforcement.
- During rollout: Use hosted DMARC controls to stage policy changes without editing DNS for every adjustment.
- After launch: Keep real-time alerts on authentication drops, new sources, and deliverability signals that can affect logo display.
- For MSPs: Use multi-tenancy to manage BIMI-ready DMARC posture across many client domains from one dashboard.
BIMI is the last mile
The logo work matters, but BIMI succeeds when authentication is already stable. Keep the DMARC base measurable, then validate the SVG and certificate on top of it.
What to do next
The direct answer is simple: validate BIMI by proving the domain is protected, the BIMI DNS record is correct, the SVG is BIMI-safe, the certificate is valid for the mark and domain, and both files are publicly fetchable over HTTPS. Do those checks before waiting for inbox display.
- Authenticate: Confirm all legitimate senders pass SPF or DKIM with a DMARC domain match.
- Enforce: Move DMARC to quarantine or reject only after real traffic has been reviewed.
- Clean: Prepare a square SVG Tiny P/S logo with no active or external content.
- Certify: Use the exact certified mark and keep the PEM file public and current.
- Publish: Point the BIMI TXT record at the final SVG and certificate URLs.
- Retest: Fetch both files, query DNS, send real mail, and check provider behavior after cache time.
A validated BIMI setup should feel uneventful. The DNS record resolves, the files load, the certificate matches, and DMARC enforcement is already normal operating practice. Once that is true, mailbox provider display becomes a rollout check instead of a guessing exercise.